

Overview
This article provides a guide on how to set up the Dragino LPS8N open-source LoRaWAN Indoor Gateway with The Things Network Server (TTN Server). In LoRaWAN communication, there are LoRa nodes, LoRa gateways, Network Servers, and Application Servers. In this guide, we will focus on setting up a gateway and registering it on The Things Network Server to receive data from LoRa nodes. Earlier we learned to set up LPS8 LoRaWAN Gateway, but LPS8N is more advanced.
The LPS8N is an open-source LoRaWAN Indoor Gateway that bridges LoRa wireless to IP networks via WiFi, Ethernet, 3G, or 4G cellular network, allowing for low-data rate, long-range data transmission. It uses a Semtech packet forwarder and the LoRaWAN Station connection is fully compatible with LoRaWAN protocol and includes an SX1302 LoRaWAN concentrator with 10 programmable demodulation paths. LPS8N has pre-configured LoRaWAN frequency bands for different countries but can be customized. It can communicate with ABP LoRaWAN end nodes without a LoRaWAN server and can be used by system integrators to integrate with existing IoT services.
Setting up a LoRaWAN gateway is essential for building a LoRaWAN network. A gateway is responsible for forwarding data between the LoRa nodes and the Network Server, which then sends the data to the Application Server. The LPS8N Indoor LoRaWAN gateway supports both Ethernet and Wi-Fi connectivity and can connect to The Things Network Server with ease.
Purchase Link: LPS8N Gateway
Dragino LPS8N Indoor LoRaWAN gateway
The LPS8N is a LoRaWAN Indoor Gateway that operates on an open-source platform. With its WiFi, Ethernet, 3G, or 4G cellular network connectivity options, it enables the bridging of LoRa wireless networks to IP networks. The LoRa wireless technology provides users with the ability to transmit data over incredibly long distances at low data rates.

This device uses the Semtech packet forwarder and is fully compatible with the LoRaWAN protocol. It comes equipped with an SX1302 LoRaWAN concentrator that allows for 10 parallel demodulation paths to be programmed.
The LPS8N comes pre-configured with standard LoRaWAN frequency bands for use in different countries. Users can customize these frequency bands for their own LoRa network.

One of the key features of the LPS8N is its ability to communicate with ABP LoRaWAN end nodes without the need for a LoRaWAN server. This makes it an excellent option for system integrators looking to integrate the device into their existing IoT service without setting up their own server or using a third-party LoRaWAN service.
Additional features of the LPS8N include an OpenWrt system, a web GUI for management, SSH via WAN or WiFi for remote access, and the ability to emulate 49x LoRa demodulators. It also supports the Semtech Packet Forwarder, LoRaWAN basic station, and optional 3G/4G cellular connectivity. The device supports different levels of login and allows for the local decoding of ABP end node information and transfer to an MQTT server.
Hardware
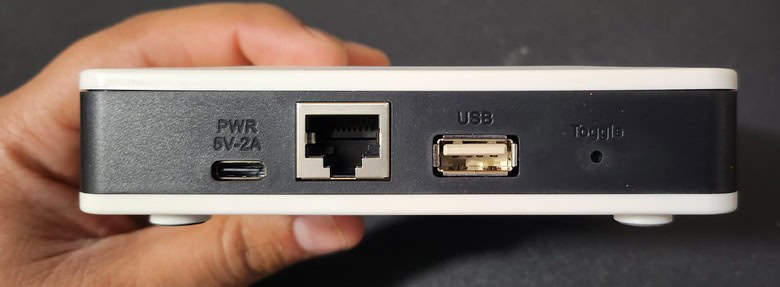
The gateway has an antenna to receive the LoRa Packets in 8-channels. On the front side, it has a USB Type C port for Input Power of DC 5V,2A. Apart from the power, it also has an Ethernet port, USB Host Port & a Toggle button to reset the gateway.
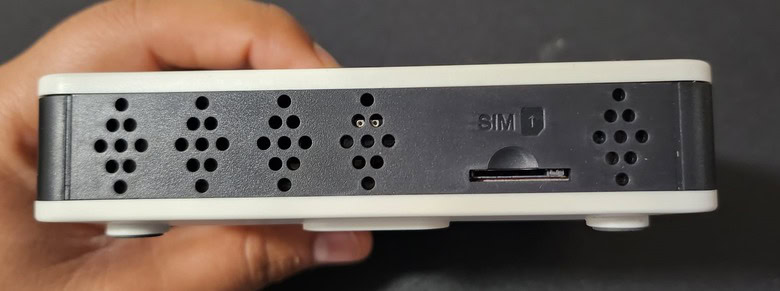
The other sides of the Gateway have SIM Card slot to install a 4G Sim Card for Cellular Connectivity.
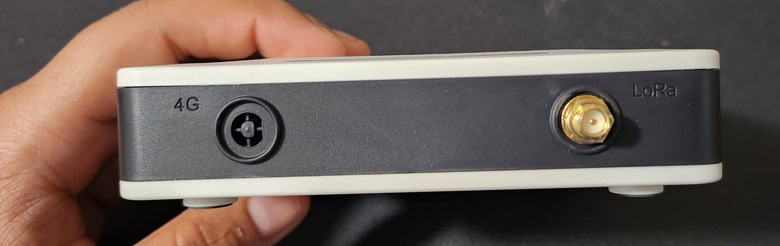
There are two antenna ports for connecting an antenna as LoRa Antenna and a 4G Antenna.
At bottom of the gateway, it has the LoRa Pico Station information Like Model-LPS8N, Frequency Band, Serial Number, and the WiFi mac address.

LED Indicators
LPS8N has totally four LEDs, They are:
- Power LED: This RED LED will be solid if the device is properly powered.
- Wireless LED: No function yet.
- SYS LED: This RGB LED will show different colors on the different states:
- SOLID BLUE: The device is alive with a LoRaWAN server connection.
- BLINKING BLUE: a) Device has an internet connection but no LoRaWAN Connection. or b) Device is in the booting stage, in this stage, it will BLINKING BLUE for several seconds and then with SOLID RED and BLINKING BLUE together
- SOLID RED: The device doesn’t have an Internet connection.
- ETH LED: This LED shows the ETH interface connection status.
Button Instruction
LPS8N has a black toggle button, which is:
➢ Long press 4-5s: The gateway will reload the Network and Initialize wifi configuration
LED status: SYS LED will BLINKING BLUE Until the reload is finished.
➢ Long press more than 30s: The gateway will restart and restore factory settings.
LED status: When the user releases the button, the LED will TURN OFF.
How to configure LPS8N Indoor LoRaWAN Gateway?
There are three methods to configure the LPS8N LoRaWAN Gateway. By default, the LPS8N is configured as a WiFi Access Point. To access and configure the LPS8, you can connect to its WiFi network or use its WAN Ethernet port.
1. Connect via WiFi

At the first boot of LPS8, it will auto-generate a WiFi network called dragino-xxxxxx with password: dragino+dragino
You can use a PC to connect to this WiFi network. The PC will get an IP address of 10.130.1.xxx and the LPS8N has the default IP 10.130.1.1.
2. Connect via Ethernet with DHCP IP from router

Alternatively, connect the LPS8N Ethernet port to your router and LPS8N can obtain an IP address from your router. In the router’s management portal, you should be able to find what IP address the router has assigned to the LPS8. You can also use this IP to connect.
3. Connect via WiFi with DHCP IP from router

If the LPS8N already connects to the router via WiFi, use can use the WiFi IP to connect to LPS8N.
Configuring Network Connection to Gateway
You can use any of the methods mentioned above to connect the Gateway to WiFi Network. The LPS8N is configured as a WiFi Access Point by factory default. So I followed the first method to connect to the network.
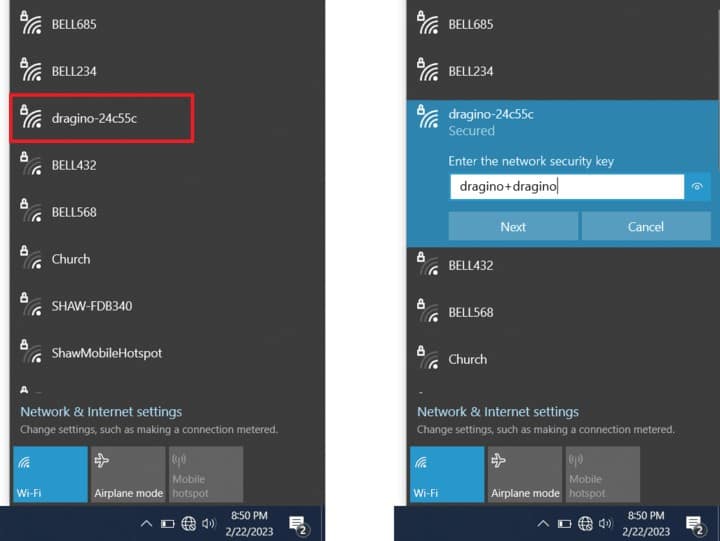
The Gateway will generate WiFi access point called dragino-xxxxxx with password: dragino+dragino. Connect to that Access point by entering the password.
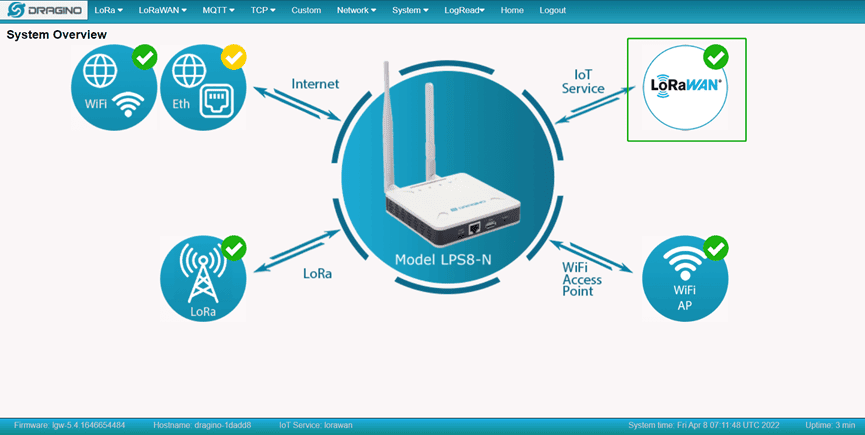
After successful connection, open any of the Web Browser. Then browse to the following IP: 10.130.1.1. A web page like the below will appear.
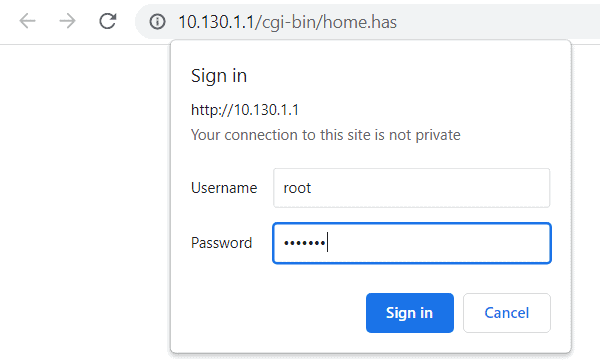
Enter the User Name: root & Password: dragino. Then hit enter. A webpage like below will appear.

The login page will show internet connectivity status. If it is connected to the internet, it is wifi or ethernet. The webpage will also show the status of LoRaWAN connection, the LoRa connection, and the Access point connection.
At this moment the Dragino LPS8N LoRaWAN Indoor Gateway doesn’t have an internet connection. So, first, we need to configure the LPS8N as a WiFi client by providing the Wifi credentials.
Go to the network, then click on WiFi.

The following Webpage will appear.
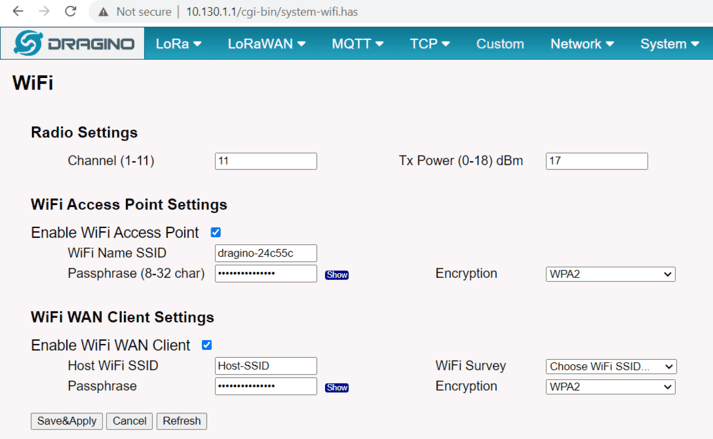
Click on the WiFi survey and select your WiFi Network. Then enter the WiFi password. Also “Enable WiFi client” option. Finally, you can click on save and apply.
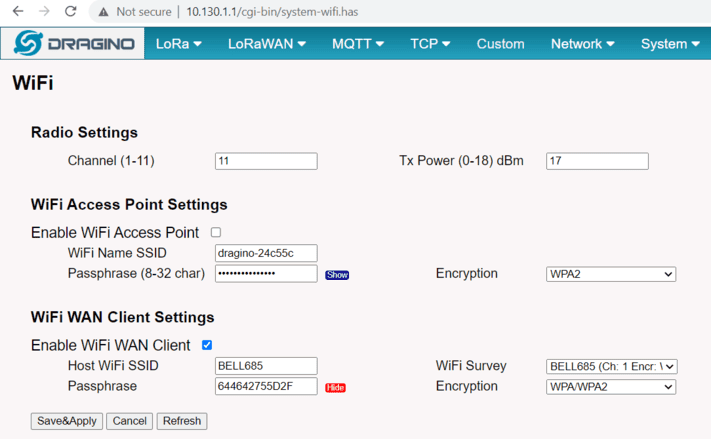
Now you will get the following response as green. Congratulations, your Gateway is connected to the WiFi Network.

Now uncheck the above Enable WiFi access point option and click on the save and apply button. This will disable the Access Point. At this time you need to find the IP Address of your Gateway. You can get the IP Address from your WiFi Router Login page.
In case if you are unable to get the IP Address of your Gateway then you can connect the Gateway via Ethernet with fall back IP. The complete process is explained in the LPS8N User Manual.
Configuring Gateway Frequency & Gateway ID
Now, we need to setup the LoRa frequency. To do that go to the LoRa option as shown in the image below.

From the frequency option you need to select your LoRa frequency. Currently, I am using my LoRa devices from Canada which is in Nother America. The LoRaWAN frequency allocated for this region is 915MHz.
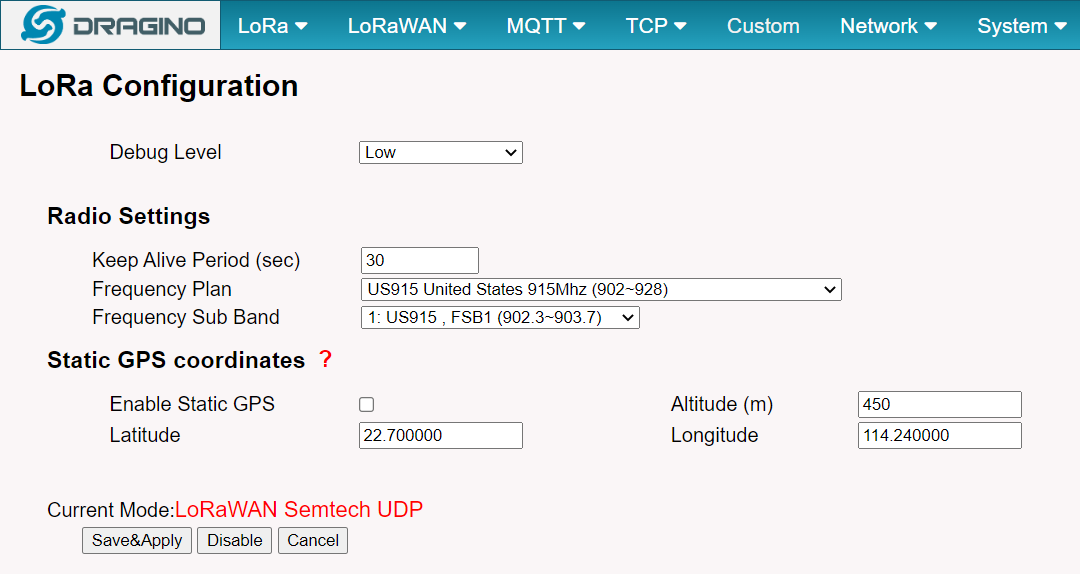
You can select the frequency band allowed in your region. There is also an option for GPS Enabling which you may enable or disable. Finally, click on save and apply.
The frequency band is allocated now. Now we need to get the Gateway ID. To get that go to the following option as LoRaWAN Semtech UDP.

Copy the Gateway ID as this will be required later. Then select the LoRaWAN Server as The Things Network V3. Select the server address as nam1.cloud.thethings.network.
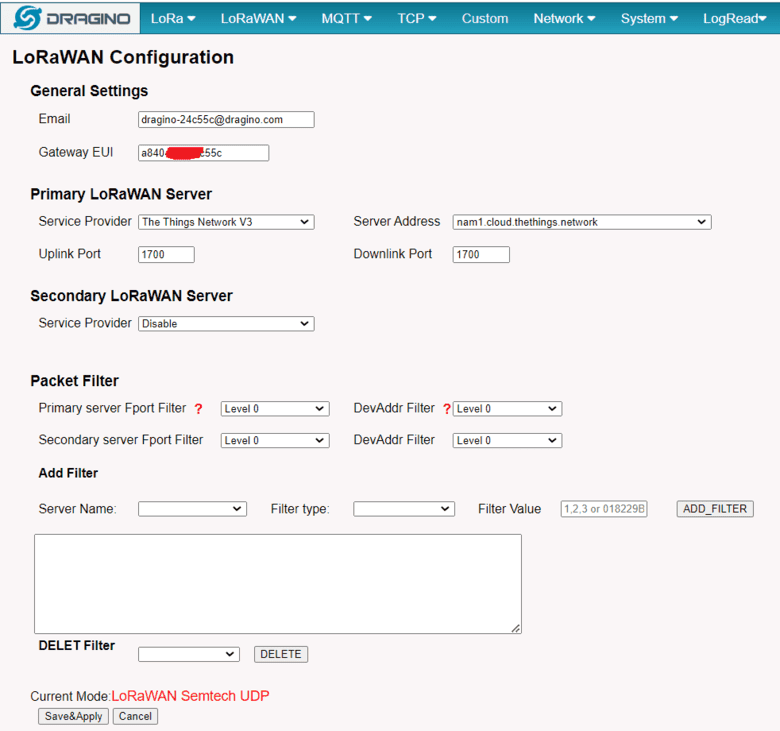
Note: Choose the cluster that corresponds to a specific Gateway server address
- Europe 1 corresponding Gateway server address: eu1.cloud.thethings.network
- North America 1 corresponding Gateway server address: nam1.cloud.thethings.network
- Australia 1 corresponding Gateway server address: au1.cloud.thethings.network
- Legacy V2 Console : TTN v2 shuts down in December 2021
Click on save & apply. So finally the setting up of LPS8N Dragino LoRaWAN Gateway completes.
Registering LPS8N LoRaWAN Gateway on The Things Network
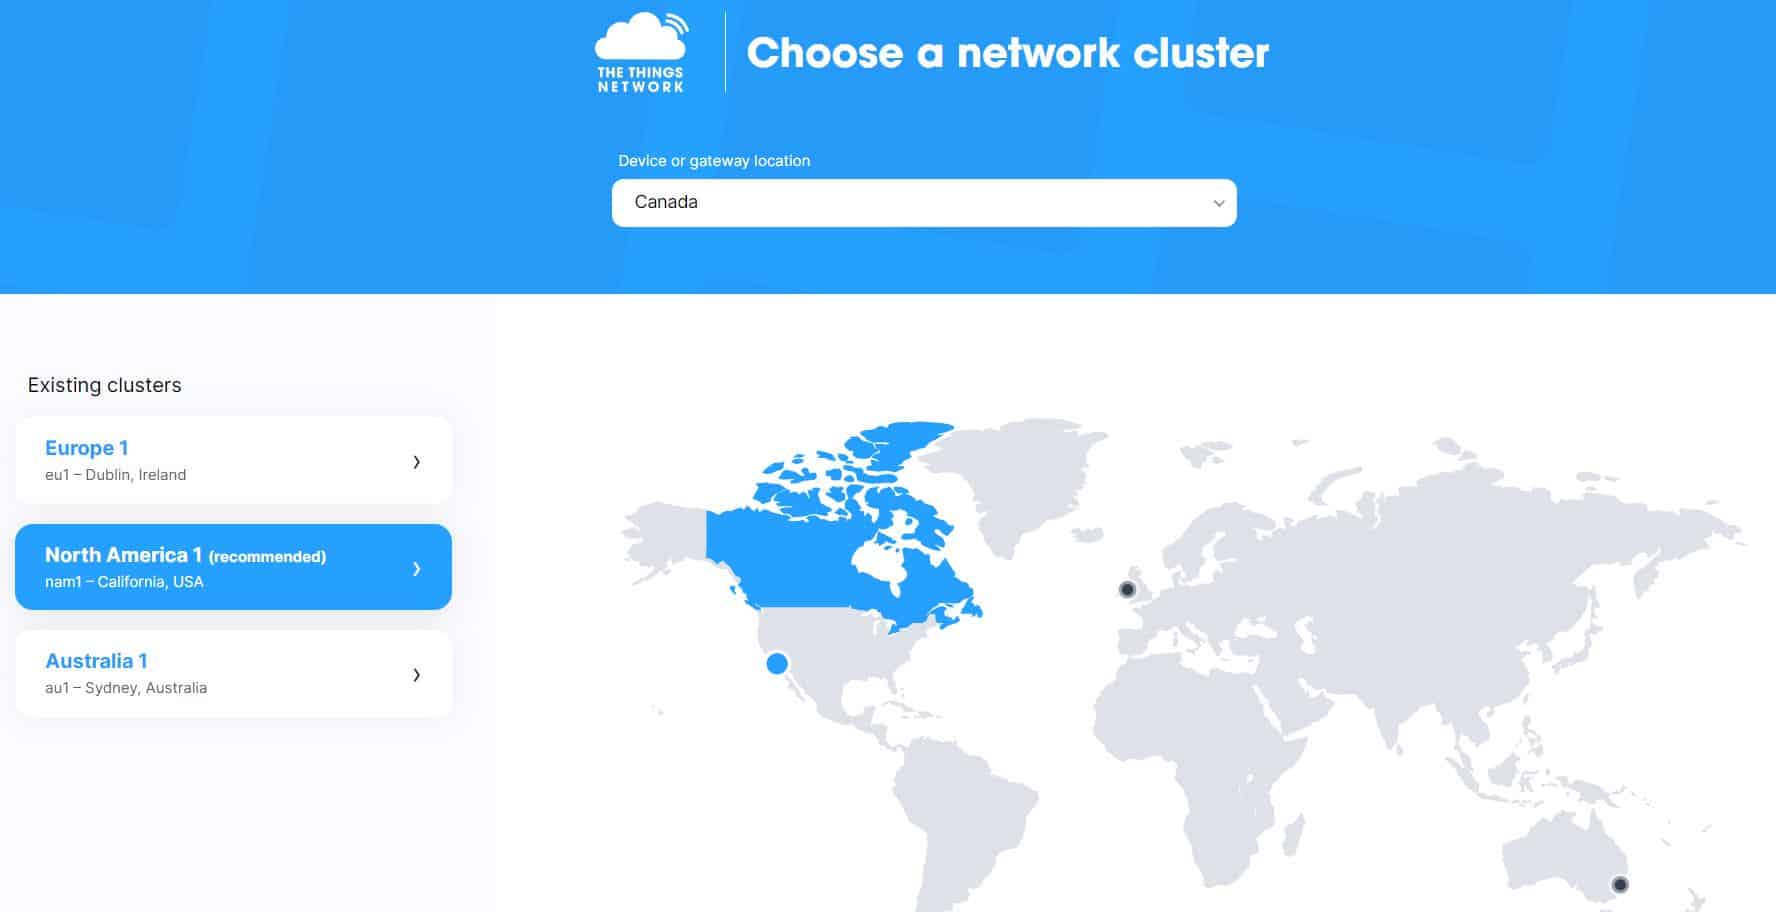
Now we need to register the LoRaWAN Gateway on The Things Network. To do that go to thethingsnetwork.org.

Here you need to signup by providing all required details. Then log in to the platform using the same credentials. Get back to the homepage & Click on the username and select console.
The Things Network has divided all countries into 3 different clusters and assigned different server locations. Select the cluster according to your region. For me, I will select North America.
From the homepage of the things stack community edition, choose to register a gateway.

The registration page will appear. The owner will be selected by default. You may change it if you want. Enter the gateway ID that you copied earlier from the LoRaWAN page.
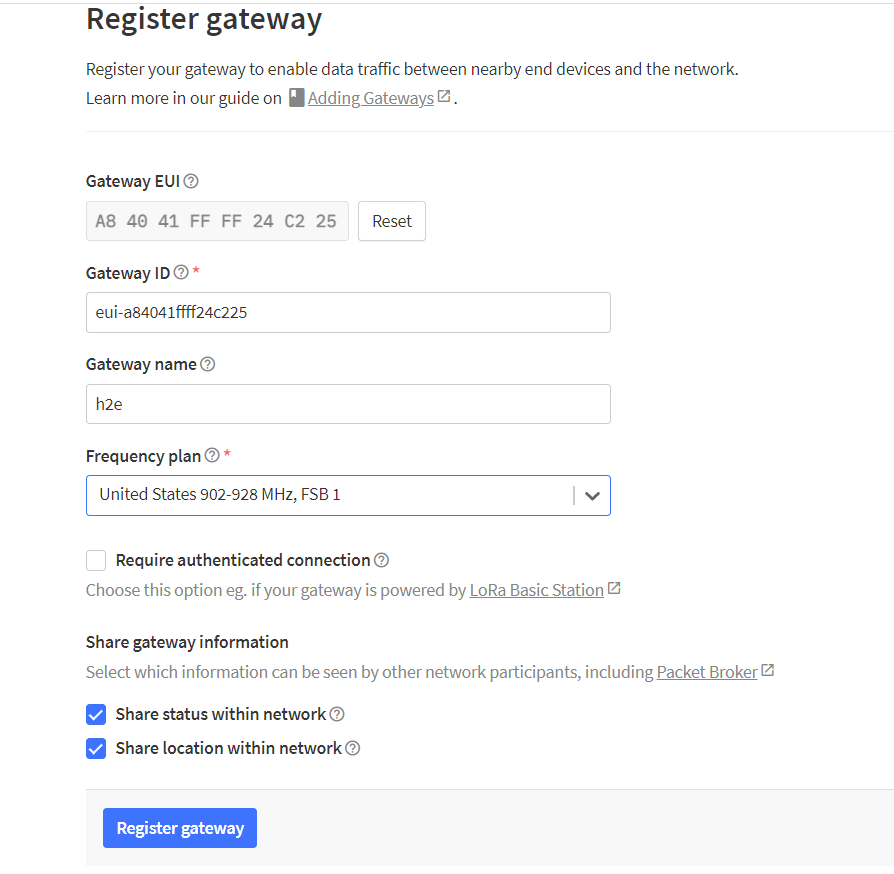
Then Give a name for your gateway, and also add a description for the gateway if you want.
Then set the gateway server address, frequency plan and keep all remaining selections as default. Then click on create Gateway. Finally, the gateway will be created successfully.
The status of the gateway will show disconnected initially. Refresh the page after some time. Hence the Gateway will show connected status.
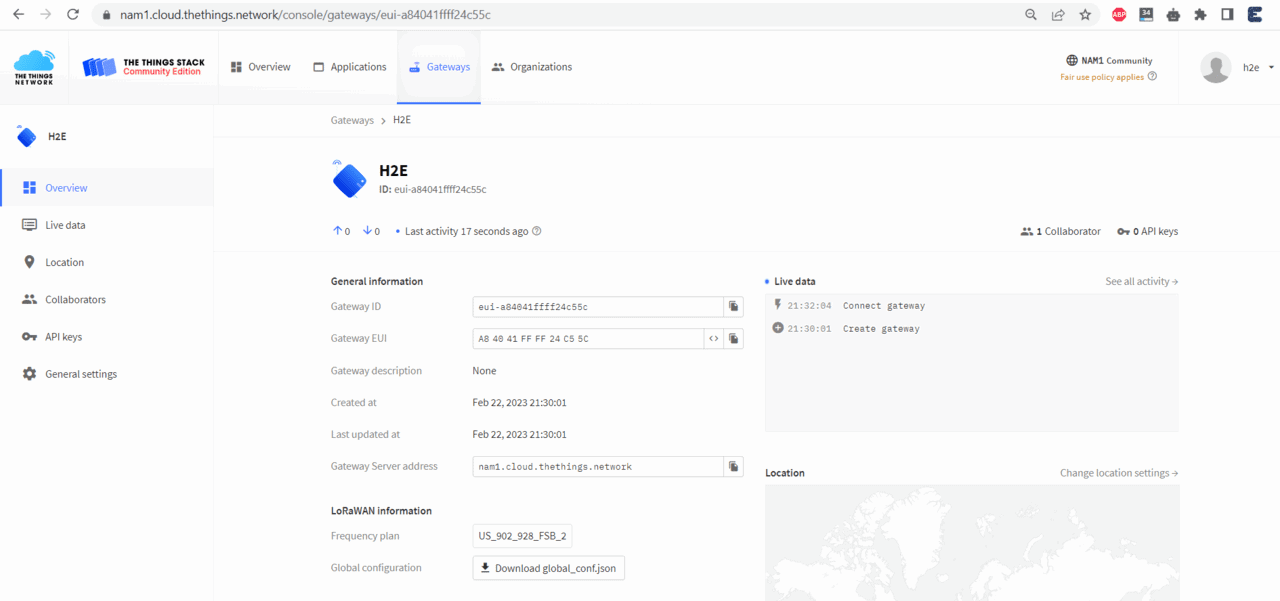
Finally we configured the 8-channel LPS8N gateway to communicate with The things networks server & activated the LoRaWAN Pico station. This is how we can set up & register the Dragino LPS8N LoRaWAN Gateway to The Things Network Server TTN.
Configure frequency
We also need to set the frequency plan in LPS8N to match the end node we use, so to receive the LoRaWAN packets from the LoRaWAN sensor.
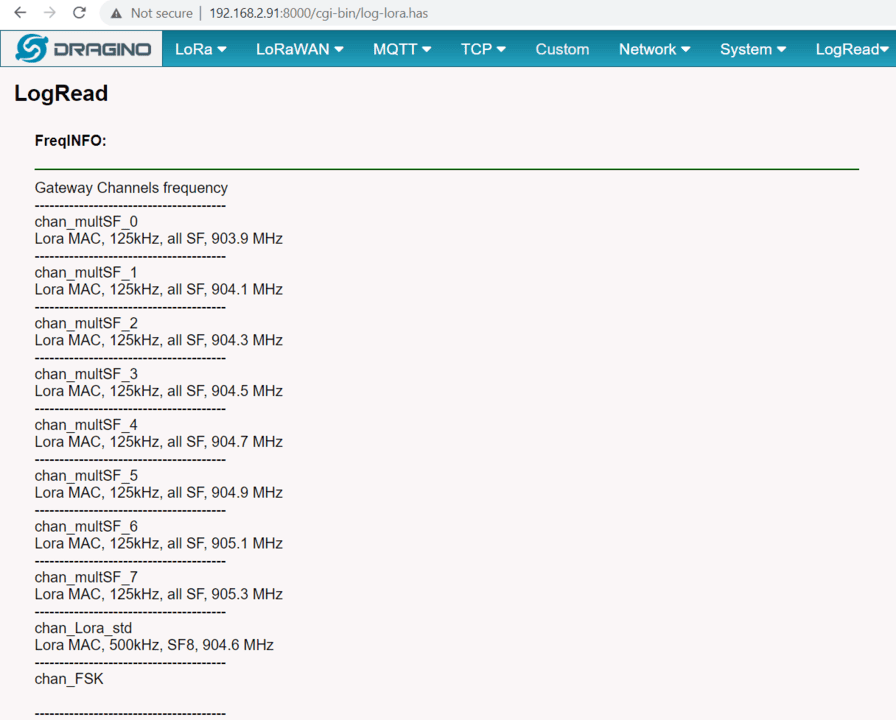
In logread page, user can check the frequency actually used.
Now the LoRa Nodes can send data to the Gateway over long distances. The LoRa Nodes will pick up the data from a remote location and send it to the LPS8N LoRaWAN Gateway. The LoRaWAN Gateway can be configured with other servers where we can monitor the data remotely.


