

Overview
This tutorial is about Interfacing of Waterproof Ultrasonic Sensor JSN-SR04T/AJ-SR04M with Arduino & SSD1306 OLED Display to display ultrasonic distance. Earlier we build IoT Water Level Indicator using this sensor.
When working on projects that involve distance measurement or object detection in outdoor environments, the traditional HC-SR04 ultrasonic sensor might not be the best choice due to its fragility and lack of waterproofing. Fortunately, there are alternatives such as the JSN-SR04T and AJ-SR04M waterproof ultrasonic sensors that can withstand harsh conditions, making them ideal for outdoor applications. These sensors, compatible with various Arduino boards, are capable of measuring distances ranging from 25 to 450 cm.
In this article, we will explore the differences between the HC-SR04 and JSN-SR04T/AJ-SR04M sensors. The we will take a look at the Waterproof Ultrasonic Sensor JSN-SR04T/AJ-SR04M pinouts, interfacing with Arduino, programming, and practical testing. We’ll also discuss how to connect and use these sensors with I2C-supported displays like the SSD1306 OLED display module. By the end of this tutorial, you’ll be equipped with the knowledge to integrate the JSN-SR04T/AJ-SR04M waterproof ultrasonic sensor into your projects for versatile distance measurement and object detection capabilities.
Bill of Materials
We need following components for this tutorial. You can purchase all these items from given links.
| S.N. | Components | Quantity | Purchase Link |
|---|---|---|---|
| 1 | Arduino Nano | 1 | Amazon | AliExpress |
| 2 | JSN-SR04T Ultrasonic Sensor | 1 | Amazon | AliExpress |
| 3 | 0.96" I2C OLED Display | 1 | Amazon | AliExpress |
| 4 | Jumper Wires | 10 | Amazon | AliExpress |
| 5 | Breadboard | 1 | Amazon | AliExpress |
How does the Ultrasonic Distance Sensor Works?
Ultrasonic sensors emit sound waves at a frequency higher than humans can hear – typically in the ultrasonic range, hence the name. These waves travel through the air until they encounter an obstacle and are reflected back to the sensor. This principle of operation is similar to how radar and sonar work, and it’s sometimes referred to as “echolocation” because it’s also how bats navigate.
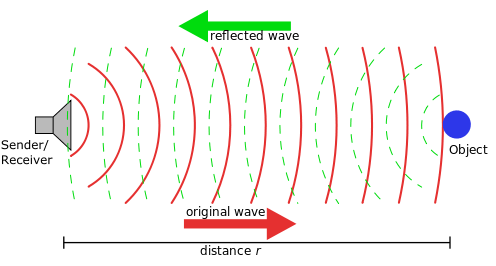
Here’s a basic step-by-step breakdown of how ultrasonic sensors work:
- Emission of Ultrasonic Waves: The sensor triggers the ultrasonic transmitter, which emits a burst of ultrasonic sound waves.
- Travel and Reflection of Waves: These sound waves travel through the air until they hit an object. When they encounter an object, they bounce back toward the sensor.
- Reception of Echo: The reflected sound waves, or “echoes,” are then detected by the ultrasonic receiver.
- Time Calculation: The sensor measures the time it took for the sound waves to travel to the object and back. This is often called “Time of Flight.”
- Distance Calculation: Using the speed of sound through air, which is approximately 343 meters per second at sea level under normal conditions, the sensor calculates the distance to the object. This is done using the formula: Distance = (Time of Flight x Speed of Sound) / 2. The division by 2 is necessary because the sound wave had to travel to the object and then back again, so the total distance is twice the distance to the object.
Ultrasonic sensors are used in a wide variety of applications, including robotics (for obstacle detection and avoidance), level sensing (for detecting the level of liquids in a tank), and even in some parking assist technologies in cars, among others.
JSN-SR04T/AJ-SR04M Waterproof Ultrasonic Sensor
The JSN-SR04T/AJ-SR04M is a versatile and robust waterproof ultrasonic sensor module that excels in non-contact distance measurement. With a remarkable ranging capacity between 25cm to 450cm and an accuracy of up to 2mm, this sensor proves to be highly precise and reliable for a multitude of applications.

Distinctively, the JSN-SR04T/AJ-SR04M sensor module consists of two separate components: the transducer, which acts as the sensing element, and the control board, which processes the signals received. This dual-component design is reminiscent of the ultrasonic sensors found in car bumpers, hinting at the sensor’s robustness and reliability in real-world applications.

Boasting an industrial-grade integrated ultrasonic sensing probe, the sensor is designed to withstand harsh conditions while delivering stable performance and high precision. Its waterproof feature adds another layer of durability, making it suitable for outdoor applications or scenarios involving water.
Beyond just distance measurement, the JSN-SR04T/AJ-SR04M sensor can be leveraged for a broad spectrum of applications. This includes horizontal ranging, obstacle avoidance, automated control, and object monitoring.
JSN-SR04T/AJ-SR04M Features & Specifications
The JSN-SR04T/AJ-SR04M is a robust waterproof ultrasonic sensor module with numerous features and specifications that make it suitable for a wide range of applications. Here are the key features and specifications:
Features:
- Waterproof: The sensor is designed to operate effectively in wet or humid conditions.
- Industrial-grade Design: It has an industrial-grade integrated ultrasonic sensing probe design, enhancing durability and performance.
- Separate Probe and Module: The module consists of two parts, the control board, and the sensing probe, allowing for flexible installation.
- High Precision: The sensor is capable of highly precise distance measurements.
Specifications:
- Operating Voltage: It typically operates at a voltage of 5V DC.
- Operating Frequency: The ultrasonic sensor operates at a frequency of 40kHz.
- Range: It can measure distances from 25cm to 450cm.
- Ranging Accuracy: It can measure with an accuracy of up to 2mm.
- Interface: The sensor has a 4-pin interface (VCC, GND, Trig, Echo).
- Operating Temperature: The sensor can operate in a wide range of temperatures, typically from -20°C to +70°C.
- Detection Angle: The sensor typically has a detection angle of up to 70 degrees.
JSN-SR04T/AJ-SR04M Pinout
The JSN-SR04T ultrasonic sensor module features four pins:

- VCC: Powers the sensor, typically with a 5V DC supply.
- Trig (Rx): Initiates the ultrasonic pulses when a high pulse is sent.
- Echo (Tx): Outputs a pulse proportional to the distance to the object.
- GND (Ground): Connects to the system ground to complete the circuit.
JSN-SR04T/AJ-SR04M VS HC-SR04
The JSN-SR04T/AJ-SR04M and HC-SR04 are both ultrasonic distance sensors used widely in robotics and other distance sensing applications. They share similar operating principles but have different features that make them suitable for different scenarios. Here is a comparison of the two:

| Feature/Specification | JSN-SR04T/AJ-SR04M | HC-SR04 |
|---|---|---|
| Waterproof | Yes | No |
| Range | 25cm – 450cm | 2cm – 400cm |
| Operating Voltage | 5V DC | 5V DC |
| Operating Temperature | -20°C to +70°C | 0°C to +70°C |
| Sensing Elements | Separate from the module | Integrated on the board |
| Durability | Higher (Industrial-grade) | Lower |
| Suitable Environment | Outdoor/Wet environments | Indoor/Dry environments |
| Detection Angle | Up to 70 degrees | About 15 degrees |
| Accuracy | Up to 2mm | Varies (slightly less) |
| Flexibility | More (due to separate probe and module) | Less (due to integrated design) |
While both sensors operate on similar principles and have comparable ranges and operating voltages, they differ significantly in terms of waterproofing, durability, flexibility, and suitable environments. The JSN-SR04T/AJ-SR04M, with its waterproof feature and separate sensing elements, offers more flexibility in installation and is suitable for outdoor or wet environments. The HC-SR04, however, is more suitable for indoor or dry environments due to its lack of waterproofing.
Interfacing JSN-SR04T Ultrasonic Sensor with Arduino
Here’s a simple guide for interfacing the waterproof ultrasonic sensor JSN-SR04T or AJ-SR04M with an Arduino and displaying the output on an OLED display. For this example, we will use an Arduino Nano Board and a 0.96″ I2C OLED Display.

The connection is very simple as shown in this table below.
| Component | Pin Name | Arduino NANO Pin |
|---|---|---|
| Ultrasonic Sensor | VCC | 5V |
| Ultrasonic Sensor | GND | GND |
| Ultrasonic Sensor | Trig | Digital 12 |
| Ultrasonic Sensor | Echo | Digital 11 |
| OLED Display | VCC | 3.3V |
| OLED Display | GND | GND |
| OLED Display | SDA | Analog 4 (A4) |
| OLED Display | SCL | Analog 5 (A5) |

You may use a breadboard for connection or for portable application solder all the components on a zero PCB.
Source Code/Program
In the programming part, we will interface the Waterproof Ultrasonic Sensor JSN-SR04T/AJ-SR04M with Arduino & OLED Display in the same way as we interface the HC-SR04 Sensor.
First, make sure you have the necessary libraries installed. You can download the Adafruit_SSD1306 library (for OLED) and Adafruit_GFX library (for graphics functions) from the Arduino Library Manager.
Here is a simple example code:
|
1 2 3 4 5 6 7 8 9 10 11 12 13 14 15 16 17 18 19 20 21 22 23 24 25 26 27 28 29 30 31 32 33 34 35 36 37 38 39 40 41 42 43 44 45 46 47 48 49 50 51 |
#include <Adafruit_GFX.h> #include <Adafruit_SSD1306.h> #define trigPin 12 #define echoPin 11 long duration; int distance; #define SCREEN_WIDTH 128 #define SCREEN_HEIGHT 64 #define OLED_RESET -1 Adafruit_SSD1306 display(SCREEN_WIDTH, SCREEN_HEIGHT, &Wire, OLED_RESET); void setup() { pinMode(trigPin, OUTPUT); pinMode(echoPin, INPUT); display.begin(SSD1306_SWITCHCAPVCC, 0x3C); delay(2000); display.clearDisplay(); display.setTextColor(WHITE); Serial.begin(9600); } void loop() { digitalWrite(trigPin, LOW); delayMicroseconds(5); digitalWrite(trigPin, HIGH); delayMicroseconds(10); digitalWrite(trigPin, LOW); duration = pulseIn(echoPin, HIGH); distance = duration*0.034/2; Serial.print("Distance = "); Serial.print(distance); Serial.println(" cm"); display.clearDisplay(); display.setTextSize(3); display.setCursor(10, 20); display.print(distance); display.setTextSize(3); display.setCursor(70, 20); display.print("CM"); display.display(); } |
This code is designed to interface an Arduino with an ultrasonic sensor (like the JSN-SR04T or AJ-SR04M) and an OLED display.
The ultrasonic sensor measures distance by sending out a sound wave at a specific frequency and then measuring how long it takes for the echo of the sound wave to return. The speed of sound is approximately 0.034 cm/µs, and we divide by 2 because the sound wave has to travel to the object and back. The OLED display then shows the measured distance.
Testing & Demonstrations
After completing the wiring and uploading the code to the Arduino, you should now be ready to test the functionality of the waterproof ultrasonic sensor (JSN-SR04T or AJ-SR04M) with the OLED display.
Connect the Arduino to your computer using a USB cable. The Arduino should power up, and if correctly wired, the OLED display should also power up.
The minimum distance the sensor can detect is 25cm. Hence if an obstacle is found at a distance lessor than 25cm, it will display 0 cm. When a distance is slightly increased, it starts showing the minimum distance.

The OLED display should also show the distance in centimeters. The display should refresh every second (or as defined in your code), and the distance should change as you move objects.

The sensor can show shows the distance upto 450cm which is the maximum distance. We tested and measured the accuracy at 193cm, the exact distance was shown in the OLED.

We measured the distance upto 250cm as this was the wall distance in our testing room.

For a more comprehensive demonstration, you can create a real-world application, such as measuring water levels, detecting object presence or distance, or even building a simple parking sensor.
To test the waterproof capability of the JSN-SR04T/AJ-SR04M, immerse the sensor (not the entire module) in water. Make sure only the waterproof part of the sensor is submerged, and the electronics remain dry.
Once you have successfully tested and demonstrated the setup, you can implement the ultrasonic sensor and OLED display in various projects, such as robotics, object detection, distance measurement, or obstacle avoidance systems.

")


