

Overview
In this project, we will develop an ESP32 Thermal Imaging Camera using the MLX90640 IR Image Array Temperature Sensor. The MLX90640 is a far-infrared thermal sensor with a 32 × 24 pixel array, providing 768 individual temperature measurement points for thermal image generation.
Compared to lower-resolution thermal sensors such as the AMG8833, which has only an 8 × 8 pixel array with 64 thermal detectors, the MLX90640 offers significantly better thermal image detail. Its higher pixel density allows the camera to detect heat patterns from objects, electronic components, human hands, faces, and surrounding temperature variations more clearly.
The project uses an ESP32 module as the main controller and the MLX90640 sensor as the thermal imaging element. The thermal data is processed as a 32 × 24 infrared temperature matrix and converted into a smooth thermal heatmap for visualization. The web interface includes enhanced thermal image processing features such as bilinear interpolation, color palette mapping, frame smoothing, contrast enhancement, and hot/cold temperature markers. It also displays useful real-time values, including minimum temperature, maximum temperature, average temperature, and center temperature.
This DIY ESP32 MLX90640 Thermal Imaging Camera is useful for heat detection, electronics troubleshooting, human presence detection, temperature visualization, thermal monitoring, and IoT-based infrared imaging applications.
MLX90640 32×24 IR Array Temperature Sensor
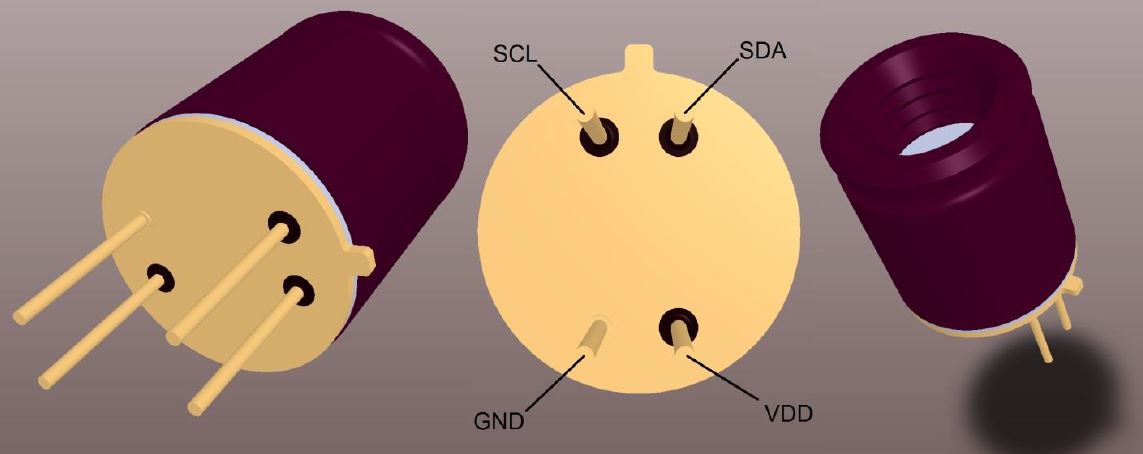
The MLX90640 from Melexis is a small size, non-contact, and low cost far-infrared thermal sensor array that integrates 768 (32×24) thermal sensors into a compact and standard 4-lead TO39 package.
This sensor is capable of capturing detailed thermal images by measuring the infrared radiation emitted by objects in its field of view, translating it into temperature readings ranging from -40°C to 300°C.

The sensor achieves a high degree of accuracy, maintaining approximately ±1°C across its operational range. Furthermore, the MLX90640 includes additional functionalities like an ambient temperature sensor and a supply voltage sensor, enhancing its precision and reliability. Data from the IR sensors, as well as the ambient and supply voltage measurements, are stored in internal RAM and can be accessed via an I2C interface.
The MLX90640 thermal camera features a 32×24 array, totaling 768 individual far-infrared pixels. Each pixel captures temperature data, allowing for detailed thermal imaging and accurate temperature measurements across the sensor’s field of view.
![]()
The MLX90640 is not only functional but also user-friendly, tailored for hobbyists and professionals alike. It supports both 3.3V and 5V operating voltages and communicates through a configurable I2C interface that can reach data rates up to 1MHz. This sensor is compatible with platforms like Arduino, Raspberry Pi, or STM32.
The sensor’s capability to adjust the frame rate from 0.5 to 64Hz allows users to fine-tune its performance based on specific application requirements, whether it’s tracking fast-moving objects or conducting detailed thermal evaluations over a slower period. Refer to MLX90640 Datasheet for more information about this Thermal Camera.
Features and Benefits
- Small size, low cost 32×24 pixels IR array
- Easy to integrate
- Industry standard four lead TO39 package
- Factory calibrated
- Noise Equivalent Temperature Difference (NETD): 0.1K RMS @1Hz refresh rate
- I2C compatible digital interface
- Programmable refresh rate 0.5Hz…64Hz
- 3.3V supply voltage
- Current consumption is less than 23mA
- 2 FOV options – 55°x35° and 110°x75°
- Operating temperature -40°C ÷ 85°C
- Target temperature -40°C ÷ 300°C
- Complies with RoHS regulations
Check previous MLX90640 Thermal Camera projects and tutorials:
1. DIY Thermal Camera with MLX90640 & Raspberry Pi
2. Thermal Fever Detector with MLX90640 & OpenCV
ESP32 MLX90640 Thermal Camera Circuit Design & Schematic
Let’s walk through the hardware design of the ESP32 MLX90640 Thermal Camera in detail.
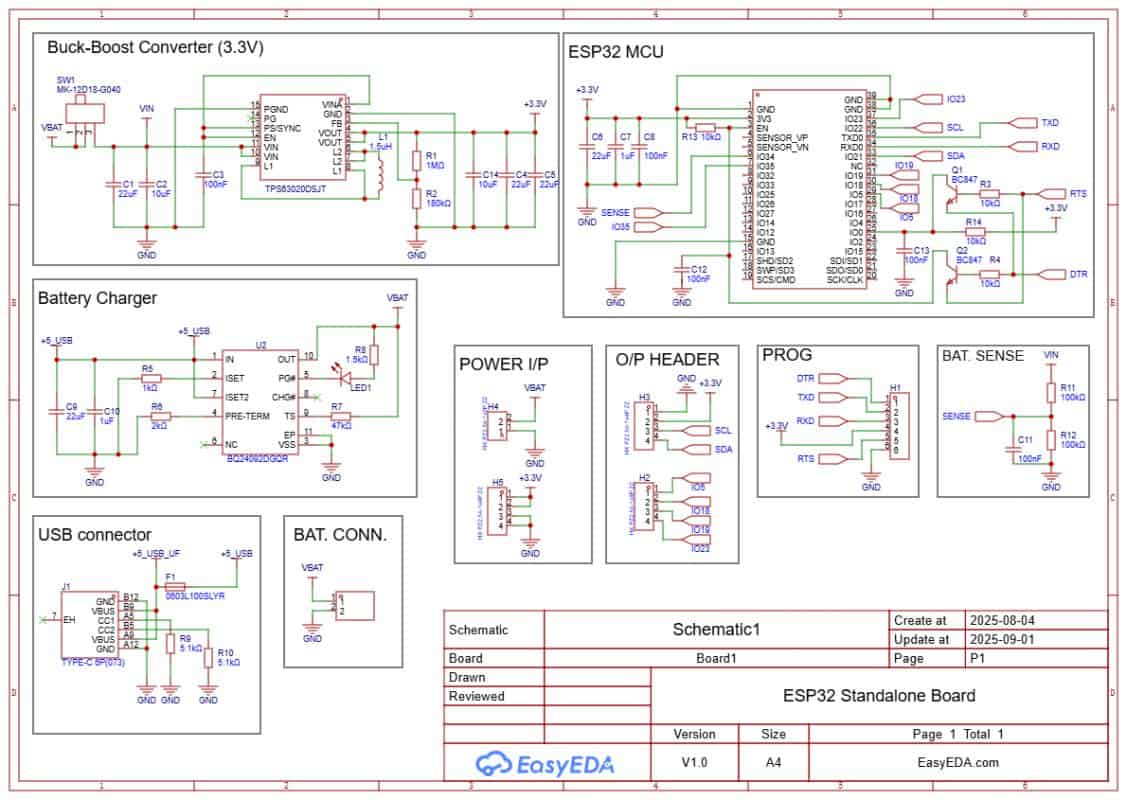
The board is powered through a USB Type-C port. If battery operation is required, charging can be handled by a Li-ion charging IC such as the BQ24092D (or similar). It supports CC/CV charging, pre-conditioning, and auto cut-off. A small LED indicates charging status. A JST-PH connector is used to connect a 3.7 V Li-ion/LiPo battery. A slide switch is added to turn the system on or off.
The regulated 3.3 V supply for the ESP32 and the MLX90640 sensor is provided by a buck-boost converter like the TPS63020. It ensures a stable 3.3 V output across the entire battery voltage range (3.0–4.2 V). This keeps the ESP32 and the Thermal Sensor powered reliably even at low battery levels.
Programming is done through the PROG header or the onboard USB interface using an FTDI adapter (depending on your ESP32 module). Two transistors, Q1 and Q2, handle the auto-reset and auto-boot sequence. This means no buttons are needed during code upload.
Extra GPIO pins are broken out for sensors and modules. IO21 (SDA) and IO22 (SCL) provide the I²C interface for connecting the MLX90640 IR Thermal Image Array Temperature Sensor, which is the core of the Thermal Camera system.
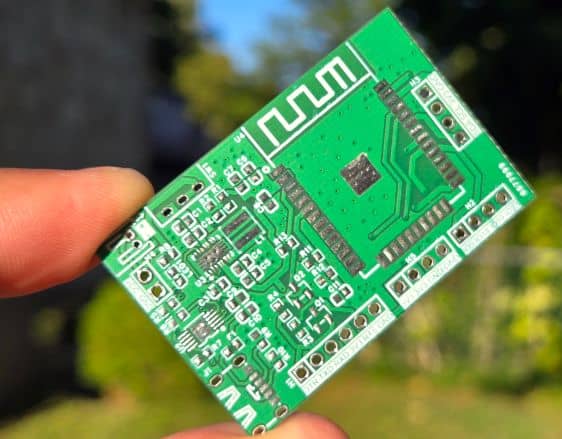
PCB Designing & Gerber Files
The schematic of the ESP32 MLX90640 Thermal Camera was created in EasyEDA, and from there it was converted into a compact PCB layout.
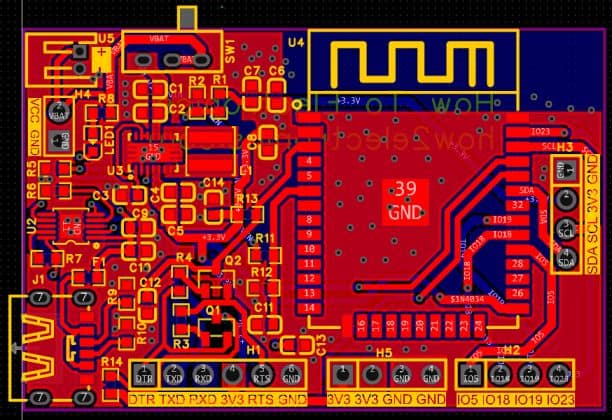
The board is designed with mostly SMD components to keep the size small. Resistors and capacitors are in the 0603 package, while the main ICs, such as the TPS63020 buck-boost converter and the BQ24092D battery charger, are also in SMD form.

All of the critical components, including the ESP32-WROOM module, are placed on the front side of the PCB, which makes assembly easier and more reliable.
Here are the link of files that you can download for PCB manufacturing and PCB assembly services.
- Download: Schematic PDF
- Download: Bill of Materials (BOM)
- Download: Pick & Place File
- Download: Gerber File
PCB Ordering Online & Assembly
The Gerber file for this ESP32 MLX90640 Thermal Camera is provided above. You can download the Gerber file and place an order with a PCB manufacturer like AIVON for as low as $1 for a PCB Prototype.

To order the PCB, visit the AIVON Official Website and upload the Gerber file using the Quote Now option. You can then choose your required parameters, such as Material Type, Dimensions, Quantity, Thickness, and Solder Mask Color.


AIVON is making PCB prototyping and assembly more affordable for new users by offering $1 PCB Prototype and $35 PCB Assembly with Shipping fee $30 OFF on your first PCB order. With this promotion, you can enjoy free shipping on your first order and affordable assembly service for your project.
Here is the promotion link: AIVON PCB/PCBA Promotion Offer
Once all the details are filled in, select your country and shipping method. After confirming everything, you can place the order and wait for your boards to arrive.
Assembly & Testing the ESP32 MLX90640 PCB Board
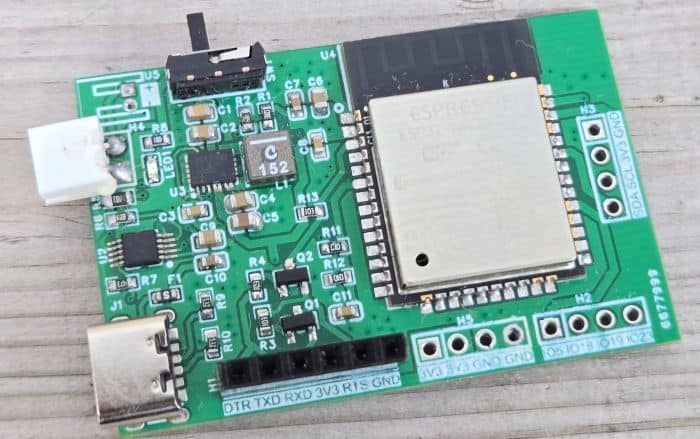
After about a week, the finished PCBs arrived from AIVON. The quality was excellent, with smooth solder pads and precise silkscreen printing—perfect for assembling the ESP32 MLX90640 IoT board.
Assembly begins with soldering all the SMD components on the front side. The design is compact, so only the front contains the ESP32 module, buck-boost converter, charger IC, and supporting resistors and capacitors.
In the first prototype there were a few minor value adjustments for capacitors and resistors, but these have been corrected in the final Gerber release, so you can assemble the latest version without any issues.

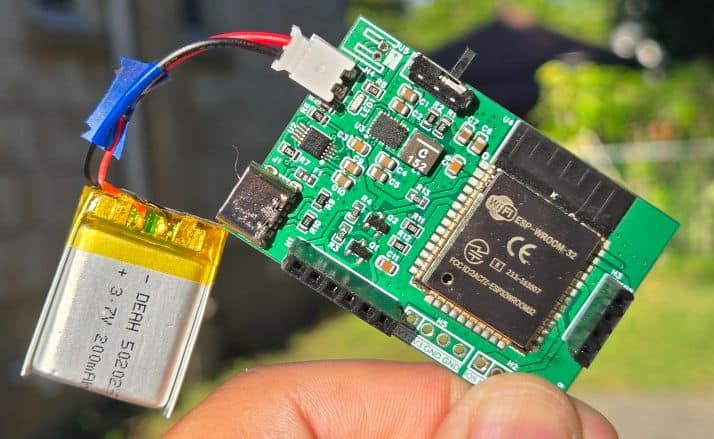
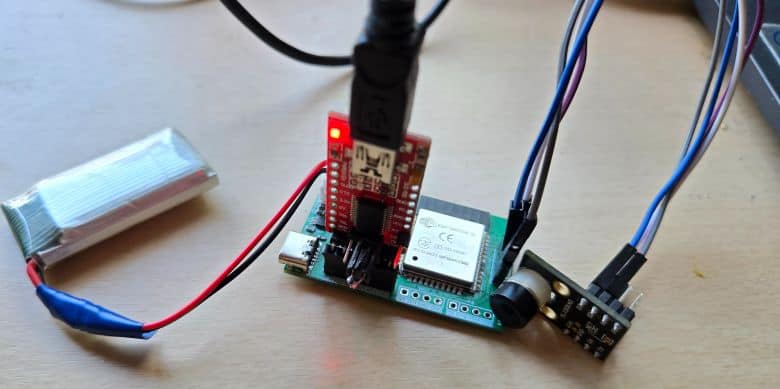
Once assembled, connect a 3.7 V Li-ion/LiPo battery to the JST connector. Programming the ESP32 is done through the PROG header with an FTDI adapter. Thanks to the automatic reset circuitry, there’s no need to press boot or reset buttons—the upload process is completely automatic.
For charging, simply plug in a USB Type-C cable. A red LED will indicate charging, and you can verify it by checking the battery voltage with a multimeter.
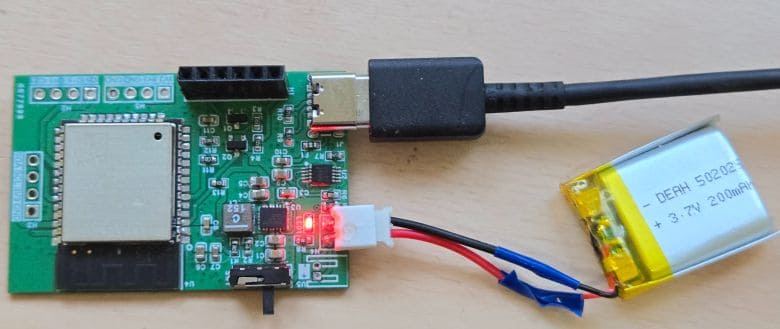
The voltage should gradually increase during charging, confirming that the system is working properly.
The most important part of this project is installing the MLX90640 Thermal Image Array Temperature Sensor. The board includes a 4-pin connector for connecting any I2C sensor or module.
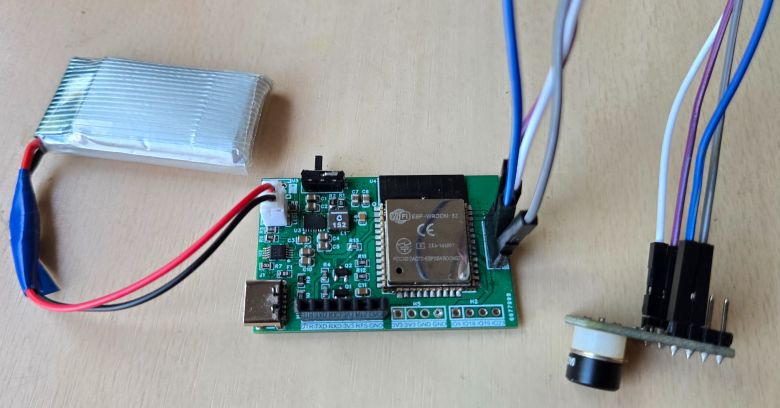
Connect the VCC, GND, SDA, and SCL pins of the MLX90640 sensor to the board’s 3.3V, GND, SDA, and SCL pins respectively. Since the thermal camera is a movable part, it is better to use jumper wires and connect it to the through-hole connector. Alternatively, you can solder the sensor wires directly to the board for a more permanent connection.
Source Code/Program for ESP32 MLX90640 Thermal Web Camera
Now let’s move to the coding part. We will develop an Arduino C++ code to interface the MLX90640 IR Image Array Temperature Sensor with the ESP32 and build our ESP32 Thermal Camera with Webserver.
For this project, we have created our own MLX90640 Arduino library to make the code easier to organize and use with the ESP32. This custom library contains the required MLX90640 API and I2C driver files needed to read thermal frame data from the sensor. You can download the library from the link below and add it to your Arduino libraries folder:
This library allows the ESP32 to read the complete 32 × 24 infrared temperature pixel array from the sensor through the I2C interface. Each frame contains 768 temperature values, which are processed by the ESP32 to generate a real-time thermal image.
After initializing the sensor, the code reads the thermal frame data, calculates the minimum, maximum, average, and center temperature values, and sends this data to the webpage.
The ESP32 also hosts a real-time webserver using its built-in Wi-Fi capability. The webpage displays the live thermal image as a smooth heatmap in the browser. To make the thermal view more detailed and visually clear, the web interface uses interpolation, color mapping, frame smoothing, and enhanced contrast. This allows the low-resolution 32 × 24 MLX90640 data to appear as a much smoother and more useful thermal image on a smartphone or computer browser.
The code for this project is divided into two main files: thermal_image.ino and webpage.h. The thermal_image.ino file contains the main ESP32 program, including Wi-Fi setup, MLX90640 initialization, thermal data reading, and webserver handling. The webpage.h file contains all the HTML, CSS, and JavaScript code used to create the live web view.
thermal_image.ino File
Here is the main.ino code for the ESP32 MLX90640 Thermal Camera project.
|
1 2 3 4 5 6 7 8 9 10 11 12 13 14 15 16 17 18 19 20 21 22 23 24 25 26 27 28 29 30 31 32 33 34 35 36 37 38 39 40 41 42 43 44 45 46 47 48 49 50 51 52 53 54 55 56 57 58 59 60 61 62 63 64 65 66 67 68 69 70 71 72 73 74 75 76 77 78 79 80 81 82 83 84 85 86 87 88 89 90 91 92 93 94 95 96 97 98 99 100 101 102 103 104 105 106 107 108 109 110 111 112 113 114 115 116 117 118 119 120 121 122 123 124 125 126 127 128 129 130 131 132 133 134 135 136 137 138 139 140 141 142 143 144 145 146 147 148 149 150 151 152 153 154 155 156 157 158 159 160 161 162 163 164 165 166 167 168 169 170 171 172 173 174 175 176 177 178 179 180 181 182 183 184 185 186 187 188 189 190 191 192 193 194 195 196 197 198 199 200 201 202 203 204 205 206 207 208 209 210 211 212 213 214 215 216 217 218 219 220 221 222 223 224 225 226 227 228 229 230 231 232 233 234 235 236 237 238 239 240 241 242 243 244 245 246 247 248 249 250 251 252 253 254 255 256 257 258 259 260 261 262 263 264 265 266 267 268 269 270 271 272 273 274 275 276 277 278 279 280 281 282 283 284 285 286 287 288 289 290 291 292 293 294 295 296 297 298 299 300 301 302 303 304 305 306 307 308 309 310 311 312 313 314 315 316 317 318 319 320 321 322 323 324 325 326 327 328 329 330 331 332 333 334 335 336 337 338 339 340 341 342 343 344 345 346 347 348 349 350 351 352 353 354 355 356 357 358 359 360 361 362 363 364 365 366 367 368 369 370 371 372 373 374 375 376 377 378 379 380 381 382 383 384 385 386 387 388 389 390 391 392 393 394 395 396 397 398 399 400 401 402 403 404 405 406 407 408 409 410 411 412 413 414 415 416 417 418 419 420 421 |
/* ESP32-WROOM-32 + MLX90640 Enhanced Web Thermal Camera Only two sketch files are normally edited: thermal_image/thermal_image.ino -> ESP32, Wi-Fi, web server, MLX90640 read logic thermal_image/webpage.h -> Browser UI and thermal image rendering MLX90640 library stays in: libraries/MLX90640/ Hardware wiring: ESP32 GPIO21 -> MLX90640 SDA ESP32 GPIO22 -> MLX90640 SCL ESP32 3V3 -> MLX90640 VIN / 3V3 ESP32 GND -> MLX90640 GND Browser: Connect to ESP32 Wi-Fi AP: MLX90640-Camera Password: 12345678 Open: http://192.168.4.1 */ #include <Arduino.h> #include <Wire.h> #include <WiFi.h> #include <WebServer.h> #include <MLX90640_I2C_Driver.h> #include <MLX90640_API.h> #include "webpage.h" // ---------------- ESP32 I2C pins ---------------- #define I2C_SDA 21 #define I2C_SCL 22 // ---------------- MLX90640 settings ---------------- static const uint8_t MLX90640_ADDR = 0x33; static const float EMISSIVITY = 0.95f; static const float TA_SHIFT = 8.0f; // Faster MLX90640 settings: // Refresh-rate register values used by the Melexis API: // 0x00=0.5Hz, 0x01=1Hz, 0x02=2Hz, 0x03=4Hz, // 0x04=8Hz, 0x05=16Hz, 0x06=32Hz, 0x07=64Hz // Recommended default: 0x04 = 8Hz. Try 0x05 only if wiring is short and stable. static const uint8_t MLX_REFRESH_RATE = 0x04; // 8 Hz // 0x00=16-bit, 0x01=17-bit, 0x02=18-bit, 0x03=19-bit // 18-bit gives good quality. For more speed/noise tradeoff, try 0x01. static const uint8_t MLX_RESOLUTION = 0x02; // 18-bit ADC resolution // MLX90640 supports fast I2C. 800 kHz is a good ESP32 balance. // If unstable, change this to 400000UL. If very stable, you can try 1000000UL. static const uint32_t I2C_CLOCK_HZ = 800000UL; // Target browser/sensor update period. MLX90640_GetFrameData waits until data is ready, // so the real speed is still limited by the sensor refresh rate. static const uint32_t FRAME_INTERVAL_MS = 110; // ---------------- Wi-Fi mode ---------------- // 1 = ESP32 creates its own Wi-Fi network. // 0 = ESP32 connects to your router/hotspot using WIFI_SSID/WIFI_PASS. #define USE_AP_MODE 1 #if USE_AP_MODE const char* AP_SSID = "MLX90640-Camera"; const char* AP_PASS = "12345678"; // minimum 8 characters for ESP32 AP mode #else const char* WIFI_SSID = "YOUR_WIFI_NAME"; const char* WIFI_PASS = "YOUR_WIFI_PASSWORD"; #endif WebServer server(80); paramsMLX90640 mlxParams; float thermalPixels[32 * 24]; uint16_t mlxFrame[834]; float minTemp = 0.0f; float maxTemp = 0.0f; float avgTemp = 0.0f; float centerTemp = 0.0f; float ambientTemp = 0.0f; uint16_t minIndex = 0; uint16_t maxIndex = 0; uint8_t minX = 0; uint8_t minY = 0; uint8_t maxX = 0; uint8_t maxY = 0; bool sensorReady = false; bool frameValid = false; uint32_t lastFrameRequestMs = 0; uint32_t lastFrameCompleteMs = 0; uint32_t frameCounter = 0; uint32_t lastReadDurationMs = 0; float measuredFps = 0.0f; String lastError = "Starting"; bool isMLXConnected() { Wire.beginTransmission(MLX90640_ADDR); return Wire.endTransmission() == 0; } void calculateStats() { minTemp = thermalPixels[0]; maxTemp = thermalPixels[0]; avgTemp = 0.0f; minIndex = 0; maxIndex = 0; for (uint16_t i = 0; i < 768; i++) { const float t = thermalPixels[i]; avgTemp += t; if (t < minTemp) { minTemp = t; minIndex = i; } if (t > maxTemp) { maxTemp = t; maxIndex = i; } } avgTemp /= 768.0f; minX = minIndex % 32; minY = minIndex / 32; maxX = maxIndex % 32; maxY = maxIndex / 32; // Four center pixels around the middle of the 32x24 thermal array. centerTemp = (thermalPixels[367] + thermalPixels[368] + thermalPixels[399] + thermalPixels[400]) / 4.0f; } bool readMLX90640Frame() { if (!sensorReady) { lastError = "MLX90640 not initialized"; return false; } const uint32_t startMs = millis(); // MLX90640 uses two subpages. Reading twice gives one complete 32x24 image. for (uint8_t subpage = 0; subpage < 2; subpage++) { int status = MLX90640_GetFrameData(MLX90640_ADDR, mlxFrame); if (status < 0) { lastError = "MLX90640_GetFrameData error: " + String(status); frameValid = false; return false; } ambientTemp = MLX90640_GetTa(mlxFrame, &mlxParams); const float reflectedTemp = ambientTemp - TA_SHIFT; MLX90640_CalculateTo(mlxFrame, &mlxParams, EMISSIVITY, reflectedTemp, thermalPixels); } calculateStats(); const uint32_t nowMs = millis(); lastReadDurationMs = nowMs - startMs; if (lastFrameCompleteMs > 0) { const uint32_t dt = nowMs - lastFrameCompleteMs; if (dt > 0) { const float instantFps = 1000.0f / (float)dt; measuredFps = (measuredFps <= 0.01f) ? instantFps : (0.75f * measuredFps + 0.25f * instantFps); } } lastFrameCompleteMs = nowMs; frameCounter++; frameValid = true; lastError = "OK"; return true; } String makeJsonData() { if (!frameValid) { String err = "{\"ok\":false,\"error\":\""; err += lastError; err += "\"}"; return err; } String json; json.reserve(10500); json += "{\"ok\":true,"; json += "\"frame\":" + String(frameCounter) + ","; json += "\"min\":" + String(minTemp, 2) + ","; json += "\"max\":" + String(maxTemp, 2) + ","; json += "\"avg\":" + String(avgTemp, 2) + ","; json += "\"center\":" + String(centerTemp, 2) + ","; json += "\"ambient\":" + String(ambientTemp, 2) + ","; json += "\"fps\":" + String(measuredFps, 2) + ","; json += "\"readMs\":" + String(lastReadDurationMs) + ","; json += "\"minX\":" + String(minX) + ","; json += "\"minY\":" + String(minY) + ","; json += "\"maxX\":" + String(maxX) + ","; json += "\"maxY\":" + String(maxY) + ","; json += "\"pixels\":["; for (uint16_t i = 0; i < 768; i++) { if (i) json += ','; json += String(thermalPixels[i], 2); } json += "]}"; return json; } String makeCsvData() { String csv; csv.reserve(7200); for (uint8_t row = 0; row < 24; row++) { for (uint8_t col = 0; col < 32; col++) { if (col) csv += ','; csv += String(thermalPixels[row * 32 + col], 2); } csv += '\n'; } return csv; } void setupWebServer() { server.on("/", HTTP_GET, []() { server.send_P(200, "text/html", WEBPAGE_HTML); }); server.on("/data", HTTP_GET, []() { server.sendHeader("Cache-Control", "no-store, no-cache, must-revalidate, max-age=0"); server.sendHeader("Pragma", "no-cache"); server.send(200, "application/json", makeJsonData()); }); server.on("/csv", HTTP_GET, []() { server.sendHeader("Cache-Control", "no-store"); server.sendHeader("Content-Disposition", "attachment; filename=mlx90640_frame.csv"); server.send(200, "text/csv", makeCsvData()); }); server.on("/health", HTTP_GET, []() { String health = "ESP32 MLX90640 Enhanced Web Thermal Camera\n"; health += "Sensor ready: " + String(sensorReady ? "yes" : "no") + "\n"; health += "Frame valid: " + String(frameValid ? "yes" : "no") + "\n"; health += "Frame count: " + String(frameCounter) + "\n"; health += "Measured FPS: " + String(measuredFps, 2) + "\n"; health += "Read duration ms: " + String(lastReadDurationMs) + "\n"; health += "I2C clock Hz: " + String(I2C_CLOCK_HZ) + "\n"; health += "Refresh setting: 0x" + String(MLX_REFRESH_RATE, HEX) + "\n"; health += "Resolution setting: 0x" + String(MLX_RESOLUTION, HEX) + "\n"; health += "Last error: " + lastError + "\n"; server.send(200, "text/plain", health); }); server.onNotFound([]() { server.send(404, "text/plain", "Not found"); }); server.begin(); } bool initializeMLX90640() { if (!isMLXConnected()) { lastError = "MLX90640 not detected at I2C address 0x33. Check SDA=21, SCL=22, 3.3V, GND."; return false; } uint16_t eeMLX90640[832]; int status = MLX90640_DumpEE(MLX90640_ADDR, eeMLX90640); if (status != 0) { lastError = "MLX90640_DumpEE failed: " + String(status); return false; } status = MLX90640_ExtractParameters(eeMLX90640, &mlxParams); if (status != 0) { lastError = "MLX90640_ExtractParameters failed: " + String(status); return false; } status = MLX90640_SetRefreshRate(MLX90640_ADDR, MLX_REFRESH_RATE); if (status != 0) { lastError = "SetRefreshRate failed: " + String(status); return false; } status = MLX90640_SetResolution(MLX90640_ADDR, MLX_RESOLUTION); if (status != 0) { lastError = "SetResolution failed: " + String(status); return false; } status = MLX90640_SetChessMode(MLX90640_ADDR); if (status != 0) { lastError = "SetChessMode failed: " + String(status); return false; } sensorReady = true; lastError = "OK"; return true; } void setupWiFi() { WiFi.setSleep(false); // lower latency for live streaming #if USE_AP_MODE WiFi.mode(WIFI_AP); WiFi.softAP(AP_SSID, AP_PASS, 1, false, 4); Serial.println(); Serial.println("Wi-Fi AP started"); Serial.print("SSID: "); Serial.println(AP_SSID); Serial.print("Password: "); Serial.println(AP_PASS); Serial.print("Open browser: http://"); Serial.println(WiFi.softAPIP()); #else WiFi.mode(WIFI_STA); WiFi.begin(WIFI_SSID, WIFI_PASS); Serial.print("Connecting to Wi-Fi"); while (WiFi.status() != WL_CONNECTED) { delay(250); Serial.print('.'); } Serial.println(); Serial.print("Open browser: http://"); Serial.println(WiFi.localIP()); #endif } void setup() { setCpuFrequencyMhz(240); Serial.begin(115200); delay(800); Serial.println(); Serial.println("ESP32 MLX90640 Enhanced Web Thermal Camera"); Wire.begin(I2C_SDA, I2C_SCL); Wire.setClock(I2C_CLOCK_HZ); Wire.setTimeOut(1000); Serial.print("I2C SDA: GPIO"); Serial.println(I2C_SDA); Serial.print("I2C SCL: GPIO"); Serial.println(I2C_SCL); Serial.print("I2C clock: "); Serial.println(I2C_CLOCK_HZ); Serial.println("MLX90640 address: 0x33"); setupWiFi(); setupWebServer(); if (initializeMLX90640()) { Serial.println("MLX90640 initialized successfully"); readMLX90640Frame(); } else { Serial.print("MLX90640 initialization failed: "); Serial.println(lastError); } } void loop() { server.handleClient(); const uint32_t now = millis(); if (now - lastFrameRequestMs >= FRAME_INTERVAL_MS) { lastFrameRequestMs = now; readMLX90640Frame(); } } |
webpage.h File
Here is the webpage file for webserver, which combines html, CSS, JavaScript and other files. Create a webpage.h file in the same Arduino editor window and paste the following code there.
|
1 2 3 4 5 6 7 8 9 10 11 12 13 14 15 16 17 18 19 20 21 22 23 24 25 26 27 28 29 30 31 32 33 34 35 36 37 38 39 40 41 42 43 44 45 46 47 48 49 50 51 52 53 54 55 56 57 58 59 60 61 62 63 64 65 66 67 68 69 70 71 72 73 74 75 76 77 78 79 80 81 82 83 84 85 86 87 88 89 90 91 92 93 94 95 96 97 98 99 100 101 102 103 104 105 106 107 108 109 110 111 112 113 114 115 116 117 118 119 120 121 122 123 124 125 126 127 128 129 130 131 132 133 134 135 136 137 138 139 140 141 142 143 144 145 146 147 148 149 150 151 152 153 154 155 156 157 158 159 160 161 162 163 164 165 166 167 168 169 170 171 172 173 174 175 176 177 178 179 180 181 182 183 184 185 186 187 188 189 190 191 192 193 194 195 196 197 198 199 200 201 202 203 204 205 206 207 208 209 210 211 212 213 214 215 216 217 218 219 220 221 222 223 224 225 226 227 228 229 230 231 232 233 234 235 236 237 238 239 240 241 242 243 244 245 246 247 248 249 250 251 252 253 254 255 256 257 258 259 260 261 262 263 264 265 266 267 268 269 270 271 272 273 274 275 276 277 278 279 280 281 282 283 284 285 286 287 288 289 290 291 292 293 294 295 296 297 298 299 300 301 302 303 304 305 306 307 308 309 310 311 312 313 314 315 316 317 318 319 320 321 322 323 324 325 326 327 328 329 330 331 332 333 334 335 336 337 338 339 340 341 342 343 344 345 346 347 348 349 350 351 352 353 354 355 356 357 358 359 360 361 362 363 364 365 366 367 368 369 370 371 372 373 374 375 376 377 378 379 380 381 382 383 384 385 386 387 388 389 390 391 392 393 394 395 396 397 398 399 400 401 402 403 404 405 406 407 408 409 410 411 412 413 414 415 416 417 418 419 420 421 422 423 424 425 426 427 428 429 430 431 432 433 434 435 436 437 438 439 440 441 442 443 444 445 446 447 448 449 450 451 452 453 454 455 456 457 458 459 460 461 462 463 464 465 466 467 468 469 470 471 472 473 474 475 476 477 478 479 480 481 482 483 484 485 486 487 488 489 490 491 492 493 494 495 496 497 498 499 500 501 502 503 504 505 506 507 508 509 510 511 512 513 514 515 516 517 518 519 520 521 522 523 524 525 526 527 528 529 530 531 532 533 534 535 536 537 538 539 540 541 542 543 544 545 546 547 548 549 550 551 552 553 554 555 556 557 558 559 560 561 562 563 564 565 566 567 568 569 570 571 572 573 574 575 576 577 578 579 580 581 582 583 584 585 586 587 588 589 590 591 592 593 594 595 596 597 598 599 600 601 602 603 604 605 606 607 608 609 610 611 612 613 614 615 616 617 618 619 620 621 622 623 624 625 626 627 628 629 630 631 632 633 634 635 636 637 638 639 640 641 642 643 644 645 646 647 648 649 650 651 652 653 654 655 656 657 658 659 660 661 662 663 664 665 666 667 668 669 670 671 672 673 674 675 676 677 678 679 680 681 682 683 684 685 686 687 688 689 690 691 692 693 694 695 696 697 698 699 700 701 702 703 704 705 706 707 708 709 710 711 712 713 714 715 716 |
#ifndef WEBPAGE_H #define WEBPAGE_H #include <Arduino.h> const char WEBPAGE_HTML[] PROGMEM = R"rawliteral( <!DOCTYPE html> <html lang="en"> <head> <meta charset="UTF-8"> <meta name="viewport" content="width=device-width, initial-scale=1.0"> <title>ESP32 MLX90640 Enhanced Thermal Camera</title> <style> :root { color-scheme: dark; --bg0: #05070d; --bg1: #0b1220; --card: rgba(255,255,255,0.075); --card2: rgba(0,0,0,0.30); --line: rgba(255,255,255,0.14); --text: #f5f7fb; --muted: #aeb9ca; --good: #7bf5c6; --warn: #ffd166; } * { box-sizing: border-box; } body { margin: 0; font-family: Inter, ui-sans-serif, system-ui, -apple-system, BlinkMacSystemFont, "Segoe UI", Arial, sans-serif; color: var(--text); background: radial-gradient(circle at top left, rgba(55, 91, 158, 0.42), transparent 38%), radial-gradient(circle at top right, rgba(187, 72, 121, 0.22), transparent 32%), linear-gradient(135deg, var(--bg1), var(--bg0)); min-height: 100vh; } .wrap { width: min(1180px, 100%); margin: 0 auto; padding: 18px; } .top { display: flex; align-items: flex-end; justify-content: space-between; gap: 16px; flex-wrap: wrap; margin-bottom: 14px; } h1 { font-size: clamp(24px, 4vw, 42px); line-height: 1.05; margin: 8px 0 5px; letter-spacing: -0.045em; } .sub { color: var(--muted); font-size: 14px; } .pill { display: inline-flex; align-items: center; gap: 8px; border: 1px solid var(--line); background: rgba(255,255,255,0.08); border-radius: 999px; padding: 9px 12px; color: #dce6f7; font-size: 13px; white-space: nowrap; } .dot { width: 9px; height: 9px; border-radius: 999px; background: var(--warn); box-shadow: 0 0 16px var(--warn); } .dot.ok { background: var(--good); box-shadow: 0 0 16px var(--good); } .grid { display: grid; grid-template-columns: minmax(0, 1fr) 330px; gap: 16px; align-items: start; } .panel { background: var(--card); border: 1px solid var(--line); border-radius: 24px; padding: 14px; box-shadow: 0 24px 80px rgba(0, 0, 0, 0.38); backdrop-filter: blur(14px); } .cameraShell { position: relative; width: 100%; max-width: 900px; margin: 0 auto; border-radius: 20px; overflow: hidden; background: #000; border: 1px solid rgba(255,255,255,0.18); } canvas { width: 100%; aspect-ratio: 4 / 3; display: block; image-rendering: auto; background: #000; } .hud { position: absolute; left: 12px; top: 12px; display: flex; flex-wrap: wrap; gap: 8px; pointer-events: none; } .hud span { background: rgba(0,0,0,0.48); border: 1px solid rgba(255,255,255,0.18); border-radius: 999px; padding: 6px 9px; font-size: 12px; color: #edf3ff; backdrop-filter: blur(8px); } .legend { display: grid; grid-template-columns: auto 1fr auto; gap: 10px; align-items: center; margin: 12px auto 0; max-width: 900px; color: var(--muted); font-size: 12px; } .bar { height: 16px; border-radius: 999px; border: 1px solid rgba(255, 255, 255, 0.22); background: linear-gradient(90deg, #080017, #240b55, #8d164f, #e03b32, #ff9a1f, #fff36d, #ffffff ); } .stats { display: grid; grid-template-columns: repeat(3, 1fr); gap: 10px; margin-top: 14px; } .box { background: var(--card2); border-radius: 16px; padding: 11px 10px; border: 1px solid rgba(255, 255, 255, 0.10); min-height: 76px; } .label { display: block; color: var(--muted); font-size: 12px; margin-bottom: 5px; } .value { display: block; font-size: clamp(18px, 3vw, 25px); font-weight: 800; letter-spacing: -0.03em; } .small { color: #9eabba; font-size: 12px; margin-top: 4px; } .controls { display: grid; gap: 12px; } .controlTitle { font-weight: 800; font-size: 16px; margin: 2px 0 0; } .control { background: var(--card2); border: 1px solid rgba(255,255,255,0.10); border-radius: 16px; padding: 12px; text-align: left; } .control label { display: flex; justify-content: space-between; gap: 12px; color: #dce5f3; font-size: 13px; margin-bottom: 8px; } .control label strong { color: #ffffff; } select, button, input[type="range"] { width: 100%; } select, button { background: rgba(255,255,255,0.10); color: #fff; border: 1px solid rgba(255,255,255,0.16); border-radius: 12px; padding: 10px 11px; font-weight: 700; outline: none; } option { background: #101827; } button { cursor: pointer; transition: 0.15s ease; } button:hover { background: rgba(255,255,255,0.18); } .buttonRow { display: grid; grid-template-columns: 1fr 1fr; gap: 8px; } .toggleLine { display: flex; align-items: center; justify-content: space-between; gap: 12px; color: #dce5f3; font-size: 13px; } .toggleLine input { transform: scale(1.15); } .status { margin-top: 12px; color: var(--muted); font-size: 13px; min-height: 20px; text-align: center; } @media (max-width: 980px) { .grid { grid-template-columns: 1fr; } .controls { grid-template-columns: repeat(2, minmax(0, 1fr)); } } @media (max-width: 650px) { .wrap { padding: 10px; } .panel { padding: 10px; border-radius: 20px; } .stats { grid-template-columns: repeat(2, 1fr); } .controls { grid-template-columns: 1fr; } .top { align-items: flex-start; } } </style> </head> <body> <div class="wrap"> <div class="top"> <div> <h1>MLX90640 Thermal Camera</h1> <div class="sub">ESP32-WROOM live thermal stream • 32 × 24 sensor • browser-enhanced image</div> </div> <div class="pill"><span class="dot" id="liveDot"></span><span id="liveText">Connecting...</span></div> </div> <div class="grid"> <div class="panel"> <div class="cameraShell"> <canvas id="thermal" width="512" height="384"></canvas> <div class="hud"> <span id="hudRange">Range --</span> <span id="hudCursor">Move over image</span> </div> </div> <div class="legend"> <span id="legendMin">-- C</span> <div class="bar" id="legendBar"></div> <span id="legendMax">-- C</span> </div> <div class="stats"> <div class="box"><span class="label">Center</span><span class="value" id="center">--</span><div class="small">middle 4 pixels</div></div> <div class="box"><span class="label">Minimum</span><span class="value" id="min">--</span><div class="small" id="minPos">--</div></div> <div class="box"><span class="label">Maximum</span><span class="value" id="max">--</span><div class="small" id="maxPos">--</div></div> <div class="box"><span class="label">Average</span><span class="value" id="avg">--</span><div class="small">all 768 pixels</div></div> <div class="box"><span class="label">Ambient</span><span class="value" id="ambient">--</span><div class="small">sensor estimate</div></div> <div class="box"><span class="label">Speed</span><span class="value" id="fps">--</span><div class="small" id="readMs">--</div></div> </div> <div class="status" id="status">Starting web display...</div> </div> <div class="panel controls"> <div class="controlTitle">Image Controls</div> <div class="control"> <label><strong>Palette</strong><span id="paletteName">Iron</span></label> <select id="palette" onchange="setPalette(this.value)"> <option value="iron" selected>Iron / Thermal</option> <option value="rainbow">Rainbow</option> <option value="arctic">Arctic</option> <option value="gray">Gray</option> </select> </div> <div class="control"> <label><strong>Interpolation</strong><span id="interpName">Smooth</span></label> <div class="buttonRow"> <button onclick="setInterpolation(true)" id="smoothBtn">Smooth</button> <button onclick="setInterpolation(false)" id="pixelBtn">Pixel</button> </div> </div> <div class="control"> <label><strong>Detail boost</strong><span id="detailVal">0.35</span></label> <input id="detail" type="range" min="0" max="1.2" value="0.35" step="0.05" oninput="setDetail(this.value)"> <div class="small">Adds light edge/detail enhancement in the browser.</div> </div> <div class="control"> <label><strong>Frame smoothing</strong><span id="smoothVal">0.35</span></label> <input id="temporal" type="range" min="0" max="0.85" value="0.35" step="0.05" oninput="setTemporal(this.value)"> <div class="small">Higher value reacts faster. Lower value looks steadier.</div> </div> <div class="control"> <div class="toggleLine"> <span><strong>Enhanced contrast</strong><br><span class="small">Uses 3% to 97% range for more visible detail.</span></span> <input id="contrast" type="checkbox" checked onchange="redrawLast()"> </div> </div> <div class="control"> <div class="toggleLine"> <span><strong>Show hot/cold markers</strong><br><span class="small">Draws max and min crosshairs.</span></span> <input id="markers" type="checkbox" checked onchange="redrawLast()"> </div> </div> <div class="control"> <button onclick="downloadCsv()">Download Current Frame CSV</button> </div> </div> </div> </div> <script> const SENSOR_W = 32; const SENSOR_H = 24; const OUT_W = 512; const OUT_H = 384; const FETCH_DELAY_MS = 85; const canvas = document.getElementById('thermal'); canvas.width = OUT_W; canvas.height = OUT_H; const ctx = canvas.getContext('2d', { alpha: false }); const imageData = ctx.createImageData(OUT_W, OUT_H); let palette = 'iron'; let useSmoothInterpolation = true; let detailBoost = 0.35; let temporalAmount = 0.35; let temporalPixels = null; let lastData = null; let isFetching = false; function clamp(v, lo, hi) { return Math.max(lo, Math.min(hi, v)); } function lerp(a, b, t) { return a + (b - a) * t; } function fmtC(v) { return Number(v).toFixed(2) + ' C'; } function setPalette(v) { palette = v; document.getElementById('paletteName').textContent = document.getElementById('palette').selectedOptions[0].textContent; updateLegendGradient(); redrawLast(); } function setInterpolation(v) { useSmoothInterpolation = v; document.getElementById('interpName').textContent = v ? 'Smooth' : 'Pixel'; document.getElementById('smoothBtn').style.opacity = v ? '1' : '0.55'; document.getElementById('pixelBtn').style.opacity = v ? '0.55' : '1'; redrawLast(); } function setDetail(v) { detailBoost = Number(v); document.getElementById('detailVal').textContent = detailBoost.toFixed(2); redrawLast(); } function setTemporal(v) { temporalAmount = Number(v); document.getElementById('smoothVal').textContent = temporalAmount.toFixed(2); } function getPixel(pixels, x, y) { x = clamp(x, 0, SENSOR_W - 1); y = clamp(y, 0, SENSOR_H - 1); return pixels[y * SENSOR_W + x]; } function sampleBilinear(pixels, x, y) { const x0 = Math.floor(x); const y0 = Math.floor(y); const x1 = Math.min(x0 + 1, SENSOR_W - 1); const y1 = Math.min(y0 + 1, SENSOR_H - 1); const fx = x - x0; const fy = y - y0; const p00 = getPixel(pixels, x0, y0); const p10 = getPixel(pixels, x1, y0); const p01 = getPixel(pixels, x0, y1); const p11 = getPixel(pixels, x1, y1); return lerp(lerp(p00, p10, fx), lerp(p01, p11, fx), fy); } function applyTemporalSmoothing(newPixels) { if (!temporalPixels || temporalPixels.length !== newPixels.length) { temporalPixels = newPixels.slice(); return temporalPixels; } const alpha = clamp(temporalAmount, 0, 1); for (let i = 0; i < newPixels.length; i++) { temporalPixels[i] = temporalPixels[i] + alpha * (newPixels[i] - temporalPixels[i]); } return temporalPixels; } function enhanceDetails(pixels) { if (detailBoost <= 0.001) return pixels; const out = new Array(pixels.length); for (let y = 0; y < SENSOR_H; y++) { for (let x = 0; x < SENSOR_W; x++) { const i = y * SENSOR_W + x; const c = pixels[i]; const n = ( getPixel(pixels, x - 1, y) + getPixel(pixels, x + 1, y) + getPixel(pixels, x, y - 1) + getPixel(pixels, x, y + 1) ) * 0.25; out[i] = c + detailBoost * (c - n); } } return out; } function percentile(values, p) { const sorted = values.slice().sort((a, b) => a - b); const idx = clamp(Math.round((sorted.length - 1) * p), 0, sorted.length - 1); return sorted[idx]; } function getDisplayRange(pixels, rawMin, rawMax) { if (document.getElementById('contrast').checked) { let lo = percentile(pixels, 0.03); let hi = percentile(pixels, 0.97); if (hi - lo < 0.5) { lo = rawMin; hi = rawMax; } return [lo, hi]; } return [rawMin, rawMax]; } function colorStopsForPalette(name) { if (name === 'gray') { return [ [0.00, [0,0,0]], [1.00, [255,255,255]] ]; } if (name === 'arctic') { return [ [0.00, [1,10,35]], [0.25, [0,80,160]], [0.50, [0,210,255]], [0.75, [170,255,230]], [1.00, [255,255,255]] ]; } if (name === 'rainbow') { return [ [0.00, [35,0,80]], [0.16, [0,0,255]], [0.33, [0,180,255]], [0.50, [0,255,80]], [0.66, [255,255,0]], [0.83, [255,90,0]], [1.00, [255,255,255]] ]; } return [ [0.00, [0,0,12]], [0.18, [34,6,75]], [0.36, [132,20,78]], [0.55, [224,58,48]], [0.72, [255,151,31]], [0.88, [255,243,105]], [1.00, [255,255,255]] ]; } function thermalColor(t) { t = clamp(t, 0, 1); const stops = colorStopsForPalette(palette); for (let i = 0; i < stops.length - 1; i++) { const a = stops[i]; const b = stops[i + 1]; if (t >= a[0] && t <= b[0]) { const k = (t - a[0]) / (b[0] - a[0]); return [ lerp(a[1][0], b[1][0], k), lerp(a[1][1], b[1][1], k), lerp(a[1][2], b[1][2], k) ]; } } return stops[stops.length - 1][1]; } function updateLegendGradient() { const stops = colorStopsForPalette(palette) .map(s => `rgb(${s[1][0]},${s[1][1]},${s[1][2]}) ${Math.round(s[0] * 100)}%`) .join(','); document.getElementById('legendBar').style.background = `linear-gradient(90deg, ${stops})`; } function drawMarker(sensorX, sensorY, label, color) { const x = (sensorX / (SENSOR_W - 1)) * OUT_W; const y = (sensorY / (SENSOR_H - 1)) * OUT_H; ctx.save(); ctx.strokeStyle = color; ctx.fillStyle = color; ctx.lineWidth = 2; ctx.shadowColor = 'rgba(0,0,0,0.85)'; ctx.shadowBlur = 5; ctx.beginPath(); ctx.moveTo(x - 12, y); ctx.lineTo(x + 12, y); ctx.moveTo(x, y - 12); ctx.lineTo(x, y + 12); ctx.stroke(); ctx.beginPath(); ctx.arc(x, y, 5, 0, Math.PI * 2); ctx.stroke(); ctx.font = 'bold 13px system-ui, sans-serif'; ctx.fillText(label, clamp(x + 9, 4, OUT_W - 90), clamp(y - 9, 14, OUT_H - 4)); ctx.restore(); } function drawThermal(data) { const rawPixels = data.pixels; let pixels = applyTemporalSmoothing(rawPixels); pixels = enhanceDetails(pixels); const range = getDisplayRange(pixels, data.min, data.max); const displayMin = range[0]; const displayMax = range[1]; const span = Math.max(0.25, displayMax - displayMin); for (let py = 0; py < OUT_H; py++) { const sySmooth = (py / (OUT_H - 1)) * (SENSOR_H - 1); const syPixel = Math.floor((py / OUT_H) * SENSOR_H); for (let px = 0; px < OUT_W; px++) { const sxSmooth = (px / (OUT_W - 1)) * (SENSOR_W - 1); const sxPixel = Math.floor((px / OUT_W) * SENSOR_W); const temp = useSmoothInterpolation ? sampleBilinear(pixels, sxSmooth, sySmooth) : getPixel(pixels, sxPixel, syPixel); const c = thermalColor((temp - displayMin) / span); const o = (py * OUT_W + px) * 4; imageData.data[o + 0] = c[0]; imageData.data[o + 1] = c[1]; imageData.data[o + 2] = c[2]; imageData.data[o + 3] = 255; } } ctx.putImageData(imageData, 0, 0); if (document.getElementById('markers').checked) { drawMarker(data.maxX, data.maxY, 'HOT ' + fmtC(data.max), '#ffffff'); drawMarker(data.minX, data.minY, 'COLD ' + fmtC(data.min), '#62d9ff'); } document.getElementById('legendMin').textContent = displayMin.toFixed(1) + ' C'; document.getElementById('legendMax').textContent = displayMax.toFixed(1) + ' C'; document.getElementById('hudRange').textContent = 'Display range ' + displayMin.toFixed(1) + '–' + displayMax.toFixed(1) + ' C'; } function redrawLast() { if (lastData) drawThermal(lastData); } function updateNumbers(data) { document.getElementById('center').textContent = fmtC(data.center); document.getElementById('min').textContent = fmtC(data.min); document.getElementById('max').textContent = fmtC(data.max); document.getElementById('avg').textContent = fmtC(data.avg); document.getElementById('ambient').textContent = fmtC(data.ambient); document.getElementById('fps').textContent = data.fps.toFixed(1) + ' fps'; document.getElementById('readMs').textContent = data.readMs + ' ms read time'; document.getElementById('minPos').textContent = 'x=' + data.minX + ', y=' + data.minY; document.getElementById('maxPos').textContent = 'x=' + data.maxX + ', y=' + data.maxY; document.getElementById('status').textContent = 'Frame ' + data.frame + ' • updated ' + new Date().toLocaleTimeString(); document.getElementById('liveDot').classList.add('ok'); document.getElementById('liveText').textContent = 'Live'; } async function updateFrame() { if (isFetching) return; isFetching = true; try { const res = await fetch('/data?ts=' + Date.now(), { cache: 'no-store' }); const data = await res.json(); if (!data.ok) { document.getElementById('status').textContent = data.error || 'Sensor not ready'; document.getElementById('liveDot').classList.remove('ok'); document.getElementById('liveText').textContent = 'Sensor error'; return; } lastData = data; drawThermal(data); updateNumbers(data); } catch (e) { document.getElementById('status').textContent = 'Web update error: ' + e; document.getElementById('liveDot').classList.remove('ok'); document.getElementById('liveText').textContent = 'Disconnected'; } finally { isFetching = false; setTimeout(updateFrame, FETCH_DELAY_MS); } } canvas.addEventListener('mousemove', (ev) => { if (!lastData) return; const rect = canvas.getBoundingClientRect(); const x = clamp((ev.clientX - rect.left) / rect.width, 0, 0.9999); const y = clamp((ev.clientY - rect.top) / rect.height, 0, 0.9999); const sx = Math.floor(x * SENSOR_W); const sy = Math.floor(y * SENSOR_H); const temp = getPixel(lastData.pixels, sx, sy); document.getElementById('hudCursor').textContent = 'x=' + sx + ' y=' + sy + ' • ' + fmtC(temp); }); canvas.addEventListener('mouseleave', () => { document.getElementById('hudCursor').textContent = 'Move over image'; }); function downloadCsv() { window.location.href = '/csv?ts=' + Date.now(); } setInterpolation(true); setPalette('iron'); updateFrame(); </script> </body> </html> )rawliteral"; #endif |
Testing DIY Thermal Camera with Live Web Display
Once the hardware assembly is complete, it’s time to upload the code.
To upload the code, connect your FTDI module directly to the PROG header on the PCB. In the Arduino IDE, go to Tools → Board and select ESP32 Dev Module. Then choose the correct COM port for your FTDI adapter.
Finally, click the Upload button. The code will be uploaded to the ESP32 board. After uploading, power the device and wait for the ESP32 Wi-Fi network to appear.
Connect your phone or computer to the ESP32 Wi-Fi network:
|
1 2 |
Wi-Fi: MLX90640-Camera Password: 12345678 |
Then open a browser and go to:
|
1 |
192.168.4.1 |
The webpage will display a live thermal image from the MLX90640 thermal camera. The heatmap shows temperature differences in front of the sensor. Warmer objects, such as your hand or face, will appear in brighter/hotter colors, while cooler background areas will appear in darker/cooler colors.
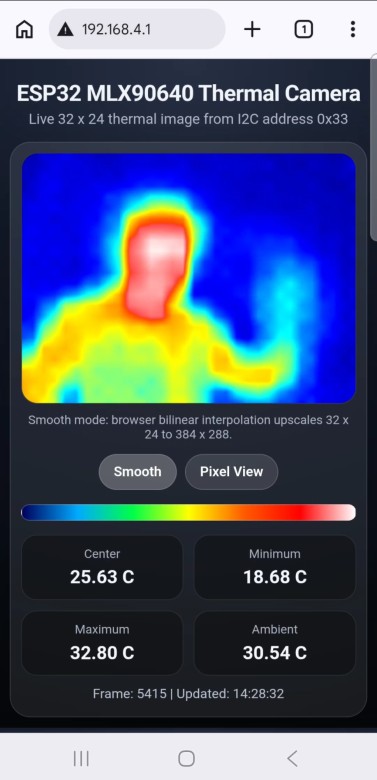
To test the sensor, move your hand slowly in front of the camera and observe the thermal image changing in real time on the webpage. You can also stand in front of the camera to see your body heat displayed as a thermal image. The webpage also shows useful temperature values such as minimum temperature, maximum temperature, average temperature, and center temperature.
You can use the webpage controls to change the color palette, enable smooth view, view hot/cold markers, and adjust the thermal image display. For the best result, point the sensor toward a clear object with a temperature difference from the background.
Video Tutorial & Guide

 & Live Dashboard")


