

Overview
This tutorial is about controlling an LED using Blynk 2.0 App & Raspberry Pi Pico W using the MicroPython Code.
The Internet of Things (IoT) has transformed the way we interact with our devices, and now we can control and monitor almost anything remotely. One of the most popular IoT platforms is Blynk, a mobile app that allows you to create custom user interfaces for your projects, and interact with them from anywhere in the world. With the help of a microcontroller, you can use Blynk to control and monitor physical devices, such as LEDs.
In this tutorial, we will show you how to control an LED using Blynk and Pico W, a microcontroller board that runs MicroPython. MicroPython is a variant of the Python programming language that has been optimized for microcontrollers, making it easy to program and interact with hardware. We will use the Pico W’s built-in Wi-Fi to connect to the Blynk app and control the LED.
We will guide you through the process of setting up the Pico W and Blynk and then writing the MicroPython code to control the LED. You will learn how to create a Blynk project and connect it to your Pico W, and how to write the code to control the LED based on the input from the Blynk app. By the end of this tutorial, you will have a fully functional project that allows you to control an LED remotely using the Blynk app and Pico W with MicroPython.
Bill of Materials
To get started, you will need a few things:
- Pico W board
- LED
- 220-ohm resistor
- Breadboard
- Jumper wires
- Blynk app (available for Android and iOS)
Hardware Setup & Circuit
To control an LED using Blynk app and Pico W, you need to connect the LED to the Pico W board. Here’s how you can set up the hardware and circuit:

- Connect the anode (positive) leg of the LED to GPIO0 (Pin 1) of the Pico W board.
- Connect the cathode (negative) leg of the LED to a GND pin on the Pico W board.
- Insert a 220-ohm resistor between the cathode leg of the LED and the GND pin on the Pico W board.

With the hardware set up, you can proceed to set up the Blynk app and program the Pico W board.
Setting up Blynk 2.0 Application
To control the LED using Blynk and Raspberry Pi Pico W, you need to create a Blynk project and set up a dashboard in the mobile or web application. Here’s how you can set up the dashboard:
Visit blynk.cloud and create a Blynk account on the Blynk website. Or you can simply sign in using the registered Email ID.
Click on +New Template.
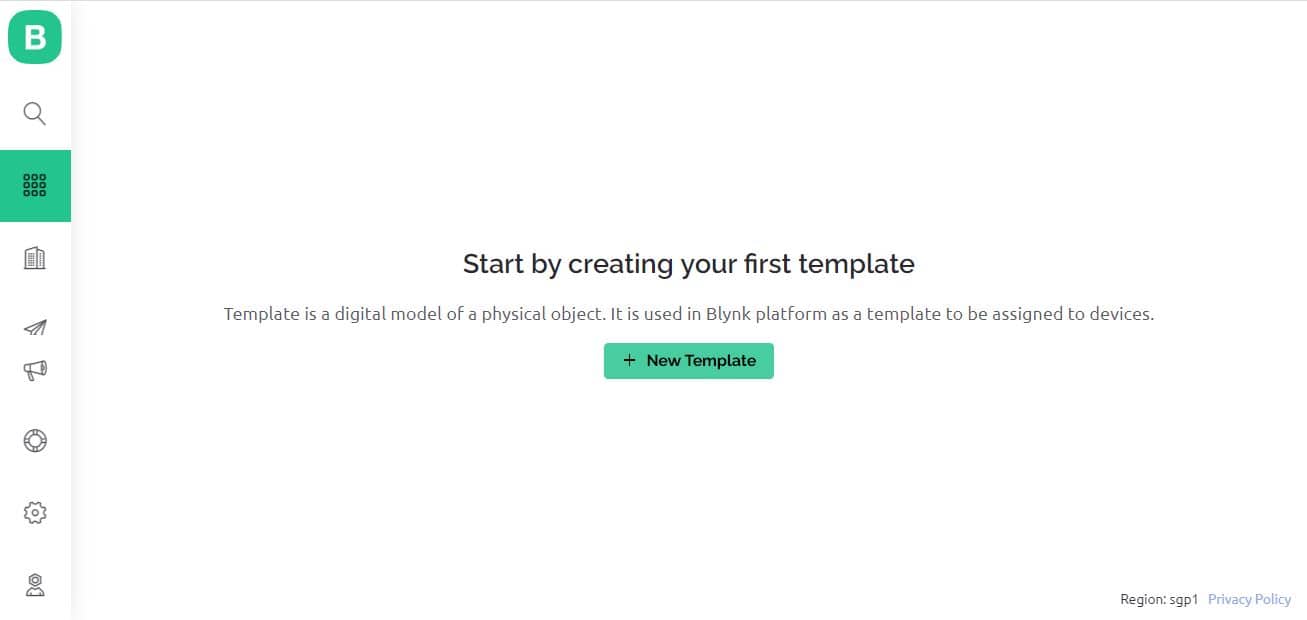
Give any name to the Template such as Raspberry Pi Pico W. Select ‘Hardware Type’ as Other and ‘Connection Type’ as WiFi.

So a template will be created now.

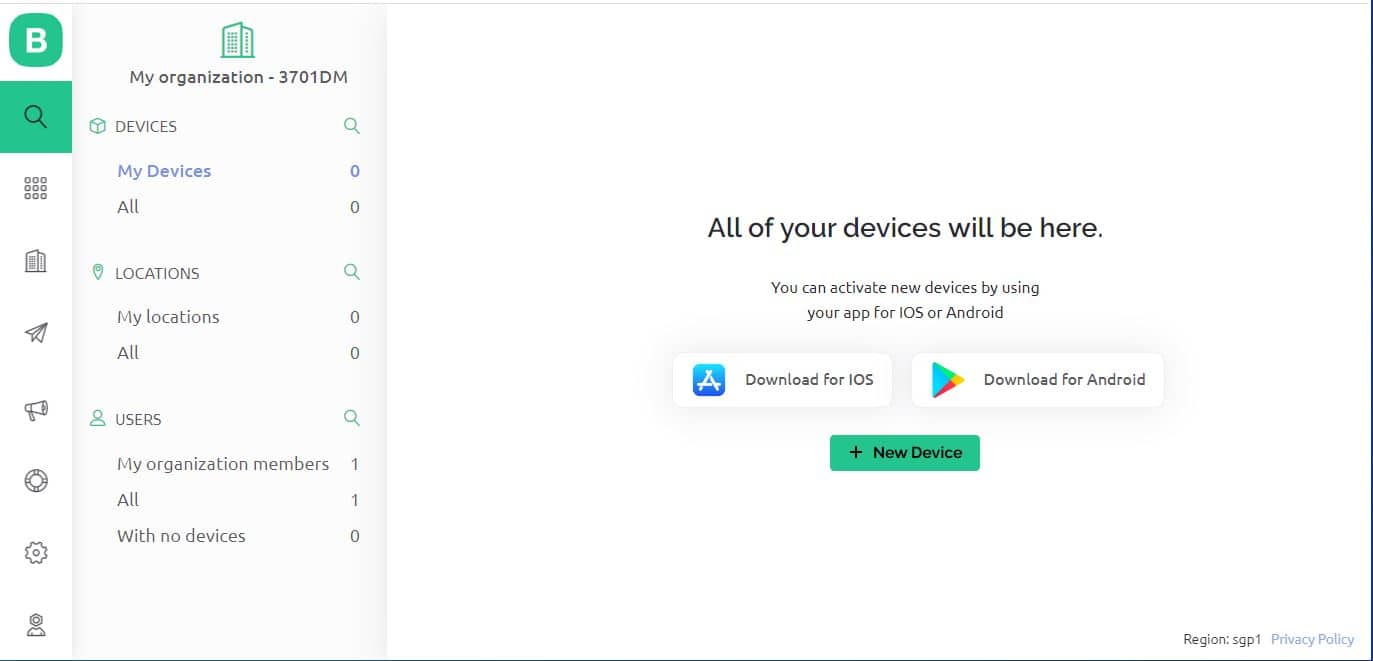
Now we need to add a ‘New Device’ now.
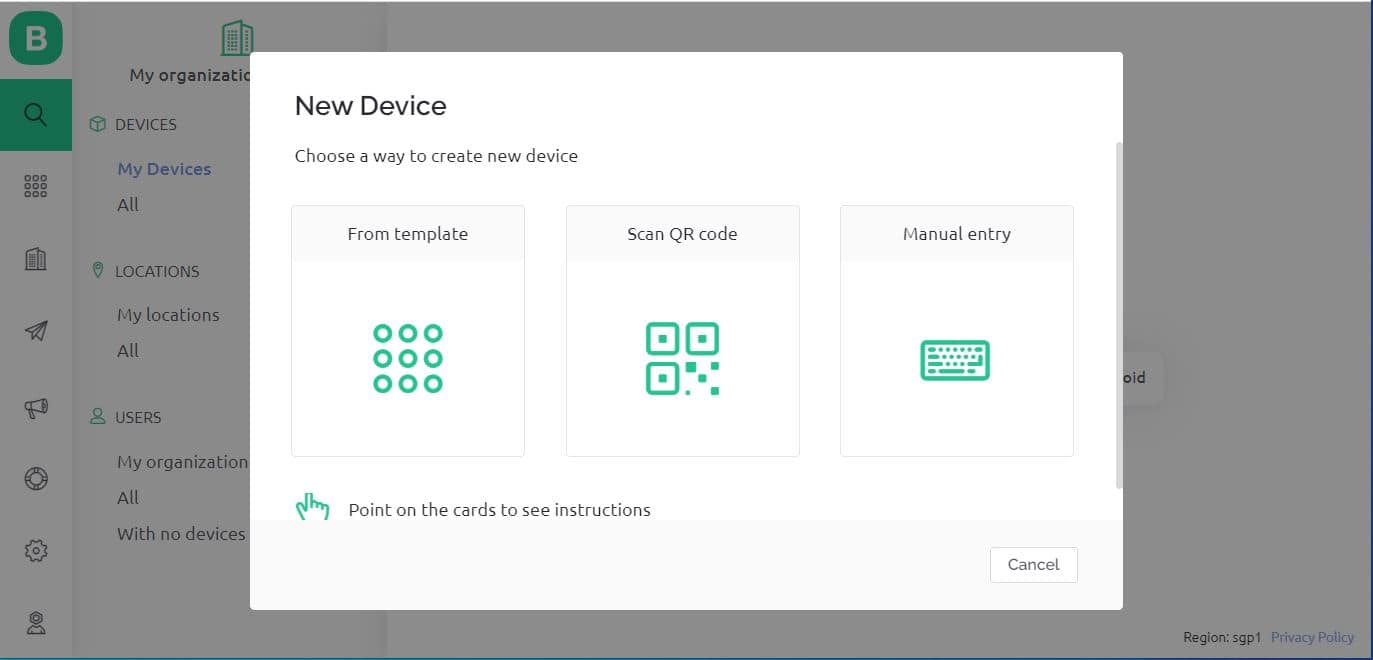
Select a New Device from ‘Template’.
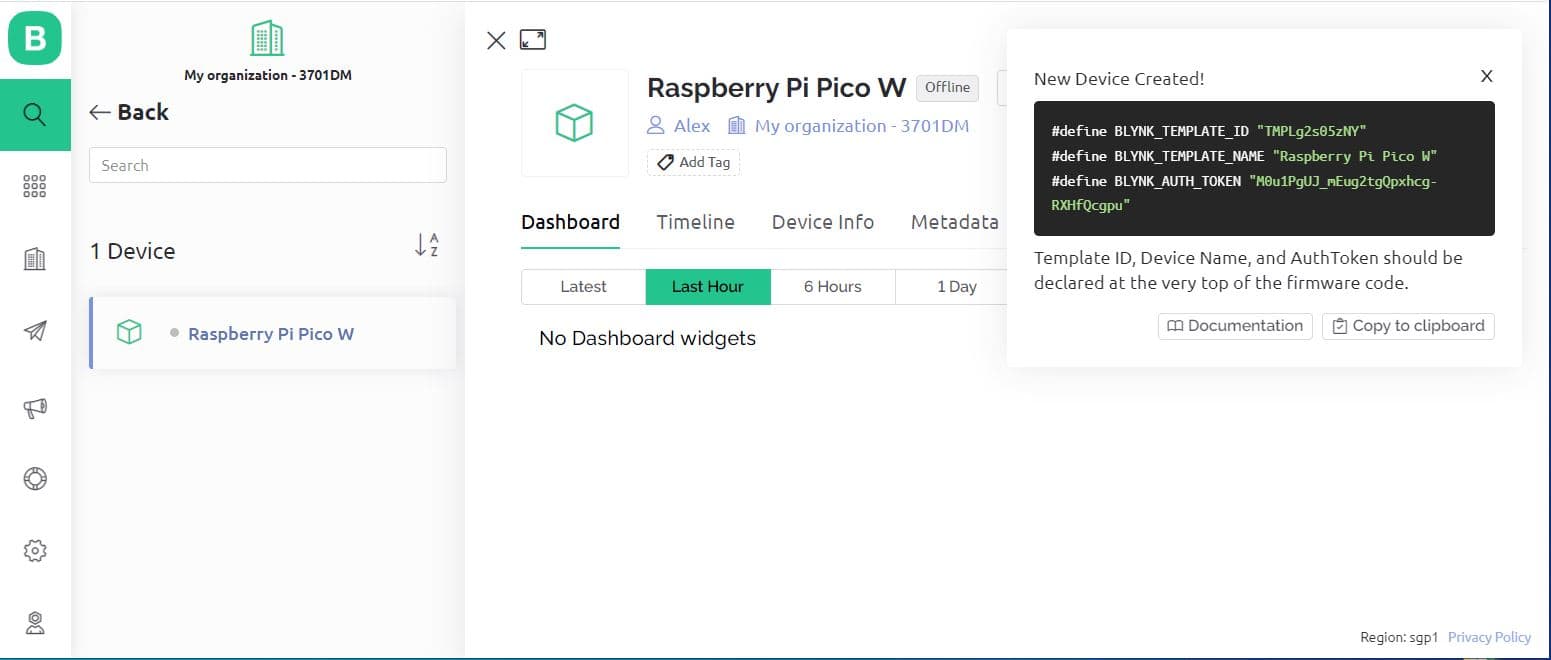
Select the device from a template that you created earlier and also give any name to the device. Click on Create.
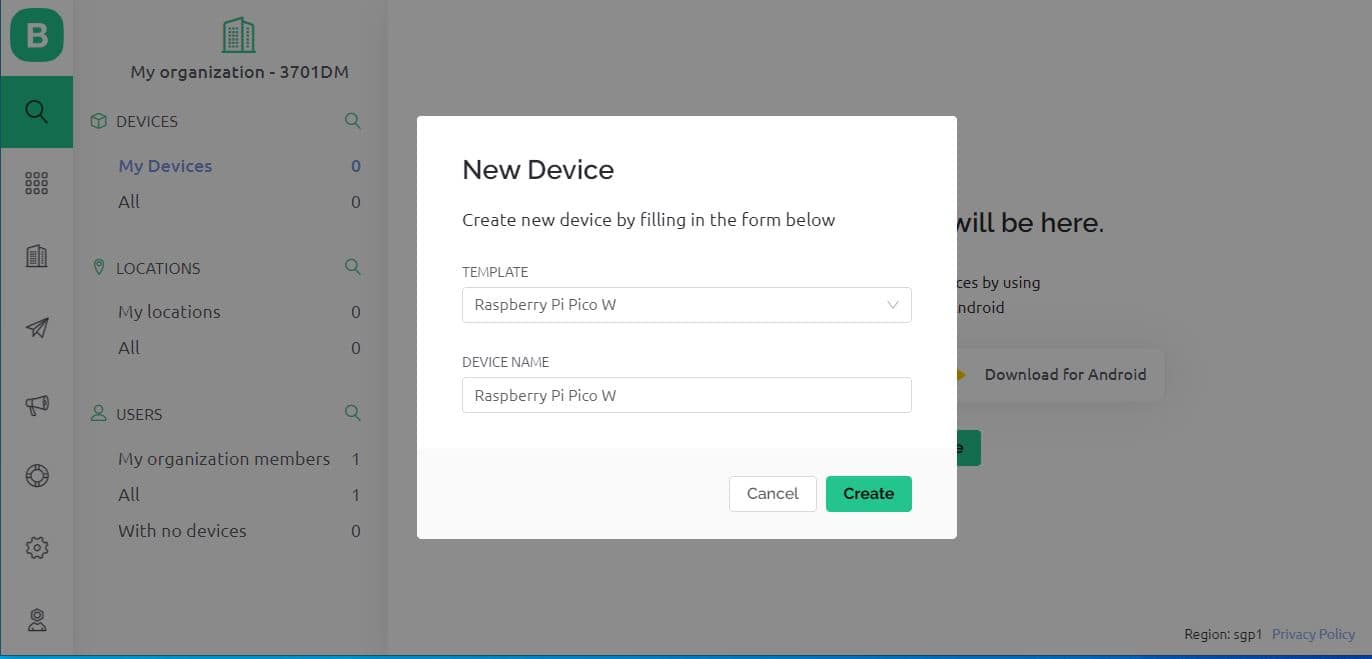
A new device will be created. You will find the Blynk Authentication Token Here. Copy it as it is necessary for the code.
Now go to the dashboard and select ‘Web Dashboard’.
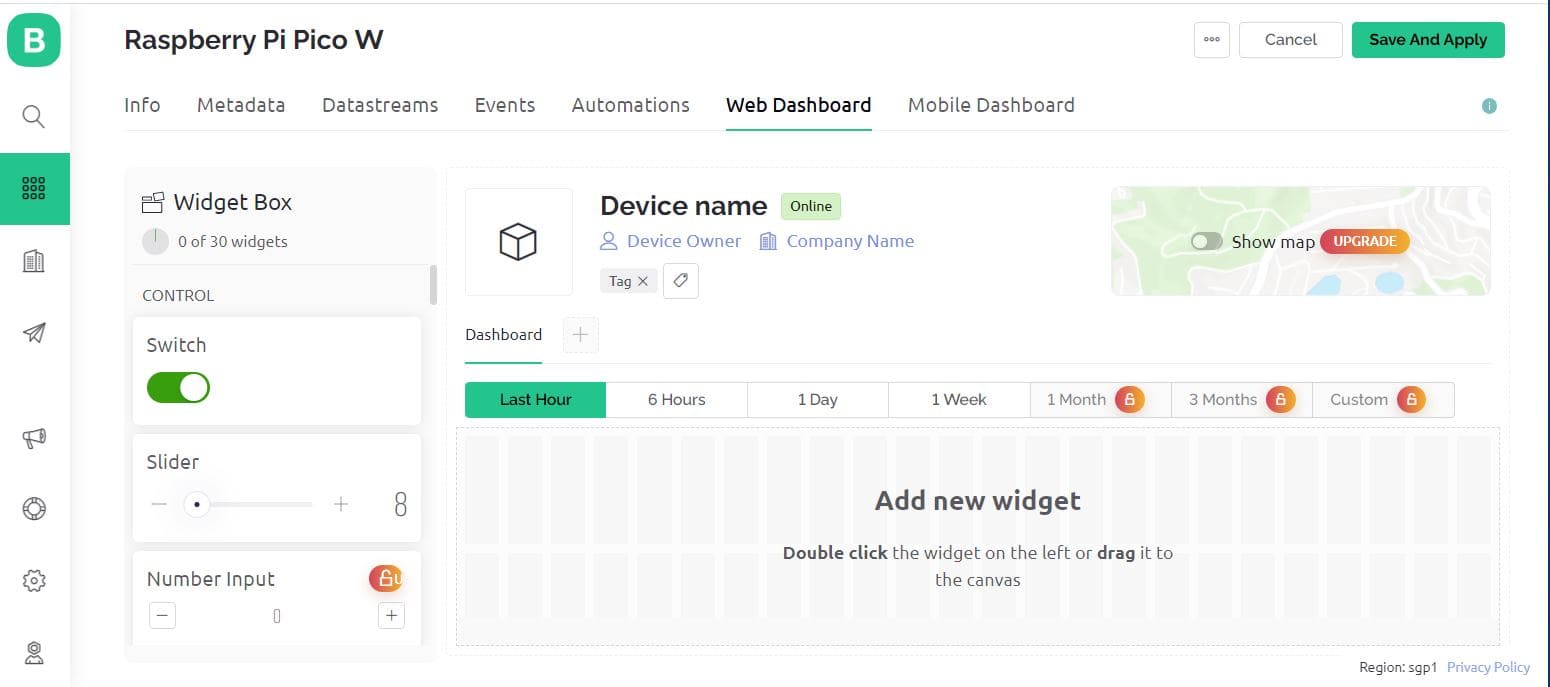
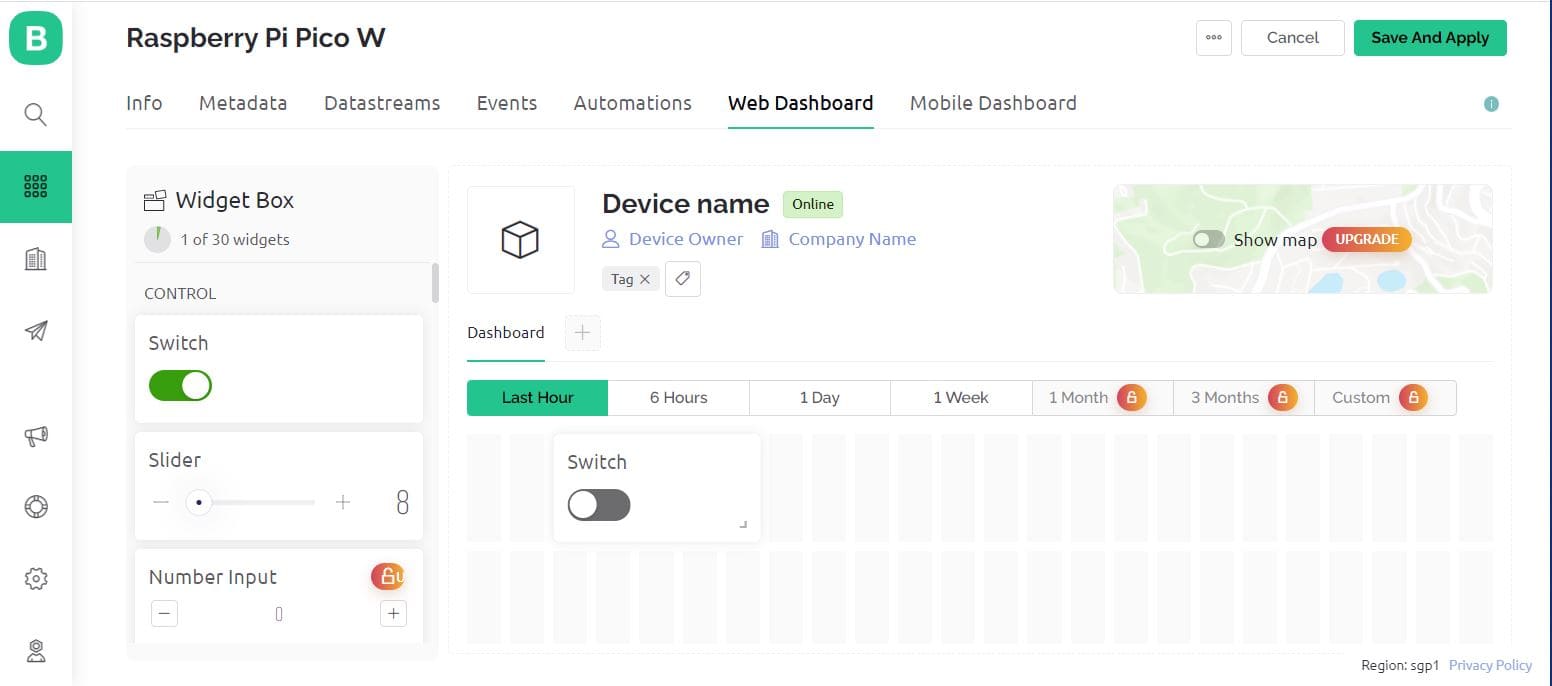
From the widget box drag a switch and place it on the dashboard screen.
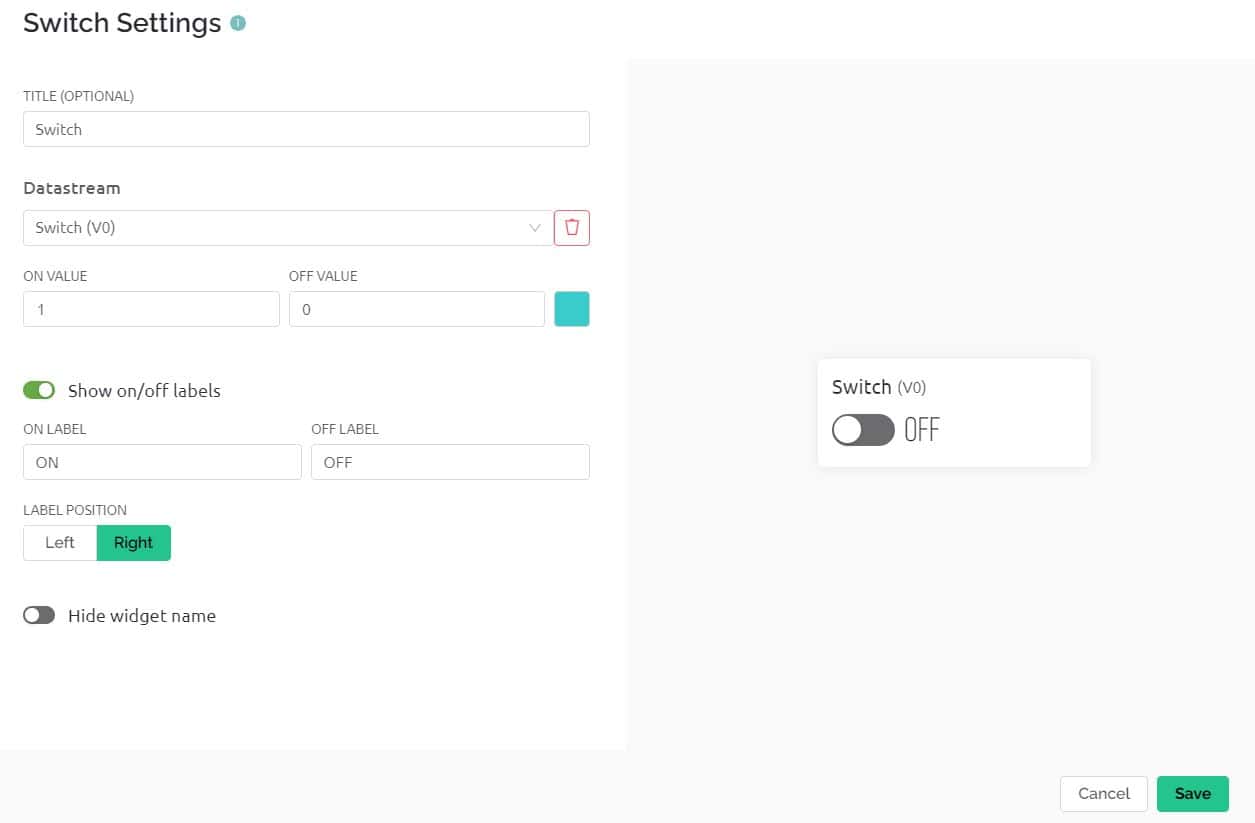
On the switch board click on Settings and here you need to set up the Switch. Give any title to it and Create Datastream as Virtual Pin.
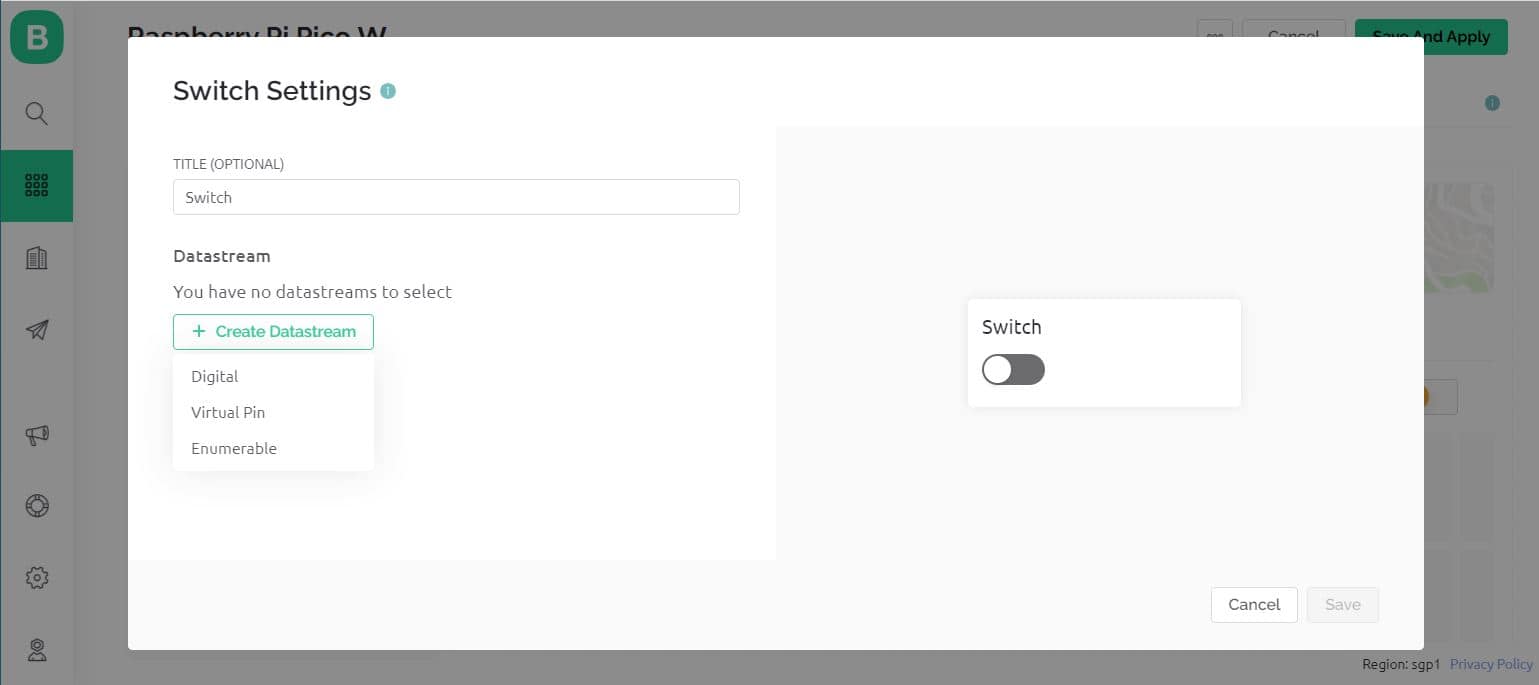
Configure the switch settings as per the image below and click on create.

Configure the final steps again.
With this Blynk dashboard set up, you can now proceed to program the Raspberry Pi Pico W board to control the LED.
To control the LED with a mobile App or Mobile Dashboard, you also need to setup the Mobile Phone Dashboard. The process is similarly explained above.
Source Code/Program
The code to Control LED using Blynk 2.0 App & Raspberry Pi Pico W is divided into two parts as BlynkLib.py and main.py. The controlling of LED requires Blynk Library for MicroPython.
BlynkLib.py
This library provides an API that enables connectivity between your IoT hardware, which supports Micropython/Python, and the Blynk Cloud. With this API, you can send both raw and processed sensor data and remotely control any connected hardware (such as relays, motors, and servos) from anywhere in the world using the Blynk mobile apps available on both iOS and Android.
Copy the following code and save it to your Raspberry Pi Pico W board with name ‘BlynkLib.py’.
|
1 2 3 4 5 6 7 8 9 10 11 12 13 14 15 16 17 18 19 20 21 22 23 24 25 26 27 28 29 30 31 32 33 34 35 36 37 38 39 40 41 42 43 44 45 46 47 48 49 50 51 52 53 54 55 56 57 58 59 60 61 62 63 64 65 66 67 68 69 70 71 72 73 74 75 76 77 78 79 80 81 82 83 84 85 86 87 88 89 90 91 92 93 94 95 96 97 98 99 100 101 102 103 104 105 106 107 108 109 110 111 112 113 114 115 116 117 118 119 120 121 122 123 124 125 126 127 128 129 130 131 132 133 134 135 136 137 138 139 140 141 142 143 144 145 146 147 148 149 150 151 152 153 154 155 156 157 158 159 160 161 162 163 164 165 166 167 168 169 170 171 172 173 174 175 176 177 178 179 180 181 182 183 184 185 186 187 188 189 190 191 192 193 194 195 196 197 198 199 200 201 202 203 204 205 206 207 208 209 210 211 212 213 214 215 216 217 218 219 220 221 222 223 224 225 226 227 228 229 230 231 232 233 234 235 236 237 238 239 240 241 242 243 244 245 246 247 248 249 250 251 252 253 254 255 256 257 258 259 260 261 262 263 264 |
# Copyright (c) 2015-2019 Volodymyr Shymanskyy. See the file LICENSE for copying permission. __version__ = "1.0.0" import struct import time import sys import os try: import machine gettime = lambda: time.ticks_ms() SOCK_TIMEOUT = 0 except ImportError: const = lambda x: x gettime = lambda: int(time.time() * 1000) SOCK_TIMEOUT = 0.05 def dummy(*args): pass MSG_RSP = const(0) MSG_LOGIN = const(2) MSG_PING = const(6) MSG_TWEET = const(12) MSG_NOTIFY = const(14) MSG_BRIDGE = const(15) MSG_HW_SYNC = const(16) MSG_INTERNAL = const(17) MSG_PROPERTY = const(19) MSG_HW = const(20) MSG_HW_LOGIN = const(29) MSG_EVENT_LOG = const(64) MSG_REDIRECT = const(41) # TODO: not implemented MSG_DBG_PRINT = const(55) # TODO: not implemented STA_SUCCESS = const(200) STA_INVALID_TOKEN = const(9) DISCONNECTED = const(0) CONNECTING = const(1) CONNECTED = const(2) print(""" ___ __ __ / _ )/ /_ _____ / /__ / _ / / // / _ \\/ '_/ /____/_/\\_, /_//_/_/\\_\\ /___/ for Python v""" + __version__ + " (" + sys.platform + ")\n") class EventEmitter: def __init__(self): self._cbks = {} def on(self, evt, f=None): if f: self._cbks[evt] = f else: def D(f): self._cbks[evt] = f return f return D def emit(self, evt, *a, **kv): if evt in self._cbks: self._cbks[evt](*a, **kv) class BlynkProtocol(EventEmitter): def __init__(self, auth, tmpl_id=None, fw_ver=None, heartbeat=50, buffin=1024, log=None): EventEmitter.__init__(self) self.heartbeat = heartbeat*1000 self.buffin = buffin self.log = log or dummy self.auth = auth self.tmpl_id = tmpl_id self.fw_ver = fw_ver self.state = DISCONNECTED self.connect() def virtual_write(self, pin, *val): self._send(MSG_HW, 'vw', pin, *val) def send_internal(self, pin, *val): self._send(MSG_INTERNAL, pin, *val) def set_property(self, pin, prop, *val): self._send(MSG_PROPERTY, pin, prop, *val) def sync_virtual(self, *pins): self._send(MSG_HW_SYNC, 'vr', *pins) def log_event(self, *val): self._send(MSG_EVENT_LOG, *val) def _send(self, cmd, *args, **kwargs): if 'id' in kwargs: id = kwargs.get('id') else: id = self.msg_id self.msg_id += 1 if self.msg_id > 0xFFFF: self.msg_id = 1 if cmd == MSG_RSP: data = b'' dlen = args[0] else: data = ('\0'.join(map(str, args))).encode('utf8') dlen = len(data) self.log('<', cmd, id, '|', *args) msg = struct.pack("!BHH", cmd, id, dlen) + data self.lastSend = gettime() self._write(msg) def connect(self): if self.state != DISCONNECTED: return self.msg_id = 1 (self.lastRecv, self.lastSend, self.lastPing) = (gettime(), 0, 0) self.bin = b"" self.state = CONNECTING self._send(MSG_HW_LOGIN, self.auth) def disconnect(self): if self.state == DISCONNECTED: return self.bin = b"" self.state = DISCONNECTED self.emit('disconnected') def process(self, data=None): if not (self.state == CONNECTING or self.state == CONNECTED): return now = gettime() if now - self.lastRecv > self.heartbeat+(self.heartbeat//2): return self.disconnect() if (now - self.lastPing > self.heartbeat//10 and (now - self.lastSend > self.heartbeat or now - self.lastRecv > self.heartbeat)): self._send(MSG_PING) self.lastPing = now if data != None and len(data): self.bin += data while True: if len(self.bin) < 5: break cmd, i, dlen = struct.unpack("!BHH", self.bin[:5]) if i == 0: return self.disconnect() self.lastRecv = now if cmd == MSG_RSP: self.bin = self.bin[5:] self.log('>', cmd, i, '|', dlen) if self.state == CONNECTING and i == 1: if dlen == STA_SUCCESS: self.state = CONNECTED dt = now - self.lastSend info = ['ver', __version__, 'h-beat', self.heartbeat//1000, 'buff-in', self.buffin, 'dev', sys.platform+'-py'] if self.tmpl_id: info.extend(['tmpl', self.tmpl_id]) info.extend(['fw-type', self.tmpl_id]) if self.fw_ver: info.extend(['fw', self.fw_ver]) self._send(MSG_INTERNAL, *info) try: self.emit('connected', ping=dt) except TypeError: self.emit('connected') else: if dlen == STA_INVALID_TOKEN: self.emit("invalid_auth") print("Invalid auth token") return self.disconnect() else: if dlen >= self.buffin: print("Cmd too big: ", dlen) return self.disconnect() if len(self.bin) < 5+dlen: break data = self.bin[5:5+dlen] self.bin = self.bin[5+dlen:] args = list(map(lambda x: x.decode('utf8'), data.split(b'\0'))) self.log('>', cmd, i, '|', ','.join(args)) if cmd == MSG_PING: self._send(MSG_RSP, STA_SUCCESS, id=i) elif cmd == MSG_HW or cmd == MSG_BRIDGE: if args[0] == 'vw': self.emit("V"+args[1], args[2:]) self.emit("V*", args[1], args[2:]) elif cmd == MSG_INTERNAL: self.emit("internal:"+args[0], args[1:]) elif cmd == MSG_REDIRECT: self.emit("redirect", args[0], int(args[1])) else: print("Unexpected command: ", cmd) return self.disconnect() import socket class Blynk(BlynkProtocol): def __init__(self, auth, **kwargs): self.insecure = kwargs.pop('insecure', False) self.server = kwargs.pop('server', 'blynk.cloud') self.port = kwargs.pop('port', 80 if self.insecure else 443) BlynkProtocol.__init__(self, auth, **kwargs) self.on('redirect', self.redirect) def redirect(self, server, port): self.server = server self.port = port self.disconnect() self.connect() def connect(self): print('Connecting to %s:%d...' % (self.server, self.port)) s = socket.socket() s.connect(socket.getaddrinfo(self.server, self.port)[0][-1]) try: s.setsockopt(socket.IPPROTO_TCP, socket.TCP_NODELAY, 1) except: pass if self.insecure: self.conn = s else: try: import ussl ssl_context = ussl except ImportError: import ssl ssl_context = ssl.create_default_context() self.conn = ssl_context.wrap_socket(s, server_hostname=self.server) try: self.conn.settimeout(SOCK_TIMEOUT) except: s.settimeout(SOCK_TIMEOUT) BlynkProtocol.connect(self) def _write(self, data): #print('<', data) self.conn.write(data) # TODO: handle disconnect def run(self): data = b'' try: data = self.conn.read(self.buffin) #print('>', data) except KeyboardInterrupt: raise except socket.timeout: # No data received, call process to send ping messages when needed pass except: # TODO: handle disconnect return self.process(data) |
main.py
Copy the following code and save it to the Raspberry Pi Pico W with name ‘main.py’.
You need to change the WiFi SSID, Password and Blynk Authentication Token on the following lines.
|
1 2 |
wlan.connect("SSID","Password") BLYNK_AUTH = '*****************************' |
Here is the complete code.
|
1 2 3 4 5 6 7 8 9 10 11 12 13 14 15 16 17 18 19 20 21 22 23 24 25 26 27 28 29 30 31 32 33 34 35 36 37 38 39 40 41 42 43 44 45 |
import time import network from machine import Pin import BlynkLib led=machine.Pin('LED', machine.Pin.OUT) led.on() wlan = network.WLAN(network.STA_IF) wlan.active(True) wlan.connect("SSID","Password") BLYNK_AUTH = '*****************************' # connect the network wait = 10 while wait > 0: if wlan.status() < 0 or wlan.status() >= 3: break wait -= 1 print('waiting for connection...') time.sleep(1) # Handle connection error if wlan.status() != 3: raise RuntimeError('network connection failed') else: print('connected') ip=wlan.ifconfig()[0] print('IP: ', ip) "Connection to Blynk" # Initialize Blynk blynk = BlynkLib.Blynk(BLYNK_AUTH) # Register virtual pin handler @blynk.on("V0") #virtual pin V0 def v0_write_handler(value): #read the value if int(value[0]) == 1: led.value(1) #turn the led on else: led.value(0) #turn the led off while True: blynk.run() |
Code Explanation
This code is a Micropython script designed to connect to a Wi-Fi network and control an LED using the Blynk app. Here is a step-by-step explanation of the code:
import timeandimport networkare used to access the time and network modules in Micropython.from machine import Pinis used to access the GPIO pins on the device.import BlynkLibis used to import the Blynk library for controlling the LED via the Blynk app.led=machine.Pin('LED', machine.Pin.OUT)creates an instance of thePinclass and sets it to output mode. TheLEDparameter specifies the pin to use for the LED.led.on()turns on the LED.wlan = network.WLAN(network.STA_IF)creates an instance of theWLANclass for connecting to a Wi-Fi network.wlan.active(True)activates the Wi-Fi connection.wlan.connect("SSID","Password")connects to the Wi-Fi network using the SSID and password specified.wait = 10sets a timer to wait for the device to connect to the Wi-Fi network.- The
whileloop checks the status of the Wi-Fi connection, and waits for a maximum of 10 seconds for the device to connect to the network. If the device is unable to connect, it raises aRuntimeError. blynk = BlynkLib.Blynk(BLYNK_AUTH)initializes the Blynk app with the specifiedBLYNK_AUTHauthentication token.@blynk.on("V0")registers the virtual pin handler for the virtual pinV0in the Blynk app.def v0_write_handler(value)is a function that reads the value of the virtual pinV0.if int(value[0]) == 1:checks if the value of the virtual pin is equal to 1.- If the value is equal to 1,
led.value(1)turns the LED on, otherwiseled.value(0)turns the LED off. blynk.run()runs the Blynk app indefinitely to handle updates to the virtual pin.
LED Control using Blynk & Raspberry Pi Pico W
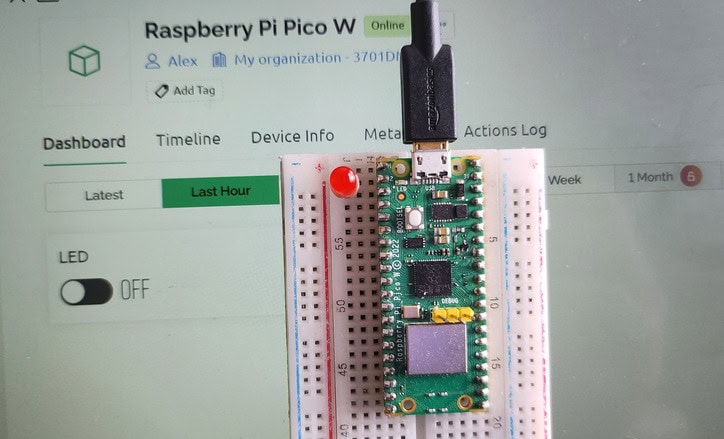
Save the above code and run it on the Pico W board.
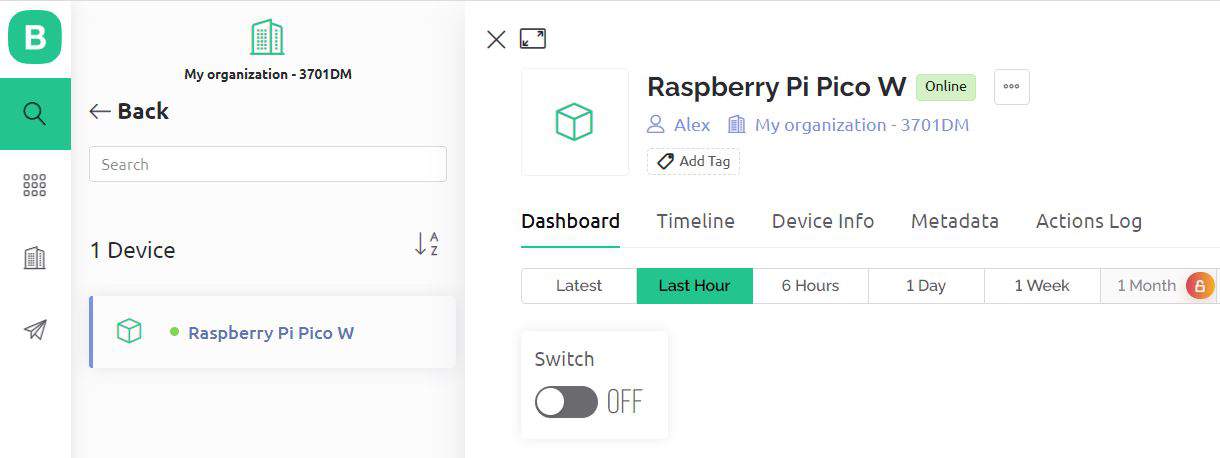
You can now test the LED control using the Blynk web app. Open the web app and navigate to the project dashboard. Click on the button widget, and the LED should turn on.

Click it again, and the LED should turn off.
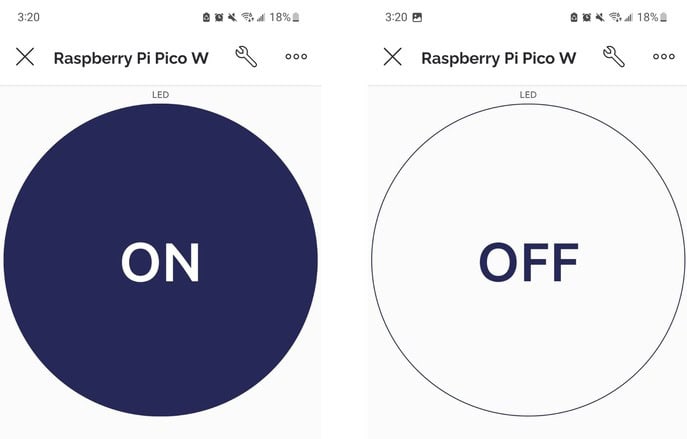
You can also control the LED using the Mobile Dashboard. Open the Blynk app and navigate to the project dashboard. Tap the button widget, and the LED should turn on. Tap it again, and the LED should turn off.
With these steps, you have successfully tested and demonstrated the LED control using the Blynk app and Raspberry Pi Pico W board. You can now use this project as a starting point to build more complex IoT projects using Blynk and MicroPython. You can use the same approach for Home Automation Project using Raspberry Pi Pico W & Blynk App.


3 Comments
thanks! just what I needed
do you have an example on how to set a value back into Blynk? for example, the same value that was set? or a value from an ADC?
Wait for a week, post is coming on that.
will do – in the meanwhile, can you point me to the documentation? all the code I could fine seems to be deprecated