

Overview
This tutorial is about interfacing C1001 60 GHz mmWave Sensor with the ESP32 Microcontroller.
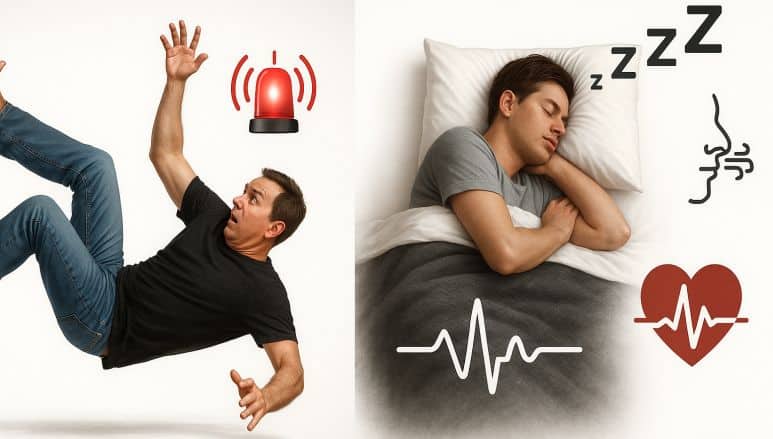
In one of my earlier guides, I explained and tested the LD2410 human presence detection module. It works well at 24 GHz and reliably tells you when someone is in the room. However, it doesn’t offer deeper insights into human activity or physiological states. That’s why today I’m introducing an upgrade: the C1001 mmWave human detection sensor, which operates at 60 GHz.
This tiny module does so much more than just “is someone here?” It can recognize posture—whether you’re standing, sitting, lying down, or even asleep—and it can tell if the subject is moving or completely still. Thanks to its onboard point-cloud imaging algorithms, it measures how long you’ve slept and assigns a sleep-quality score. It also reports fallen or static states, plus it tracks your respiration rate and heartbeat without any physical contact. It’s pretty amazing that a board this small packs in all those capabilities!
In this video, we’ll cover everything you need to get started with the C1001. We’ll review its features, capabilities, pinout, communication protocol, and the correct way to install it. Then I’ll show you how to hook it up to an ESP32 microcontroller. Finally, we’ll run three hands-on examples using your own code.
In the first example, we will explore basic presence detection with respiration and heart-rate readings. In the second example, a full sleep-tracking demo with bed entry status, awake duration, sleep quality, and turn counts can be detected and measured. Finally, in the third example, a fall-detection test reports fall duration, unattended time, dwell duration, and sensitivity can be measured.
Bill of Materials
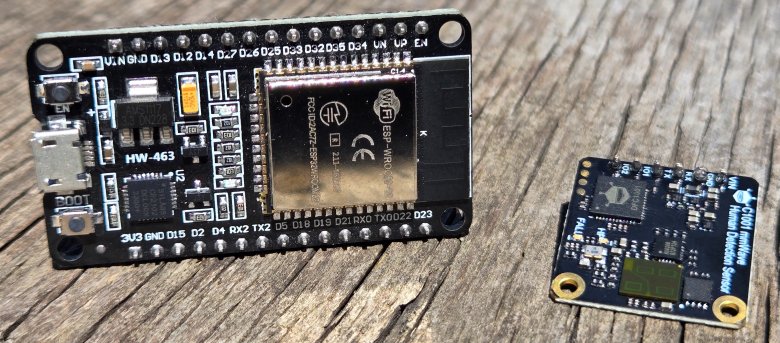
We need the following components for interfacing the C1001 60Hz mmWave Sensor with the ESP32 microcontroller.
| S.N. | Components Name | Quantity | Purchase Link |
|---|---|---|---|
| 1 | ESP32 Board | 1 | Amazon | AliExpress |
| 2 | C1001 60Hz mmWave Presence Sensor | 1 | Amazon | AliExpress |
| 3 | Connecting Wires | 10 | Amazon | AliExpress |
| 4 | Breadboard | 1 | Amazon | AliExpress |
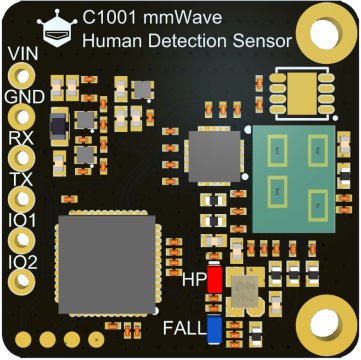
C1001 60 GHz mmWave Presence Sensor
The C1001 mmWave Human Detection Sensor is a high-precision 60 GHz millimeter-wave radar sensor engineered for advanced human detection.

Unlike standard 24 GHz sensors that only report presence, speed, and distance, the C1001 adds fall detection and sleep monitoring to its feature set. It employs up to a 1 GHz chirp bandwidth and onboard DSP to generate and process a dense point cloud, enabling posture recognition (standing, sitting, lying) and sub-millimeter micro-Doppler analysis for breathing and heartbeat. With a +6 dBm transmit power and an 11m max range, it senses both motion and static presence, outperforming PIR sensors that require movement to trigger.
The C1001’s comprehensive monitoring capabilities deliver detailed insights into human activity, improving safety and health applications while enhancing the user experience. It runs on 5 V at just 100 mA. The DFRobot C1001 mmWave Sensor can be easily interfaced with ESP32, micro:bit, and Arduino boards.
Features and Specifications of C1001 60 GHz mmWave Sensor
- Working Voltage: 5 V ± 0.1 V DC
- Working Current: ≤ 100 mA
- Operating Frequency: 61 – 61.5 GHz (1 GHz FMCW sweep)
- Transmission Power: +6 dBm EIRP
- Max Detection Distance: 11 m (0 dBsm target)
- Radar FOV: 100°×100° (fall mode), 40°×40° (sleep mode)
- Sleep Detection Range: 0.4 – 2.5 m
- Vital-Sign Range: 0.4 – 1.5 m (respiration & heartbeat)
- Respiration Rate: 10 – 25 breaths/min
- Heart Rate: 60 – 100 bpm
- Range Resolution: ~0.15 m
- Velocity Resolution: < 0.1 m/s
- UART Interface: 3.3 V TTL @ 115 200 bps
- Onboard Processor: ARM Cortex-M4 DSP
- Operating Temperature: –20 °C to +60 °C
Applications of C1001 60 GHz mmWave Sensor
- Elderly Care & Fall Alerts: Instant detection of falls and unattended duration, with configurable sensitivity for different body weights.
- Sleep Tracking: In-bed/out-of-bed status, deep vs. light sleep staging, turn counts, and sleep-quality scoring—no wearable required.
- Vital Sign Monitoring: Continuous, contactless measurement of breathing and heart rates in hospital wards or home settings.
- Smart Building Occupancy: Fine-grained presence and activity analytics for HVAC and lighting control.
- Security & Behavioral Analytics: Distinguish standing vs. sitting vs. lying—detect loitering or unauthorized behavior in restricted zones.
Integrated Fall Detection Function with C1001 60 GHz mmWave Sensor
The C1001 leverages its 60 GHz FMCW radar front end and multi-channel point-cloud imaging to deliver precision fall detection. Each chirp sweeps a 1 GHz bandwidth across the 61–61.5 GHz band at up to 20 kHz PRF, generating thousands of virtual antenna elements via MIMO processing. Onboard DSP clusters these returns into a 3D point cloud, then applies a posture‐classification neural network to distinguish upright, sitting, and prone postures.

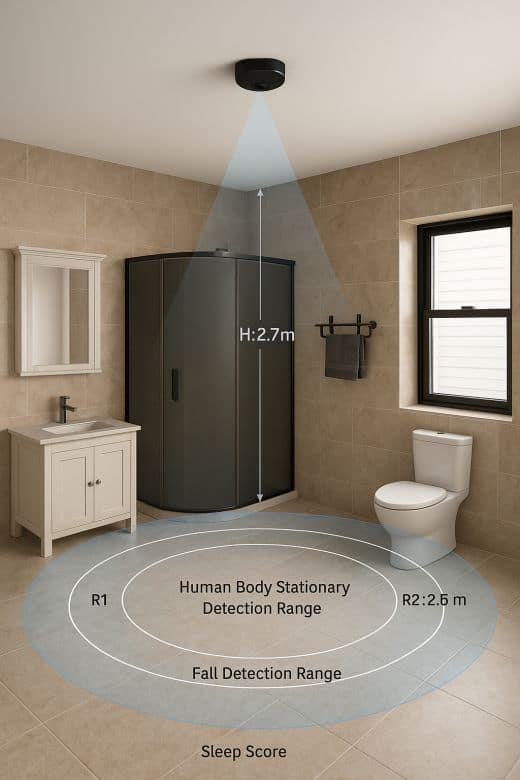
When a rapid transition to “lying” posture is detected—using a velocity threshold of ~0.5 m/s and a height‐drop criterion of ≥0.3 m—the sensor flags a fall event. It then measures “immobility duration” by monitoring whether the point cloud centroid remains within a 0.2 m radius for longer than a user‐configurable timeout (default 5 s). Ceiling‐mounted at 2.7 m, the C1001 covers an 11 m × 11 m × 3 m volume (100°×100° FOV), ensuring both rapid fall recognition and reliable static‐body detection—capabilities that passive infrared or ultrasonic sensors cannot match.
Comprehensive Sleep Monitoring with C1001 60 GHz mmWave Sensor
In sleep mode, the C1001 switches to a 40° × 40° beam with a 30–45° downward tilt, optimized for a 0.4–2.5 m range over the mattress. It continuously analyzes subtle micro‐Doppler shifts (< 1 mm displacement) from chest wall motion to extract respiration waveforms, using a bandpass filter (0.1–0.5 Hz) and peak‐detection algorithm to compute breath rate (1–25 bpm). Simultaneously, it captures higher‐frequency cardiac micro‐movements (0.8–1.7 Hz), isolating heartbeat pulses via a second bandpass stage (0.8–2.0 Hz) and calculating beats‐per‐minute (60–100 bpm).
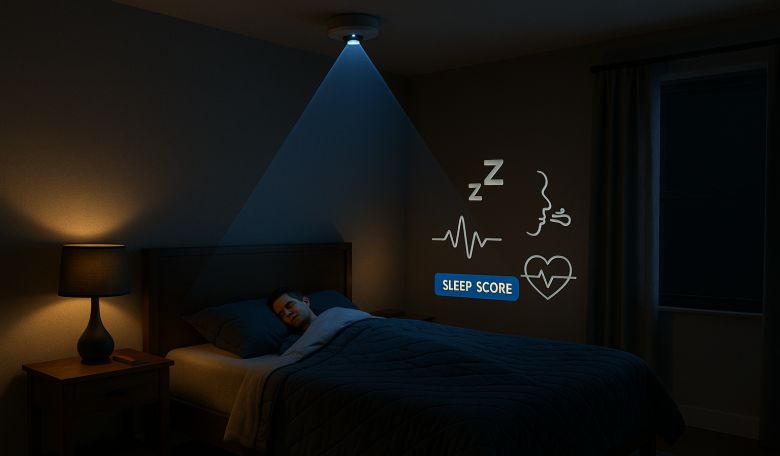
Over an entire sleep session, the onboard firmware aggregates these metrics with movement‐based actigraphy—tracking turn counts, bed‐entry/exit events, and wake epochs—to compute a composite sleep‐quality score. This multi‐parameter approach provides nuanced insights into sleep architecture (light vs. deep stages), breathing irregularities, and overall restfulness, all without any wearable device.
C1001 Installation Method
1. Sleep-Monitoring Mounting:
The radar beam coverage range is as shown in the figure below:
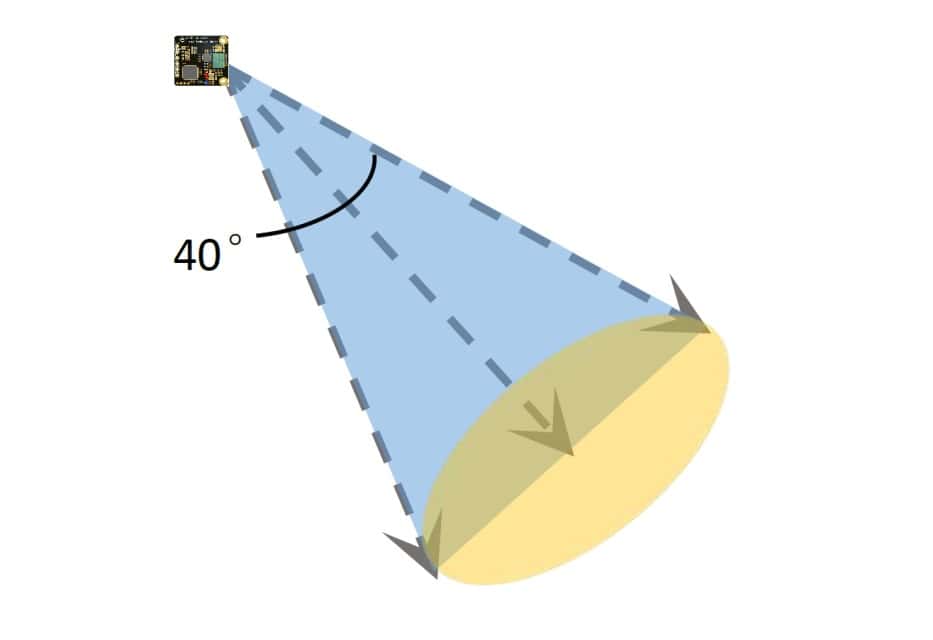
The radar direction is required as below:
-
- Side-of-Bed or Ceiling-Tilt: Mount at ceiling height with a 30–45° downward tilt, creating a stereoscopic fan over the bed.
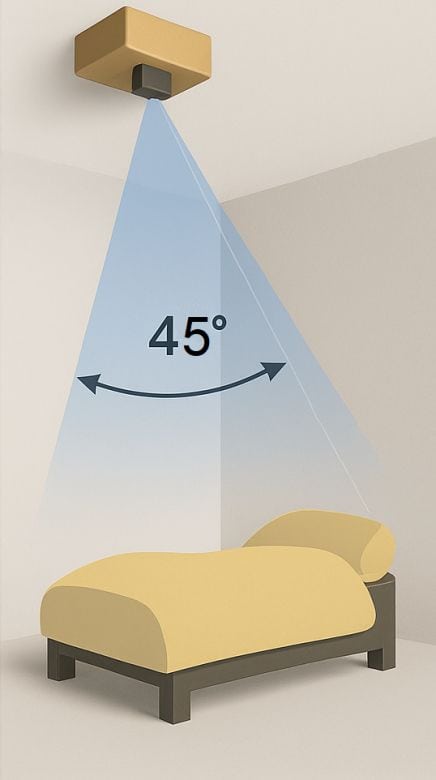
- Beam Focus: Ensure the 40° × 40° beam fully covers the mattress area without significant side-lobe reflections.
2. Fall-Detection Mounting:
- Ceiling Installation: Centered above the monitored area, 2.5–3 m high, for a full 100° × 100° coverage.
- Orientation: Sensor face parallel to the floor; avoid obstructions (furniture, large metal surfaces).
3. Environmental Considerations:
- Temperature/Humidity: Operate within the specified range—extreme cold/humidity can degrade micro-Doppler sensitivity.
- Interference: Keep away from 60 GHz Wi-Fi links or other radar sources; the DFRobot library includes basic interference rejection, but optimal isolation is recommended.
- Enclosure: If housing in a protective case, use radar-transparent materials (ABS, PTFE) and maintain at least 1 cm clearance on all sides.
Interfacing C1001 60 GHz mmWave Sensor with ESP32
C1001 60 GHz mmWave Sensor with the ESP32 microcontroller. The connection is very simple, as shown in the table below:
| Sensor Pin | ESP32 Pin | Description |
|---|---|---|
| VCC | VIN (5 V input) | Provide stable 5 V (e.g. from USB-power) |
| GND | GND | Common ground reference |
| TX | GPIO16 (RX2) | UART2 RX: sensor → ESP32 |
| RX | GPIO17 (TX2) | UART2 TX: (not required for uni-directional) |

The ESP32’s VIN pin outputs ~5 V when USB-powered, which is sufficient for the C1001 sensor. As C1001 is a UART module, we will useSerial2.begin(115200, SERIAL_8N1, 16, 17) In our Arduino sketch.
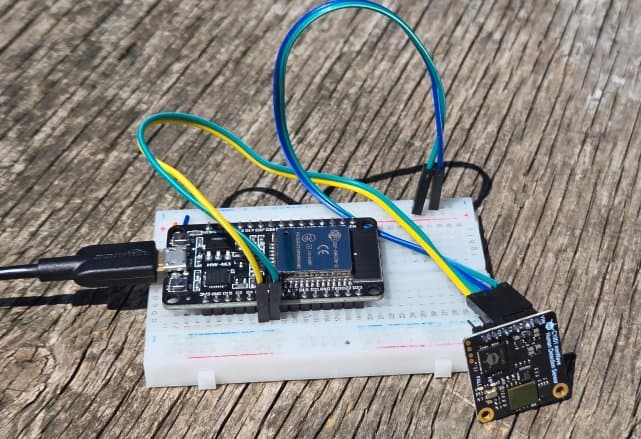
You may simply use a breadboard and jumper wires to connect C1001 with ESP32.
Example 1: Presence Information & Respiration Rate & Heart Rate Acquisition
In the first example for C1001 & ESP32 usage, we switch the C1001 into sleep mode (which is also used to extract vital signs) and then continuously poll five key data points:
- Human Presence (
eHumanPresence) – a simple binary flag that tells you whether anyone is in the module’s field of view. - Motion State (
eHumanMovement)– a three-state indicator (None, Still, Active) that lets you distinguish a completely static person from one who’s merely standing versus walking or gesturing. - Movement Amplitude (
eHumanMovingRange) – a numeric value representing how far the centroid of the point cloud is shifting, so you can quantify micro-movements (e.g., fidgeting) versus gross motion. - Respiration Rate (
getBreatheValue()) – measured in breaths per minute with ±1 bpm accuracy, enabling you to track breathing patterns without any wearables. - Heart Rate (
getHeartRate()) – measured in beats per minute (60–100 bpm range), derived from micro-Doppler chest wall motion.
Before moving to the coding part, you need to add the DFRobot C1001 Human Detection library to the Arduino IDE. This is a driver library for human millimeter-wave detection, capable of detecting respiratory sleep and fall detection functions.
Source Code/Program
|
1 2 3 4 5 6 7 8 9 10 11 12 13 14 15 16 17 18 19 20 21 22 23 24 25 26 27 28 29 30 31 32 33 34 35 36 37 38 39 40 41 42 43 44 45 46 47 48 49 50 51 52 53 54 55 56 57 58 59 60 61 62 63 64 65 66 67 68 69 70 71 72 73 74 75 76 77 78 79 80 81 82 83 84 85 86 87 |
#include "DFRobot_HumanDetection.h" DFRobot_HumanDetection hu(&Serial1); void setup() { Serial.begin(115200); Serial1.begin(115200, SERIAL_8N1, 16, 17); Serial.println("Start initialization"); while (hu.begin() != 0) { Serial.println("init error!!!"); delay(1000); } Serial.println("Initialization successful"); Serial.println("Start switching work mode"); while (hu.configWorkMode(hu.eSleepMode) != 0) { Serial.println("error!!!"); delay(1000); } Serial.println("Work mode switch successful"); Serial.print("Current work mode:"); switch (hu.getWorkMode()) { case 1: Serial.println("Fall detection mode"); break; case 2: Serial.println("Sleep detection mode"); break; default: Serial.println("Read error"); } hu.configLEDLight(hu.eHPLed, 1); // Set HP LED switch, it will not light up even if the sensor detects a person when set to 0. hu.sensorRet(); // Module reset, must perform sensorRet after setting data, otherwise the sensor may not be usable Serial.print("HP LED status:"); switch (hu.getLEDLightState(hu.eHPLed)) { case 0: Serial.println("Off"); break; case 1: Serial.println("On"); break; default: Serial.println("Read error"); } Serial.println(); Serial.println(); } void loop() { Serial.print("Existing information:"); switch (hu.smHumanData(hu.eHumanPresence)) { case 0: Serial.println("No one is present"); break; case 1: Serial.println("Someone is present"); break; default: Serial.println("Read error"); } Serial.print("Motion information:"); switch (hu.smHumanData(hu.eHumanMovement)) { case 0: Serial.println("None"); break; case 1: Serial.println("Still"); break; case 2: Serial.println("Active"); break; default: Serial.println("Read error"); } Serial.printf("Body movement parameters:%d\n", hu.smHumanData(hu.eHumanMovingRange)); Serial.printf("Respiration rate:%d\n", hu.getBreatheValue()); Serial.printf("Heart rate:%d\n", hu.getHeartRate()); Serial.println(); delay(1000); } |
Testing & Results
After uploading the example-1 sketch to the ESP32 and opening the Serial Monitor at 115200 baud, we positioned a volunteer roughly 1 m in front of the ceiling-mounted C1001.
We first stayed still for 15s, then performed deliberate motions (raising arms, shifting stance) for another 15s, repeating this cycle three times. Throughout, we compared the sensor’s “Motion information” flag (None/Still/Active) against our actual movements. Simultaneously, we manually counted breaths (via chest rise) and measured heart rate (via wrist pulse) over 30s intervals to verify the radar’s vital-sign readings.
The module consistently reported “Someone is present” whenever the subject remained within its 0.4–1.5 m vital-sign range. During motion segments, “Motion information: Active” appeared, while true stillness triggered “Still.” The “Body movement parameters” numeric value rose from ~1–2 (minor fidgets) to >20 during full-arm swings.
Respiration readings stabilized at 15–16 bpm, matching our manual count within ±1 bpm. Heart-rate outputs ranged from 72–82 bpm, closely tracking the volunteer’s measured pulse.
Example 2: Sleep Information Acquisition
In the 2nd example for C1001 & ESP32, we will collect the sleep information data. This sketch switches the C1001 into Sleep Detection mode and then streams a rich set of sleep metrics every second:
- Bed Entry Status (
eInOrNotInBed): Detects whether the subject is “In bed” or “Out of bed.” - Sleep State (
eSleepState): Classifies the current stage as Deep Sleep, Light Sleep, or Awake. - Awake & Deep-Sleep Durations: Reports how many seconds the subject has spent awake and in deep sleep so far.
- Instant Sleep Quality Score (
eSleepQuality): A real-time score (0–100) reflecting current sleep performance.
It then gathers a composite sleep summary via getSleepComposite() including:
- Average Respiration & Heart Rates over the session
- Number of Turns (large posture changes)
- Proportions of Major vs. Minor Body Movements
- Apnea Event Count
Next, the code reads Sleep Disturbances (eSleepDisturbances), flagging issues like too-short (<4 h) or too-long (>12 h) sleep, or prolonged absence.
Finally, once the sleep session ends, getSleepStatistics() returns full-night statistics:
- Overall Sleep Quality Score
- Percentages of Awake, Light, and Deep Sleep
- Total Out-of-Bed Time & Number of Exits
- Total Turn Count
- Average Respiration & Heart Rates
Source Code/Program
|
1 2 3 4 5 6 7 8 9 10 11 12 13 14 15 16 17 18 19 20 21 22 23 24 25 26 27 28 29 30 31 32 33 34 35 36 37 38 39 40 41 42 43 44 45 46 47 48 49 50 51 52 53 54 55 56 57 58 59 60 61 62 63 64 65 66 67 68 69 70 71 72 73 74 75 76 77 78 79 80 81 82 83 84 85 86 87 88 89 90 91 92 93 94 95 96 97 98 99 100 101 102 103 104 105 106 107 108 109 110 111 112 113 114 115 116 117 118 119 120 121 122 123 124 125 126 127 128 129 130 131 132 133 134 135 136 137 138 139 140 141 142 143 144 145 146 147 148 149 150 151 152 153 154 155 156 157 158 159 160 161 162 163 164 165 166 167 168 169 170 171 172 173 174 175 176 177 178 179 180 181 182 183 184 185 186 187 188 189 190 191 192 193 194 195 196 197 |
#include "DFRobot_HumanDetection.h" DFRobot_HumanDetection hu(&Serial1); void setup() { Serial.begin(115200); Serial1.begin(115200, SERIAL_8N1, 16, 17); Serial.println("Start initialization"); while (hu.begin() != 0) { Serial.println("init error!!!"); delay(1000); } Serial.println("Initialization successful"); Serial.println("Start switching work mode"); while (hu.configWorkMode(hu.eSleepMode) != 0) { Serial.println("error!!!"); delay(1000); } Serial.println("Work mode switch successful"); Serial.print("Current work mode:"); switch (hu.getWorkMode()) { case 1: Serial.println("Fall detection mode"); break; case 2: Serial.println("Sleep detection mode"); break; default: Serial.println("Read error"); } hu.configLEDLight(hu.eHPLed, 1); // Set HP LED switch hu.sensorRet(); // Module reset, must perform sensorRet after setting data, otherwise the sensor may not be usable Serial.print("HP LED status:"); switch (hu.getLEDLightState(hu.eHPLed)) { case 0: Serial.println("Off"); break; case 1: Serial.println("On"); break; default: Serial.println("Read error"); } Serial.println(); Serial.println(); } void loop() { Serial.print("Bed entry status:"); switch (hu.smSleepData(hu.eInOrNotInBed)) { case 0: Serial.println("Out of bed"); break; case 1: Serial.println("In bed"); break; default: Serial.println("Read error"); } Serial.print("Sleep status:"); switch (hu.smSleepData(hu.eSleepState)) { case 0: Serial.println("Deep sleep"); break; case 1: Serial.println("Light sleep"); break; case 2: Serial.println("Awake"); break; case 3: Serial.println("None"); break; default: Serial.println("Read error"); } Serial.printf("Awake duration: %d\n", hu.smSleepData(hu.eWakeDuration)); Serial.printf("Deep sleep duration: %d\n", hu.smSleepData(hu.eDeepSleepDuration)); Serial.printf("Sleep quality score: %d\n", hu.smSleepData(hu.eSleepQuality)); sSleepComposite comprehensiveState = hu.getSleepComposite(); Serial.println("Comprehensive sleep status:{"); Serial.print("\tExistence status: "); switch (comprehensiveState.presence) { case 0: Serial.println("No one"); break; case 1: Serial.println("Someone is present"); break; default: Serial.println("Read error"); } Serial.print("\tSleep status:"); switch (comprehensiveState.sleepState) { case 0: Serial.println("Deep sleep"); break; case 1: Serial.println("Light sleep"); break; case 2: Serial.println("Awake"); break; case 3: Serial.println("None"); break; default: Serial.println("Read error"); } Serial.printf("\tAverage respiration rate: %d\n", comprehensiveState.averageRespiration); Serial.printf("\tAverage heart rate: %d\n", comprehensiveState.averageHeartbeat); Serial.printf("\tNumber of turns: %d\n", comprehensiveState.turnoverNumber); Serial.printf("\tProportion of significant body movement: %d\n", comprehensiveState.largeBodyMove); Serial.printf("\tProportion of minor body movement: %d\n", comprehensiveState.minorBodyMove); Serial.printf("\tNumber of apneas: %d\n", comprehensiveState.apneaEvents); Serial.println("}"); Serial.print("Sleep abnormalities:"); switch (hu.smSleepData(hu.eSleepDisturbances)) { case 0: Serial.println("Sleep duration less than 4 hours"); break; case 1: Serial.println("Sleep duration more than 12 hours"); break; case 2: Serial.println("Long time abnormal absence of person"); break; case 3: Serial.println("None"); break; default: Serial.println("Read error"); } sSleepStatistics statistics = hu.getSleepStatistics(); // Get sleep statistics, the sensor reports the whole night's sleep statistics data when it judges the sleep process to be over. Serial.println("Sleep statistics:{"); Serial.printf("\tSleep quality score: %d\n", statistics.sleepQualityScore); Serial.printf("\tProportion of awake time: %d\n", statistics.sleepTime); Serial.printf("\tProportion of light sleep time: %d\n", statistics.wakeDuration); Serial.printf("\tProportion of light sleep time: %d\n", statistics.shallowSleepPercentage); Serial.printf("\tProportion of deep sleep time: %d\n", statistics.deepSleepPercentage); Serial.printf("\tOut of bed duration: %d\n", statistics.timeOutOfBed); Serial.printf("\tNumber of times out of bed: %d\n", statistics.exitCount); Serial.printf("\tNumber of turns: %d\n", statistics.turnOverCount); Serial.printf("\tAverage respiration: %d\n", statistics.averageRespiration); Serial.printf("\tAverage heartbeat: %d\n", statistics.averageHeartbeat); Serial.println("}"); Serial.print("Sleep quality rating: "); switch (hu.smSleepData(hu.eSleepQualityRating)) { case 0: Serial.println("None"); break; case 1: Serial.println("Good sleep quality"); break; case 2: Serial.println("Average sleep quality"); break; case 3: Serial.println("Poor sleep quality"); break; default: Serial.println("Read error"); } Serial.print("Abnormal struggle status: "); switch (hu.smSleepData(hu.eAbnormalStruggle)) { case 0: Serial.println("None"); break; case 1: Serial.println("Normal status"); break; case 2: Serial.println("Abnormal struggle status"); break; default: Serial.println("Read error"); } Serial.println(); Serial.println(); delay(1000); } |
Testing & Results
After uploading the “Sleep Information Acquisition” sketch to the ESP32 and opening the Serial Monitor at 115 200 baud, we positioned the volunteer in bed directly beneath the C1001 sensor (≈1 m distance, 30–45° downward tilt).
It instantly recognizes when someone settles into bed, flipping its internal state to “In bed” the moment it senses a human presence within the sleep-mode detection cone. Once calibrated, the sensor continuously classifies each second of data into wake, light-sleep, or deep-sleep stages, turning raw micro-Doppler echoes into meaningful sleep-stage labels. Simultaneously, it extracts and averages the subject’s respiration and heart rates, delivering real-time vital-sign trends without a single wire or wearable device attached to the body.
Beyond just stages and vitals, the module tallies movement events—counting significant posture changes (turns), minor fidgets, and even potential apnea episodes—then integrates these metrics into a running sleep-quality score. At the end of a full sleep session, it consolidates everything into a comprehensive night-time report: total time spent in each sleep stage, percentage breakdowns, number of bed exits, average breathing and heart rates, and an overall sleep-quality rating (Good/Average/Poor).
Example 3: Fall Information Acquisition
In the 3rd example code for C1001 and ESP32, we acquire fall information. The code does the following task:
- Installation Parameters: Reads and configures installation height, fall-delay time, unmanned-delay time, dwell time, and sensitivity.
- Human Presence: Reports “Someone is present” or “No one is present.”
- Motion State: Indicates None, Still, or Active movement.
- Movement Amplitude: Raw point-cloud shift value.
- Fall Status: Flags “Fallen” when a rapid height drop matches a fall pattern.
- Stationary Dwell: Detects when a person remains motionless on the floor beyond the configured dwell threshold.
Source Code/Program
|
1 2 3 4 5 6 7 8 9 10 11 12 13 14 15 16 17 18 19 20 21 22 23 24 25 26 27 28 29 30 31 32 33 34 35 36 37 38 39 40 41 42 43 44 45 46 47 48 49 50 51 52 53 54 55 56 57 58 59 60 61 62 63 64 65 66 67 68 69 70 71 72 73 74 75 76 77 78 79 80 81 82 83 84 85 86 87 88 89 90 91 92 93 94 95 96 97 98 99 100 101 102 103 104 105 106 107 108 109 110 111 112 113 114 115 116 117 118 119 120 121 122 123 124 125 126 127 128 129 130 |
#include "DFRobot_HumanDetection.h" DFRobot_HumanDetection hu(&Serial1); void setup() { Serial.begin(115200); Serial1.begin(115200, SERIAL_8N1, 16, 17); Serial.println("Start initialization"); while (hu.begin() != 0) { Serial.println("init error!!!"); delay(1000); } Serial.println("Initialization successful"); Serial.println("Start switching work mode"); while (hu.configWorkMode(hu.eFallingMode) != 0) { Serial.println("error!!!"); delay(1000); } Serial.println("Work mode switch successful"); hu.configLEDLight(hu.eFALLLed, 1); // Set HP LED switch, it will not light up even if the sensor detects a person present when set to 0. hu.configLEDLight(hu.eHPLed, 1); // Set FALL LED switch, it will not light up even if the sensor detects a person falling when set to 0. hu.dmInstallHeight(270); // Set installation height, it needs to be set according to the actual height of the surface from the sensor, unit: CM. hu.dmFallTime(5); // Set fall time, the sensor needs to delay the current set time after detecting a person falling before outputting the detected fall, this can avoid false triggering, unit: seconds. hu.dmUnmannedTime(1); // Set unattended time, when a person leaves the sensor detection range, the sensor delays a period of time before outputting a no person status, unit: seconds. hu.dmFallConfig(hu.eResidenceTime, 200); // Set dwell time, when a person remains still within the sensor detection range for more than the set time, the sensor outputs a stationary dwell status. Unit: seconds. hu.dmFallConfig(hu.eFallSensitivityC, 3); // Set fall sensitivity, range 0~3, the larger the value, the more sensitive. hu.sensorRet(); // Module reset, must perform sensorRet after setting data, otherwise the sensor may not be usable. Serial.print("Current work mode:"); switch (hu.getWorkMode()) { case 1: Serial.println("Fall detection mode"); break; case 2: Serial.println("Sleep detection mode"); break; default: Serial.println("Read error"); } Serial.print("HP LED status:"); switch (hu.getLEDLightState(hu.eHPLed)) { case 0: Serial.println("Off"); break; case 1: Serial.println("On"); break; default: Serial.println("Read error"); } Serial.print("FALL status:"); switch (hu.getLEDLightState(hu.eFALLLed)) { case 0: Serial.println("Off"); break; case 1: Serial.println("On"); break; default: Serial.println("Read error"); } Serial.printf("Radar installation height: %d cm\n", hu.dmGetInstallHeight()); Serial.printf("Fall duration: %d seconds\n", hu.getFallTime()); Serial.printf("Unattended duration: %d seconds\n", hu.getUnmannedTime()); Serial.printf("Dwell duration: %d seconds\n", hu.getStaticResidencyTime()); Serial.printf("Fall sensitivity: %d \n", hu.getFallData(hu.eFallSensitivity)); Serial.println(); Serial.println(); } void loop() { Serial.print("Existing information:"); switch (hu.smHumanData(hu.eHumanPresence)) { case 0: Serial.println("No one is present"); break; case 1: Serial.println("Someone is present"); break; default: Serial.println("Read error"); } Serial.print("Motion information:"); switch (hu.smHumanData(hu.eHumanMovement)) { case 0: Serial.println("None"); break; case 1: Serial.println("Still"); break; case 2: Serial.println("Active"); break; default: Serial.println("Read error"); } Serial.printf("Body movement parameters:%d\n", hu.smHumanData(hu.eHumanMovingRange)); Serial.print("Fall status:"); switch (hu.getFallData(hu.eFallState)) { case 0: Serial.println("Not fallen"); break; case 1: Serial.println("Fallen"); break; default: Serial.println("Read error"); } Serial.print("Stationary dwell status:"); switch (hu.getFallData(hu.estaticResidencyState)) { case 0: Serial.println("No stationary dwell"); break; case 1: Serial.println("Stationary dwell present"); break; default: Serial.println("Read error"); } Serial.println(); delay(1000); } |
Testing & Results
We mounted the C1001 at 2.7 m height in “Fall Detection” mode, then positioned a volunteer directly beneath it. With the Serial Monitor at 115200 bps, we alternated between standing perfectly still and making broad arm swings—without actually falling—to verify the sensor’s motion and fall logic.
Presence & Motion:
- “Someone is present” consistently whenever the volunteer stayed under the beam.
- “Still” reported during true motionlessness (e.g. Body movement parameters ≈ 1).
- “Active” reported on movement, with parameter spikes (e.g. 23 during large arm swings, 8–2 for smaller shifts).
Fall & Dwell Status:
- “Fall status: Not fallen” throughout non-fall tests—no false positives.
- “No stationary dwell” as expected, since the volunteer never remained prone long enough to trigger the dwell threshold.
 & Live Dashboard")


