

Overview
IoT (Internet of Things) soil moisture monitor with Raspberry Pi Pico W and Blynk is a project that allows you to monitor the moisture level of your plants remotely through an internet-connected device. The Raspberry Pi Pico W is a microcontroller board that can be programmed using MicroPython or C. Similarly, Blynk is a popular IoT platform that allows you to create custom dashboards to visualize and control connected devices.
This project involves interfacing a Capacitive Soil Moisture Sensor with a Raspberry Pi Pico W, utilizing Micropython Code. The project is centered around the Internet of Things (IoT), with the Raspberry Pi Pico W configured to transmit and receive data over a WiFi network. The sensor readings of soil moisture can be sent to a Blynk Application, enabling remote monitoring of real-time soil moisture data.
This project has immense potential for use in the field of agriculture, as it allows farmers to keep track of soil moisture levels remotely. With the help of this system, farmers can monitor and adjust irrigation schedules, ensuring optimal soil moisture levels for healthy crop growth. Additionally, the ability to monitor soil moisture levels remotely reduces the need for manual labor and saves time and resources.
Overall, this project presents a valuable tool for modern agriculture and demonstrates the potential of IoT in improving agricultural practices.
Components Required
In this guide, I used SunFounder Raspberry Pi Pico W Kit to test different Modules. You can buy the kit and perform some other operations as well. From this kit, you can use the following components.
- Raspberry Pi Pico Board – 1
- Capacitive Soil Moisture Sensor V2.0 – 1
- Breadboard – 1
- Jumper Wires – 10
- Micro-USB Cable – 1
Capacitive Soil Moisture Sensor V2.0
The Capacitive Soil Moisture Sensor V2.0 is a high-quality sensor that accurately measures soil moisture levels using capacitive sensing technology, which is more reliable than resistive sensing used in other sensors. It is designed with corrosion-resistant material that enhances its service life and ensures long-lasting performance.

This sensor is easy to use and comes with an onboard voltage regulator that makes it compatible with a wide range of low-voltage MCUs with an operating voltage range of 3.3 ~ 5.5V. The Capacitive Soil Moisture Sensor V2.0 is ideal for use with Raspberry Pi Pico via ADC and can be easily inserted into the soil around your plants to provide real-time soil moisture data.

Additionally, this sensor is equipped with a high-precision ADC converter that ensures accurate measurements and can be connected to a variety of microcontrollers and single-board computers for data processing and analysis. The sensor also features a compact and lightweight design that makes it easy to install and use in different soil types and environmental conditions.
Follow our previous tutorial about the Capacitive Soil Moisture Sensor with Raspberry Pi Pico using MicroPython Code:
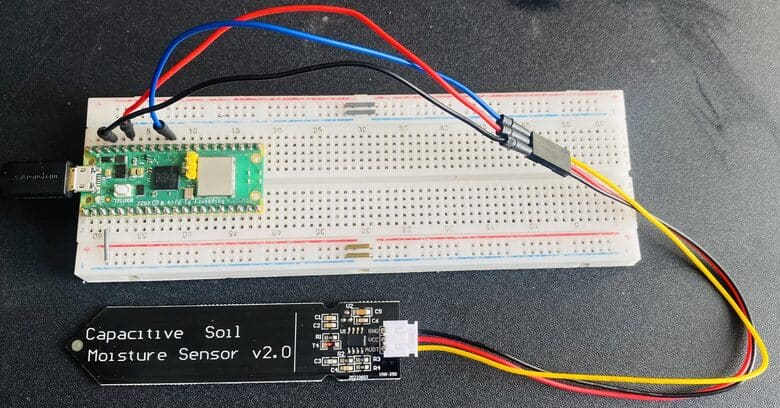
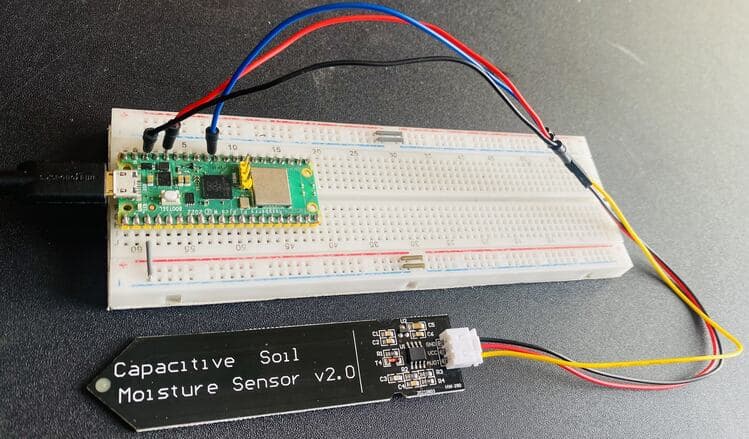
Hardware Setup & Circuit
Let’s proceed with interfacing the Capacitive Soil Moisture Sensor with Raspberry Pi Pico W. The process of connecting the components is straightforward.

For the Capacitive Soil Moisture Sensor, which is an analog sensor, you need to connect its Analog output pin to GP26 of Raspberry Pi Pico W. Additionally, you can power the Capacitive Soil Moisture Sensor using the 3.3V and GND pins of Raspberry Pi Pico.
Setting up Blynk 2.0 Application
To post the Capacitive Soil Moisture Data to Blynk using Raspberry Pi Pico W, you need to create a Blynk project and set up a dashboard in the mobile or web application. Here’s how you can set up the dashboard:
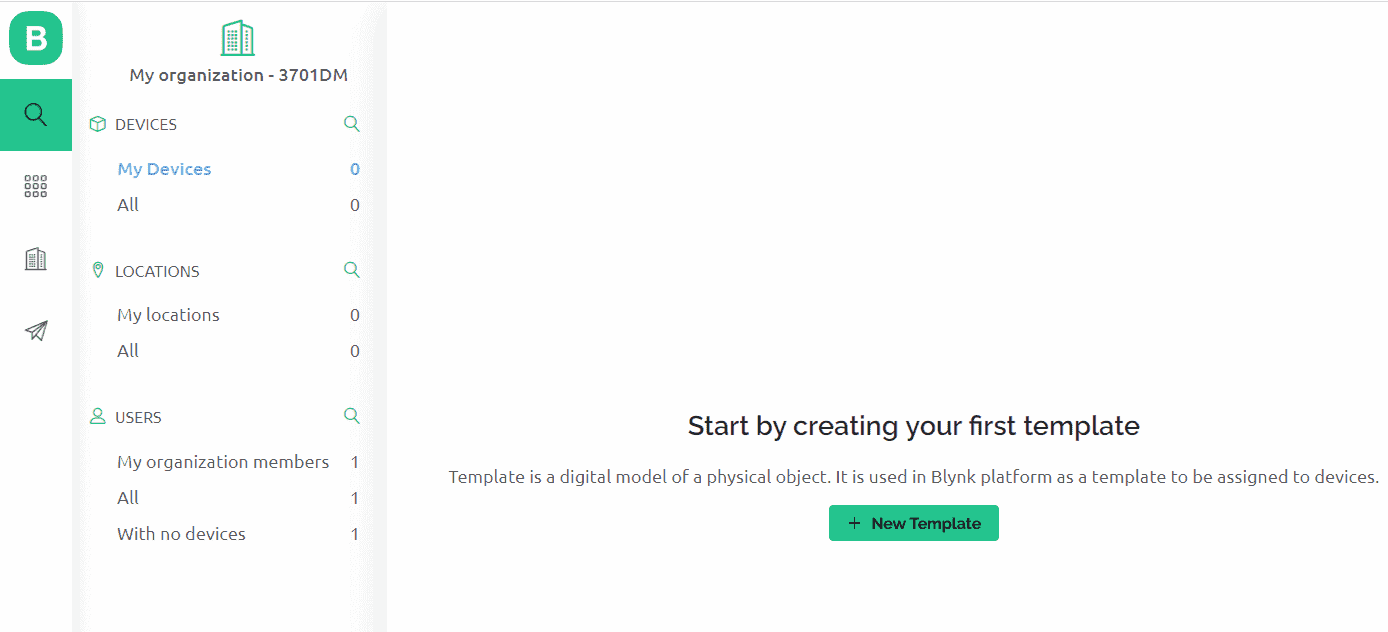
Visit blynk.cloud and create a Blynk account on the Blynk website. Or you can simply sign in using the registered Email ID.
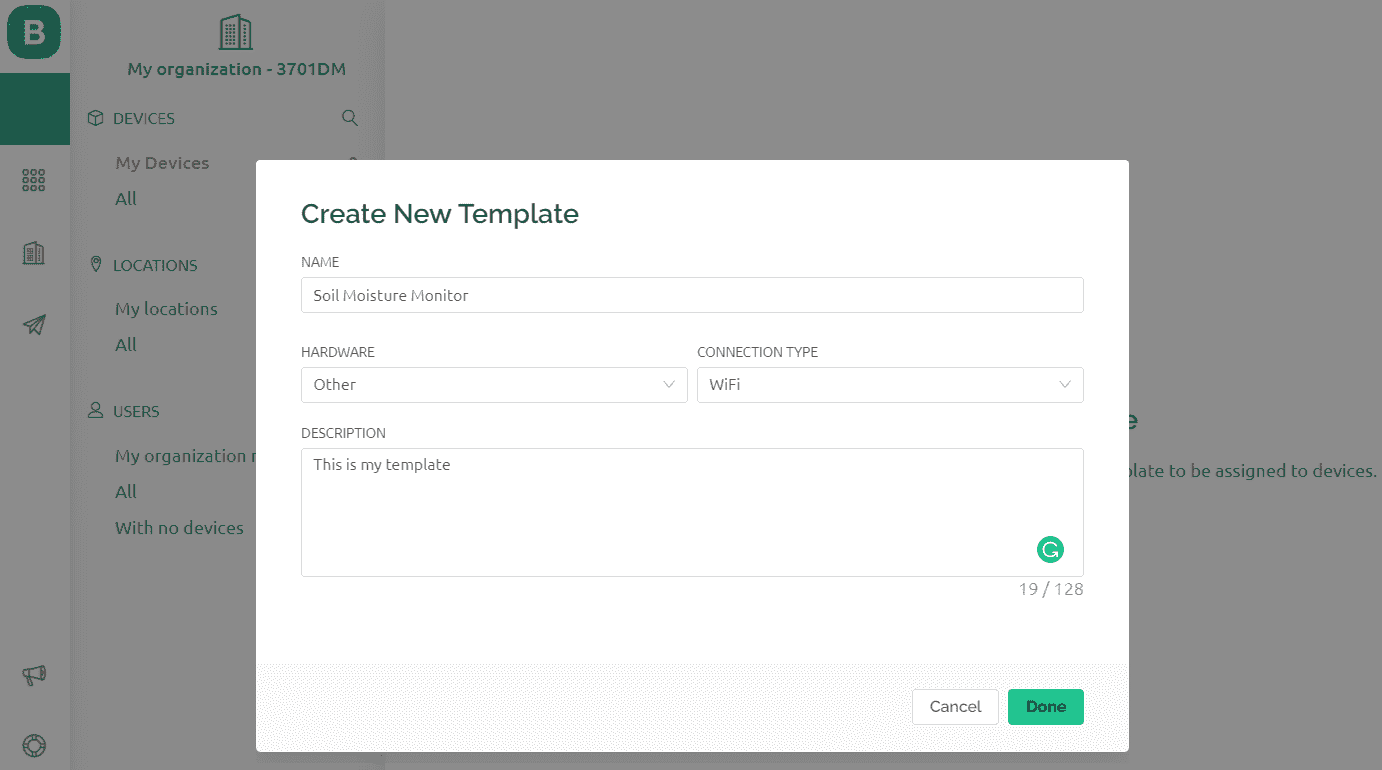
Click on +New Template.
Give any name to the Template such as ‘Soil Moisture Monitor’. Select ‘Hardware Type’ as Other and ‘Connection Type’ as WiFi.
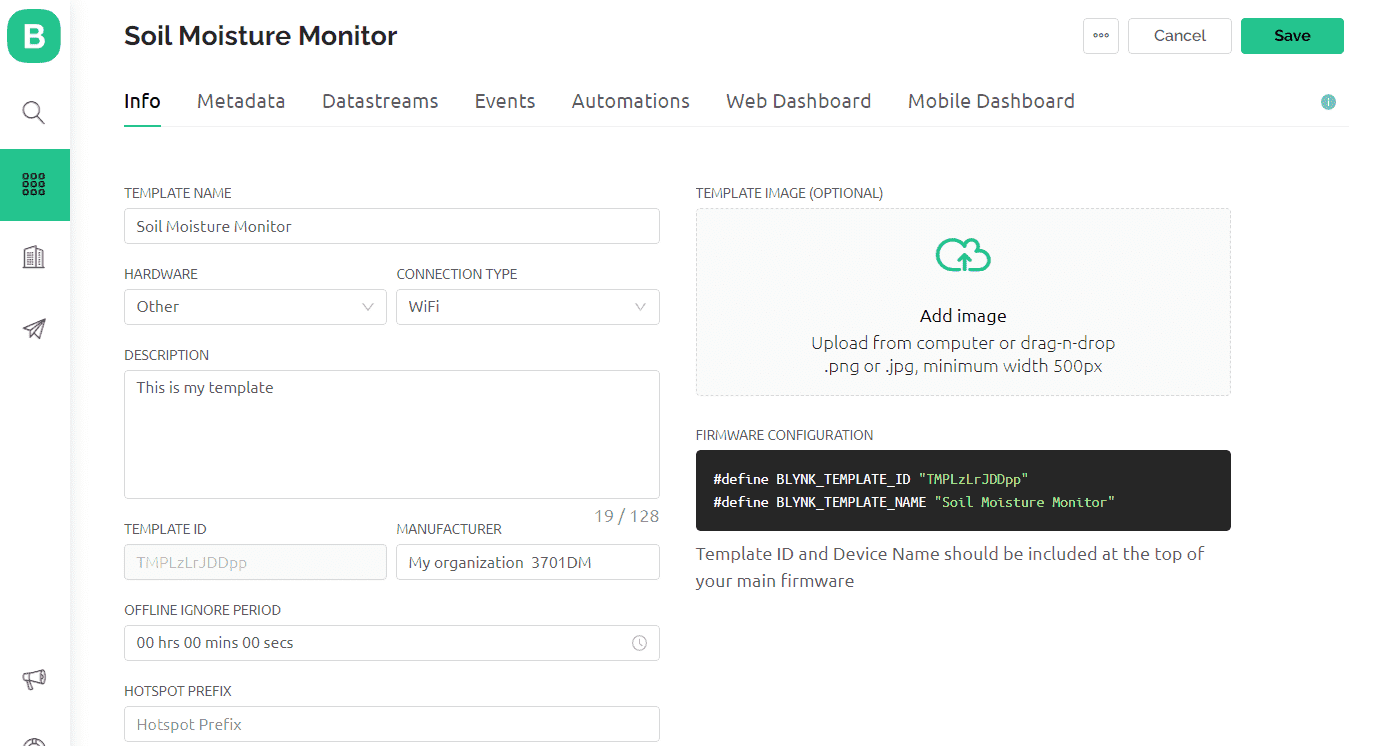
After clicking OK, the dashboard looks something like this.
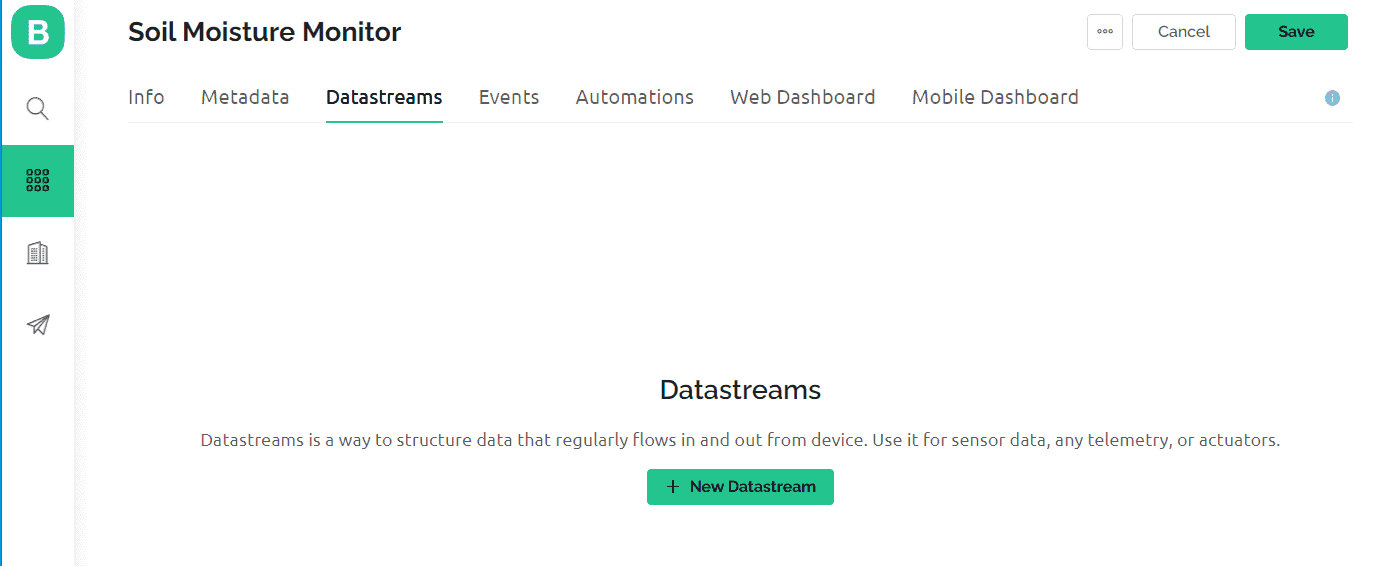
Now go to ‘Datastreams’. From here we need to create a Datastream.
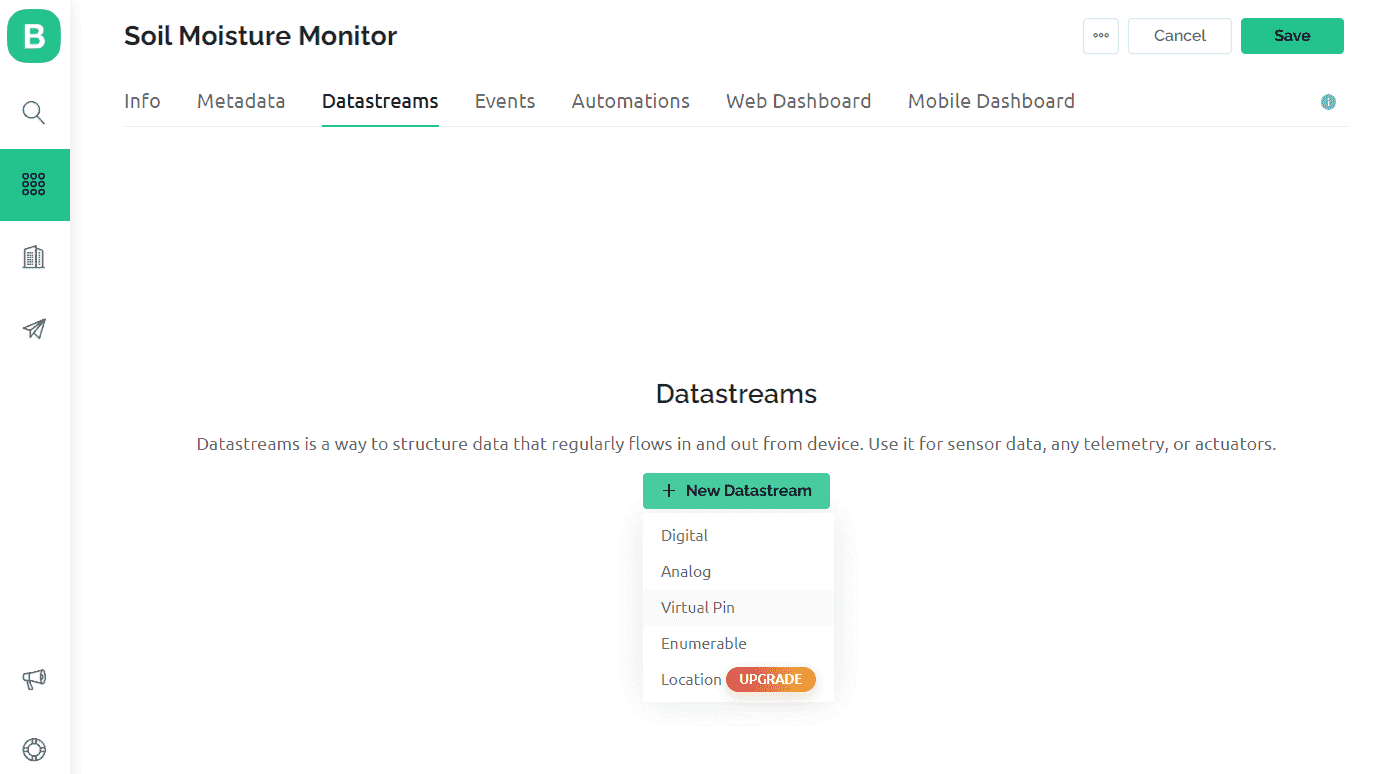
Click on ‘New Datastream’ and select Virtual Pin’.
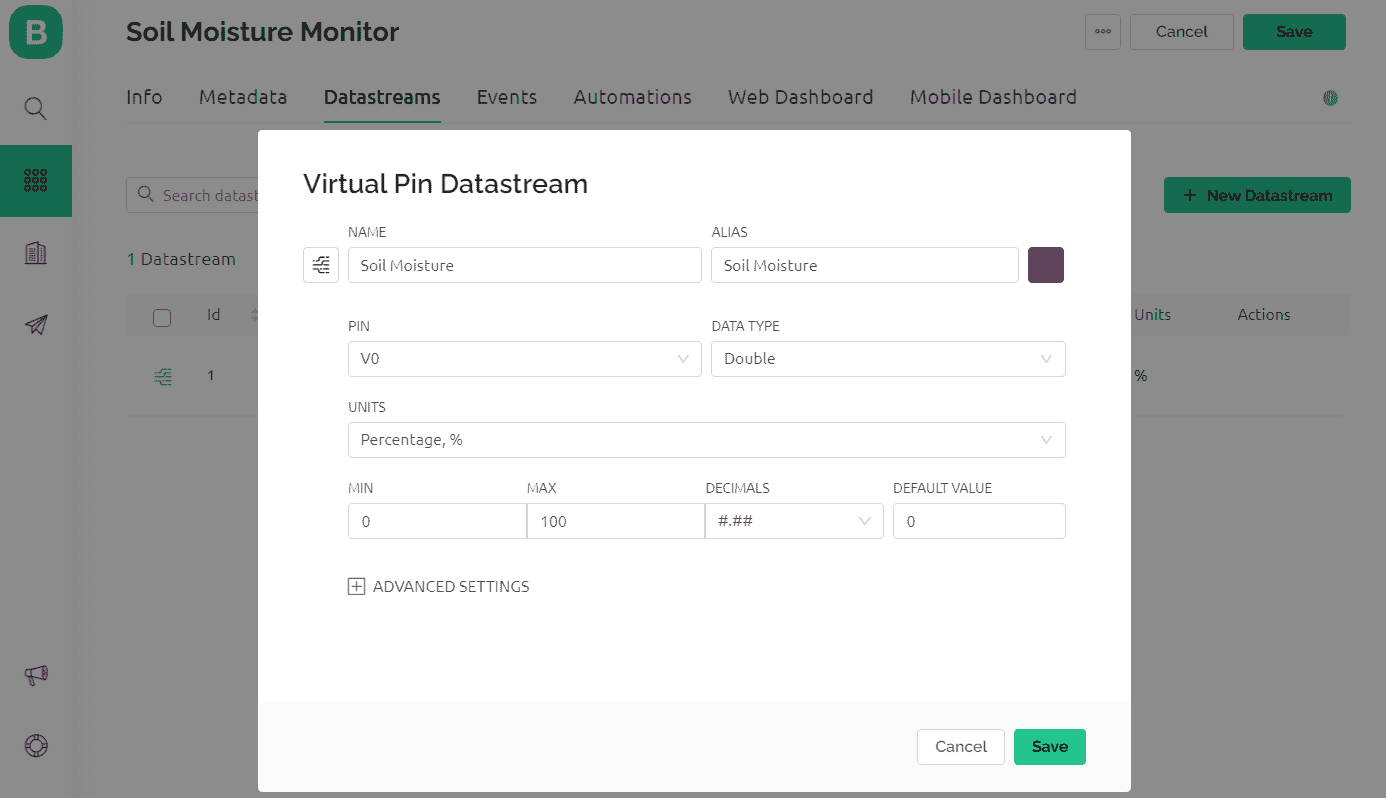
In ‘Virtual Pin Datastream’, select the options as in the image below.
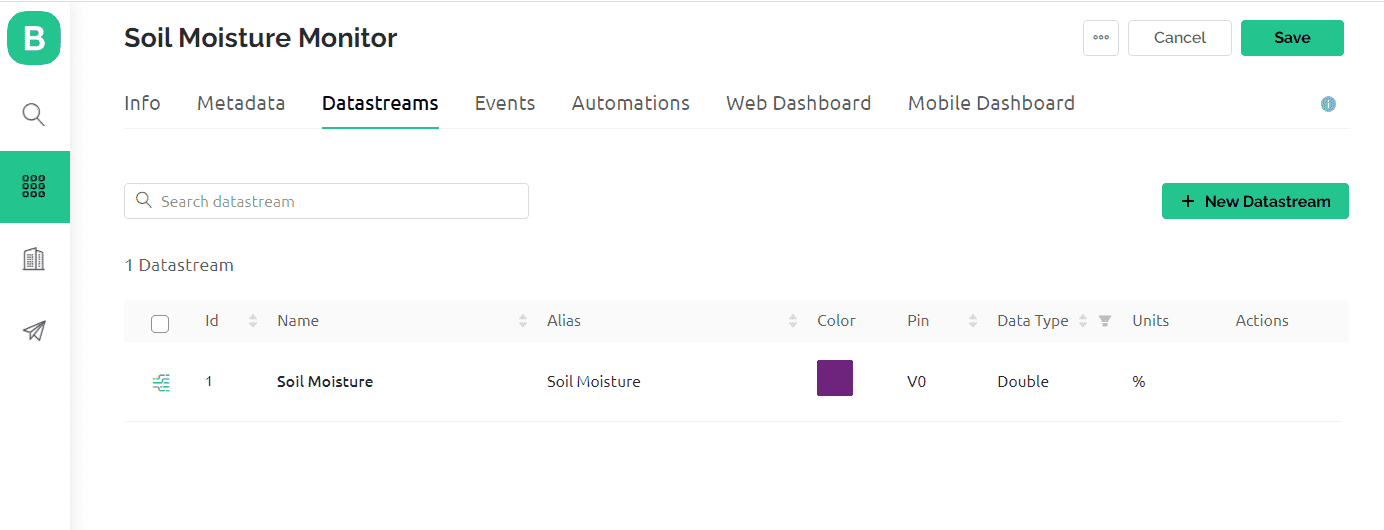
So a new datastream is successfully created now.
Now Go to Web Dashboard. Here we need to create a dashboard for graphical visualization.
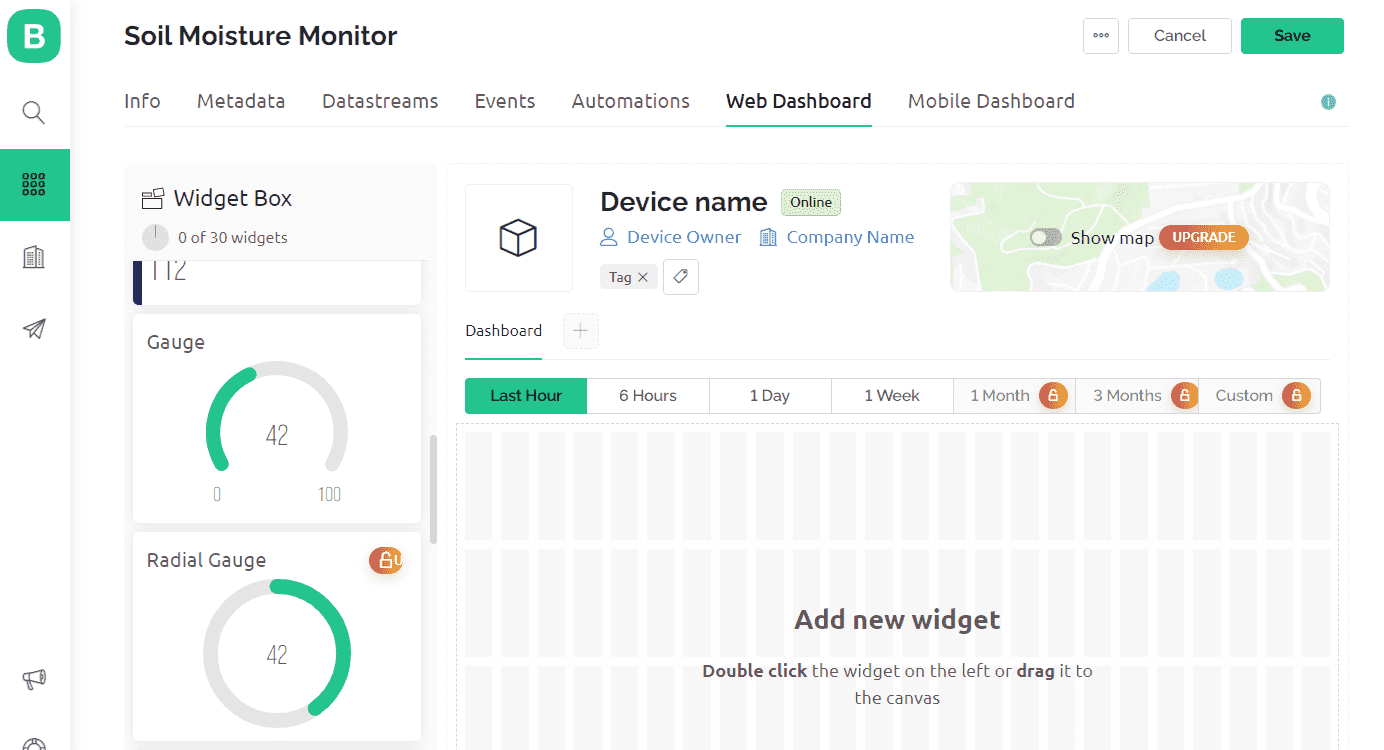
Drag and drop Gague in the dashboard window.
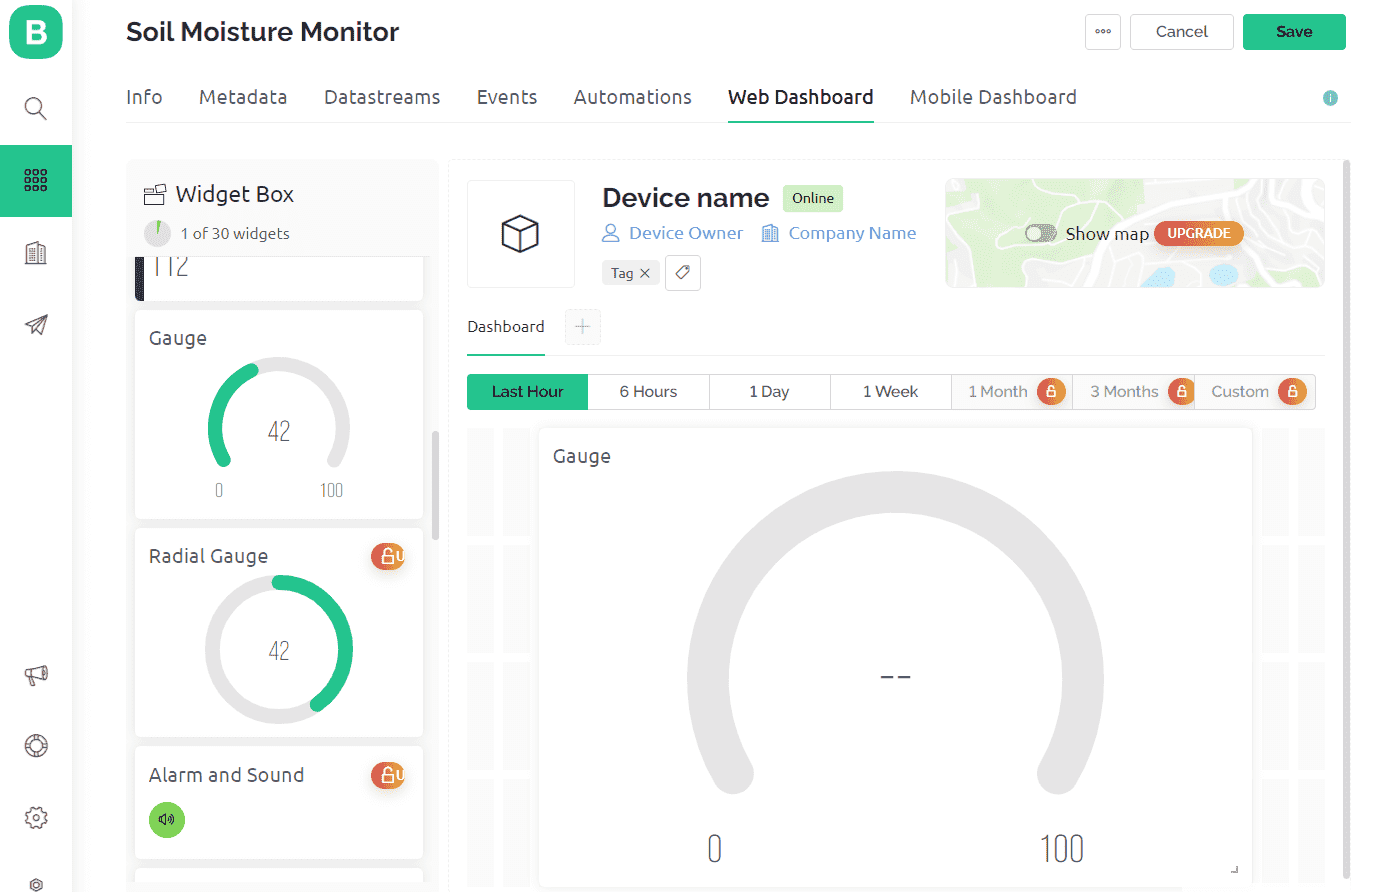
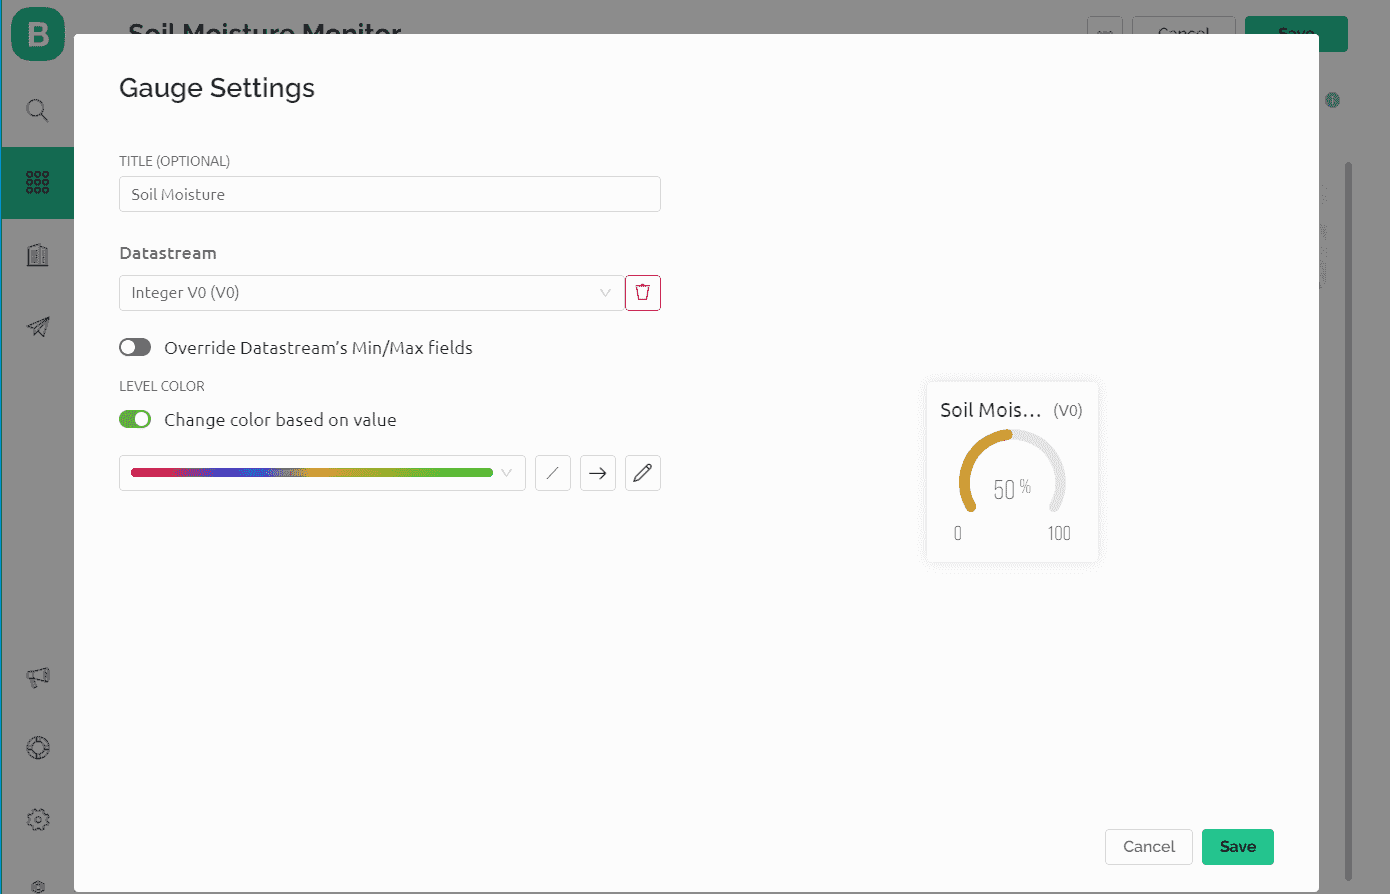
You need to setup the Gauge now. Give a name to the Gauge and select the V0 datastream you created earlier.
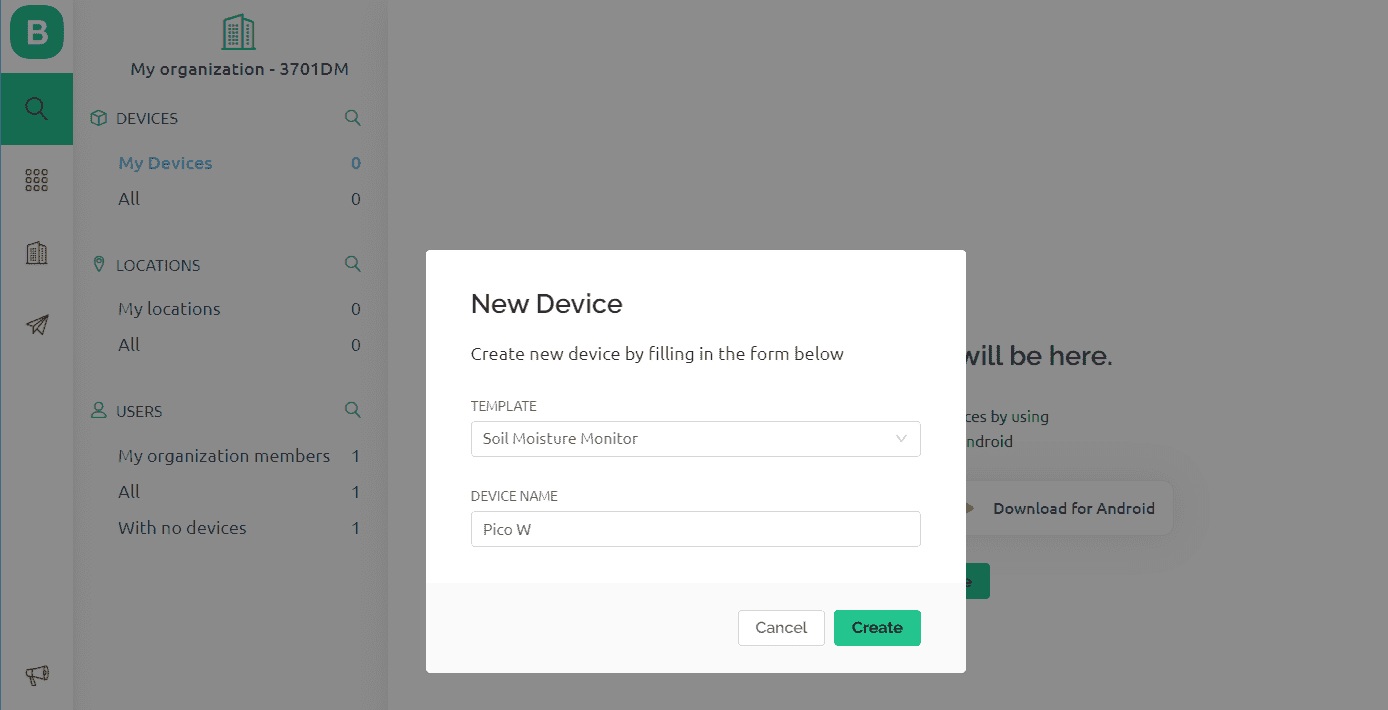
Now we need to add devices for visualization.
Choose New Device from Template.
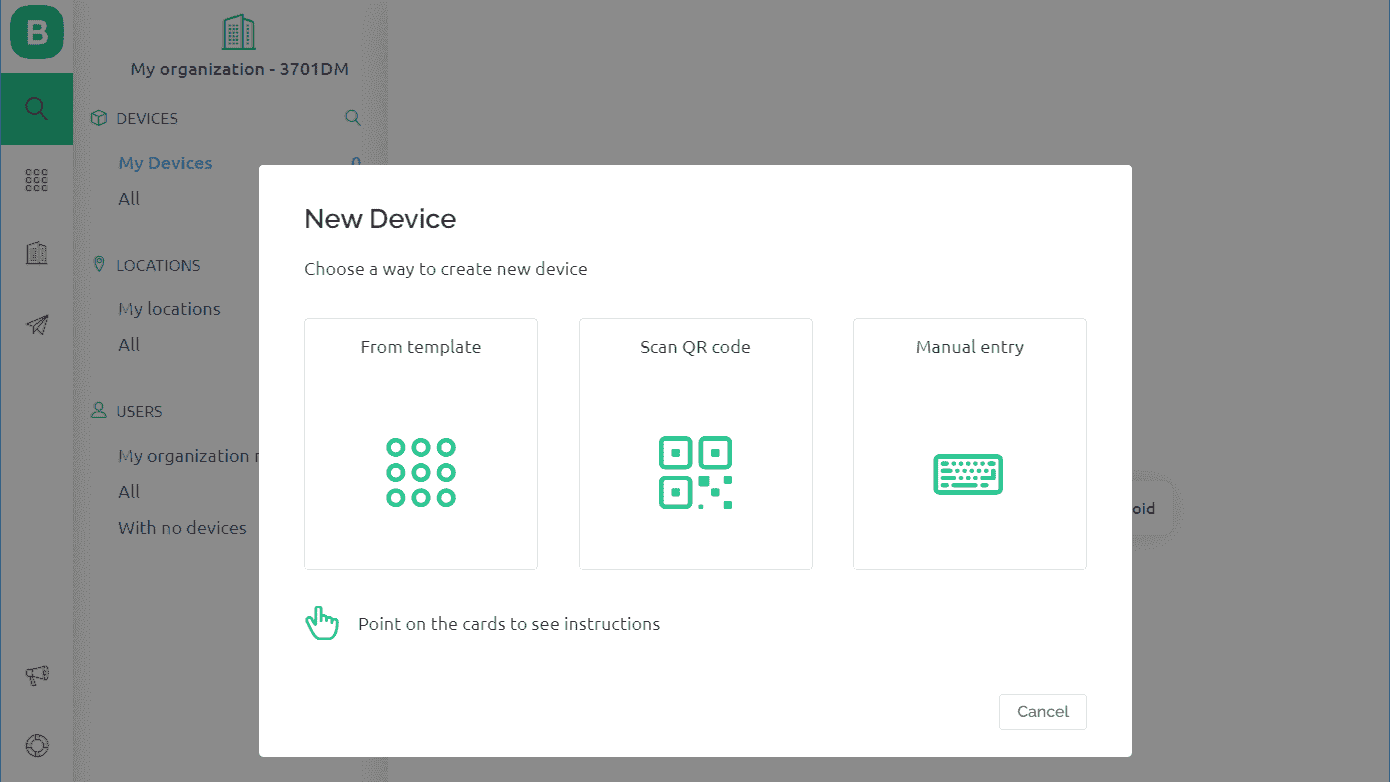
Select the Template you created and give any name to the device.
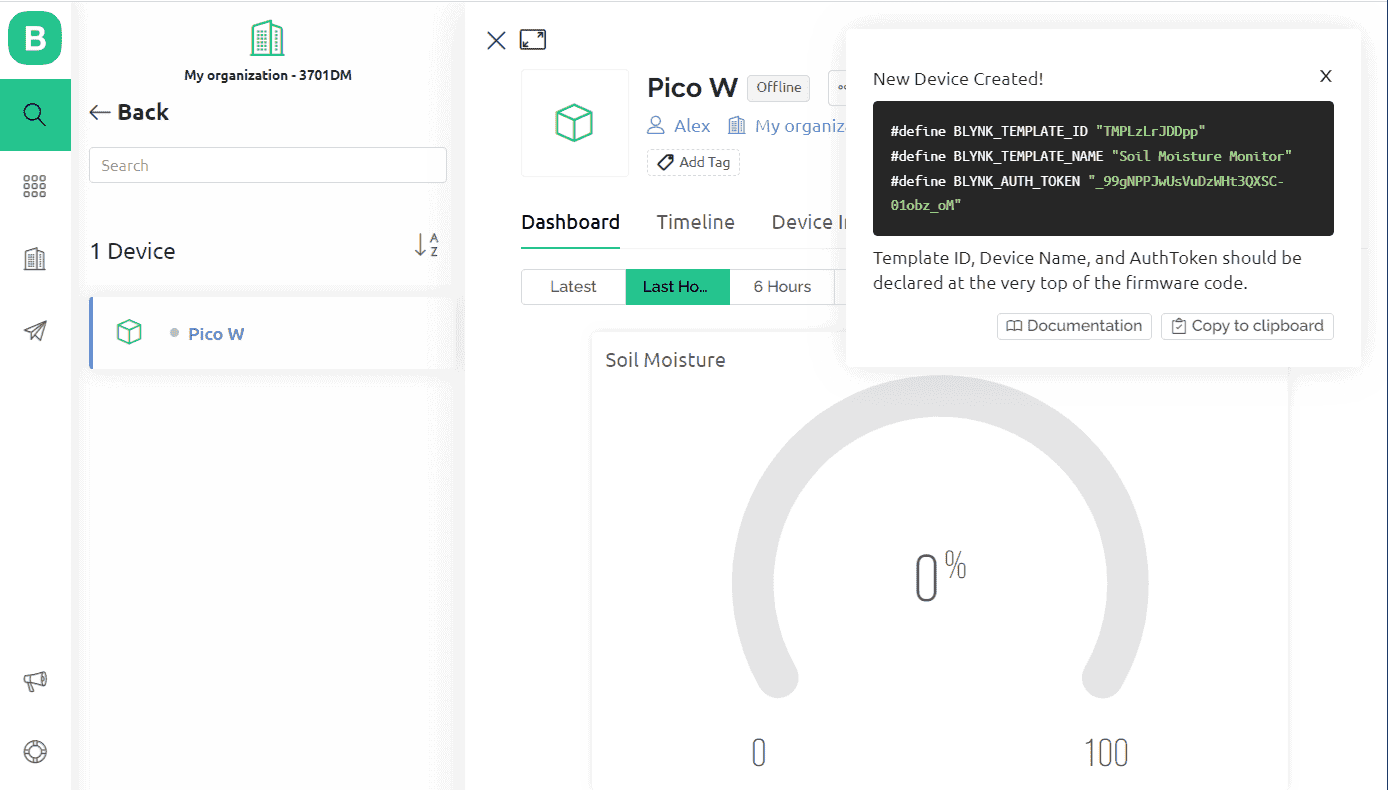
Now a New Device is created. Therefore the authentication token is also generated. You can copy the Authentication token. This token is needed in the code.
With this Blynk dashboard set up, you can now proceed to program the Raspberry Pi Pico W board to send Soil Moisture Sensor data to Blynk Dashboard.
To visualize the Soil Moisture data on a mobile App or Mobile Dashboard, you also need to set up the Mobile Phone Dashboard. The process is similar as above.
Source Code/Program
The code to Send Soil Moisture Sensor Data Blynk 2.0 App using Raspberry Pi Pico W is divided into two parts as BlynkLib.py and main.py. The posting of sensor data requires Blynk Library for MicroPython.
BlynkLib.py
This library provides an API that enables connectivity between your IoT hardware, which supports Micropython/Python, and the Blynk Cloud. With this API, you can send both raw and processed sensor data and remotely control any connected hardware (such as relays, motors, and servos) from anywhere in the world using the Blynk mobile apps available on both iOS and Android.
Copy the following code and save it to your Raspberry Pi Pico W board with name ‘BlynkLib.py’.
|
1 2 3 4 5 6 7 8 9 10 11 12 13 14 15 16 17 18 19 20 21 22 23 24 25 26 27 28 29 30 31 32 33 34 35 36 37 38 39 40 41 42 43 44 45 46 47 48 49 50 51 52 53 54 55 56 57 58 59 60 61 62 63 64 65 66 67 68 69 70 71 72 73 74 75 76 77 78 79 80 81 82 83 84 85 86 87 88 89 90 91 92 93 94 95 96 97 98 99 100 101 102 103 104 105 106 107 108 109 110 111 112 113 114 115 116 117 118 119 120 121 122 123 124 125 126 127 128 129 130 131 132 133 134 135 136 137 138 139 140 141 142 143 144 145 146 147 148 149 150 151 152 153 154 155 156 157 158 159 160 161 162 163 164 165 166 167 168 169 170 171 172 173 174 175 176 177 178 179 180 181 182 183 184 185 186 187 188 189 190 191 192 193 194 195 196 197 198 199 200 201 202 203 204 205 206 207 208 209 210 211 212 213 214 215 216 217 218 219 220 221 222 223 224 225 226 227 228 229 230 231 232 233 234 235 236 237 238 239 240 241 242 243 244 245 246 247 248 249 250 251 252 253 254 255 256 257 258 259 260 261 262 263 264 |
# Copyright (c) 2015-2019 Volodymyr Shymanskyy. See the file LICENSE for copying permission. __version__ = "1.0.0" import struct import time import sys import os try: import machine gettime = lambda: time.ticks_ms() SOCK_TIMEOUT = 0 except ImportError: const = lambda x: x gettime = lambda: int(time.time() * 1000) SOCK_TIMEOUT = 0.05 def dummy(*args): pass MSG_RSP = const(0) MSG_LOGIN = const(2) MSG_PING = const(6) MSG_TWEET = const(12) MSG_NOTIFY = const(14) MSG_BRIDGE = const(15) MSG_HW_SYNC = const(16) MSG_INTERNAL = const(17) MSG_PROPERTY = const(19) MSG_HW = const(20) MSG_HW_LOGIN = const(29) MSG_EVENT_LOG = const(64) MSG_REDIRECT = const(41) # TODO: not implemented MSG_DBG_PRINT = const(55) # TODO: not implemented STA_SUCCESS = const(200) STA_INVALID_TOKEN = const(9) DISCONNECTED = const(0) CONNECTING = const(1) CONNECTED = const(2) print(""" ___ __ __ / _ )/ /_ _____ / /__ / _ / / // / _ \\/ '_/ /____/_/\\_, /_//_/_/\\_\\ /___/ for Python v""" + __version__ + " (" + sys.platform + ")\n") class EventEmitter: def __init__(self): self._cbks = {} def on(self, evt, f=None): if f: self._cbks[evt] = f else: def D(f): self._cbks[evt] = f return f return D def emit(self, evt, *a, **kv): if evt in self._cbks: self._cbks[evt](*a, **kv) class BlynkProtocol(EventEmitter): def __init__(self, auth, tmpl_id=None, fw_ver=None, heartbeat=50, buffin=1024, log=None): EventEmitter.__init__(self) self.heartbeat = heartbeat*1000 self.buffin = buffin self.log = log or dummy self.auth = auth self.tmpl_id = tmpl_id self.fw_ver = fw_ver self.state = DISCONNECTED self.connect() def virtual_write(self, pin, *val): self._send(MSG_HW, 'vw', pin, *val) def send_internal(self, pin, *val): self._send(MSG_INTERNAL, pin, *val) def set_property(self, pin, prop, *val): self._send(MSG_PROPERTY, pin, prop, *val) def sync_virtual(self, *pins): self._send(MSG_HW_SYNC, 'vr', *pins) def log_event(self, *val): self._send(MSG_EVENT_LOG, *val) def _send(self, cmd, *args, **kwargs): if 'id' in kwargs: id = kwargs.get('id') else: id = self.msg_id self.msg_id += 1 if self.msg_id > 0xFFFF: self.msg_id = 1 if cmd == MSG_RSP: data = b'' dlen = args[0] else: data = ('\0'.join(map(str, args))).encode('utf8') dlen = len(data) self.log('<', cmd, id, '|', *args) msg = struct.pack("!BHH", cmd, id, dlen) + data self.lastSend = gettime() self._write(msg) def connect(self): if self.state != DISCONNECTED: return self.msg_id = 1 (self.lastRecv, self.lastSend, self.lastPing) = (gettime(), 0, 0) self.bin = b"" self.state = CONNECTING self._send(MSG_HW_LOGIN, self.auth) def disconnect(self): if self.state == DISCONNECTED: return self.bin = b"" self.state = DISCONNECTED self.emit('disconnected') def process(self, data=None): if not (self.state == CONNECTING or self.state == CONNECTED): return now = gettime() if now - self.lastRecv > self.heartbeat+(self.heartbeat//2): return self.disconnect() if (now - self.lastPing > self.heartbeat//10 and (now - self.lastSend > self.heartbeat or now - self.lastRecv > self.heartbeat)): self._send(MSG_PING) self.lastPing = now if data != None and len(data): self.bin += data while True: if len(self.bin) < 5: break cmd, i, dlen = struct.unpack("!BHH", self.bin[:5]) if i == 0: return self.disconnect() self.lastRecv = now if cmd == MSG_RSP: self.bin = self.bin[5:] self.log('>', cmd, i, '|', dlen) if self.state == CONNECTING and i == 1: if dlen == STA_SUCCESS: self.state = CONNECTED dt = now - self.lastSend info = ['ver', __version__, 'h-beat', self.heartbeat//1000, 'buff-in', self.buffin, 'dev', sys.platform+'-py'] if self.tmpl_id: info.extend(['tmpl', self.tmpl_id]) info.extend(['fw-type', self.tmpl_id]) if self.fw_ver: info.extend(['fw', self.fw_ver]) self._send(MSG_INTERNAL, *info) try: self.emit('connected', ping=dt) except TypeError: self.emit('connected') else: if dlen == STA_INVALID_TOKEN: self.emit("invalid_auth") print("Invalid auth token") return self.disconnect() else: if dlen >= self.buffin: print("Cmd too big: ", dlen) return self.disconnect() if len(self.bin) < 5+dlen: break data = self.bin[5:5+dlen] self.bin = self.bin[5+dlen:] args = list(map(lambda x: x.decode('utf8'), data.split(b'\0'))) self.log('>', cmd, i, '|', ','.join(args)) if cmd == MSG_PING: self._send(MSG_RSP, STA_SUCCESS, id=i) elif cmd == MSG_HW or cmd == MSG_BRIDGE: if args[0] == 'vw': self.emit("V"+args[1], args[2:]) self.emit("V*", args[1], args[2:]) elif cmd == MSG_INTERNAL: self.emit("internal:"+args[0], args[1:]) elif cmd == MSG_REDIRECT: self.emit("redirect", args[0], int(args[1])) else: print("Unexpected command: ", cmd) return self.disconnect() import socket class Blynk(BlynkProtocol): def __init__(self, auth, **kwargs): self.insecure = kwargs.pop('insecure', False) self.server = kwargs.pop('server', 'blynk.cloud') self.port = kwargs.pop('port', 80 if self.insecure else 443) BlynkProtocol.__init__(self, auth, **kwargs) self.on('redirect', self.redirect) def redirect(self, server, port): self.server = server self.port = port self.disconnect() self.connect() def connect(self): print('Connecting to %s:%d...' % (self.server, self.port)) s = socket.socket() s.connect(socket.getaddrinfo(self.server, self.port)[0][-1]) try: s.setsockopt(socket.IPPROTO_TCP, socket.TCP_NODELAY, 1) except: pass if self.insecure: self.conn = s else: try: import ussl ssl_context = ussl except ImportError: import ssl ssl_context = ssl.create_default_context() self.conn = ssl_context.wrap_socket(s, server_hostname=self.server) try: self.conn.settimeout(SOCK_TIMEOUT) except: s.settimeout(SOCK_TIMEOUT) BlynkProtocol.connect(self) def _write(self, data): #print('<', data) self.conn.write(data) # TODO: handle disconnect def run(self): data = b'' try: data = self.conn.read(self.buffin) #print('>', data) except KeyboardInterrupt: raise except socket.timeout: # No data received, call process to send ping messages when needed pass except: # TODO: handle disconnect return self.process(data) |
main.py
Copy the following code and save it to the Raspberry Pi Pico W with name ‘main.py’.
You need to change the WiFi SSID, Password, and Blynk Authentication Token on the following lines.
|
1 2 |
wlan.connect("SSID","Password") BLYNK_AUTH = '*****************************' |
Here is the complete code.
|
1 2 3 4 5 6 7 8 9 10 11 12 13 14 15 16 17 18 19 20 21 22 23 24 25 26 27 28 29 30 31 32 33 34 35 36 37 38 39 40 41 42 43 44 45 46 47 48 49 50 51 52 53 54 55 56 57 |
# import required modules from machine import ADC, Pin import utime import network import BlynkLib # use variables instead of numbers: soil = ADC(Pin(26)) # Soil moisture PIN reference #Calibraton values min_moisture=19200 max_moisture=49300 readDelay = 2 # delay between readings wlan = network.WLAN(network.STA_IF) wlan.active(True) wlan.connect("SSID","Password") # Blynk authentication token BLYNK_AUTH = "******************************" # connect the network wait = 10 while wait > 0: if wlan.status() < 0 or wlan.status() >= 3: break wait -= 1 print('waiting for connection...') time.sleep(1) # Handle connection error if wlan.status() != 3: raise RuntimeError('wifi connection failed') else: print('connected') ip=wlan.ifconfig()[0] print('IP: ', ip) # Initialize Blynk blynk = BlynkLib.Blynk(BLYNK_AUTH) # Run the main loop while True: # read moisture value and convert to percentage into the calibration range moisture = (max_moisture-soil.read_u16())*100/(max_moisture-min_moisture) # print values print("moisture: " + "%.2f" % moisture +"% (adc: "+str(soil.read_u16())+")") # Send sensor data to Blynk blynk.virtual_write(0, moisture) # virtual pin 1 for temperature # Run Blynk blynk.run() utime.sleep(readDelay) # set a delay between readings |
Code Explanation
This code is a Micropython script designed to connect to a Wi-Fi network and the post soil moisture data using on Blynk app. Here is a step-by-step explanation of the code:
|
1 2 3 4 5 6 7 8 |
# import required modules from machine import ADC, Pin import utime import network import BlynkLib # use variables instead of numbers: soil = ADC(Pin(26)) # Soil moisture PIN reference |
Here, the necessary modules are imported including machine module for hardware control, utime module for time related functions, network module for Wi-Fi connectivity and BlynkLib module for communicating with Blynk IoT platform. Then, an instance of the ADC object is created with Pin(26) as reference to the GPIO pin connected to the soil moisture sensor.
|
1 2 3 4 5 |
#Calibraton values min_moisture=19200 max_moisture=49300 readDelay = 2 # delay between readings |
The minimum and maximum moisture values for calibration are set to 19200 and 49300, respectively. readDelay is a delay of 2 seconds between readings.
|
1 2 3 |
wlan = network.WLAN(network.STA_IF) wlan.active(True) wlan.connect("SSID","Password") |
Here, an instance of WLAN object is created with network.STA_IF parameter, which is used for the station interface of Wi-Fi. The Wi-Fi interface is activated using wlan.active(True) and connected to a network with the SSID and password.
|
1 2 |
# Blynk authentication token BLYNK_AUTH = "*********************" |
Blynk authentication token is set to a unique value provided by the Blynk Dashboard.
|
1 2 3 4 5 6 7 8 |
# connect the network wait = 10 while wait > 0: if wlan.status() < 0 or wlan.status() >= 3: break wait -= 1 print('waiting for connection...') time.sleep(1) |
This is a loop that waits for a Wi-Fi connection. The wlan.status() method is used to get the status of the Wi-Fi connection. If the connection status is less than 0 or greater than or equal to 3, the loop is broken. The loop waits for 10 seconds and prints “waiting for connection…” for each second.
|
1 2 3 4 5 6 7 |
# Handle connection error if wlan.status() != 3: raise RuntimeError('wifi connection failed') else: print('connected') ip=wlan.ifconfig()[0] print('IP: ', ip) |
Here, the status of the Wi-Fi connection is checked. If the connection status is not 3 (which means the connection is successful), a RuntimeError is raised. If the connection is successful, the IP address is printed.
|
1 2 |
# Initialize Blynk blynk = BlynkLib.Blynk(BLYNK_AUTH) |
An instance of the Blynk class is created with the Blynk authentication token.
|
1 2 3 4 5 6 7 8 9 10 11 12 13 14 |
# Run the main loop while True: # read moisture value and convert to percentage into the calibration range moisture = (max_moisture-soil.read_u16())*100/(max_moisture-min_moisture) # print values print("moisture: " + "%.2f" % moisture +"% (adc: "+str(soil.read_u16())+")") # Send sensor data to Blynk blynk.virtual_write(0, moisture) # virtual pin 1 for temperature # Run Blynk blynk.run() utime.sleep(readDelay) # set a delay between readings |
The main loop starts with reading the moisture level from the soil moisture sensor and converting it to a percentage value within the calibration range. Then, the moisture level and ADC value are printed to the console. Next, the moisture level is sent to the Blynk Dashboard using the blynk.virtual_write() method, and the connection is updated with the Blynk IoT platform using the blynk.run() method. A delay of readDelay seconds is set between readings using the utime.sleep() function. This loop continues indefinitely until the program is stopped.
IoT Soil Moisture Monitor with Raspberry Pi Pico W & Blynk
You can run this code now to check the working of the Capacitive Soil Moisture Sensor.
On the Thonny Shell, you will see the following messages.
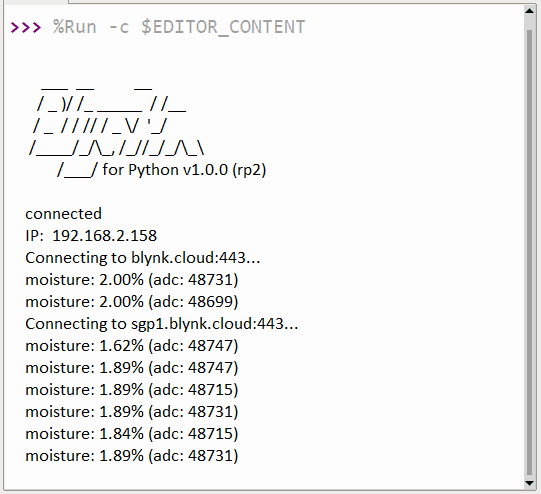
Initially the Soil Moisture Data appears below 2% as it is placed in dry air.
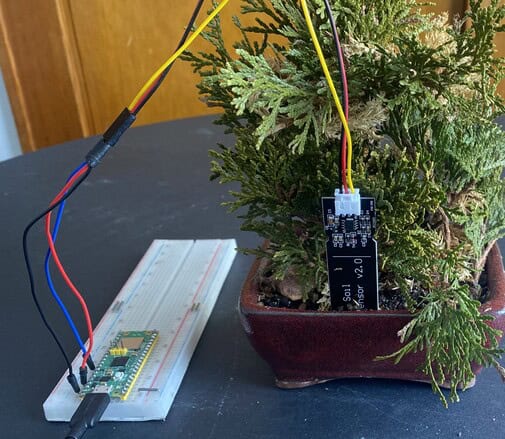
Place the soil moisture sensor in the soil. The soil may be dry, wet or too wet.
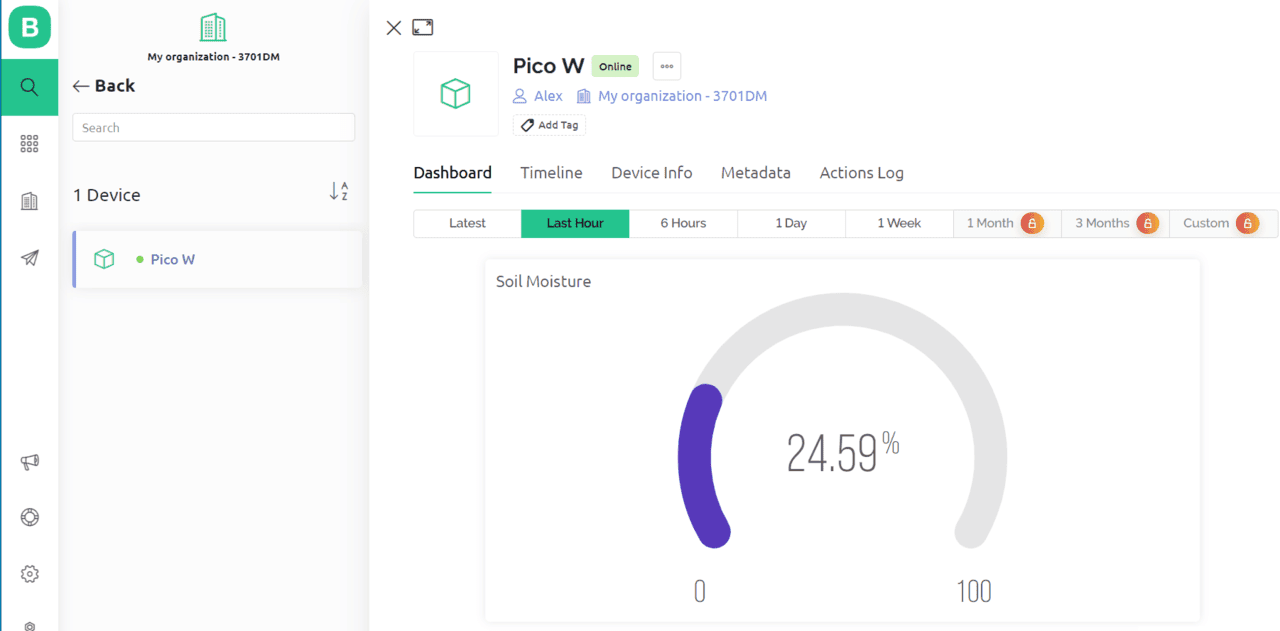
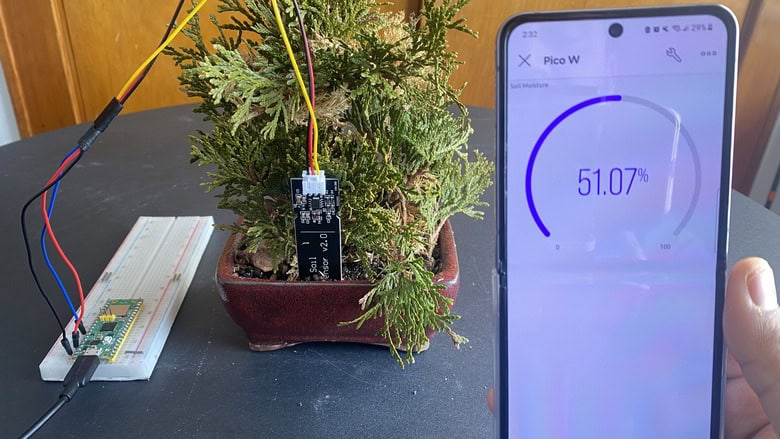
Now you can check the Blynk Dashboard. The Blynk Dashboard will show the amount of soil moisture in the gauge.
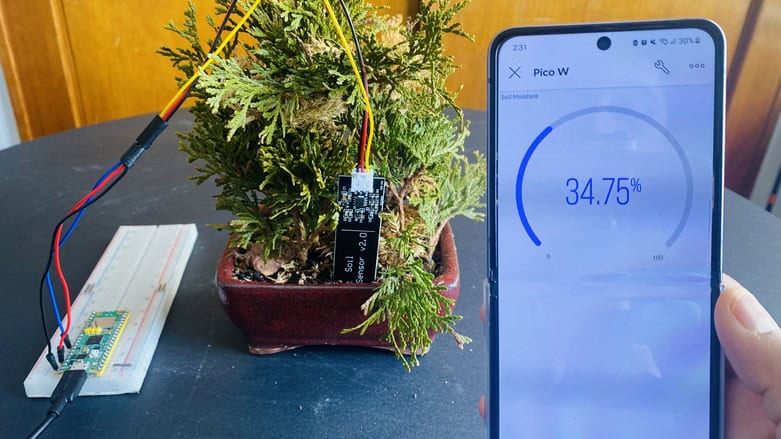
Go to your Blynk Dashboard in Mobile phone. The dashboard will show the same Soil Moisture data.
On adding more water to the Soil, the value of Soil Moisture rises rapidly.
To achieve 100% soil moisture value, you can dip the Sensor into water.
In conclusion, the integration of a capacitive soil moisture sensor with a Raspberry Pi Pico W and the use of MicroPython code provides an effective means of monitoring soil humidity remotely. By sending the sensor data to an IoT Blynk app, users can view the real-time status of their soil moisture levels from anywhere with an internet connection.
This system provides a convenient and efficient way for gardeners and farmers to ensure that their crops receive adequate moisture, thereby improving yield and overall crop health. With the increasing popularity of IoT devices and the availability of affordable sensors and microcontrollers, such systems are becoming more accessible to a wider range of users.


8 Comments
Thank you, you’re amazing!
Thanks, very cool!
Hi – Thanks for the excellent information, it’s really helpful. My only problem is how to insert the Blynk Authorisation Token into my Pico/Thonny Micro Python program. I have tried everything I can it always returns a Syntax error.
I have tried as below & with every combination I can with ” & ‘ , all on one line, etc. but always returns Syntax error – can you help please? The asterisks in the Template & Auth Token are mine
BLYNK_AUTH =
define BLYNK_TEMPLATE_ID “TMPLhT1xFk”
define BLYNK_TEMPLATE_NAME “Temperature Datalogger”
define BLYNK_AUTH_TOKEN “yTh23A3ZqBN9VqTB2NkfcLu_Dfoonq”
Many thanks, Ken
You don’t need to assign everything like you assign in Arduino programming. You just need to assign the authentication token only. Also the above syntax is for Arduino code, which is not supported by MicroPython.
Send blyk app code smart erigation
Thank you for sharing this project!
When I run the script via Thonny it works flawlessly.
If I just plug the pico w into the USB without running the script via Thonny, the pico w will connect to the WIFI (can be seen on the router page) but it won’t connect to Blynk (shows as offline in my dashboard).
The code file is correctly named main.py and is on the pico board itself.
Do you have any idea what the issue could be?
J’ai exactement le même problème… Y’a t’il une solution. Càrdialement,
#define BLYNK_TEMPLATE_ID “TMPL3T6Ug1FPJ”
#define BLYNK_TEMPLATE_NAME “ss”
#define BLYNK_AUTH_TOKEN “NMH-BBJNZSrDj_1nvXVOpHaeDw9PxJ3J”
#define BLYNK_PRINT Serial
#define motor D0
#include
#include
char auth[] = BLYNK_AUTH_TOKEN;
char ssid[] = “OPPO K3”;
char pass[] = “12345678”;
int soilMoistureValue = 0;
int soilmoisturepercent=0;
int sensor = A0;
BlynkTimer timer;
void myTimerEvent()
{
Blynk.virtualWrite(V0,digitalRead(motor));
Blynk.virtualWrite(V1,soilmoisturepercent);
}
void setup()
{
Serial.begin(9600);
pinMode(motor,OUTPUT);
Blynk.begin(auth, ssid, pass);
timer.setInterval(1000L, myTimerEvent);
}
void loop() {
Blynk.run();
timer.run();
//soilMoistureValue = analogRead(sensor); //put Sensor insert into soil
Serial.print(“sensor value”);
Serial.println(soilMoistureValue);
soilmoisturepercent = ( 100.00 – ( (analogRead(sensor)/1023.00) * 100.00 ) );
if(soilmoisturepercent >= 100)
{
Serial.print(“moisture is “);
Serial.println(“100 %”);
}
else if(soilmoisturepercent
{
Serial.print(“moisture is “);
Serial.println(“0 %”);
}
else if(soilmoisturepercent >0 && soilmoisturepercent < 100)
{
Serial.print(“moisture is “);
Serial.print(soilmoisturepercent);
Serial.println(“%”);
}
if(soilmoisturepercent
{
digitalWrite(motor,HIGH);
Serial.println(“MOTOR IS ONN”);
}
if(soilmoisturepercent >= 42)
{
digitalWrite(motor,LOW);
Serial.println(“MOTOR IS OFF”);
}
delay(1000);
}