

Overview
In this tutorial, we will learn about the CAN Bus protocol by Interfacing MCP2515 CAN Bus Module with Arduino. We will transmit the DHT11 Sensor data over a certain distance using the CAN protocol.
Controller Area Network also known as CAN-BUS is a common industrial bus because of its long travel distance, medium communication speed, and high reliability. It is commonly found on modern machine tools and as an automotive diagnostic bus.
In modern Vehicle systems, there are more than 60 to 100 sensor units for sensing and exchanging information. Similarly, car manufacturers are constantly making their cars smarter by adding features like Autonomous driving, Airbag system, ABS (Anti-braking System), Telematics, Transmission Control, Battery management systems, Cruise control system, etc. To enable the transmission and receiving of the data at a very high-speed standard automotive communication protocols are required. The standard communication protocols like UART, SPI, and I2C are not reliable for this system. Hence we need an automobile communication protocol like the CAN protocol for high-speed & 1000s of data transmission at a single time.
In this guide we will learn about the CAN Bus Communication protocol using Microchip MCP2515 CAN Bus Module & Arduino Board. Using the pair of CAN Bus Module MCP2515, we will send the DHT11 Sensor data over a distance of a few centimeters. Typically the communication speed for CAN ranges from 50 Kbps to 1Mbps and the distance can range from 40 meters at 1Mbps to 1000 meters at 50kpbs.
Bill of Materials
To learn about the CAN Bus protocol and do practical stuff, we need the following components and modules. You can purchase all these components online from Amazon.
| S.N. | Components | Quantity | |
|---|---|---|---|
| 1 | Arduino Nano Board | 1 | Amazon | AliExpress |
| 2 | Arduino UNO Board | 1 | Amazon | AliExpress |
| 3 | CAN Module MCP2515 | 2 | Amazon | AliExpress |
| 4 | I2C LCD Display | 1 | Amazon | AliExpress |
| 5 | DHT11 Sensor | 1 | Amazon | AliExpress |
| 6 | Jumper Wires | 30 | Amazon | AliExpress |
| 7 | Breadboard | 2 | Amazon | AliExpress |
CAN BUS (Controller Area Network)
The CAN bus is an automotive bus developed by Bosch, allowing microcontrollers and devices to communicate with each other within a vehicle without a host computer. CAN bus is a message-based protocol, designed specifically for automotive applications but now also used in other areas such as aerospace, industrial automation, and medical equipment.

It become an international standard (ISO 11898) in 1994 and was specially developed for fast serial data exchange between electronic controllers in motor vehicles. It connects the individual systems and sensors as an alternative to conventional multi-wire looms. It allows automotive components to communicate on a single or dual-wire networked data bus up to 1Mbps.
Principle of operation of the CAN BUS
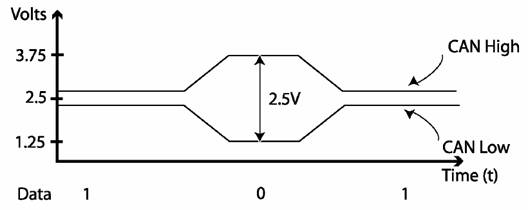
CAN bus uses two dedicated wires for communication. The wires are called CAN high and CAN low. The CAN controller is connected to all the components on the network via these two wires. Each network node has a unique identifier. All ECUs on the bus are effectively in parallel and that’s why all the nodes see all of the data, all of the time. A node only responds when it detects its own identifier. Individual nodes can be removed from the network without affecting the other nodes.
When the CAN bus is in idle mode, both lines carry 2.5V. When data bits are being transmitted, the CAN high line goes to 3.75V, and the CAN low drops to 1.25V, thereby generating a 2.5V differential between the lines.
CAN power can be supplied through the CAN bus. Or a power supply for the CAN bus modules can be arranged separately. The power supply wiring can be either totally separate from the CAN bus lines resulting in two 2-wire cables being utilized for the network, or it can be integrated into the same cable as the CAN bus lines resulting in a single 4-wire cable.
The nature of CAN bus communications allows all modules to transmit and receive data on the bus. Any module can transmit data, which all the rest of the modules receive. It is very important that the CAN bus bandwidth is allocated to the most safety-critical systems first. Nodes are usually assigned to one of a number of priority levels. A process known as arbitration decides the priority of any messages.
Most motor vehicle CAN network operate at a bus speed of 250 kB/s or 500 kB/s.
Applications of CAN BUS
- The controller area network (CAN) is used for transmission airbags, antilock braking, electric power steering, etc.
- It is used in audio-video systems.
- The controller area network (CAN) is used in lifts and escalators.
- It is used in sports cameras.
- It is used in automatic doors.
- It is used in telescopes and coffee machines.
- The controller area network (CAN) is used in aircraft with flight state sensors,
navigation systems, and flight data analysis to aircraft engine control systems such as
fuel systems, linear actuators, and pumps. - It is used for windows, doors, and mirror adjustment.
- It is used in railway applications such as streetcars, trams, undergrounds, light
railways, long-distance trains incorporate, etc.
Comparison of CAN over I2C & SPI
| I2C | SPI | CAN | |
| Speed | Standard: 100Kbps, Fast: 400 Kbps, Highspeed:3.4Mbps | 3Mbps to 10Mbps | 10KBps to 1MBps |
| Types | Synchronous | Synchronous | Asynchronous |
| Wires | 2 wires (SDA, SCL) | 4 Wires (MISO, MOSI, SCK, CS) | 2 wires (CAN_H, CAN_L) |
| Duplex Mode | Half Duplex | Full Duplex | Half Duplex |
MCP2515 CAN Bus Controller Module
The MCP2515 CAN Bus Controller is a simple Module that supports CAN Protocol version 2.0B and can be used for communication at 1Mbps.

This particular module is based on MCP2515 CAN Controller IC and TJA1050 CAN Transceiver IC. The MCP2515 IC is a standalone CAN Controller and has an integrated SPI Interface for communication with microcontrollers. Coming to the TJA1050 IC, it acts as an interface between the MCP2515 CAN Controller IC and the Physical CAN Bus.

The board has a 8 MHz Crystal oscillator. Even the 16 MHz version is also available. A jumper can be attached which will give 120ohm Termination. CAN_H & CAN_L are the two screws where wires can be attached over a distance for communicating with other CAN Module.
Following is the schematic of MCP2515 CAN Module.

MCP2515 IC is the main controller that internally consists of three main subcomponents: The CAN Module, the Control Logic, and the SPI Block. CAN Module is responsible for transmitting and receiving messages on the CAN Bus. Control Logic handles the setup and operation of the MCP2515 by interfacing all the blocks. The SPI Block is responsible for the SPI communication interface. The TJA1050 IC IC is responsible for taking the data from the controller and relaying it onto the bus.
Features and Specification of MCP2515
- Uses High-speed CAN transceiver TJA1050
- Dimension: 40×28mm
- SPI control for expanding Multi CAN bus interface
- 8MHZ crystal oscillator
- 120Ω terminal resistance
- Has independent key, LED indicator, Power indicator
- Supports 1 Mb/s CAN operation
- Low current standby operation
- Up to 112 nodes can be connected
For more information refer to MCP2515 Datasheet which also has a detailed guide.
How to use MCP2515 CAN Bus Module with Arduino?
Now let us interface MCP2515 CAN Bus Module with Arduino and test the CAN Communication protocol. We will transmit the DHT11 Sensor data over a CAN Bus with the help of pair of Arduino Board & MCP2515 CAN Module. Here is the simple connection diagram.

The upper part consisting of Arduino UNO Board, CAN Module & I2C LCD is a receiver part. Similarly, the bottom part consisting of Arduino Nano Board, CAN Module & DHT11 Humidity Temperature Sensor is the transmitter part.
The transmitter & Receiver Part is connected to each other with the help of the MCP2515 CAN Bus Module. The CAN_H & CAN_L of the transmitter are connected to the CAN_H & CAN_L of the receiver respectively.

The connection between Arduino Board & MCP2515 CAN Module is as follows.
| MCP2515 Pin | Arduino Pin |
| VCC | 5V |
| GND | GND |
| CS | D10 |
| SO | D12 |
| SI | D11 |
| SCK | D13 |
| INT | D2 |
On the transmitter part, the DHT11 Sensor output pin is connected to Arduino Nano D8 Pin. The DHT11 VCC & GND Pin is connected to 3.3V & GND of Arduino.

On the receiver part, the 16×2 I2C Display has 4 pins & VCC, GND, SCL, and SDA. The SCL & SDA are I2C Pins that are connected to the A5 & A4 of the Arduino Board. The VCC & GND of LCD connects to the 5V & GND of Arduino.

You can assemble the circuit on a breadboard or you can use your own custom PCB for this project.
Source Code/Program for Arduino MCP2515 CAN Communication
Before moving to the coding part of the project, we need to install MCP2515 CAN Bus Library to the Arduino IDE. Download the library from the following link and then add it to the Arduino Library folder.
This CAN-BUS library gives your Arduino CAN-BUS capability with the following features.
- Implements CAN V2.0B at up to 1 Mb/s
- SPI Interface up to 10 MHz
- Standard (11 bit) and extended (29 bit) data and remote frames
- Two receive buffers with prioritized message storage
You also need to add DHT11 Library to Arduino Library Folder.
The code is divided into two parts one as CAN transmitter code (Arduino Nano) and the other as CAN Receiver code (Arduino UNO).
CAN Transmitter Code
|
1 2 3 4 5 6 7 8 9 10 11 12 13 14 15 16 17 18 19 20 21 22 23 24 25 26 27 28 29 30 31 32 33 34 35 36 37 38 39 40 41 42 43 44 45 46 |
#include <SPI.h> //Library for using SPI Communication #include <mcp2515.h> //Library for using CAN Communication (https://github.com/autowp/arduino-mcp2515/) #include <DHT.h> //Library for using DHT sensor #define DHTPIN 8 #define DHTTYPE DHT11 struct can_frame canMsg; MCP2515 mcp2515(10); DHT dht(DHTPIN, DHTTYPE); //initilize object dht for class DHT with DHT pin with STM32 and DHT type as DHT11 void setup() { while (!Serial); Serial.begin(9600); SPI.begin(); //Begins SPI communication dht.begin(); //Begins to read temperature & humidity sesnor value mcp2515.reset(); mcp2515.setBitrate(CAN_500KBPS, MCP_8MHZ); //Sets CAN at speed 500KBPS and Clock 8MHz mcp2515.setNormalMode(); } void loop() { int h = dht.readHumidity(); //Gets Humidity value int t = dht.readTemperature(); //Gets Temperature value canMsg.can_id = 0x036; //CAN id as 0x036 canMsg.can_dlc = 8; //CAN data length as 8 canMsg.data[0] = h; //Update humidity value in [0] canMsg.data[1] = t; //Update temperature value in [1] canMsg.data[2] = 0x00; //Rest all with 0 canMsg.data[3] = 0x00; canMsg.data[4] = 0x00; canMsg.data[5] = 0x00; canMsg.data[6] = 0x00; canMsg.data[7] = 0x00; mcp2515.sendMessage(&canMsg); //Sends the CAN message delay(1000); } |
CAN Receiver Code
|
1 2 3 4 5 6 7 8 9 10 11 12 13 14 15 16 17 18 19 20 21 22 23 24 25 26 27 28 29 30 31 32 33 34 35 36 37 38 39 40 41 42 43 44 45 46 |
#include <SPI.h> //Library for using SPI Communication #include <mcp2515.h> //Library for using CAN Communication (https://github.com/autowp/arduino-mcp2515/) #include <LiquidCrystal_I2C.h> LiquidCrystal_I2C lcd(0x27,16,2); // set the LCD address to 0x3F for a 16 chars and 2 line display struct can_frame canMsg; MCP2515 mcp2515(10); // SPI CS Pin 10 void setup() { Serial.begin(9600); //Begins Serial Communication at 9600 baudrate SPI.begin(); //Begins SPI communication lcd.init(); lcd.clear(); lcd.backlight(); // Make sure backlight is on lcd.setCursor(0, 0); lcd.print("CANBUS TUTORIAL"); delay(3000); lcd.clear(); mcp2515.reset(); mcp2515.setBitrate(CAN_500KBPS, MCP_8MHZ); //Sets CAN at speed 500KBPS and Clock 8MHz mcp2515.setNormalMode(); //Sets CAN at normal mode } void loop() { if (mcp2515.readMessage(&canMsg) == MCP2515::ERROR_OK) // To receive data (Poll Read) { int x = canMsg.data[0]; int y = canMsg.data[1]; lcd.setCursor(0, 0); //Display Temp & Humidity value received at 16x2 LCD lcd.print("Humi: "); lcd.print(x); lcd.setCursor(0, 1); lcd.print("Temp: "); lcd.print(y); delay(1000); lcd.clear(); } } |
Code Explanation
A canMsg struct data type for storing CAN message format.
|
1 |
struct can_frame canMsg; |
It set the pin number where SPI CS is connected.
|
1 |
MCP2515 mcp2515(10); |
The MCP2515 is being RESET using the following command.
|
1 |
mcp2515.reset(); |
The MCP2515 is set to a speed of 500KBPS and 8MHZ as the clock frequency.
|
1 |
mcp2515.setBitrate(CAN_500KBPS,MCP_8MHZ); |
The MCP2525 is set at normal mode.
|
1 |
mcp2515.setNormalMode(); |
The CAN ID is given as 0x036 and DLC as 8 and we give the h and t data to the data[0] and data[1] and reset all data with 0.
|
1 2 3 4 5 6 7 8 9 10 |
canMsg.can_id = 0x036; canMsg.can_dlc = 8; canMsg.data[0] = h; canMsg.data[1] = t; canMsg.data[2] = 0x00; canMsg.data[3] = 0x00; canMsg.data[4] = 0x00; canMsg.data[5] = 0x00; canMsg.data[6] = 0x00; canMsg.data[7] = 0x00; |
In order to send the message to CAN BUS we use the following statement.
|
1 |
mcp2515.sendMessage(&canMsg); |
This statement is used to receive the message from the CAN bus. If the message is received it gets into the if condition.
|
1 |
if (mcp2515.readMessage(&canMsg) == MCP2515::ERROR_OK) |
In the if condition the data is received and stored in canMsg, the data [0] that has humidity value and data [1] that has temperature value. Both values are stored in an integer x and y.
|
1 2 |
int x = canMsg.data[0]; int y = canMsg.data[1]; |
Project Testing & Working
After assembling the, upload the program for the CAN transmitter and CAN receiver in the respective Arduino boards.

When powered you should notice the temperature value read by DHT11 will be sent to another Arduino through CAN communication and displayed on the LCD of the 2nd Arduino as you can see in the below image.

Video Tutorial & Guide


")


8 Comments
Cool bro
how to connect multiple arduino as nodes
I have used a modification of the above code with a different sensor (LM35 Temperature Sensor). I am able to feed my data into canMsg.data[0] and canMsg.data[1]. However, I am not getting any data at the reciever. In fact, the condition ” if (mcp2515.readMessage(&canMsg) == MCP2515::ERROR_OK) ” itself is not being met. I have made no changes to this part of the code. Any leads on where I am doing a mistake?
I have the same problem with Varun, anyone can inform us?
I had the exact same problem. The problem most likely comes from the hardware. What i did was first to add a female to female jumper wire to the 120ohm jumper termination. do this for both mcp2515 . then I took all the wires out from the sensor and the display and left just the conections for the Can transmission and ran an example from library autowp-mcp2515 until i made sure this part worked. I also borrowed some extra MCPs from friends to try out with those because sometimes these MCP2515 are broken and don’t work. And when nothing worked i took all the wires out and I did again the connections and then it worked. In my case i had a broke MPC2515 and most likely a wire that didn’t make contact somewhere.
You can connect multiple nodes by connecting wires to Can H and Can L on one side of each MCP2515 and on the other side you connect the wires to the breadboard in a row. All Can H wires are on one row and all Can L are in another row ( the rows are the ones that have numbers on the breadboard. the collums have letters).
Brilliant content! The delivery was incredibly didactic, making it easy to grasp and comprehend.
Nice, but didn’t got working this. Micro Arduino and DHT11 work fine but do not get data to the Arduino Uno even modifying the code. Maybe something wrong with MCP2515 can bus modules? Didn’t find what was issue…