

Overview
In this project, we will make IoT Based Drinking Water Quality Monitoring System with ESP32 WiFi Module, TDS/EC Sensor & Temperature Sensor. This complete system can be used to monitor the drinking water quality, i.e Water Electrical Conductivity or EC & Water Temperature. The EC & temperature value can be monitored online from any part of the world on an IoT Server called Thingspeak.
According to WHO standards, EC value should not exceed 400 μS/cm or 0.4mS/cm. The best temperature for drinking water is room temperature (20°C / 68°F) for maximum flavor or chilled cold (6°C / 43°F) for maximum refreshment.
This project uses a TDS Sensor and DS18B20 waterproof temperature sensor along with ESP32 WiFi Module to measure water quality monitoring parameters like Electrical Conductivity & temperature. The EC & Temperature value will be displayed on a 0.96″ I2C OLED Display. The same data can also be monitored graphically on Thingspeak Server online.
Check the previous projects related to TDS Sensor:
1. Arduino Based TDS Meter
2. IoT ESP8266 TDS Meter
3. Aquarium Water Quality Monitoring System
Bill of Materials
To make IoT based Water Quality Monitoring System, we need the following components. You can purchase all these components online from the given link.
| S.N. | Components Name | Quantity | Purchase Links |
|---|---|---|---|
| 1 | ESP32 Board | 1 | Amazon | AliExpress |
| 2 | Analog TDS Sensor | 1 | Amazon | AliExpress |
| 4 | DS81B20 Temperature Sensor | 1 | Amazon | AliExpress |
| 5 | Resistor 4.7K | 1 | Amazon | AliExpress |
| 6 | Connecting Wires | 10 | Amazon | AliExpress |
| 7 | Breadboard | 1 | Amazon | AliExpress |
What is Water Electrical Conductivity (EC)?
EC or Electrical Conductivity of water is its ability to conduct an electric current. Salts or other chemicals that dissolve in water can break down into positively and negatively charged ions. These free ions in the water conduct electricity, so the water’s electrical conductivity depends on the concentration of ions.
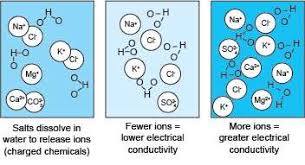
Salinity and total dissolved solids (TDS) are used to calculate the EC of water, which helps to indicate the water’s purity. The pure the water, the lower the conductivity. To give a real-life example, distilled water is almost an insulator, but salt water is a very efficient electrical conductor.
Analog TDS Sensor
The Analog TDS Sensor is an Arduino-compatible TDS sensor/Meter Kit for measuring TDS value of the water. It can be applied to domestic water, hydroponic and other fields of water quality testing. This product supports 3.3 ~ 5.5V wide voltage input, and 0 ~ 2.3V analog voltage output, which makes it compatible with 5V or 3.3V control systems or boards.

The excitation source is an AC signal, which can effectively prevent the probe from polarization and prolong the life of the probe, meanwhile, it can help increase the stability of the output signal. The TDS probe is waterproof, it can be immersed in water for long time measurement.
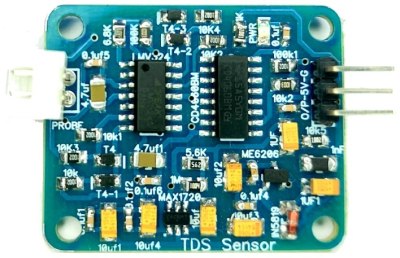
The sensor has a TDS Measurement Range between 0 ~ 1000ppm with an accuracy of 10% FS (25 ℃). The probe can not to be used in water above 55 degrees centigrade.
Specifications
- Input Voltage: 3.3 ~ 5.5V
- Output Voltage: 0 ~ 2.3V
- Working Current: 3 ~ 6mA
- TDS Measurement Range: 0 ~ 1000ppm
- TDS Measurement Accuracy: ± 10% F.S. (25 ℃)
- Waterproof Probe
DS18B20 Waterproof Temperature Sensor
This is a pre-wired and waterproofed version of the DS18B20 Sensor used to measure something far away, or in wet conditions. The Sensor can measure the temperature between -55 to 125°C (-67°F to +257°F). The cable is jacketed in PVC. These 1-wire digital temperature sensors are fairly precise, i.e ±0.5°C over much of the range. They work great with any microcontroller using a single digital pin.

The sensor requires two libraries like Dallas Temperature Sensor Library & One-Wire Library. It also requires a 4.7k resistor, which is required as a pullup from the DATA to the VCC line when using the sensor. To learn more about this sensor you can go through the previous post: DS18B20 Sensor Tutorial.
Circuit: IoT Based Water Quality Monitoring System
Now, let us interface the Analog TDS Sensor & DS18B20 Temperature Sensor with ESP32 Board. The reason why we are using a temperature sensor is that the temperature parameter is required during Electrical Conductivity EC Value compensation. The EC values change a lot with rising and fall in temperature.
Here is the simple connection diagram for the project.

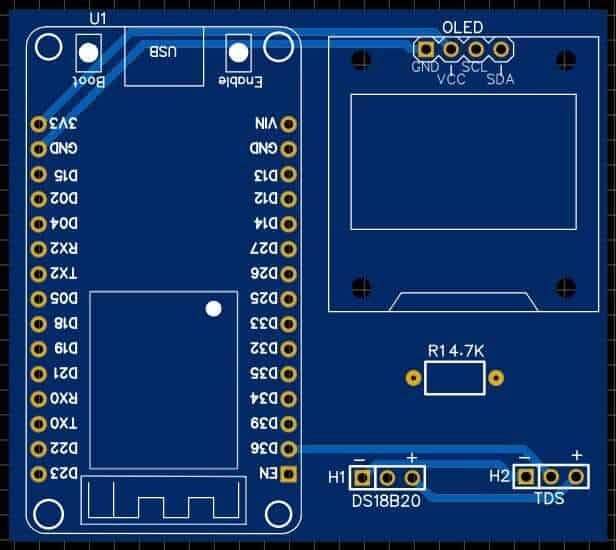
Connect the TDS & Temperature Sensor VCC & GND Pin to ESP32 3.3V & GND Pin respectively. Connect the output analog pin of the TDS Sensor to ESP32 A0 Pin, which is the GPIO36 Pin. Similarly, connect the output of DS18B20 to ESP32 IO14 Pin. A 4.7K pull of resistor is necessary and requires a connection between the DS18B20 output pin & 3.3V VCC as a parasitic power.

You may assemble the components on a breadboard for testing purposes.
Project PCB Gerber File & PCB Ordering Online
If you don’t want to assemble the circuit on a breadboard and you want PCB for the project, then here is the PCB for you. I used EasyEDA to design the PCB. The PCB Board for IoT Water Quality Monitoring looks something like below.


The Gerber File for the PCB is given below. You can simply download the Gerber File and order the PCB from ALLPCB at 1$ only.
You can use this Gerber file to order high quality PCB for this project. To do that visit the ALLPCB official website by clicking here: https://www.allpcb.com/.

You can now upload the Gerber File by choosing the Quote Now option. From these options, you can choose the Material Type, Dimensions, Quantity, Thickness, Solder Mask Color and other required parameters.

After filling all details, select your country and shipping method. Finally you can place the order.
You can assemble the components on the PCB Board.
Setting up Thingspeak Server
In order to Monitor the Electrical Conductivity (EC) & Temperature data on Thingspeak Server, you first need to Setup the Thingspeak. To set up the Thingspeak Server, visit https://thingspeak.com/. Create an account or simply sign in if you created the account earlier. Then create a new channel with the following details.
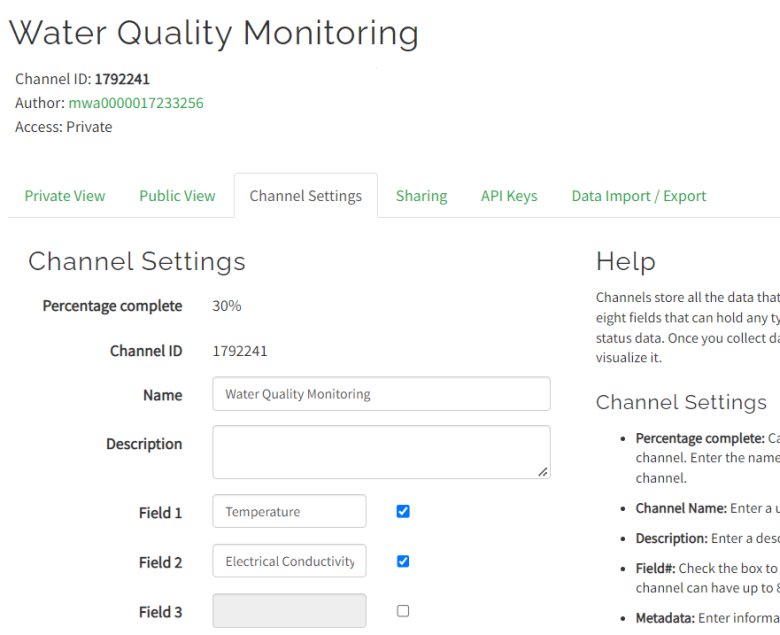
Then go to the API section of the dashboard and copy the API Key. This API key is needed in the code part.

Source Code/Program
The source code/program for IoT Based Drinking Water Quality Monitoring with ESP32 is written in C/C++ on Arduino IDE. The code uses a lot of libraries in this project.
Some of the libraries for this project along with the download link are given below. First, download all these libraries and add them to the Arduino library folder.
1. OneWire Library: https://github.com/PaulStoffregen/OneWire
2. Dallas Temperature Library: https://github.com/milesburton/Arduino-Temperature-Control-Library
3. ADS1015 Library: https://github.com/adafruit/Adafruit_ADS1X15 (Install version 1.4)
4. DFRobot ESP EC Library: https://github.com/GreenPonik/DFRobot_ESP_EC_BY_GREENPONIK
5. Adafruit GFX Library: https://github.com/adafruit/Adafruit-GFX-Library
6. Adafruit SSD1306 Library: https://github.com/adafruit/Adafruit_SSD1306
The complete code for the project is given below. Before uploading the code to the ESP32 Board, you need to make some changes to the following lines.
|
1 2 3 4 |
String apiKey = "****************"; // Enter your Write API key from ThingSpeak const char *ssid = "****************"; // replace with your wifi ssid and wpa2 key const char *pass = "****************"; |
Replace the Thingspeak API Key with the key that you copied earlier from the Thingspeak setup API tab. Then change the WiFi SSID & Password by replacing them with your local SSID & password.
Now you can upload the code to the ESP32 WiFi Module.
|
1 2 3 4 5 6 7 8 9 10 11 12 13 14 15 16 17 18 19 20 21 22 23 24 25 26 27 28 29 30 31 32 33 34 35 36 37 38 39 40 41 42 43 44 45 46 47 48 49 50 51 52 53 54 55 56 57 58 59 60 61 62 63 64 65 66 67 68 69 70 71 72 73 74 75 76 77 78 79 80 81 82 83 84 85 86 87 88 89 90 91 92 93 94 95 96 97 98 99 100 101 102 103 104 105 106 107 108 109 110 111 112 113 114 115 116 117 118 119 120 121 |
#include <Arduino.h> #include <Wire.h> #include <EEPROM.h> #include <WiFi.h> #include <OneWire.h> #include <DallasTemperature.h> #include <Adafruit_ADS1015.h> #include <DFRobot_ESP_EC.h> #include <Adafruit_GFX.h> #include <Adafruit_SSD1306.h> #define SCREEN_WIDTH 128 // OLED display width, in pixels #define SCREEN_HEIGHT 64 // OLED display height, in pixels // Declaration for an SSD1306 display connected to I2C (SDA, SCL pins) Adafruit_SSD1306 display(SCREEN_WIDTH, SCREEN_HEIGHT, &Wire, -1); #define ONE_WIRE_BUS 14 // this is the gpio pin 13 on esp32. OneWire oneWire(ONE_WIRE_BUS); DallasTemperature sensors(&oneWire); DFRobot_ESP_EC ec; Adafruit_ADS1115 ads; float voltage, ecValue, temperature = 25; String apiKey = "**************"; // Enter your Write API key from ThingSpeak const char *ssid = "**************"; // replace with your wifi ssid and wpa2 key const char *pass = "**************"; const char* server = "api.thingspeak.com"; WiFiClient client; void setup() { Serial.begin(115200); EEPROM.begin(32);//needed EEPROM.begin to store calibration k in eeprom ec.begin(); sensors.begin(); if (!display.begin(SSD1306_SWITCHCAPVCC, 0x3C)) { // Address 0x3D for 128x64 Serial.println(F("SSD1306 allocation failed")); for (;;); } delay(2000); display.clearDisplay(); Serial.println("Connecting to "); Serial.println(ssid); WiFi.begin(ssid, pass); while (WiFi.status() != WL_CONNECTED) { delay(500); Serial.print("."); } Serial.println(""); Serial.println("WiFi connected"); } void loop() { voltage = analogRead(A0); // A0 is the gpio 36 sensors.requestTemperatures(); temperature = sensors.getTempCByIndex(0); // read your temperature sensor to execute temperature compensation ecValue = ec.readEC(voltage, temperature); // convert voltage to EC with temperature compensation Serial.print("Temperature:"); Serial.print(temperature, 2); Serial.println("ºC"); Serial.print("EC:"); Serial.println(ecValue, 2); display.setTextSize(2); display.setTextColor(WHITE); display.setCursor(0, 10); display.print("T:"); display.print(temperature, 2); display.drawCircle(85, 10, 2, WHITE); // put degree symbol ( ° ) display.setCursor(90, 10); display.print("C"); display.setCursor(0, 40); display.print("EC:"); display.print(ecValue, 2); display.display(); delay(1500); display.clearDisplay(); ec.calibration(voltage, temperature); // calibration process by Serail CMD if (client.connect(server, 80)) // "184.106.153.149" or api.thingspeak.com { String postStr = apiKey; postStr += "&field1="; postStr += String(temperature, 2); postStr += "&field2="; postStr += String(ecValue, 2); postStr += "\r\n\r\n"; delay(500); client.print("POST /update HTTP/1.1\n"); client.print("Host: api.thingspeak.com\n"); client.print("Connection: close\n"); client.print("X-THINGSPEAKAPIKEY: " + apiKey + "\n"); client.print("Content-Type: application/x-www-form-urlencoded\n"); client.print("Content-Length: "); client.print(postStr.length()); client.print("\n\n"); client.print(postStr); delay(500); } client.stop(); } |
Water Quality Monitoring with ESP32 on Thingspeak Server
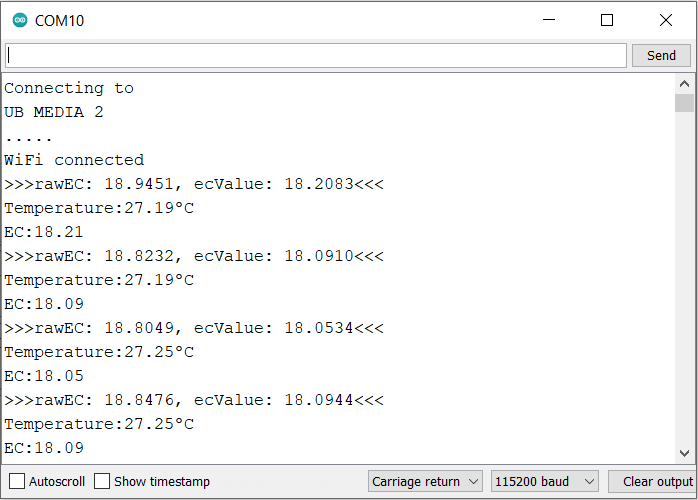
After uploading the code to the ESP32 Board, the ESP32 will try connecting to the WiFi Network. Once it connects to the WiFi Network, it will start reading the EC & Temperature values from the Sensor. You can open the Serial Monitor to read those values.
The temperature sensor will show the room temperature. When the TDS Sensor is dry and not exposed to air, it will show an EC value as zero. You can view these data on OLED Screen.

When the temperature Sensor & TDS Sensor is dipped in water, the OLED will display the EC & Temperature value of the water.

Adding more salts to water increases the electrical conductivity of water & will show a massive rise in water EC value.

You can also monitor the same data on the Thingspeak dashboard. To view the data, go to the Thingspeak private view & you will see the EC & Temperature data getting uploaded after the interval of every 15 seconds.

This is how you can make your own IoT-Based Drinking Water Quality Monitoring with ESP32 WiFi Module, Analog TDS Sensor & DS18B20 Temperature Sensor.
Video Tutorial & Guide


8 Comments
Sir, for below program the mentioned version (1.4) is not available ; so can you tell which version should i download?
3. ADS1015 Library: https://github.com/adafruit/Adafruit_ADS1X15 (Install version 1.4)
Port not selected in ssp 32 what can i do
Hello Hello sir, I have tried to make a project from your youtube channel. But there is a little problem with it. I do not have the LCD display that you have installed. I have 16×2 I2c module display
Try using the Older version…its work for me
hi, the temperature sensor is only showing -127 constantly, what is the issue?
Connect 4.7k resistor between the ouput and vcc pin of DS18B20.
We cant see the graph in thingspeak
Everything worked. But the values are not showing on thingspeak . What should i do