

Overview
In this project, we use HC-SR04 Ultrasonic Distance Sensor with Arduino for displaying the measured distance on an LCD screen. The HC-SR04 sensor operates on the principle of sonar, emitting an ultrasonic wave at a specific frequency that reflects off an object and returns to the sensor. The system then calculates the distance to the object by measuring the time taken for the ultrasonic wave to travel to the object and back.
First we will interface the HC-SR04 Ultrasonic Distance Sensor with Arduino Code and display the measured distance in Serial Monitor. Later, we will add an additional 16×2 I2C LCD Display to the system which will display the measured distance in Screen. The HC-SR04 Ultrasonic Sensor can be used for a variety of applications, such as obstacle detection systems, automation projects, and more.
Components Required
For this tutorial I am using the SunFounder Arduino Starter Kit which has 90+ components.
Here are the list of components I am using from this Kit.
| S.N. | Components | Quantity | Purchase Links |
|---|---|---|---|
| 1 | Arduino UNO R4/R3 Board | 1 | Amazon | AliExpress |
| 2 | Ultrasonic Sensor HC-SR04 | 1 | Amazon | AliExpress | SunFounder |
| 3 | 16X2 I2C LCD Display | 1 | Amazon | AliExpress | SunFounder |
| 4 | Connecting Wires | 10 | Amazon | AliExpress | SunFounder |
| 5 | Type C USB Cable | 1 | Amazon | AliExpress |
| 6 | Breadboard | 1 | Amazon | AliExpress | SunFounder |
HC-SR04 Ultrasonic Distance Sensor
The HC-SR04 ultrasonic sensor uses sonar to determine the distance to an object like bats do. It offers excellent non-contact range detection with high accuracy and stable readings in an easy-to-use package.

From 2cm to 400 cm or 1” to 13 feet. Its operation is not affected by sunlight or black material like sharp rangefinders are (although acoustically soft materials like cloth can be difficult to detect). It comes complete with the ultrasonic transmitter and a receiver module. A waterproof version of this Ultrasonic Sensor is also available called as JSN-SR04T/AJ-SR04M.
How Does the Ultrasonic Sensor HC-SR04 Work?
Ultrasonic sensors function by emitting a sequence of short, high-frequency sound waves. These sound waves are produced at regular intervals and travel through the air at a consistent speed, known as the speed of sound. When these ultrasonic waves encounter any object in their path, they are reflected back toward the sensor, creating an echo that is detected by the sensor’s receiver.

The sensor is equipped with the capability to calculate the distance to the object by analyzing the time interval between the moment the sound pulse is emitted and the moment the echo is received. This time interval is directly related to the round-trip distance that the sound waves have traveled.
To convert this time interval into a distance measurement, we use the formula:
Where:
- is the distance to the object (in centimeters),
- is the speed of sound in air (approximately 340 meters per second or 0.034 centimeters per microsecond),
- is the time interval measured from when the sound wave is emitted to when the echo is received (in seconds).
It’s important to note that the time measured is the total time for the sound wave to travel to the object and back to the sensor. Since we are interested in the distance from the sensor to the object, not the round trip, we divide the time by 2.
By using this formula, the ultrasonic sensor can provide a precise measurement of the distance to an object, which can be utilized in various applications such as collision avoidance systems, robotics, level sensing, and more.
Specifications of HC-SR04 Ultrasonic Distance Sensor
The specifications of the HC-SR04 Ultrasonic Distance Sensor are below:
- Minimum measuring range – 2 cm
- Maximum measuring range: 400 cm or 4 meter
- Accuracy : 3 mm
- Operating Voltage: +5V
- Operating Current: 15mA
- Working Frequency: 40 KHz
- Trigger Input signal: 10us pulse
- Measuring angle: 15 degrees
Pinout of HC-SR04
The HC-SR04 ultrasonic sensor has 4 Pins.

- VCC (Power): This pin powers the sensor, typically with +5V from the microcontroller board.
- Trig (Trigger): This pin is used to initiate the ultrasonic pulse. A short pulse of 10 microseconds sent to this pin starts the ultrasonic burst.
- Echo (Echo Pulse): This pin outputs a pulse from the sensor. The duration of this pulse is proportional to the time taken for the ultrasonic wave to travel to the object and back to the sensor.
- GND (Ground): This pin is connected to the ground of the circuit.
Interfacing HC-SR04 Ultrasonic Distance Sensor with Arduino
Now lets interface the HC-SR04 Ultrasonic Distance Sensor with Arduino. Here is the simple connection diagram.
Hardware Connection
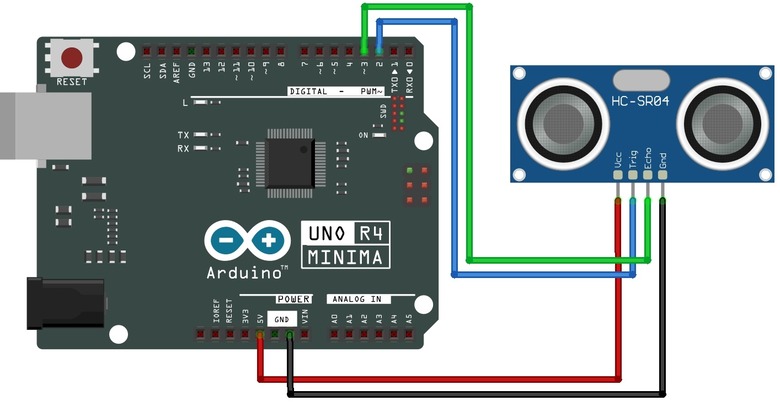
- VCC connects to the 5V output on the Arduino.
- Trig connects to a D2 pin on the Arduino.
- Echo connects to D3 pin on the Arduino.
- GND connects to the ground pin on the Arduino.
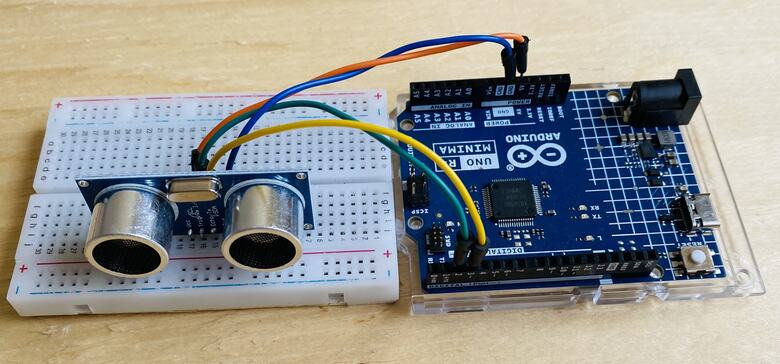
You can use a breadboard and jumper wires for connection.
Source Code/Program
Here is the simple code for reading the distance value from HC-SR04 Ultrasonic Sensor using the Arduino Code.
|
1 2 3 4 5 6 7 8 9 10 11 12 13 14 15 16 17 18 19 20 21 22 23 24 25 26 27 28 29 30 31 32 33 34 35 36 37 38 39 40 41 42 43 44 45 46 47 |
/* Read data from an ultrasonic sensor connected to the Arduino board and print the distance measurement in centimeters through the serial communication. Board: Arduino Uno R4 (or R3) Component: Ultrasonic distance Sensor(HC-SR04) */ // Define the pin numbers for the ultrasonic sensor const int echoPin = 3; const int trigPin = 2; void setup() { Serial.begin(9600); // Start serial communication with a baud rate of 9600 pinMode(echoPin, INPUT); // Set echo pin as input pinMode(trigPin, OUTPUT); // Set trig pin as output Serial.println("Ultrasonic sensor:"); // Print a message indicating the ultrasonic sensor is ready } void loop() { float distance = readDistance(); // Call the function to read the sensor data and get the distance if (distance > 400) { // Check if the distance is greater than 400 cm Serial.println("Out of Range"); // Print "Out of Range" } else { Serial.print(distance); // Print the distance value Serial.println(" cm"); // Print " cm" to indicate the unit of measurement } delay(400); // Delay for 400 milliseconds before repeating the loop } // Function to read the sensor data and calculate the distance float readDistance() { digitalWrite(trigPin, LOW); // Set trig pin to low to ensure a clean pulse delayMicroseconds(2); // Delay for 2 microseconds digitalWrite(trigPin, HIGH); // Send a 10 microsecond pulse by setting trig pin to high delayMicroseconds(10); digitalWrite(trigPin, LOW); // Set trig pin back to low // Measure the pulse width of the echo pin and calculate the distance value float pulse_duration = pulseIn(echoPin, HIGH); // Read pulse duration float distance = pulse_duration / 58.00; // Calculate the distance return distance; // Return the calculated distance } |
To upload the code to the Arduino Board, Select the Arduino UNO Board from Tools Menu and also select the COM port. Then upload the code by clicking on upload button.
Testing & Results
The device is ready for testing after the code uploading is done.
Place some solid flat object in front of the Ultrasonic Sensor.

Then open the Serial Monitor on the Arduino IDE. The Serial Monitor will show the measured distance.

To test it further place the obstacle at far distance from the Sensor.

Observe the distance on the Serial Monitor. The Serial Monitor will show the measured distance again.

You can increase or decrease the distance between 2cm to 400cm and measurement will be shown in Serial Monitor.
Interfacing HC-SR04 Ultrasonic Sensor with Arduino & LCD Display
Now lets add an extra component to the above circuit for distance visualization. We can use 16×2 I2C LCD Display with the Arduino UNO.
Hardware Connection
Here is a connection between Arduino and 16×2 I2C LCD Display along with HC-SR04 Ultrasonic Sensor.

- VCC connects to the 5V output on the Arduino.
- SDA connects to a A4 pin on the Arduino.
- SCL connects to A5 pin on the Arduino.
- GND connects to the ground pin on the Arduino.
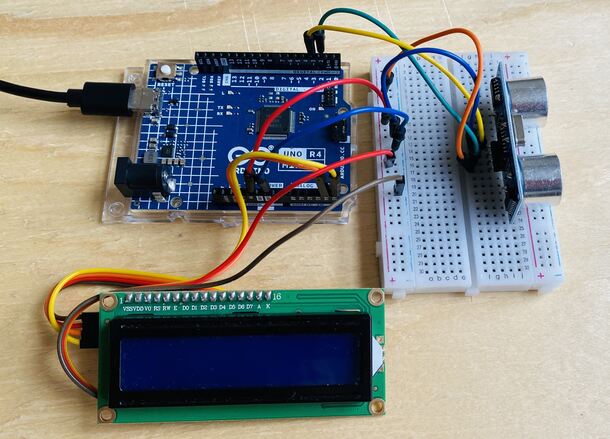
You can again use Jumper Wires for connections.
Source Code/Program
We can modify the above code by adding the extra code for LCD Display. Then we can print the Measured Distance on LCD Screen.
Before that, we need to add I2C LCD Library to the Arduino Library Folder.
Here is the complete code for this project.
|
1 2 3 4 5 6 7 8 9 10 11 12 13 14 15 16 17 18 19 20 21 22 23 24 25 26 27 28 29 30 31 32 33 34 35 36 37 38 39 40 41 42 43 44 45 46 47 48 49 50 51 52 53 54 55 |
#include <Wire.h> #include <LiquidCrystal_I2C.h> // Define the pin numbers for the ultrasonic sensor const int echoPin = 3; const int trigPin = 2; // Set the LCD address to 0x27 for a 16 chars and 2 line display LiquidCrystal_I2C lcd(0x27, 16, 2); void setup() { // Initialize the LCD lcd.init(); // Turn on the backlight. lcd.backlight(); pinMode(echoPin, INPUT); // Set echo pin as input pinMode(trigPin, OUTPUT); // Set trig pin as output lcd.print("Ultrasonic Sensor"); // Print a message on the LCD } void loop() { float distance = readDistance(); // Call the function to read the sensor data and get the distance lcd.clear(); // Clear the LCD display lcd.setCursor(0,0); lcd.print("Distance: "); lcd.setCursor(0,1); if (distance > 400) // Check if the distance is greater than 400 cm { lcd.print("Out of Range"); // Print "Out of Range" on the LCD } else { lcd.print(distance); // Print the distance value on the LCD lcd.print(" cm"); // Print " cm" to indicate the unit of measurement } delay(750); // Delay for 750 milliseconds before repeating the loop } // Function to read the sensor data and calculate the distance float readDistance() { digitalWrite(trigPin, LOW); // Set trig pin to low to ensure a clean pulse delayMicroseconds(2); // Delay for 2 microseconds digitalWrite(trigPin, HIGH); // Send a 10 microsecond pulse by setting trig pin to high delayMicroseconds(10); digitalWrite(trigPin, LOW); // Set trig pin back to low // Measure the pulse width of the echo pin and calculate the distance value float pulse_duration = pulseIn(echoPin, HIGH); // Read pulse duration float distance = pulse_duration / 58.00; // Calculate the distance return distance; // Return the calculated distance } |
Upload the code to the Arduino UNO Board.
Testing & Results
After uploading the code, the LCD will print the measured distance.
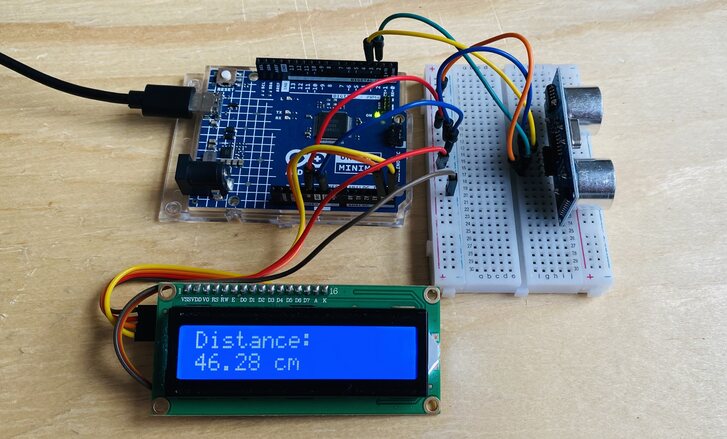
You can put some barrier in front of Ultrasonic Sensor and observe the distance on LCD Screen.

Projects using HC-SR04 Ultrasonic Sensor
There are many projects that can be done using the Ultrasonic Sensor such as distance measurement applications, such as robotic obstacle avoidance systems, and liquid level monitoring in tanks. Another common use is in interactive installations, like parking sensors and automated doors, where distance-triggered actions are required.
Here are some projects that has been done using this sensor.
- Obstacle Avoidance Robot
- Ultrasonic Range Finder with TFT LCD
- Blind Walking Stick
- Density Based Traffic Light Controller
- IoT Water Level Indicator
- Ultrasonic RADAR Model

")


