

Overview
In this guide, we will learn about the best 7-inch Raspberry Pi Touch Screen Display from SunFounder called TS-7 Pro. The TS-7 Pro 7-inch touchscreen display is an excellent addition to a Raspberry Pi setup. It provides a portable and interactive interface for the Raspberry Pi, allowing users to perform a variety of tasks without the need for a separate monitor, keyboard, or mouse.

The 7-inch touchscreen display is a compact and interactive display device that can be used with the Raspberry Pi single-board computer. With a resolution of 1024×600 pixels, it offers a convenient way to display content and interact with the Raspberry Pi. Setting up the 7-inch touchscreen display with a Raspberry Pi 4 involves connecting the display to the Pi’s GPIO pins, installing the necessary drivers, and configuring the display settings in the operating system. With the right setup, the 7-inch touchscreen display can be used for a variety of projects, including game consoles, digital photo frames, and smart home controllers.
Components Required
We need the following components for this complete setup. You can purchase all the components online from Amazon or SunFounder directly.
| S.N. | Components | Quantity | Purchase Link |
|---|---|---|---|
| 1 | Raspberry Pi 4 | 1 | Amazon | SunFounder |
| 2 | SD Card 16/32 GB | 1 | Amazon | SunFounder |
| 3 | TS-Pro 7 inch LCD Display | 1 | Amazon | SunFounder |
| 4 | 5V, 3A DC Adapter for RPi | 1 | Amazon | SunFounder |
| 5 | Mouse & Keyboard | 1 | Amazon | SunFounder |
SunFounder TS-7 Pro Hardware Details
Let’s have an overview of the SunFounder TS-7 Pro display first.

The 7-inch touchscreen display is a compact and user-friendly device that can be paired with a Raspberry Pi. With dual-channel speakers and a protective cover and stand, it offers both high-definition viewing and portability. Its onboard buttons allow for easy adjustments to volume and brightness, as well as the ability to turn the screen on and off.

This display also features a reserved hard drive mounting position, which is compatible with both 2.5-inch mechanical hard drives and solid-state drives. By using an SSD instead of a Micro SD card, you can increase the capacity and speed of your Raspberry Pi. Additionally, the 40-pin interface is reserved, giving you the ability to connect 40-pin cables or directly connect sensors for increased scalability.
Features of TS-7 Pro Display
- Screen Size: 7 inch Display
- Resolution: 1024×600 Pixels
- Working Voltage: DC 5V
- Rated Power: 3.5W
- Touch Screen: 5 dot touch control applies to it, plug and play.
- Refresh rate: 60Hz
- External Dimensions: 165×114×40mm (Excluding the height of the metal support(55mm))
- Visual Area: 154.21(H)×85.92(V)
- Panel Type IPS: 45% color gamut
- HD full view screen
- Response Time: 5ms
- Contrast Ratio: 800:1
- Visual Angle: 170°
- Display Color: 262K
- Brightness: 300cd/m2
- Input Signal: HDMI
- HDMI Input: Adjustable resolution ranging 640×480 ~1920×1200
- Speaker: 8Ω/2W
Interfaces Details

-
- Power: Used to provide power to this screen when you use it as an extended screen.
-
- Touch(External): When you use this screen as an external screen, you can connect this screen to your device with a micro USB cable. If the screen does not have enough power, you can connect a separate Micro USB cable to the Power port.
-
- HDMI: HDMI connector
-
- Speaker: This screen has 2 speakers for playing sound, music, etc.
-
- Touch(Raspberry Pi): When you drive this display with Raspberry Pi, you need to connect this port to your Raspberry Pi with the USB Bridge to get the touch function.
-
- 40-Pin Female Header: You can plug in your Raspberry Pi here.
-
- 40-Pin Male Header: This is the 40-pin header from the Raspberry Pi, you can use it to do some projects or use a 40-pin ribbon cable to expand it to the breadboard.
-
- Buttons: These 5 buttons can be used to turn on/off the screen and adjust the volume and brightness, they are used in combination for setting the other features of the display as well.
Hardware Assembly Instructions
You need to check whether there are missing or damaged components according to the list first. Then, follow the steps on the PDF to assemble.
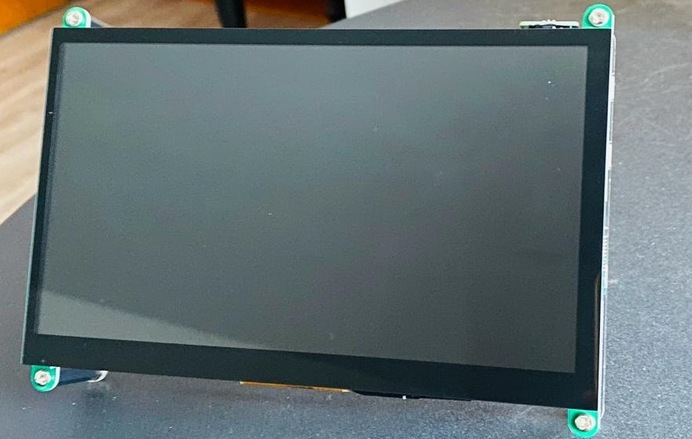
The front side of the display looks something like this.
The backside of the display after putting the Acrylic case looks like this.

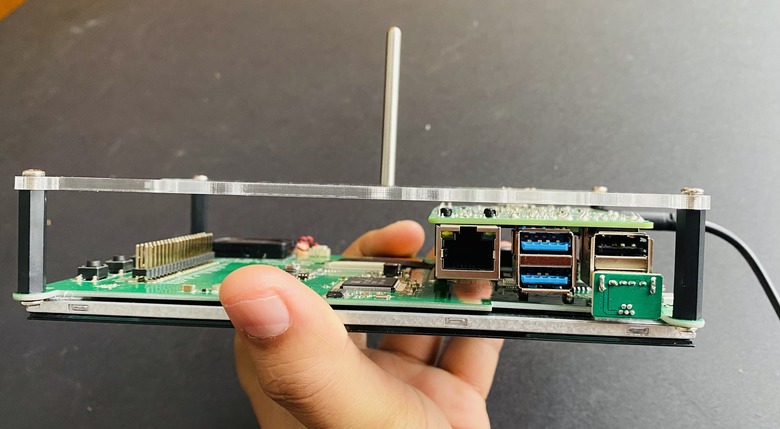
Similarly, the left and right side of the display shows some ports and connections.

Setutp & Usage Guide
After hardware Assembly lets setup the software part for 7 inch Raspberry Pi Display. This section includes installing the Raspberry Pi OS, installing the virtual keyboard, setting the right-click function, and calibrating the rotating screen function.
Install the Raspberry Pi OS
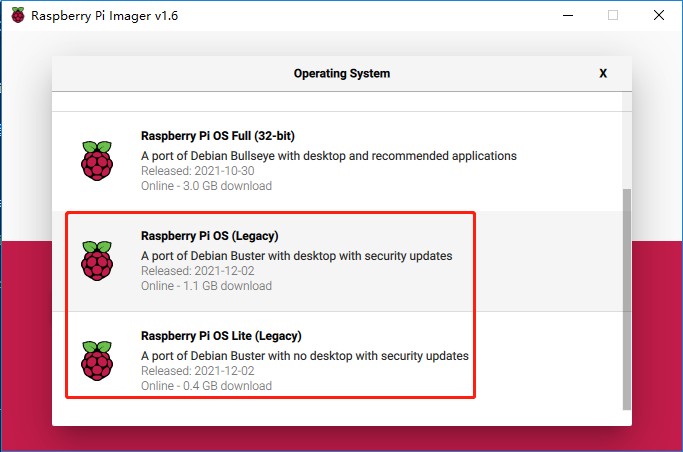
First we need to install Raspberry Pi OS to the SD Card. For this 7 inch Raspberry Pi Display. it is recommended to install Raspberry Pi OS(Legacy) and Raspberry Pi OS Lite(Legacy). These are security updates for Debian Buster, the difference between them is with or without the desktop.
To learn about how to set up the Raspberry Pi OS using the Raspberry Pi Imager, check this link.
Adjust the Screen Resolution
As for Raspberry Pi 4, when you start up it, the resolution is optimum. If you want to change its resolution, you may do the following settings.
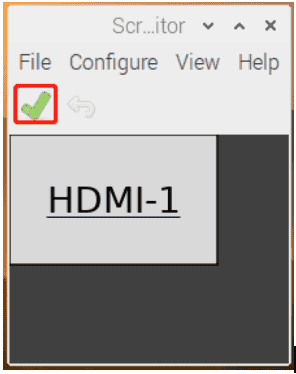
- Click the Raspberry Pi icon -> Preferences -> Screen Configuration.
- Then choose Configure -> Screens -> HDMI-1 -> Resolution -> choose the resolution that you want.
- After that, you need to click the tick icon to save your configuration.


Install Virtual Keyboard on Raspberry Pi
When you use a touch panel, you can connect an external keyboard to help you do a text input operation, but it is best to install a virtual keyboard.
Install the required software with the following command.
|
1 2 |
sudo apt install onboard sudo apt install at-spi2-core |
In order to make the virtual keyboard have a better effect, you need to do further settings.
Click the Raspberry Pi icon in the upper left corner and select Preferences -> Onboard Settings.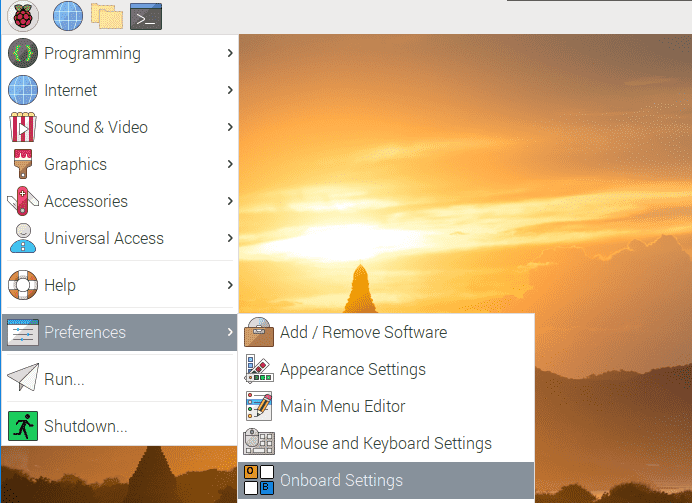
In the General option, check the following 2 items. When you check Automatically display when editing text, you will be prompted to reboot, you can reboot after all settings are complete.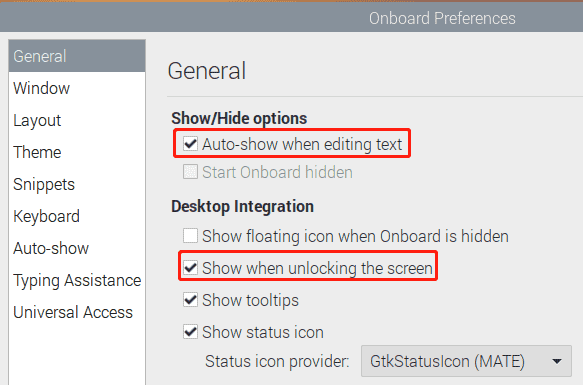
In the Window option, check Dock to screen edge.
And in the Auto-show option, check Auto-show when editing text again.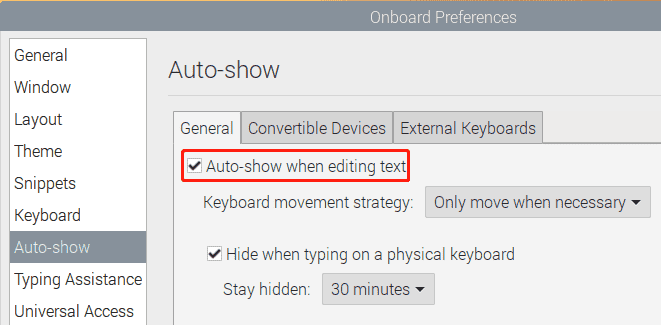
The next 2 items are optional, the ones checked in the picture are recommended by us, you can also check other ones.
In the Layout option, Small is recommended.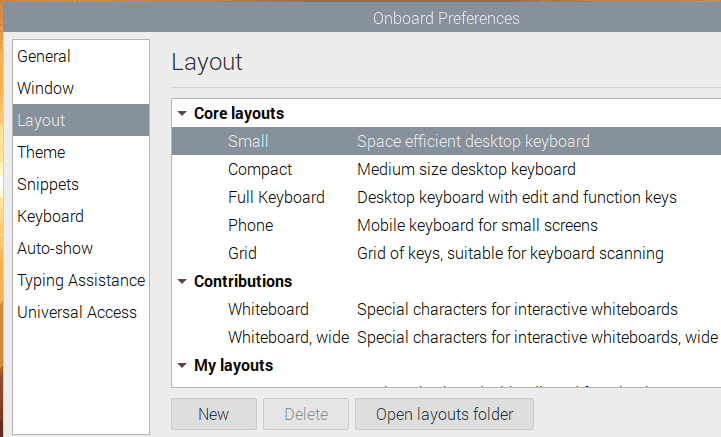
In the Theme option, DarkRoom is recommended.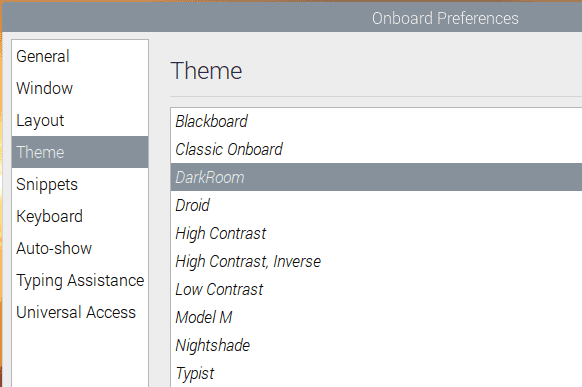
After the setting is complete, restart Raspberry pi. Every time you restart Raspberry pi, you need to click General Access -> Onboard to enable the virtual keyboard.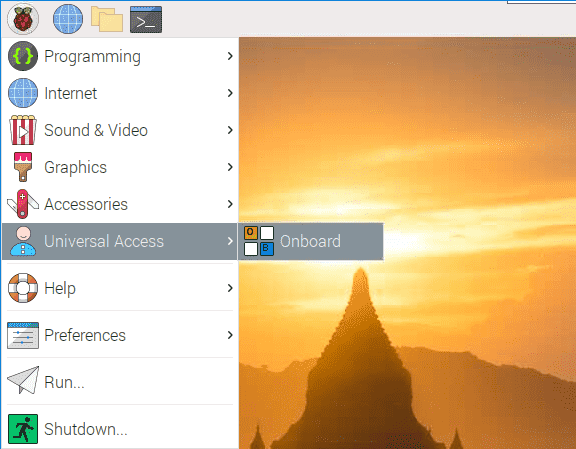
Now you can use this keyboard to edit your files or codes.
Enable Right Click on Raspberry Pi for Touch
The touchscreen makes it easy to perform simple navigation tasks with your finger or stylus, but you may want to be able to use the context menu (right-click menu).
Then you will need to download a Touchégg. Enter the following command to install it.
|
1 2 |
wget https://github.com/JoseExposito/touchegg/releases/download/2.0.14/touchegg_2.0.14_armhf.deb sudo apt install ./touchegg_2.0.14_armhf.deb |
After restarting, you can double-tap the screen to bring up the context menu.
|
1 |
sudo reboot |

Finally all your setting for the 7 inch Raspberry Pi Touch Screen Display is completed. You can start using the display like a Linux Computer now.
Appications, Usage & Conclusion

The SunFounder 7″ Raspberry Pi IPS monitor boasts a 5-point capacitive touch screen with 1024×600 resolution and an IPS panel for outstanding visual clarity. It is compatible with a variety of operating systems, including Raspberry Pi OS, Ubuntu, Ubuntu Mate, Windows, Android, RetroPie, Twister OS, macOS, and Chrome OS (a USB extension cable may be required).

The monitor is equipped with 8Ω/3W dual stereo speakers, an OSD menu system, and a user-friendly stand. Simply plug it in and get started.
You can use this display for multipurpose applications including:
- Portable Raspberry Pi Monitor
- Raspberry Pi Gaming Monitor
- Raspberry Pi Camera Bracket
- Home Assistant
- DIY Interesting Projects via GPIO
- 3D Printing Control

You can also use this TS7-Pro Raspberry Pi Screen to build your own NAS server, it can help you to store and check your big files safely and easily.


