Close Menu
  • Articles
    • Learn Electronics
    • Product Review
    • Tech Articles
  • Electronics Circuits
    • 555 Timer Projects
    • Op-Amp Circuits
    • Power Electronics
  • Microcontrollers
    • Arduino Projects
    • STM32 Projects
    • AMB82-Mini IoT AI Camera
    • BLE Projects
  • IoT Projects
    • ESP8266 Projects
    • ESP32 Projects
    • ESP32 MicroPython
    • ESP32-CAM Projects
    • LoRa/LoRaWAN Projects
  • Raspberry Pi
    • Raspberry Pi Projects
    • Raspberry Pi Pico Projects
    • Raspberry Pi Pico W Projects
  • Electronics Calculator
Facebook X (Twitter) Instagram
  • About Us
  • Disclaimer
  • Privacy Policy
  • Contact Us
  • Advertise With Us
Facebook X (Twitter) Instagram Pinterest YouTube LinkedIn
How To Electronics
  • Articles
    • Learn Electronics
    • Product Review
    • Tech Articles
  • Electronics Circuits
    • 555 Timer Projects
    • Op-Amp Circuits
    • Power Electronics
  • Microcontrollers
    • Arduino Projects
    • STM32 Projects
    • AMB82-Mini IoT AI Camera
    • BLE Projects
  • IoT Projects
    • ESP8266 Projects
    • ESP32 Projects
    • ESP32 MicroPython
    • ESP32-CAM Projects
    • LoRa/LoRaWAN Projects
  • Raspberry Pi
    • Raspberry Pi Projects
    • Raspberry Pi Pico Projects
    • Raspberry Pi Pico W Projects
  • Electronics Calculator
How To Electronics
Home » Getting Started & Setting up Raspberry Pi 4 Model B
Raspberry Pi Raspberry Pi Projects

Getting Started & Setting up Raspberry Pi 4 Model B

Mamtaz AlamBy Mamtaz AlamUpdated:December 20, 20224 Mins Read
Share Facebook Twitter LinkedIn Telegram Reddit WhatsApp
Getting Started & Setting up Raspberry Pi 4 Model B
Share
Facebook Twitter LinkedIn Pinterest Email Reddit Telegram WhatsApp

Overview

This tutorial is about Getting Started & Setting up Raspberry Pi 4 Model B. In the previous article, we learned about what is a Raspberry Pi and what all is embedded in the Raspberry Pi, including the specifications of its precious ancestors. You can go through the Raspberry Pi 4 Overview covered in brief in previous tutorial.

In this article, we going to set up a new raspberry pi from scratch such that it is ready to use. We will be setting the Pi in Desktop mode. It is the most user-friendly and easy to use. Moreover, all the functionalities are supported by the Pi in this mode.


Bill of Materials

For getting started & setting up Raspberry Pi 4 Model B, here are the following requirements.

S.N.Components NameQuantityPurchase Links
1Raspberry Pi 4 Model B1Amazon | AliExpress
2Power Supply for Pi 1Amazon | AliExpress
3HDMI Cable 1Amazon | AliExpress
47 inch Display or Monitor1Amazon | AliExpress
5Sd Card 16/32 GB1Amazon | AliExpress
6Mouse & Keyboard1Amazon | AliExpress


Setting Up the Raspberry Pi 4

Now as we know that Raspberry PI 4 is a Microprocessor, thus in order to use it easily and in a user-friendly manner we require an Operating System to be installed thus let’s get started for that:

  • Take your SD card and connect it with your PC
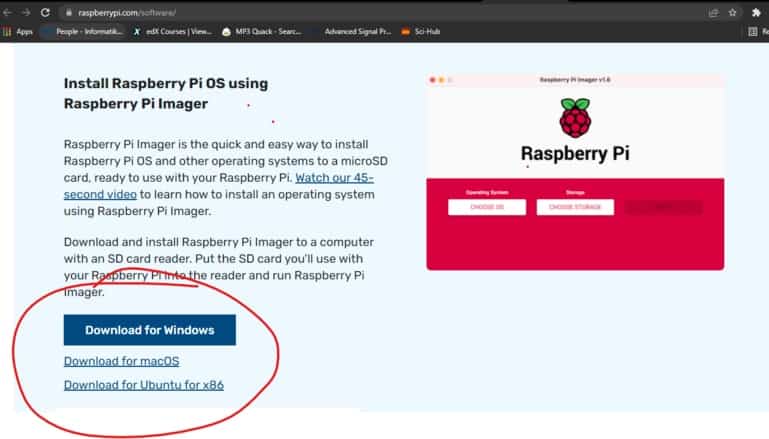
  • Now got to this link here, scroll down, and download Raspberry Pi Imager according to your system whether it is a Mac or Linux or a Windows as in the image below.
  • Once Downloaded install it fully and open it.
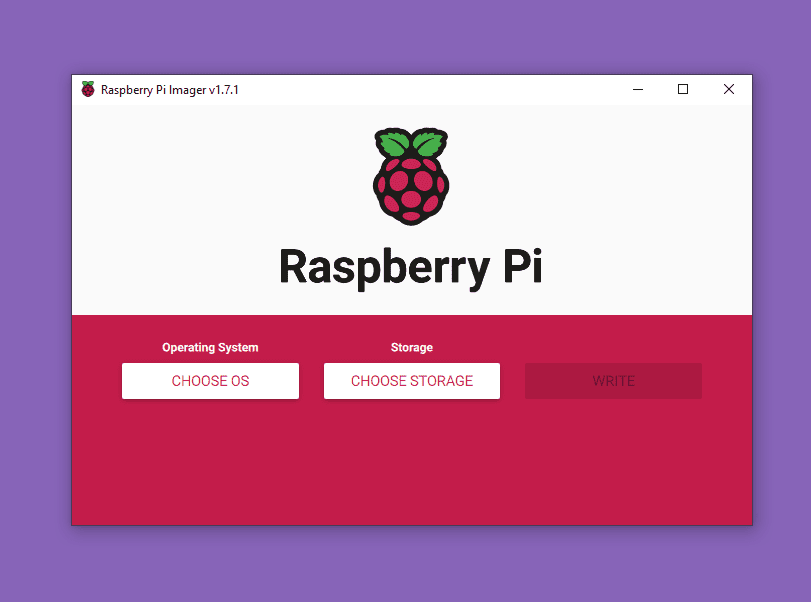
  • Now click on “CHOOSE STORAGE” and select the SD card that you are using to install the OS as in the image below.
  • Now Click on “CHOOSE OS” there select the first option i.e.; Raspberry Pi OS as in the image below
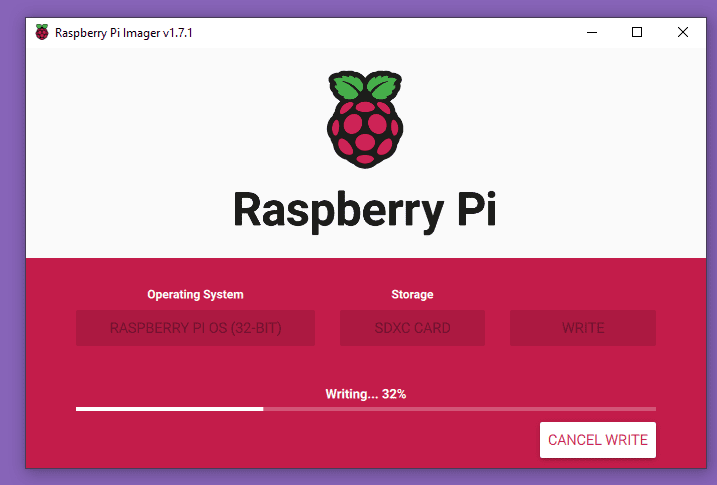
  • Once selected click on “WRITE” the imaging will start now
  • The imaging takes some time once it is done it will verify the imaged files.
  • Once done eject the SD card from the PC.


Raspberry Pi 4 Connections

Now we will set up our Raspberry Pi connections

  • Keyboard and mouse connections, connect both the USB in the given USB slots of the Raspberry Pi.
  • Now we move to the HDMI or Display connections. On the Raspberry Pi, we are having two micro HDMI Ports where any one of them can be used. Make sure you connect the wire safely otherwise the port can get damaged. Because  I had a display with VGA type, I  bought a VGA to HDMI Male connected and a Female HDMI to Male Micro HDMI connector as in the image below.
  • Now we are left with an SD card, for this, we are having one SD Card slot behind the Pi board we simply have to insert the SD card there.
  • Now we have to power on the board by connecting the board with a power supply using the C-Type connector which has a 5v and 3 Amp output. After this two onboard LEDs will start blinking.

Display Setup & Interface

  • Now after this has been done it might take a few seconds or a minute after which a display should be visible on the monitor with a Raspberry Pi OS Home screen.
  • You will be greeted with a pop-up window asking for timing and language setup, for me the setup was as below.
  • Thus, click Next, after this
  • Now another window for setting the Password and after that another Wi-Fi connection will pop up, which can be done as per the requirements.


  • The window for setting Password.
  • The window for setting the Wi-Fi. We will need to add the password for the Wi-Fi after this the Wi-Fi will automatically connect. (Make sure the Wi-Fi connection is of 2.4Ghz and not 5Ghz otherwise it won’t connect)

Thus, Our Setup is done, and we are ready to do our tasks on Raspberry Pi. You can start doing various projects now.

You can build your own DIY Mini PC using Raspberry Pi 4 and Sunfounder Pironman kit.

Share. Facebook Twitter Pinterest LinkedIn Tumblr Email Reddit Telegram WhatsApp
Previous ArticleRaspberry Pi 4 Model B comparison & what’s inside the box
Next Article Setting up Dragino LPS8 Indoor LoRaWAN gateway with TTN Server

Related Posts

ADXL375 Accelerometer with Raspberry Pi Pico & MicroPython

ADXL375 Accelerometer with Raspberry Pi Pico & MicroPython

Updated:July 24, 2025
Interface BMI160 with Raspberry Pi Pico & MicroPython

Interface BMI160 with Raspberry Pi Pico & MicroPython

Updated:February 2, 20253K
Shift Register 74HC595 with Raspberry Pi Pico & MicroPython

Shift Register 74HC595 with Raspberry Pi Pico & MicroPython

Updated:February 2, 202513K
Interfacing XBee Module with Raspberry Pi Pico & MicroPython

Interfacing XBee Module with Raspberry Pi Pico & MicroPython

Updated:February 2, 20253K
Modbus RTU with Raspberry Pi Pico & Micropython

Modbus RTU with Raspberry Pi Pico & MicroPython

Updated:February 2, 20258K
Fever Detector with MLX90640 & OpenCV Raspberry Pi

Thermal Fever Detector with MLX90640 & OpenCV Raspberry Pi

Updated:February 2, 20256K
Add A Comment

CommentsCancel reply

Latest Posts
ESP32 Fingerprint Attendance System with Live Web Dashboard

ESP32 Fingerprint Attendance System with Live Web Dashboard

June 21, 2026
IoT Based PM & Air Quality Monitoring System using ESP32

IoT Based PM & Air Quality Monitoring System using ESP32

June 14, 2026
DIY ESP32 MLX90640 IR Thermal Camera with Live Web Display

DIY ESP32 MLX90640 IR Thermal Camera with Live Web Display

May 10, 2026
IoT Activity Tracker with ESP32 & Accelerometer Gyroscope

IoT Activity Tracker with ESP32 & Accelerometer/Gyroscope

May 2, 2026
A Guide to Sourcing Obsolete ICs for Vintage Projects

Beyond AliExpress: A Guide to Sourcing Obsolete ICs for Vintage Projects

April 21, 2026

ESP32 IoT Vehicle Motion Analyzer with MPU6050 & LIS3MDL

April 27, 2026
Building a Smart Sensor Node with a BLE Microcontroller

Building a Smart Sensor Node with a BLE Microcontroller

February 26, 2026
High-Accuracy Pitch, Roll, Yaw with ESP32 & BNO08x IMU

High-Accuracy Pitch, Roll, Yaw with ESP32 & BNO08x IMU

April 27, 2026
Top Posts & Pages
  • ESP32 Fingerprint Attendance System with Live Web Dashboard
    ESP32 Fingerprint Attendance System with Live Web Dashboard
  • IoT AC Energy Meter with PZEM-004T & ESP32 WebServer
    IoT AC Energy Meter with PZEM-004T & ESP32 WebServer
  • 12V DC to 220V AC Inverter Circuit & PCB
    12V DC to 220V AC Inverter Circuit & PCB
  • Buck Converter: Basics, Working, Design & Application
    Buck Converter: Basics, Working, Design & Application
  • How to use INA226 DC Current Sensor with Arduino
    How to use INA226 DC Current Sensor with Arduino
  • LD2410 Sensor with ESP32 - Human Presence Detection
    LD2410 Sensor with ESP32 - Human Presence Detection
  • Half Wave Rectifier Basics, Circuit, Working & Applications
    Half Wave Rectifier Basics, Circuit, Working & Applications
  • ECG Graph Monitoring with AD8232 ECG Sensor & Arduino
    ECG Graph Monitoring with AD8232 ECG Sensor & Arduino
Categories
  • Arduino Projects (197)
  • Articles (60)
    • Learn Electronics (19)
    • Product Review (15)
    • Tech Articles (28)
  • Electronics Circuits (46)
    • 555 Timer Projects (21)
    • Op-Amp Circuits (7)
    • Power Electronics (13)
  • IoT Projects (205)
    • ESP32 MicroPython (7)
    • ESP32 Projects (82)
    • ESP32-CAM Projects (15)
    • ESP8266 Projects (76)
    • LoRa/LoRaWAN Projects (22)
  • Microcontrollers (38)
    • AMB82-Mini IoT AI Camera (4)
    • BLE Projects (18)
    • STM32 Projects (19)
  • Raspberry Pi (93)
    • Raspberry Pi Pico Projects (57)
    • Raspberry Pi Pico W Projects (12)
    • Raspberry Pi Projects (24)
Follow Us
  • Facebook
  • Twitter
  • Pinterest
  • Instagram
  • YouTube
About Us

“‘How to Electronics’ is a vibrant community for electronics enthusiasts and professionals. We deliver latest insights in areas such as Embedded Systems, Power Electronics, AI, IoT, and Robotics. Our goal is to stimulate innovation and provide practical solutions for students, organizations, and industries. Join us to transform learning into a joyful journey of discovery and innovation.

Copyright © How To Electronics. All rights reserved.
  • About Us
  • Disclaimer
  • Privacy Policy
  • Contact Us
  • Advertise With Us

Type above and press Enter to search. Press Esc to cancel.

Ad Blocker Enabled!
Ad Blocker Enabled!
Looks like you're using an ad blocker. Please allow ads on our site. We rely on advertising to help fund our site.