

overview
In this project, we will build a Simple Calculator using a 4×4 Keypad Module, 0.96″ OLED Display & Raspberry Pi Pico Board. We will go through the basic functionality and usage of the 4×4 Keypad Matrix Module with the application of MicroPython Code on Raspberry Pi Pico.
In the calculator design the A, B, C & D keys can be used as an addition, subtraction, multiplication & division functions respectively. The device can perform arithmetic operations, and print the operation process and results on the OLED display to realize the function of a simple calculator.
Components Required
In this guide, I used Elecrow Raspberry Pi Pico Starter Kit to test different Modules. You can buy the kit and perform some other operations as well. From this kit, you can use the following components.
1. Raspberry Pi Pico Board – 1
2. SSD1306 OLED Display – 1
3. 4×4 Keypad Matrix Module – 1
4. Breadboard – 1
5. Jumper Wires – 10
6. Micro-USB Cable – 1
4×4 Matrix Keypad Module
The 4×4 matrix keypad is an input device, it is usually used to provide input value in a project. It has 16 keys in total, which means it can provide 16 input values. The most interesting thing is it used only 8 GPIO pins of a microcontroller.

These Keypad modules are made of thin, flexible membrane material. The 4 x4 keypad module consists of 16 keys, these Keys are organized in a matrix of rows and columns. All these switches are connected to each other with a conductive trace. Normally there is no connection between rows and columns. When we will press a key, then a row and a column make contact.

It consists of four parts: panel, upper circuit, isolation layer and lower circuit. When the panel is not pressed down, the upper and lower contacts are disconnected, and the isolation layer plays an isolation role on the upper and lower lines.
When the panel is pressed, the contact of the upper circuit deforms downward and remerges with the lower circuit to make the circuit turn on, and the level signal changes; When the finger is released, the upper circuit contact bounces back, the circuit is disconnected, and the level signal is in its initial state.
SSD1306 OLED Display
This is a 0.96-inch blue OLED display module. The display module can be interfaced with any microcontroller using SPI/IIC protocols. It is having a resolution of 128×64. The package includes a display board, a display, and 4 pin male header pre-soldered to the board.

OLED (Organic Light-Emitting Diode) is a self-light-emitting technology composed of a thin, multi-layered organic film placed between an anode and cathode. In contrast to LCD technology, OLED does not require a backlight. OLED possesses high application potential for virtually all types of displays and is regarded as the ultimate technology for the next generation of flat-panel displays.
A detailed tutorial on OLED Display & Raspberry Pi Pico interfacing is explained in the previous article. You can go through the article in detail to learn more about the OLED Display.
Simple Calculator using Keypad, OLED & Raspberry Pi Pico
Now let us interface the 4×4 Keypad Matrix Module with Raspberry Pi Pico & 0.96″ OLED Display. The connection diagram is very simple.

The SSD1306 OLED Display is an I2C Module. Therefore connect its SDA & SCL Pin to GP0 & GP1 of Raspberry Pi Pico. Power the OLED via Power 5V & GND pin of Raspberry Pi Pico.
The Keypad Matrix has 8 Pins which connect to the following pin of Raspberry Pi Pico.
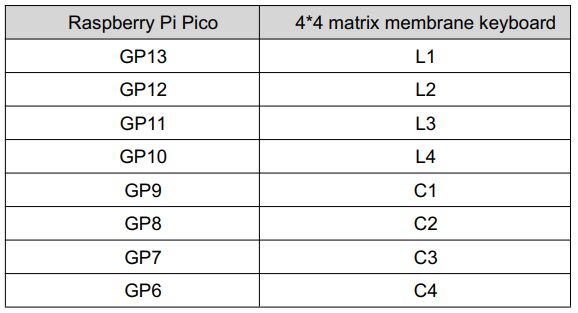
You can use a jumper wires for a breadboard assembly.

MicroPython Code/Program
The code is divided into 2 parts. The 1st one is ssd1306.py and the other is main.py. The OLED Display doesn’t work directly as it requires SSD1306 Module library.
ssd1306.py
Copy the following code and save it as ssd1306.py in Raspberry Pi Pico.
|
1 2 3 4 5 6 7 8 9 10 11 12 13 14 15 16 17 18 19 20 21 22 23 24 25 26 27 28 29 30 31 32 33 34 35 36 37 38 39 40 41 42 43 44 45 46 47 48 49 50 51 52 53 54 55 56 57 58 59 60 61 62 63 64 65 66 67 68 69 70 71 72 73 74 75 76 77 78 79 80 81 82 83 84 85 86 87 88 89 90 91 92 93 94 95 96 97 98 99 100 101 102 103 104 105 106 107 108 109 110 111 112 113 114 115 116 117 118 119 120 121 122 123 124 125 126 127 128 129 130 131 132 133 134 135 136 137 138 139 140 141 142 143 144 145 146 147 148 149 150 151 152 153 154 155 |
# MicroPython SSD1306 OLED driver, I2C and SPI interfaces from micropython import const import framebuf # register definitions SET_CONTRAST = const(0x81) SET_ENTIRE_ON = const(0xA4) SET_NORM_INV = const(0xA6) SET_DISP = const(0xAE) SET_MEM_ADDR = const(0x20) SET_COL_ADDR = const(0x21) SET_PAGE_ADDR = const(0x22) SET_DISP_START_LINE = const(0x40) SET_SEG_REMAP = const(0xA0) SET_MUX_RATIO = const(0xA8) SET_COM_OUT_DIR = const(0xC0) SET_DISP_OFFSET = const(0xD3) SET_COM_PIN_CFG = const(0xDA) SET_DISP_CLK_DIV = const(0xD5) SET_PRECHARGE = const(0xD9) SET_VCOM_DESEL = const(0xDB) SET_CHARGE_PUMP = const(0x8D) # Subclassing FrameBuffer provides support for graphics primitives # http://docs.micropython.org/en/latest/pyboard/library/framebuf.html class SSD1306(framebuf.FrameBuffer): def __init__(self, width, height, external_vcc): self.width = width self.height = height self.external_vcc = external_vcc self.pages = self.height // 8 self.buffer = bytearray(self.pages * self.width) super().__init__(self.buffer, self.width, self.height, framebuf.MONO_VLSB) self.init_display() def init_display(self): for cmd in ( SET_DISP | 0x00, # off # address setting SET_MEM_ADDR, 0x00, # horizontal # resolution and layout SET_DISP_START_LINE | 0x00, SET_SEG_REMAP | 0x01, # column addr 127 mapped to SEG0 SET_MUX_RATIO, self.height - 1, SET_COM_OUT_DIR | 0x08, # scan from COM[N] to COM0 SET_DISP_OFFSET, 0x00, SET_COM_PIN_CFG, 0x02 if self.width > 2 * self.height else 0x12, # timing and driving scheme SET_DISP_CLK_DIV, 0x80, SET_PRECHARGE, 0x22 if self.external_vcc else 0xF1, SET_VCOM_DESEL, 0x30, # 0.83*Vcc # display SET_CONTRAST, 0xFF, # maximum SET_ENTIRE_ON, # output follows RAM contents SET_NORM_INV, # not inverted # charge pump SET_CHARGE_PUMP, 0x10 if self.external_vcc else 0x14, SET_DISP | 0x01, ): # on self.write_cmd(cmd) self.fill(0) self.show() def poweroff(self): self.write_cmd(SET_DISP | 0x00) def poweron(self): self.write_cmd(SET_DISP | 0x01) def contrast(self, contrast): self.write_cmd(SET_CONTRAST) self.write_cmd(contrast) def invert(self, invert): self.write_cmd(SET_NORM_INV | (invert & 1)) def show(self): x0 = 0 x1 = self.width - 1 if self.width == 64: # displays with width of 64 pixels are shifted by 32 x0 += 32 x1 += 32 self.write_cmd(SET_COL_ADDR) self.write_cmd(x0) self.write_cmd(x1) self.write_cmd(SET_PAGE_ADDR) self.write_cmd(0) self.write_cmd(self.pages - 1) self.write_data(self.buffer) class SSD1306_I2C(SSD1306): def __init__(self, width, height, i2c, addr=0x3C, external_vcc=False): self.i2c = i2c self.addr = addr self.temp = bytearray(2) self.write_list = [b"\x40", None] # Co=0, D/C#=1 super().__init__(width, height, external_vcc) def write_cmd(self, cmd): self.temp[0] = 0x80 # Co=1, D/C#=0 self.temp[1] = cmd self.i2c.writeto(self.addr, self.temp) def write_data(self, buf): self.write_list[1] = buf self.i2c.writevto(self.addr, self.write_list) class SSD1306_SPI(SSD1306): def __init__(self, width, height, spi, dc, res, cs, external_vcc=False): self.rate = 10 * 1024 * 1024 dc.init(dc.OUT, value=0) res.init(res.OUT, value=0) cs.init(cs.OUT, value=1) self.spi = spi self.dc = dc self.res = res self.cs = cs import time self.res(1) time.sleep_ms(1) self.res(0) time.sleep_ms(10) self.res(1) super().__init__(width, height, external_vcc) def write_cmd(self, cmd): self.spi.init(baudrate=self.rate, polarity=0, phase=0) self.cs(1) self.dc(0) self.cs(0) self.spi.write(bytearray([cmd])) self.cs(1) def write_data(self, buf): self.spi.init(baudrate=self.rate, polarity=0, phase=0) self.cs(1) self.dc(1) self.cs(0) self.spi.write(buf) self.cs(1) |
main.py
Copy the following code and save it as main.py in Raspberry Pi Pico.
|
1 2 3 4 5 6 7 8 9 10 11 12 13 14 15 16 17 18 19 20 21 22 23 24 25 26 27 28 29 30 31 32 33 34 35 36 37 38 39 40 41 42 43 44 45 46 47 48 49 50 51 52 53 54 55 56 57 58 59 60 61 62 63 64 65 66 67 68 69 70 71 72 73 74 75 76 77 78 79 80 81 82 83 84 85 86 87 88 89 90 91 92 93 94 95 96 97 98 99 100 101 102 103 104 105 106 107 108 109 110 111 112 113 114 115 116 117 118 119 120 121 122 123 124 125 126 127 128 129 130 131 132 133 134 135 136 137 138 139 140 141 142 143 144 145 146 147 148 149 150 151 152 153 154 155 156 157 158 159 160 161 162 163 164 165 166 167 168 169 170 171 172 173 174 175 176 177 178 179 180 181 182 183 184 185 186 187 188 189 190 191 192 193 194 195 196 197 198 199 200 201 202 203 204 205 206 207 208 209 210 211 212 213 214 215 216 217 218 219 220 221 222 223 224 225 |
from machine import Pin,Timer,I2C import utime from ssd1306 import SSD1306_I2C import framebuf debug=True i2c = I2C(0, scl=Pin(1), sda=Pin(0), freq=200000) oled = SSD1306_I2C(128, 64, i2c) keyName = [['1','2','3','+'], ['4','5','6','-'], ['7','8','9','*'], ['c','0','=','/']] keypadRowPins = [13,12,11,10] keypadColPins = [9,8,7,6] row = [] col = [] keypadState = []; for i in keypadRowPins: row.append(Pin(i,Pin.IN,Pin.PULL_UP)) keypadState.append([0,0,0,0]) for i in keypadColPins: col.append(Pin(i,Pin.OUT)) def solve(oprt, oprdA, oprdB): if(oprt == "+"): return oprdA + oprdB elif(oprt == "-"): return oprdA - oprdB elif(oprt == "*"): return oprdA * oprdB elif(oprt == "/"): return round(oprdA / oprdB , 6) def calc(lst): operand = [] operator = [] for i in lst: if(debug): print(i) if(i=='+'): while (len(operator)!=0 and (operator[-1] == '*' or operator[-1] == '/' or operator[-1] == '-' or operator[-1] == '+')): b = operand.pop(-1) a = operand.pop(-1) c = operator.pop(-1) operand.append(solve(c,a,b)) operator.append(i) elif(i=='-'): while (len(operator)!=0 and (operator[-1] == '*' or operator[-1] == '/' or operator[-1] == '-' or operator[-1] == '+')): b = operand.pop(-1) a = operand.pop(-1) c = operator.pop(-1) operand.append(solve(c,a,b)) operator.append(i) elif(i=='*'): while (len(operator)!=0 and (operator[-1] == '*' or operator[-1] == '/')): b = operand.pop(-1) a = operand.pop(-1) c = operator.pop(-1) operand.append(solve(c,a,b)) operator.append(i) elif(i=='/'): while (len(operator)!=0 and (operator[-1] == '*' or operator[-1] == '/')): b = operand.pop(-1) a = operand.pop(-1) c = operator.pop(-1) operand.append(solve(c,a,b)) operator.append(i) elif(i=='('): operator.append(i) elif(i==')'): while(operator[-1] !='('): b = operand.pop(-1) a = operand.pop(-1) c = operator.pop(-1) operand.append(solve(c,a,b)) operator.pop(-1) else: operand.append(i) while(len(operator) != 0): b = operand.pop(-1) a = operand.pop(-1) c = operator.pop(-1) operand.append(solve(c,a,b)) return operand[0] def keypadRead(): global row j_ifPressed = -1 i_ifPressed = -1 for i in range(0,len(col)): col[i].low() utime.sleep(0.005) #settling time for j in range(0,len(row)): pressed = not row[j].value() if(pressed and (keypadState[j][i] != pressed)): #state changed to high keypadState[j][i] = pressed elif(not pressed and (keypadState[j][i] != pressed)): # state changed to low keypadState[j][i] = pressed j_ifPressed = j i_ifPressed = i col[i].high() if(j_ifPressed != -1 and i_ifPressed != -1): return keyName[j_ifPressed][i_ifPressed] else: return -1 def printOled(lst): oledPos = { "x" : 0, "y" : 0 } oled.fill(0) string = '' for i in lst: string += str(i) l = 0 while(l<len(string)): oled.text(string[l:l+16],oledPos["x"], oledPos["y"]) oledPos["y"] =oledPos["y"] + 10 l = l+16 oled.show() shiftFlag = False signFlag = False inputList = [''] oled.show() oled.fill(0) oled.show() oled.text("Simple",35,15,1) oled.text("Calculator",18,30,1) oled.show() if __name__ == '__main__': while True: key = keypadRead() if(key != -1): if((key <= '9' and key >='0') or key == '.'): inputList[-1] = inputList[-1] + key elif(key == '+' or key == '-' or key == '*' or key == '/'): if(inputList != ['']): if(inputList[-1] == '' and (inputList[-2] == '+' or inputList[-2] == '-' or inputList[-2] == '*' or inputList[-2] == '/')): inputList[-2] = key elif(inputList[-1]==''): inputList[-1]=key inputList.append('') else: inputList[-1] = float(inputList[-1]) inputList.append(key) inputList.append('') elif(key == 's'): shiftFlag = not shiftFlag elif(key == 'a'): if(shiftFlag): if(inputList[-1] != ''): inputList[-1] = float(inputList[-1]) inputList.append(')') inputList.append('') else: inputList[-1] = ')' inputList.append('') shiftFlag = False else: signFlag = not signFlag if(inputList[-1] == ''): inputList[-1] = '-' else: if(inputList[-1][0] == '-'): inputList[-1] = inputList[-1][1:] else: inputList[-1] = '-' + inputList[-1] elif(key == 'b'): if(shiftFlag): if(inputList[-1] == ''): inputList[-1] = '(' else: inputList.append('(') inputList.append('') shiftFlag = False else: if(inputList[-1] == ''): inputList[-1] = 3.14 else: inputList.append(3.14) inputList.append('') elif(key == 'c'): if(shiftFlag): inputList = [''] shiftFlag = False else: if(inputList == ["error"]): inputList = [''] if(inputList != ['']): if(inputList[-1] == ''): inputList.pop() inputList[-1] = str(inputList[-1])[:-1] else: inputList[-1] = str(inputList[-1])[:-1] elif(key == '='): if(inputList[-1] == ''): inputList.pop(-1) elif(inputList[-1] != ')'): inputList[-1] = float(inputList[-1]) try: ans = calc(inputList) inputList = [str(ans)] except: ans = '' inputList = [] inputList.append("error") printOled(inputList) print(inputList) |
Now click on the Run button to run all the libraries and the main files.

Now press the numbers 0 to 9 from the Keypad Matrix. To add, subtract, divide & multiply press the A, B, C, and D buttons. The * sign is the decimal point and the # sign is the equal to symbol


