

Overview
In this IoT project, we will make an Online Weather Station using Raspberry Pi Pico W & display the parsed Weather data from OpenWeatherMap on a 16×2 LCD Display. The Raspberry Pi Pico W will connect to the WiFi network using MicroPython Code and make HTTP GET requests from OpenWeatherMap Server. We can decode JSON data from OpenWeatherMap and display some of its parameters on LCD Display.
The Pico W pulls weather data like temperature, humidity, pressure, wind speed, and wind directional degree. You can change the location or your city and retrieve weather data using an API key.
Components Required
We need the following components for the Raspberry Pi Pico W Weather Station Project. You can purchase all these components from SunFounder Amazon link which consists of the necessary sensors & modules along with 200+ components.
- Raspberry Pi Pico W – 1
- 16×2 I2C LCD Display – 1
- Jumper Wires – 10
- Breadboard – 1
- Micro-USB Cable – 1
Block Diagram
This is a simple block diagram for IoT Weather Station which explains how the System works with OpenWeatherMap.

The website openweathermap.org provides an online service for weather data and forecasts. The data is uploaded to a cloud server. NodeMCU ESP8266 Wifi Module collects the data information online and downloads/retrieves the info like temperature, humidity, pressure, wind speed, and wind directional degree.
HTTP GET Request Method
The Hypertext Transfer Protocol (HTTP) works as a request-response protocol between a client and a server. Here’s an example:
- The Raspberry Pi Pico W (client) submits an HTTP request to a Server (OpenWeatherMap.org);
- The server returns a response to the Raspberry Pi Pico W (client);
- Finally, the response contains status information about the request and may also contain the requested content.
Circuit Diagram & Connection
Let us see the circuit for IoT Weather Station made using Raspberry Pi Pico W & OpenWeatherMap.

The SDA and SCL lines of the I2C bus come from GPI0 and GPI1 of the Raspberry Pi Pico respectively. They are connected to the SDA and SCL (SCK) pins of the I2C LCD Display. The LCD display module is supplied with 5V from the Vsys pin of the Pico W board.

OpenWeatherMap Setup
OpenWeatherMap Access current weather data for any location including over 200,000 cities all over the world. Current weather is frequently updated from more than 40,000 weather stations. The data is available in JSON, XML, or HTML format. We will use the data in JSON format here.

In this example, we will learn how to make API requests to access data from OpenWeatherMap. An application programming interface (API) is a set of functions written by software developers to enable anyone to use their data or services. The OpenWeatherMap project has an API that enables users to request weather data. This API has a free plan and provides lots of useful information about the weather in almost any location in the world.
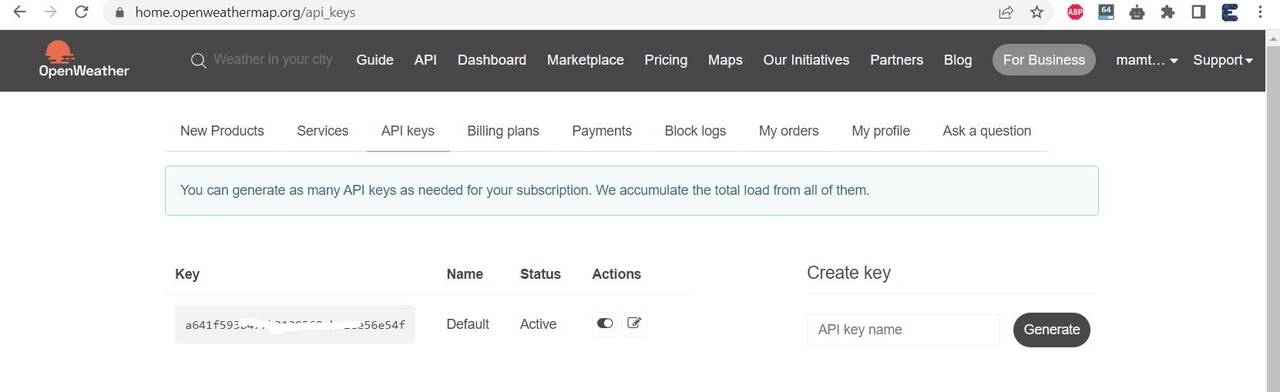
To use the OpenWeatherMap, open your browser and go to openweathermap.org. Then click on the Signup button and create a free account.
After creating and activating the account, click on API and go to the Current Weather Data Section. Click Subscribe

Under Current weather and forecast collection, subscribe to the appropriate service. In our project, Free is good enough.

Copy the Key from the API keys page.
MicroPython Code
Let us see the MicroPython code for Raspberry Pi Pico W to retrieve the weather data from OpenWeatherMap.
The code requires NTPClient Library and LCD library.
ntptime.py
Open your Thonny IDE and paste the following code into the editor window. Save this file to Raspberry Pi Pico W with name ntptime.py.
|
1 2 3 4 5 6 7 8 9 10 11 12 13 14 15 16 17 18 19 20 21 22 23 24 25 26 27 28 29 30 31 32 33 34 35 36 |
try: import usocket as socket except: import socket try: import ustruct as struct except: import struct # (date(2000, 1, 1) - date(1900, 1, 1)).days * 24*60*60 NTP_DELTA = 3155673600 host = "pool.ntp.org" def time(): NTP_QUERY = bytearray(48) NTP_QUERY[0] = 0x1b addr = socket.getaddrinfo(host, 123)[0][-1] s = socket.socket(socket.AF_INET, socket.SOCK_DGRAM) s.settimeout(1) res = s.sendto(NTP_QUERY, addr) msg = s.recv(48) s.close() val = struct.unpack("!I", msg[40:44])[0] return val - NTP_DELTA # There's currently no timezone support in MicroPython, so # utime.localtime() will return UTC time (as if it was .gmtime()) def settime(): t = time() import machine import utime tm = utime.localtime(t) tm = tm[0:3] + (0,) + tm[3:6] + (0,) machine.RTC().datetime(tm) print(utime.localtime()) |
lcd1602.py
Open another tab on Thonny IDE and paste the following code into the editor window. Save this file to Raspberry Pi Pico W with the name lcd1602.py.
Note: The I2C Address of 16×2 LCD is 0x27. It may vary to 0x3F on some LCD Displays.
|
1 2 3 4 5 6 7 8 9 10 11 12 13 14 15 16 17 18 19 20 21 22 23 24 25 26 27 28 29 30 31 32 33 34 35 36 37 38 39 40 41 42 43 44 45 46 47 48 49 50 51 52 53 54 55 56 57 58 59 60 61 62 63 64 65 66 67 68 69 70 71 72 73 74 75 76 77 78 79 80 81 82 83 84 85 86 87 88 89 90 91 92 93 94 95 |
import machine import time class LCD(): def __init__(self, addr=0x27, blen=1): sda = machine.Pin(0) scl = machine.Pin(1) self.bus = machine.I2C(0,sda=sda, scl=scl, freq=400000) #print(self.bus.scan()) self.addr = addr self.blen = blen self.send_command(0x33) # Must initialize to 8-line mode at first time.sleep(0.005) self.send_command(0x32) # Then initialize to 4-line mode time.sleep(0.005) self.send_command(0x28) # 2 Lines & 5*7 dots time.sleep(0.005) self.send_command(0x0C) # Enable display without cursor time.sleep(0.005) self.send_command(0x01) # Clear Screen self.bus.writeto(self.addr, bytearray([0x08])) def write_word(self, data): temp = data if self.blen == 1: temp |= 0x08 else: temp &= 0xF7 self.bus.writeto(self.addr, bytearray([temp])) def send_command(self, cmd): # Send bit7-4 firstly buf = cmd & 0xF0 buf |= 0x04 # RS = 0, RW = 0, EN = 1 self.write_word(buf) time.sleep(0.002) buf &= 0xFB # Make EN = 0 self.write_word(buf) # Send bit3-0 secondly buf = (cmd & 0x0F) << 4 buf |= 0x04 # RS = 0, RW = 0, EN = 1 self.write_word(buf) time.sleep(0.002) buf &= 0xFB # Make EN = 0 self.write_word(buf) def send_data(self, data): # Send bit7-4 firstly buf = data & 0xF0 buf |= 0x05 # RS = 1, RW = 0, EN = 1 self.write_word(buf) time.sleep(0.002) buf &= 0xFB # Make EN = 0 self.write_word(buf) # Send bit3-0 secondly buf = (data & 0x0F) << 4 buf |= 0x05 # RS = 1, RW = 0, EN = 1 self.write_word(buf) time.sleep(0.002) buf &= 0xFB # Make EN = 0 self.write_word(buf) def clear(self): self.send_command(0x01) # Clear Screen def openlight(self): # Enable the backlight self.bus.writeto(self.addr,bytearray([0x08])) # self.bus.close() def write(self, x, y, str): if x < 0: x = 0 if x > 15: x = 15 if y < 0: y = 0 if y > 1: y = 1 # Move cursor addr = 0x80 + 0x40 * y + x self.send_command(addr) for chr in str: self.send_data(ord(chr)) def message(self, text): #print("message: %s"%text) for char in text: if char == '\n': self.send_command(0xC0) # next line else: self.send_data(ord(char)) |
main.py
Here is the main code for this project. Copy the following code and save it to Raspberry Pi Pico W with any unique name like main.py.
From the following line, change the WiFi SSID & Password. Change the OpenWeatherMap API Key and replace it with your API Key.
|
1 2 |
wlan.connect("SSID", "PASSWORD") openweather_api_key = "******************" |
After making changes, you can run the following code.
|
1 2 3 4 5 6 7 8 9 10 11 12 13 14 15 16 17 18 19 20 21 22 23 24 25 26 27 28 29 30 31 32 33 34 35 36 37 38 39 40 41 42 43 44 45 46 47 48 49 50 51 52 53 54 55 56 57 58 59 60 61 62 63 64 65 66 67 68 69 70 71 72 73 74 75 76 77 78 79 80 81 82 83 84 85 86 87 88 89 90 91 92 93 94 95 96 97 98 99 100 101 102 103 104 105 106 107 108 109 110 111 112 113 114 115 116 117 118 119 120 121 122 123 124 125 126 127 |
import urequests import network import time wlan = network.WLAN(network.STA_IF) wlan.active(True) wlan.connect("SSID","PASSWORD") openweather_api_key = "******************" # connect the network wait = 10 while wait > 0: if wlan.status() < 0 or wlan.status() >= 3: break wait -= 1 print('waiting for connection...') time.sleep(1) # Handle connection error if wlan.status() != 3: raise RuntimeError('wifi connection failed') else: print('connected') ip=wlan.ifconfig()[0] print('IP: ', ip) # syncing the time import ntptime while True: try: ntptime.settime() print('Time Set Successfully') break except OSError: print('Time Setting...') continue # init LCD from lcd1602 import LCD lcd=LCD() lcd.clear() string = 'Loading...' lcd.message(string) # Open Weather TEMPERATURE_UNITS = { "standard": "K", "metric": "°C", "imperial": "°F", } SPEED_UNITS = { "standard": "m/s", "metric": "m/s", "imperial": "mph", } units = "metric" def get_weather(city, api_key, units='metric', lang='en'): ''' Get weather data from openweathermap.org city: City name, state code and country code divided by comma, Please, refer to ISO 3166 for the state codes or country codes. https://www.iso.org/obp/ui/#search api_key: Your unique API key (you can always find it on your openweather account page under the "API key" tab https://home.openweathermap.org/api_keys unit: Units of measurement. standard, metric and imperial units are available. If you do not use the units parameter, standard units will be applied by default. More: https://openweathermap.org/current#data lang: You can use this parameter to get the output in your language. More: https://openweathermap.org/current#multi ''' url = f"https://api.openweathermap.org/data/2.5/weather?q={city}&appid={api_key}&units={units}&lang={lang}" print(url) res = urequests.post(url) return res.json() def print_weather(weather_data): print(f'Timezone: {int(weather_data["timezone"] / 3600)}') sunrise = time.localtime(weather_data['sys']['sunrise']+weather_data["timezone"]) sunset = time.localtime(weather_data['sys']['sunset']+weather_data["timezone"]) print(f'Sunrise: {sunrise[3]}:{sunrise[4]}') print(f'Sunset: {sunset[3]}:{sunset[4]}') print(f'Country: {weather_data["sys"]["country"]}') print(f'City: {weather_data["name"]}') print(f'Coordination: [{weather_data["coord"]["lon"]}, {weather_data["coord"]["lat"]}') print(f'Visibility: {weather_data["visibility"]}m') print(f'Weather: {weather_data["weather"][0]["main"]}') print(f'Temperature: {weather_data["main"]["temp"]}{TEMPERATURE_UNITS[units]}') print(f'Temperature min: {weather_data["main"]["temp_min"]}{TEMPERATURE_UNITS[units]}') print(f'Temperature max: {weather_data["main"]["temp_max"]}{TEMPERATURE_UNITS[units]}') print(f'Temperature feels like: {weather_data["main"]["feels_like"]}{TEMPERATURE_UNITS[units]}') print(f'Humidity: {weather_data["main"]["humidity"]}%') print(f'Pressure: {weather_data["main"]["pressure"]}hPa') print(f'Wind speed: {weather_data["wind"]["speed"]}{SPEED_UNITS[units]}') #print(f'Wind gust: {weather_data["wind"]["gust"]}{SPEED_UNITS[units]}') print(f'Wind direction: {weather_data["wind"]["deg"]}°') if "clouds" in weather_data: print(f'Cloudiness: {weather_data["clouds"]["all"]}%') elif "rain" in weather_data: print(f'Rain volume in 1 hour: {weather_data["rain"]["1h"]}mm') print(f'Rain volume in 3 hour: {weather_data["rain"]["3h"]}mm') elif "snow" in weather_data: print(f'Snow volume in 1 hour: {weather_data["snow"]["1h"]}mm') print(f'Snow volume in 3 hour: {weather_data["snow"]["3h"]}mm') while True: # get weather weather_data = get_weather('dubai', openweather_api_key, units=units) weather=weather_data["weather"][0]["main"] t=weather_data["main"]["temp"] rh=weather_data["main"]["humidity"] # get time hours=time.localtime()[3]+int(weather_data["timezone"] / 3600) mins=time.localtime()[4] # LCD print lcd.clear() time.sleep_ms(200) string = f'{hours:02d}:{mins:02d} {weather}\n' lcd.message(string) string = f'{t}{TEMPERATURE_UNITS[units]} {rh}%rh' lcd.message(string) # shell print print_weather(weather_data) # refresh every 30s time.sleep(30) |
After running the code, the Raspberry Pi Pico W will try connecting to the WiFi Network. Once it establishes a connection, it will connect to the OpenWeatherMap Server & retrieves Weather Data.
The Thonny Python Shell will show the following message.
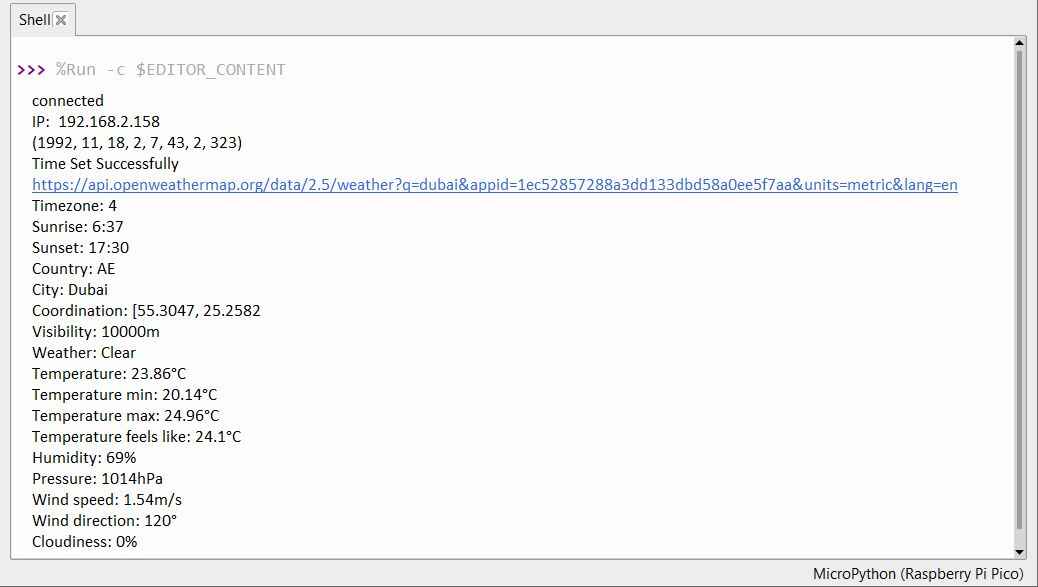
On the LCD Display, some of the parameters like Time, Weather Conditions, Temperature, and Relative Humidity.

The data on the LCD Display updates after an interval of every 30 seconds.
Project Working & Code Explanation
The Raspberry Pi Pico W needs to be connected to the Internet. Using the following line it connects to the WiFi Network.
|
1 2 3 4 5 6 7 8 9 10 11 12 13 14 15 16 17 18 19 20 |
wlan = network.WLAN(network.STA_IF) wlan.active(True) wlan.connect("BELL685","644642755D2F") # connect the network wait = 10 while wait > 0: if wlan.status() < 0 or wlan.status() >= 3: break wait -= 1 print('waiting for connection...') time.sleep(1) # Handle connection error if wlan.status() != 3: raise RuntimeError('wifi connection failed') else: print('connected') ip=wlan.ifconfig()[0] print('IP: ', ip) |
After connecting to the Internet, these few lines of code will help synchronize your Pico W to Greenwich Mean Time (GMT).
|
1 2 3 4 5 6 7 8 9 |
import ntptime while True: try: ntptime.settime() print('Time Set Successfully') break except OSError: print('Time Setting...') continue |
The following lines will initialize the LCD, please refer to LCD Interfacing tutorial for its usage details.
|
1 2 3 4 5 |
from lcd1602 import LCD lcd=LCD() lcd.clear() string = 'Loading...' lcd.message(string) |
We need to select the unit for some weather data (e.g. temperature, wind speed) before we get the weather data. In this case, the unit is metric.
|
1 2 3 4 5 6 7 8 9 10 11 12 13 14 |
# Open Weather TEMPERATURE_UNITS = { "standard": "K", "metric": "°C", "imperial": "°F", } SPEED_UNITS = { "standard": "m/s", "metric": "m/s", "imperial": "mph", } units = "metric" |
Next, this function gets the weather data from openweathermap.org. We will post a URL message to it with your city, API keys, and a set unit. As a result, you will receive a JSON file with weather data.
|
1 2 3 4 5 6 |
def get_weather(city, api_key, units='metric', lang='en'): url = f"https://api.openweathermap.org/data/2.5/weather?q={city}&appid={api_key}&units={units}&lang={lang}" print(url) res = urequests.post(url) return res.json() |
We used the print_weather(weather_data) function to convert these raw data into easy-to-read data format and print them.
In the while True loop, the get_weather() function is called first to retrieve the weather, temperature and humidity information needed for this project.
|
1 2 3 4 |
weather_data = get_weather('shenzhen', secrets['openweather_api_key'], units=units) weather=weather_data["weather"][0]["main"] t=weather_data["main"]["temp"] rh=weather_data["main"]["humidity"] |
Get the local time. The time.localtime() function is called here to return a set of tuples (year, month, day, hour, minute, second, weekday, yearday). We have taken hour and minute out of it.
Note that we have already synchronized Pico W to Greenwich Mean Time, so we need to add the time zone of the location.
|
1 2 |
hours=time.localtime()[3]+int(weather_data["timezone"] / 3600) mins=time.localtime()[4] |
Finally, the weather information and time are just displayed in the 16×2 LCD Display.
|
1 2 3 4 5 6 |
lcd.clear() time.sleep_ms(200) string = f'{hours:02d}:{mins:02d} {weather}\n' lcd.message(string) string = f'{t}{TEMPERATURE_UNITS[units]} {rh}%rh' lcd.message(string) |
The LCD will become a clock that refreshes every 30 seconds when the main loop runs every 30 seconds.


4 Comments
Great tutorial thanks :)
Nice sir
good job.. I recreated the project (see https://github.com/tehniq3/MicroPython_weatherstation_clock_RPiW_i2c_LCD1602/tree/main/Weatherstatio_clock_RPiW_i2c_LCD1602_v1 ) with degree symbol at temperature units chr(223) and fix for local time %24 for positive local time
good job.. I recreated your project, but I added degree symbol (chr(223) and fix for local time >0 (%24)