

In this project we are going to make an IoT Based Air Pollution/Quality Monitoring System with ESP8266, PM2.5 Particulate Matter Sensor, MQ-135 Air Quality Sensor & BME280 Barometric Pressure Sensor. We will monitor the Air Quality on Thinspeak Server using the internet.
Overview
This is a simple prototype for an Environmental IoT Air Pollution/Quality Monitoring System for monitoring the concentrations of major air pollutant gases. The system uses 3 sensors like PMS5003 PM2.5 Particulate Matter Sensor, MQ-135 Air Quality Sensor, BME280 Barometric Pressure Sensor. In this IoT project, you can monitor the pollution level from anywhere using your computer or mobile.

PMS5003 PM2.5 Particulate matter sensor from Plantpower measure particle concentration in PM1.0, PM2.5 & PM10. This MQ-135 Air Quality Sensor measures concentrations of gases such as CO, CO2, SO2, and NO2 and gives the result in PPM (Part per Million). Similarly, BME280 Measures environmental Temperature, Pressure & Humidity.
The sensors will gather the data of various environmental parameters and send it to the Thingspeak server which displays the data online after the interval of every 15 seconds. We can install this system anywhere and can also trigger some devices when pollution goes beyond some level like we can switch on the Exhaust fan.
Components Required
Following are the components required for making IoT-based Air Pollution/Quality Monitoring System. All the components can be easily purchased from Amazon. The components Purchased links are given as well.
| S.N. | Components Name | Quantity | Purchase Links |
|---|---|---|---|
| 1 | NodeMCU ESP8266 Board | 1 | Amazon | AliExpress |
| 2 | PMS5003 PM2.5/PM10 Sensor | 1 | Amazon | AliExpress |
| 3 | MQ-135 Air Quality Sensor | 1 | Amazon | AliExpress |
| 4 | BME280 Sensor | 1 | Amazon | AliExpress |
| 5 | Connecting Wires | 10 | Amazon | AliExpress |
| 6 | Breadboard | 1 | Amazon | AliExpress |
PMS5003 PM2.5 Particulate Matter Sensor

The Plantower PMS5003 is a low-cost laser particle counter, one of a range of sensors by Plantower that also include the PMS1003, PMS3003, and PMS7003. PMS5003 is a kind of digital and universal particle concentration sensor, which can be used to obtain the number of suspended particles in the air, i.e. the concentration of particles, and output them in the form of a digital interface. This sensor can be inserted into variable instruments related to the concentration of suspended particles in the air or other environmental improvement equipment to provide correct concentration data in time.
To learn more about this sensor check some of the previous Arduino & PMS5003 Interfacing project.
MQ-135 Air Quality Sensor
The MQ-135 gas sensor senses the gases like ammonia nitrogen, oxygen, alcohols, aromatic compounds, sulfide and smoke. The MQ-3 gas sensor has a lower conductivity to clean the air as a gas sensing material. In the atmosphere, we can find polluting gases, but the conductivity of the gas sensor increases as the concentration of polluting gas increases. MQ-135 gas sensor can be implemented to detect the smoke, benzene, steam, and other harmful gases. It has the potential to detect different harmful gases. It is at a low cost and particularly suitable for Air quality monitoring applications.

The MQ135 sensor is a signal output indicator instruction. It has two outputs: analog output and TTL output. The TTL output is low signal light that can be accessed through the IO ports on the Microcontroller. The analog output is an concentration, i.e. increasing voltage is directly proportional to increasing concentration. This sensor has a long life and reliable stability as well.
To learn more about this sensor check some of the previous projects: MQ-135 ESP8266 Gas Level Monitoring.
BME280 Barometric Pressure Sensor
Bosch BME280 Humidity, Temperature & Pressure Sensor is an integrated environmental sensor which is very small-sized with low power consumption.This BME280 Atmospheric Sensor Breakout is the easy way to measure barometric pressure, humidity, and temperature readings all without taking up too much space. Basically, anything you need to know about atmospheric conditions you can find out from this tiny breakout.

This module uses an environmental sensor manufactured by Bosch with temperature, barometric pressure sensor that is the next generation upgrade to the popular BMP085/BMP180/BMP183 Sensor. This sensor is great for all sorts of weather sensing and can even be used in both I2C and SPI! This precision sensor from Bosch is the best low-cost, precision sensing solution for measuring barometric pressure with ±1 hPa absolute accuracy, and temperature with ±1.0°C accuracy. Because pressure changes with altitude and the pressure measurements are so good, you can also use it as an altimeter with ±1 meter accuracy.
IoT Based Air Pollution/Quality Monitoring with ESP8266
Below is the circuit diagram or connection for IoT Based Air Pollution/Quality Monitoring System. There are 3 sensors which is connected to wifi chip NodeMCU ESP8266 12E.

PMS5003 Sensor works on UART Communication. It has 8 pins and counting is done from the right. Connect Pin1 VCC to Vin pin of NodeMCU & Pin2 GND to GND. The 4th pin is the Rx pin which is connected to the Tx pin of NodeMCU. Similarly, the 5th pin the Tx pin which is connected to the Rx pin of NodeMCU.
MQ-135 is an analog sensor. So connect its A0 pin to A0 pin of NodeMCU. Connect the VCC pin to Vin 5V & GND to GND. And then we have BME280 Sensor which works on I2C Communication. So connect it SCL & SDA pin to I2C pin of NodeMCU, i.e D1, D2.
So here you can see how all the sensors are interfaced with NodeMCU ESP8266-12E.

Setting up Thingspeak
We need to setup Thingspeak account to monitor the data from Nodemcu ESP8266-12E online. To setup thingspeak visit https://thingspeak.com/. Here you need to create an account.

Once the account is created, you need to create a new channel by filling in the following details shown in the image below.
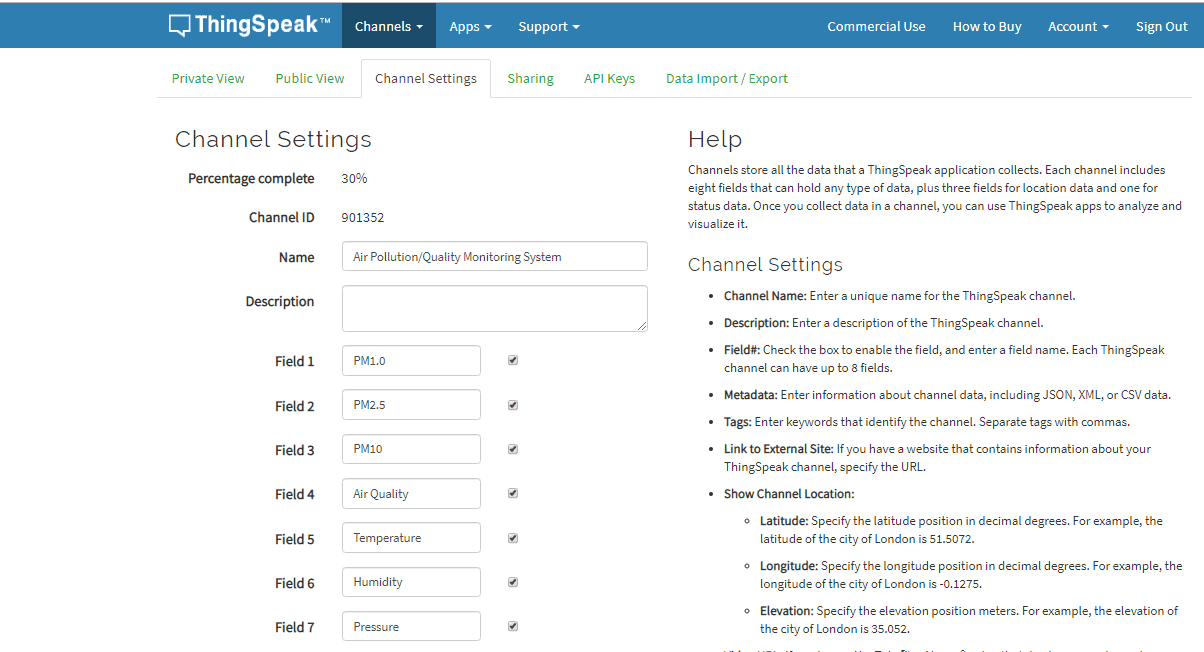
Now copy the write API key and make a modification in the Arduino by replacing the API Key you copied.

Source Code/Program IoT based Air Quality/Pollution Monitoring
The source code/Program is wriiten for NodeMCU ESP8266 12E Board. Before compiling the code you need to add 3 libraries to Arduino IDE from the library manager or the library link given below:
Make sure to change the wifi SSID, password, and API key before uploading the code. Also please remove the Rx Tx pin connection between Nodemcu & PMS5003 while uploading else the code won’t upload. You can reconnect it again after uploading the code.
|
1 2 3 4 5 6 7 8 9 10 11 12 13 14 15 16 17 18 19 20 21 22 23 24 25 26 27 28 29 30 31 32 33 34 35 36 37 38 39 40 41 42 43 44 45 46 47 48 49 50 51 52 53 54 55 56 57 58 59 60 61 62 63 64 65 66 67 68 69 70 71 72 73 74 75 76 77 78 79 80 81 82 83 84 85 86 87 88 89 90 91 92 93 94 95 96 97 98 99 100 101 102 103 104 105 106 107 108 109 110 111 112 113 114 115 116 117 118 119 120 121 122 123 124 125 126 127 128 129 130 131 132 133 134 135 136 137 138 139 140 141 142 143 144 145 146 147 148 149 150 151 152 153 154 155 156 157 158 159 160 161 162 163 164 165 166 167 168 169 170 171 172 173 174 175 176 177 178 179 180 181 182 183 184 185 186 187 188 189 190 191 192 |
#include <ESP8266WiFi.h> #include <Wire.h> #include <Adafruit_Sensor.h> #include <Adafruit_BME280.h> #include "MQ135.h" #include <Arduino.h> #define LENG 31 //0x42 + 31 bytes equal to 32 bytes unsigned char buf[LENG]; int PM01Value=0; //define PM1.0 value of the air detector module int PM2_5Value=0; //define PM2.5 value of the air detector module int PM10Value=0; //define PM10 value of the air detector module float h, t, p, pin, dp; char temperatureFString[6]; char dpString[6]; char humidityString[6]; char pressureString[7]; char pressureInchString[6]; Adafruit_BME280 bme; // I2C String apiKey = "85JJUZZ7WX809P3M"; // replace with your routers SSID const char* ssid = "Sri Krishna 2."; // replace with your routers password const char* password = "subbu@123"; const char* server = "api.thingspeak.com"; WiFiClient client; void setup() { Serial.begin(9600); delay(10); Serial.println(); Serial.print("Connecting to "); Serial.println(ssid); WiFi.begin(ssid, password); while (WiFi.status() != WL_CONNECTED) { delay(500); Serial.print("."); } Serial.println(""); Serial.println("WiFi connected"); // Printing the ESP IP address Serial.println(WiFi.localIP()); if (!bme.begin()) { Serial.println("Could not find a valid BME280 sensor, check wiring!"); while (1); } } void loop() { if(Serial.find(0x42)){ //start to read when detect 0x42 Serial.readBytes(buf,LENG); if(buf[0] == 0x4d){ if(checkValue(buf,LENG)){ PM01Value=transmitPM01(buf); //count PM1.0 value of the air detector module PM2_5Value=transmitPM2_5(buf);//count PM2.5 value of the air detector module PM10Value=transmitPM10(buf); //count PM10 value of the air detector module } } } static unsigned long OledTimer=millis(); if (millis() - OledTimer >=1000) { OledTimer=millis(); Serial.print("PM1.0: "); Serial.print(PM01Value); Serial.println(" ug/m3"); Serial.print("PM2.5: "); Serial.print(PM2_5Value); Serial.println(" ug/m3"); Serial.print("PM10 : "); Serial.print(PM10Value); Serial.println(" ug/m3"); Serial.println(); MQ135 gasSensor = MQ135(A0); float air_quality = gasSensor.getPPM(); Serial.print("Air Quality: "); Serial.print(air_quality); Serial.println(" PPM"); Serial.println(); h = bme.readHumidity(); t = bme.readTemperature(); t = t*1.8+32.0; dp = t-0.36*(100.0-h); p = bme.readPressure()/100.0F; pin = 0.02953*p; dtostrf(t, 5, 1, temperatureFString); dtostrf(h, 5, 1, humidityString); dtostrf(p, 6, 1, pressureString); dtostrf(pin, 5, 2, pressureInchString); dtostrf(dp, 5, 1, dpString); Serial.print("Temperature = "); Serial.println(temperatureFString); Serial.print("Humidity = "); Serial.println(humidityString); Serial.print("Pressure = "); Serial.println(pressureString); Serial.print("Pressure Inch = "); Serial.println(pressureInchString); Serial.print("Dew Point = "); Serial.println(dpString); Serial.println("..............................................."); if (client.connect(server,80)) // "184.106.153.149" or api.thingspeak.com { String postStr = apiKey; postStr +="&field1="; postStr += String(PM01Value); postStr +="&field2="; postStr += String(PM2_5Value); postStr +="&field3="; postStr += String(PM10Value); postStr +="&field4="; postStr += String(air_quality); postStr +="&field5="; postStr += String(temperatureFString); postStr +="&field6="; postStr += String(humidityString); postStr +="&field7="; postStr += String(pressureInchString); postStr += "\r\n\r\n"; client.print("POST /update HTTP/1.1\n"); client.print("Host: api.thingspeak.com\n"); client.print("Connection: close\n"); client.print("X-THINGSPEAKAPIKEY: "+apiKey+"\n"); client.print("Content-Type: application/x-www-form-urlencoded\n"); client.print("Content-Length: "); client.print(postStr.length()); client.print("\n\n"); client.print(postStr); } client.stop(); } } char checkValue(unsigned char *thebuf, char leng) { char receiveflag=0; int receiveSum=0; for(int i=0; i<(leng-2); i++){ receiveSum=receiveSum+thebuf[i]; } receiveSum=receiveSum + 0x42; if(receiveSum == ((thebuf[leng-2]<<8)+thebuf[leng-1])) //check the serial data { receiveSum = 0; receiveflag = 1; } return receiveflag; } int transmitPM01(unsigned char *thebuf) { int PM01Val; PM01Val=((thebuf[3]<<8) + thebuf[4]); //count PM1.0 value of the air detector module return PM01Val; } //transmit PM Value to PC int transmitPM2_5(unsigned char *thebuf) { int PM2_5Val; PM2_5Val=((thebuf[5]<<8) + thebuf[6]);//count PM2.5 value of the air detector module return PM2_5Val; } //transmit PM Value to PC int transmitPM10(unsigned char *thebuf) { int PM10Val; PM10Val=((thebuf[7]<<8) + thebuf[8]); //count PM10 value of the air detector module return PM10Val; } |
Online Monitoring of Air Pollution
Once the code is uploaded to NodeMCU, you can click on the serial monitor and see the following results.

Similarly, you can go to Thingspeak and check the private view to see the following graph below.

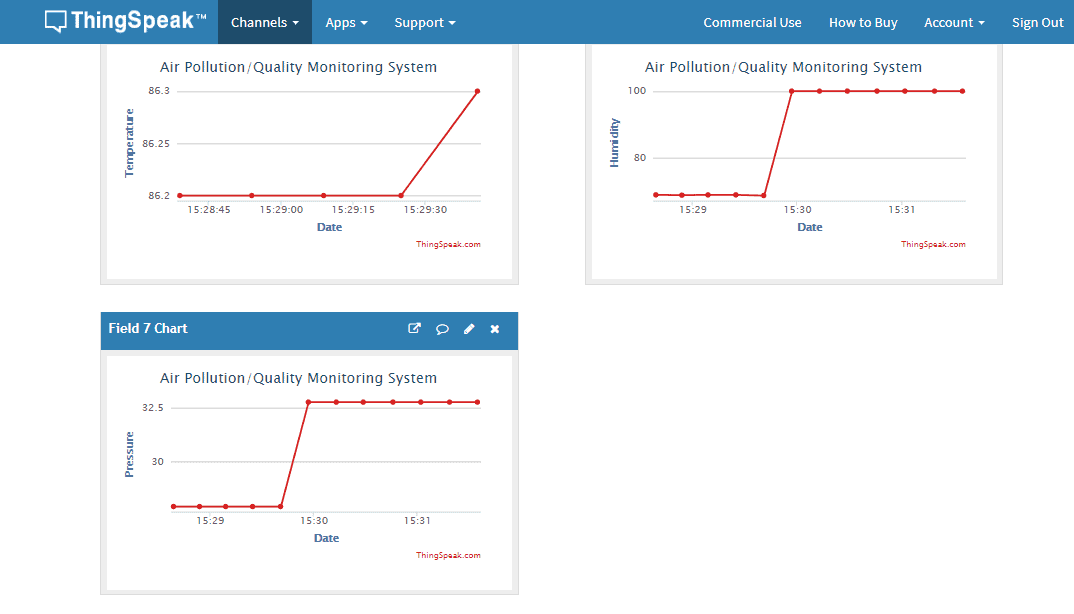
There is an upgraded version of BME280 Sensor called BME680 Sensor, that can also measure Index of Air Quality (IAQ) & can be used to measure Air Quality as well. So the single sensor is enough to replace BME280 & MQ-135.
Video Tutorial & Demonstration

This is how you can monitor the Air Pollution data wirelessly on IoT Platform. You can use this system with ESP32 to make Air Freshener System.
 & Live Dashboard")


11 Comments
In the schematic, the BME280 is powered by the NodeMCU’s 3.3V, but in the pictures of the breadboard the BME280 appears to be powered by the NodeMCU’s 5.0V. The data sheet for the BME280 says it’s Supply Voltage Max is 3.6V. Can you confirm which is correct? Thanks.
The BME280 can only be powered by 3.3V Pin. Powering the BME280 for more than a few minutes will damage the sensor like mine. The Schematic connection is correct.
Dear Mr.Alam, I have run almost all your applications. But this application gives a BME280 cable connection error on the serial port screen. Whatever I did I couldn’t get it to work.
When I have executed my code it is showing that there is no such directory
my nodemcu cant reach the thinkspeak it shows only empty
please help me
Just surprised that the PMS5003 is connected to the serial output, that is also used to print values on screen
dear download library from google . i face such kind of problem through copy error and paste on google \
The code is showing 0 0 values for all PM size. Any inputs why it might be happening.
can any bodu help ..i am facing this error
Arduino: 1.8.19 (Windows 10), Board: “NodeMCU 0.9 (ESP-12 Module), 80 MHz, Flash, Disabled (new aborts on oom), Disabled, All SSL ciphers (most compatible), 32KB cache + 32KB IRAM (balanced), Use pgm_read macros for IRAM/PROGMEM, 4MB (FS:2MB OTA:~1019KB), v2 Lower Memory, Disabled, None, Only Sketch, 115200”
compilation terminated.
Used: C:\Users\Saeed Computers\AppData\Local\Arduino15\packages\esp8266\hardware\esp8266\3.0.2\libraries\Wire
Not used: C:\Users\Saeed Computers\Documents\Arduino\libraries\PaulStoffregen-Wire-dfbdd2c
exit status 1
Error compiling for board NodeMCU 0.9 (ESP-12 Module).
1) Can I use BMP280 instead of BME280 since it is cheaper (knowing that it don’t measure humidity) ?
2) PMS5003 is PM 2.5 sensor does it also measure PM1 & PM10 ?
3) Will I get good accuracy in data by sensors ?
4) If in future suppose I needed to add more sensors in this project to what platform should I jump since NodeMCU has only 1 analog pin (what do you recommend) ?
5)Thanks For this great Tutorial “how2electronics “.
1) yeap, same librairies
2) yep 5003 shows pm1, pm2,5 and pm10 as shown
3) you’ll find accuracy of each sensor reading his datasheet
4) esp32, arduino mega if you really need