

In this tutorial, we will learn about Sending & Receiving Sensor Data Wirelessly with LoRa Ra-02 SX1278 Module & Arduino. We will use DHT11 Humidity & Temperature Sensor & send the Temperature & Humidity value wirelessly from one Arduino to another using SX1278 Ra-02 LoRa Module.
Overview
In the last couple of years, there is a number of communication technologies available for interaction between IoT devices. The most popular ones are the Wi-Fi Technology and Bluetooth Module. But they have few limitations like limited range, limited access points & high power consumption. So LoRa technology is introduced by Semtech to fix all these issue. Using a single battery the device operates over a year.

In this tutorial, we will use DHT11 Humidity & Temperature Sensor and send the temperature and humidity value wirelessly from one Arduino to another Arduino Board. One LoRa SX1278 will be used as a transmitter, transferring the sensor data to the other, receiver LoRa SX1278.
Before getting started, you can visit the following posts as well:
1. Interfacing SX1278 (Ra-02) LORA Module with Arduino: Check Here
2. ESP8266 & LoRa SX1278 Transmitter Receiver with DHT11: Check Here
3. ESP32 LoRa Sensor Data Monitoring on Web Server: Check Here
4. ESP32 & LoRa SX1278/76 Transmitter Receiver with OLED: Check Here
Bill of Materials
Following are the components required for making this project. All the components can easily be purchased from Amazon. The components purchase link is given below.
| S.N. | Components | Quantity | Purchase Links |
|---|---|---|---|
| 1 | Arduino Nano Board | 2 | Amazon | AliExpress |
| 2 | LoRa Module SX1278 | 2 | Amazon | AliExpress |
| 3 | DHT11 Sensor | 1 | Amazon | AliExpress |
| 4 | Connecting Wires | 20 | Amazon | AliExpress |
| 5 | Breadboard | 1 | Amazon | AliExpress |
Semtech SX1278 LoRa Module
SX1278 Module
The SX1276/77/78/79 transceivers feature the LoRa® long range modem that provides ultra-long range spread spectrum communication and high interference immunity whilst minimizing current consumption.

SX1278 can achieve a sensitivity of over -148dBm using a low-cost crystal. The high sensitivity combined with the integrated +20dBm power amplifier yields industry leading link budget making it optimal for any application requiring range or robustness. Lora SX1278 also provides significant advantages in both blocking and selectivity over conventional modulation techniques, solving the traditional design compromise between range, interference immunity and energy consumption. Learn more about it at: Semtech SX1278 Datasheet.
Semtech SX1278 Pinout
There are different versions and types of SX1278 breakout board available in market. But basically all of them has same pinout as LoRa SX1278 is an SPI module. I am using this board as shown in photos below.

This module version of SX1278 has 12 pins for interfacing with microcontroller & additional two pins for antenna.

DHT11 Humidity & Temperature Sensor
The DHT11 is a basic, ultra low-cost digital temperature and humidity sensor. It uses a capacitive humidity sensor and a thermistor to measure the surrounding air, and spits out a digital signal on the data pin (no analog input pins needed).

Its fairly simple to use, but requires careful timing to grab data. The only real downside of this sensor is you can only get new data from it once every 2 seconds, so when using the library, sensor readings can be up to 2 seconds old.
Sending Sensor Data Wirelessly with LoRa SX1278 & Arduino
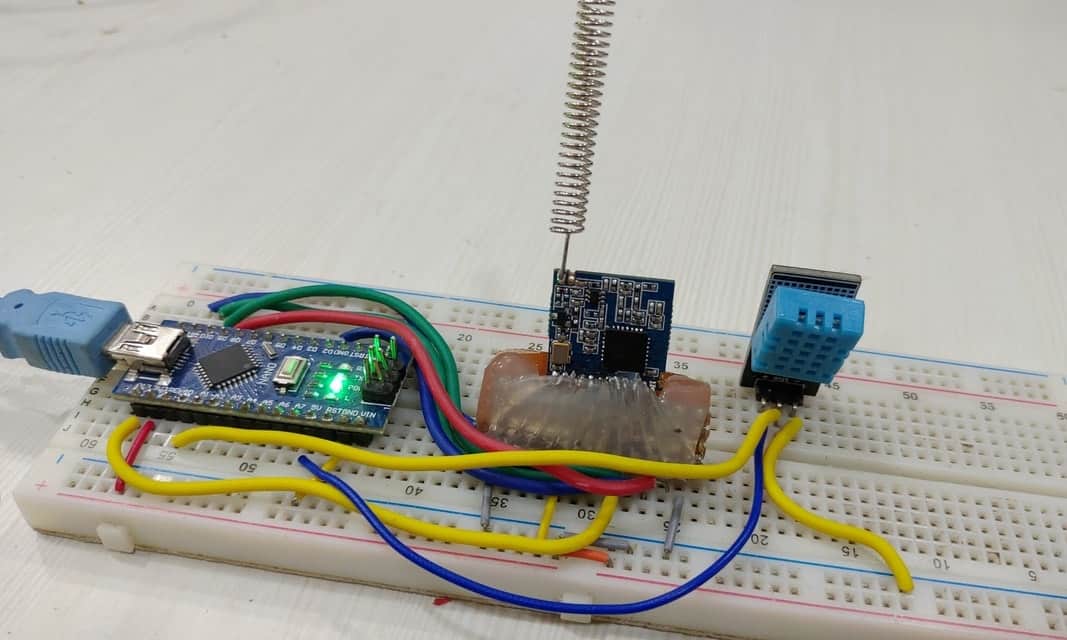
Now let us interface SX1278 LoRa module with Arduino and DHT11 Sensor. We have to make two different setup, one as a transmitter and other as a receiver.
Arduino Lora SX1278 DHT11 Transmitter
Let us first setup the transmitter part first. The transmitter part contains Arduino Nano Board, DHT11 Humidity & Temperature Sensor and LoRa SX1278 Module. The circuit diagram is given below. Assemble the circuit as shown in the figure below.

The LoRa SX1278 is not 5V friendly so do not supply 5V to it else the board will get damaged. Use 3.3V of Arduino to connect it to VCC pin. Connect all the GND pins to GND. Connect the RST pin to D9 and DIO0 to D2 of Arduino. Connect the SPI Pins NSS, MOSI, MISO, SCK to Arduino D10, D11, D12, D13 of Arduino respectively as shown in the circuit diagram above.
Connect the DHT11 Humidity & Temperature Sensor VCC, Out & GND pins to VCC, A0 & GND of Arduino respectively.
Arduino Lora SX1278 Receiver
Now let us setup the Receiver part now. The receiver part contains Arduino Nano Board and LoRa SX1278 Module. The circuit diagram is given below. Assemble the circuit as shown in the figure below.
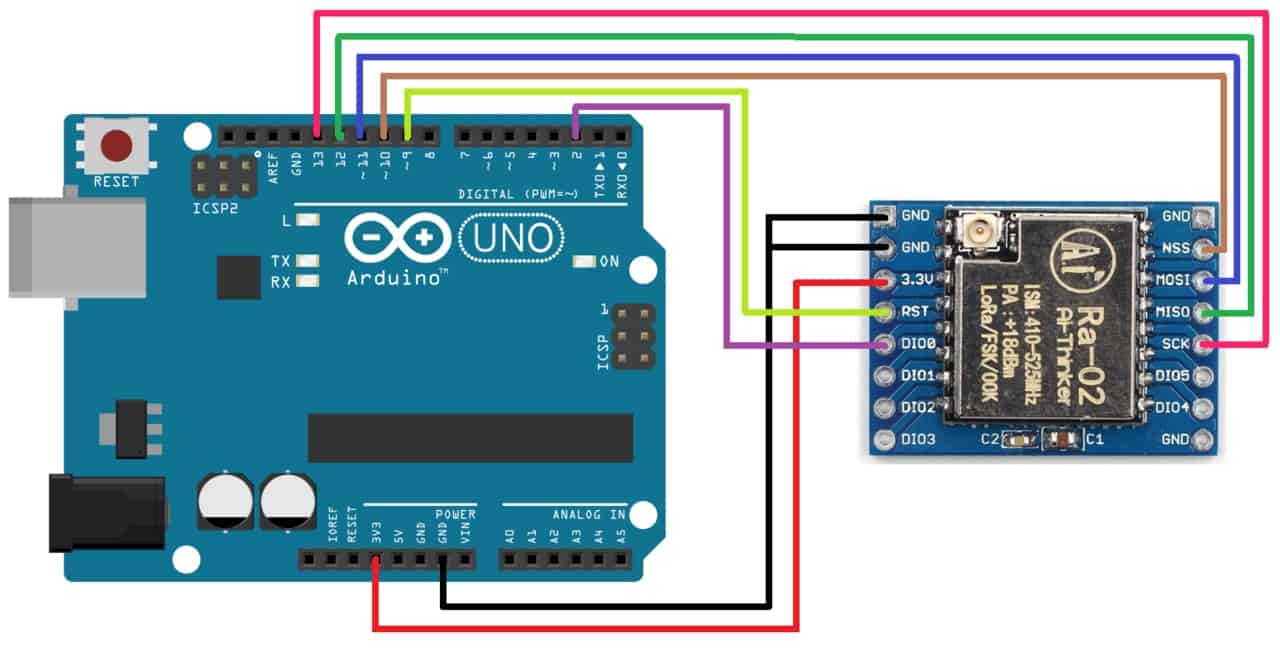
The LoRa SX1278 is not 5V friendly so do not supply 5V to it else the board will get damaged. Use 3.3V of Arduino to connect it to VCC pin. Connect all the GND pins to GND. Connect the RST pin to D9 and DIO0 to D2 of Arduino. Connect the SPI Pins NSS, MOSI, MISO, SCK to Arduino D10, D11, D12, D13 of Arduino respectively as shown in the circuit diagram above.

Source Code/Program
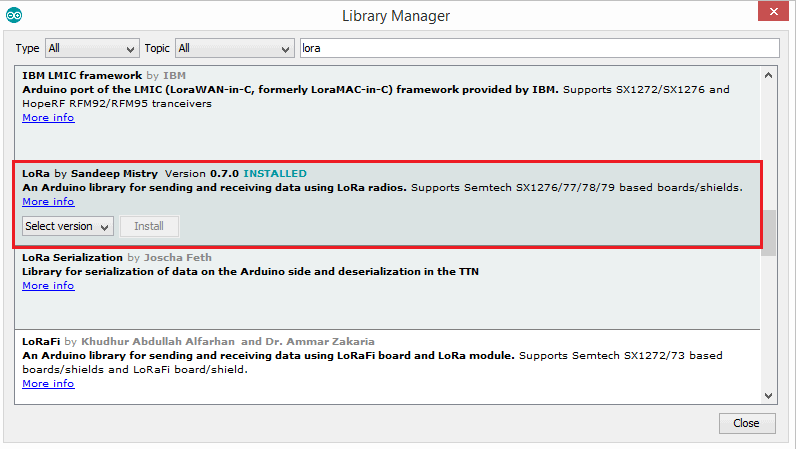
For communication between two LoRa Module, you need to have LoRa library. To get the LoRa Library go to library manager and search for LoRa and install it.
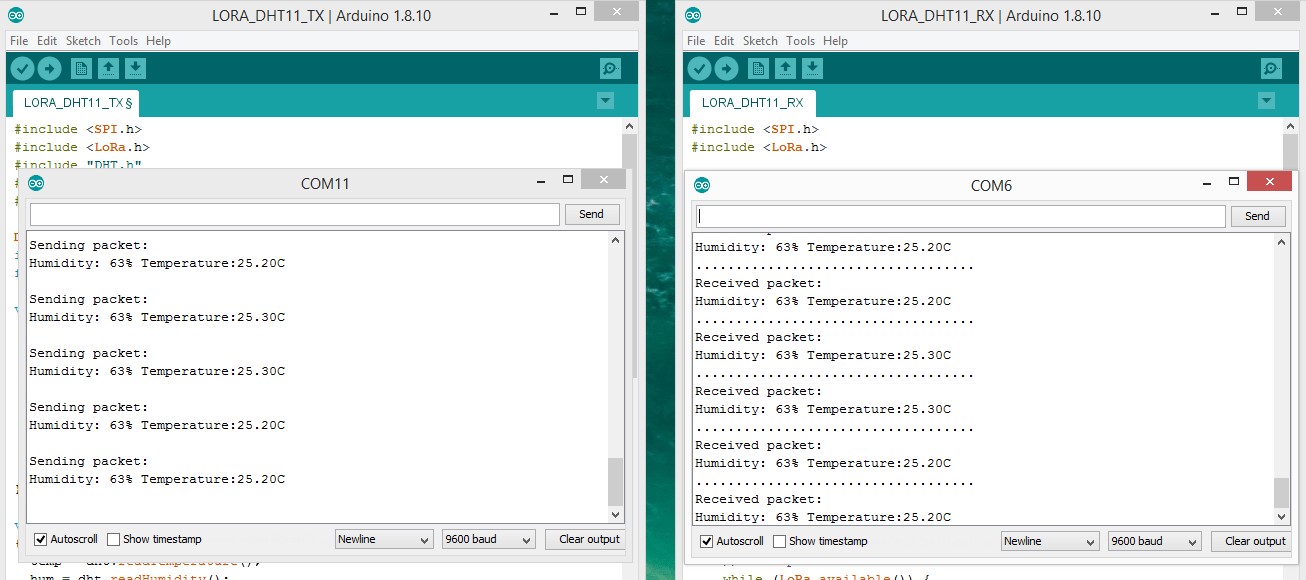
Once the library is installed you can upload the transmitter and receiver code and learn about Sending Sensor Data Wirelessly with LoRa SX1278 & Arduino.
Transmitter Code
|
1 2 3 4 5 6 7 8 9 10 11 12 13 14 15 16 17 18 19 20 21 22 23 24 25 26 27 28 29 30 31 32 33 34 35 36 37 38 39 40 41 42 43 44 45 46 47 48 49 |
#include <SPI.h> #include <LoRa.h> #include "DHT.h" #define DHTPIN A0 #define DHTTYPE DHT11 DHT dht(DHTPIN, DHTTYPE); int hum; float temp; //Stores temperature value void setup() { Serial.begin(9600); dht.begin(); while (!Serial); Serial.println("LoRa Sender"); if (!LoRa.begin(433E6)) { Serial.println("Starting LoRa failed!"); while (1); } } void loop() { temp = dht.readTemperature(); hum = dht.readHumidity(); Serial.println("Sending packet: "); // send packet LoRa.beginPacket(); LoRa.print("Humidity: "); LoRa.print(hum); LoRa.print("%"); LoRa.print(" Temperature:"); LoRa.print(temp); LoRa.print("C"); Serial.print("Humidity: "); Serial.print(hum); Serial.print("%"); Serial.print(" Temperature:"); Serial.print(temp); Serial.println("C"); Serial.println(""); LoRa.endPacket(); delay(1000); } |
Receiver Code
|
1 2 3 4 5 6 7 8 9 10 11 12 13 14 15 16 17 18 19 20 21 22 23 24 25 26 27 28 29 30 31 32 33 34 35 36 37 38 |
#include <SPI.h> #include <LoRa.h> void setup() { Serial.begin(9600); while (!Serial); Serial.println("LoRa Receiver"); if (!LoRa.begin(433E6)) { Serial.println("Starting LoRa failed!"); while (1); } } void loop() { // try to parse packet int packetSize = LoRa.parsePacket(); if (packetSize) { // received a paket Serial.println(""); Serial.println("..................................."); Serial.println("Received packet: "); // read packet while (LoRa.available()) { char incoming = (char)LoRa.read(); if (incoming == 'c') { Serial.print("Error"); } else { Serial.print(incoming); } } } } |
Once the code is uploaded you can open the serial monitor and see the received data on the receiver end. You can place the transmitter to the very far end and observe the receiver data on Serial Monitor.
Video Tutorial & Guide: DHT11 Sensor with LoRa & Arduino

You can check this link as well: LoRa SX1278 & ESP8266 Transmitter Receiver with DHT11 Sensor


6 Comments
Hello, i want to ask. Why my humidity and temperature data only send 5 times only ? Can someone help me please.
Do you have any tutorials on how to set up LoRa MESH Radio module in this same task?
In my serial ,monitor it says,LoRa sensder failed.Why is that?
I gave the power using my laptop through the USB cable.Is that the isssue?
hei, how about using the other sensor?
same situation, how did you solve this?
I got garbage values at receiver what can i do to resolve this problem?