

In this project, we will make a sensor monitoring system on Web Server using an ESP32 board & LoRa Module SX1278 or SX1276. The device will send temperature & humidity readings via LoRa radio to an ESP32 LoRa receiver. The receiver displays the latest sensor readings on a web server.
Overview
In the last couple of years, there is a number of communication technologies available for interaction between IoT devices. The most popular ones are the Wi-Fi Technology and Bluetooth Module. But they have few limitations like limited range, limited access points & high power consumption. So LoRa technology is introduced by Semtech to fix all these issue. Using a single battery the device operates over a year.
So, in this IoT Project, we will design ESP32 LoRa Web Server to monitor the sensor reading wirelessly from a few kilometer distances. The sender will read the humidity and temperature data using DHT11 Sensor. Then it transmits the data via LoRa Radio. The data is received by the receiver module which contains the OLED Display. The receiver has the capability of connecting the device to a WiFi network. The OLED will display the IP Address. Using the IP address, you can log into any web browser where the sensor reading is monitored. The basic overview of ESP32 LoRa Web Server is given below.

The LoRa receiver runs an asynchronous web server and the web page files are saved on the ESP32 filesystem (SPIFFS). It also shows the date and time the last readings were received. To get date and time, we use the Network Time Protocol with the ESP32.
Before getting started, you can visit the following posts:
- Interfacing SX1278 (Ra-02) LORA Module with Arduino: Check Here
- Sending Sensor Data Wirelessly with LoRa SX1278 & Arduino: Check Here
- ESP8266 & LoRa SX1278 Transmitter Receiver with DHT11: Check Here
- ESP32 & LoRa SX1278/76 Transmitter Receiver with OLED: Check Here
- ESP32 LoRa Thingspeak Gateway with LoRa Sensor Node: Check Here
Bill of Materials
Following are the components required for making this project. All the components can easily be purchased from Amazon. The components purchase link is given below.

| S.N. | Components | Quantity | Purchase Links |
|---|---|---|---|
| 1 | ESP32 Board | 2 | Amazon | AliExpress |
| 2 | LoRa Module SX1278 | 2 | Amazon | AliExpress |
| 3 | 0.96" I2C OLED Display | 1 | Amazon | AliExpress |
| 4 | Connecting Wires | 20 | Amazon | AliExpress |
| 5 | Breadboard | 1 | Amazon | AliExpress |
| 6 | DHT11 Sensor | 1 | Amazon | AliExpress |
Installing the Required Libraries
Several Libraries are required for the project to program the ESP32 Board with Arduino IDE.
1. DHT11 Library
To read the temperature and humidity we need any temperature humidity sensor. For that DHT11 is the best and cheap sensor. We need to install DHT11 Library for that. Download the library from below and add to the Arduino IDE.
2. LoRa Library
We need an Arduino library for sending and receiving data using LoRa radios. The library supports module like Semtech SX1276, SX1277, SX1278, SX1279 and also HopeRF RFM95W, RFM96W and RFM98W.
3. OLED Libraries
We need two Library for OLED Display. Adafruit_SSD1306 is a library for our Monochrome OLEDs based on SSD1306 drivers. Adafruit GFX Library is the core graphics library for all our displays, providing a common set of graphics primitives (points, lines, circles, etc.).
4. NTPClient Library
The Network Time Protocol (NTP) is a networking protocol for clock synchronization between computer systems over packet-switched, variable-latency data networks. Every time the LoRa receiver receives a new LoRa message, it will request the date and time from an NTP server so that the last packet was received time can be obtained.
5. Asynchronous Web Server Libraries
To build the asynchronous web server we need two libraries, i.e ESPAsyncWebServer library & Async TCP Library.
Installing ESP32 Filesystem Uploader Plugin
SPIFFS
SPIFFS lets you access the flash memory like you would do in a normal filesystem in your computer, but simpler and more limited. Using SPIFFS with the ESP32 board is especially useful to:
1. Create configuration files with settings
2. Save data permanently
3. Create files to save small amounts of data instead of using a microSD card
4. Save HTML and CSS files to build a web server
5. Save images, figures, and icons

In this project we are going to upload webpage and image to the ESP32 File System.
Installing the Arduino ESP32 Filesystem Uploader
Follow the following steps to install the filesystem uploader:
Step 1: Visit the link: Release for esptool_py. From here download the ESP32FS-1.0.zip
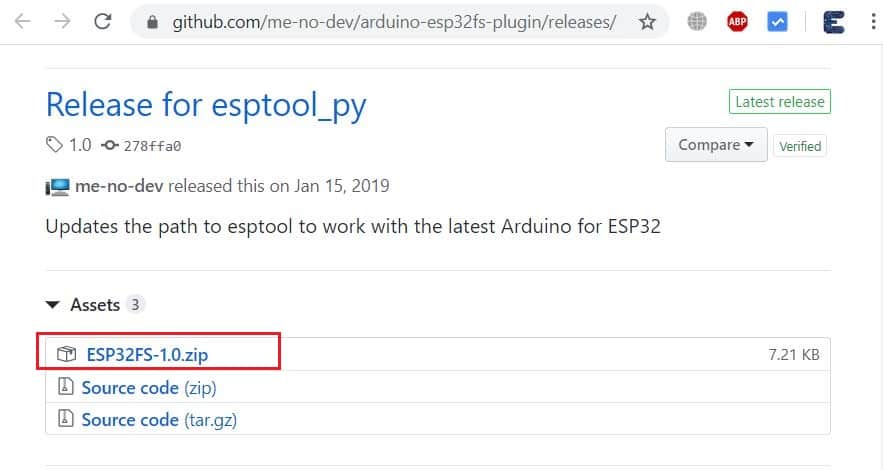
Step 2: Extract the folder ESP32FS-1.0.zip
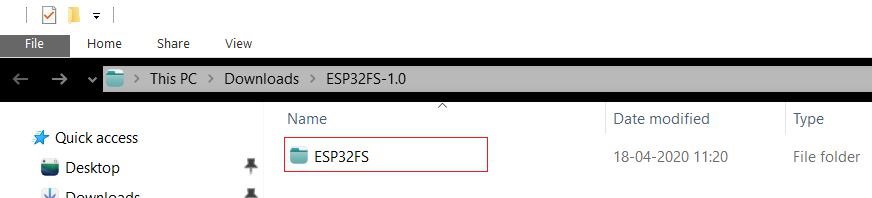
Step 3: Move the the folder ESP32FS to location C:\Program Files (x86)\Arduino\tools.

Step 4: Restart the Arduino IDE. Click on tools and there you can see “Sketch Data Upload” option.
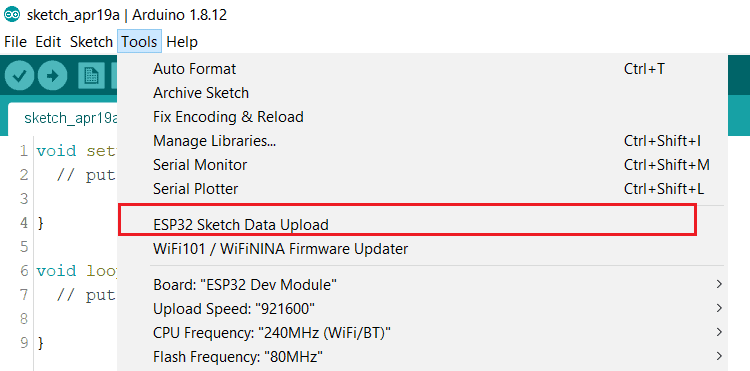
You have successfully installed the SPIFFS plugin now. The rest of the things need to be done on the receiver sketch below.
Circuit: ESP32 LoRa Sensor Data Monitoring on Web Server
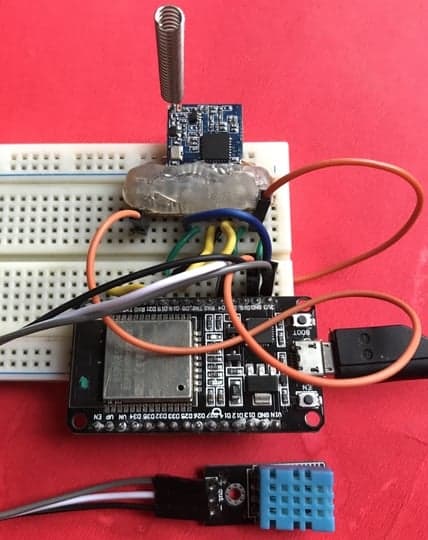
Now let us see the sender and receiver circuit for building ESP32 LoRa Web Server. I assembled both the circuit on breadboard. You can make it on PCB if you want.
Sender Circuit for ESP32 LoRa Web Server
Here is an ESP32 LoRa Module SX1278 Sender Circuit with DHT11 Sensor. This part work as a transmitter. The humidity and temperature data is read by DHT11 Humidity Temperature Sensor and transmitted using LoRa Radio.

The connection is fairly simple. Simlarly connect the Lora SX1278 & ESP32 as follows.
| ESP32 Pins | SX1278 Pins |
|---|---|
| GND | GND |
| 3.3V | VCC |
| D5 | NSS |
| D23 | MOSI |
| D19 | MISO |
| D18 | SCK |
| D14 | RST |
| D2 | DIO0 |
Similarly connect the DHT11 digital input pin to GPIO4 of ESP32. Connect its VCC to 3.3V & GND to GND of ESP32.
Receiver Circuit for ESP32 LoRa Web Server
Here is an ESP32 LoRa Module SX1278 Receiver Circuit with OLED Display. This part work as a Receiver. The humidity and temperature data is received using LoRa Radio.

The ESP32 & LoRa SX1278 connection same as above. But the OLED need to be connected here. Connect the I2C Pins of OLED Display, i.e SDA & SCL pins to GPIO21 & GPIO22 of ESP32 respectively. Supply it with 3.3V VCC & connect the GND to GND.

ESP32 LoRa Sender Code
After assembling the circuit on breadboard for Sender Circuit. Copy the following code and upload it to the ESP32 Board. Before uploading make sure to do the changes in the LoRa frequency according to region.
|
1 |
#define BAND 433E6 //433E6 for Asia, 866E6 for Europe, 915E6 for North America |
|
1 2 3 4 5 6 7 8 9 10 11 12 13 14 15 16 17 18 19 20 21 22 23 24 25 26 27 28 29 30 31 32 33 34 35 36 37 38 39 40 41 42 43 44 45 46 47 48 49 50 51 52 53 54 55 56 57 58 59 60 61 62 63 64 65 66 67 68 69 70 71 72 73 74 75 76 77 78 79 80 81 82 83 84 85 86 87 88 89 90 91 |
//Libraries for LoRa #include <SPI.h> #include <LoRa.h> //Libraries for LoRa #include "DHT.h" #define DHTPIN 4 //pin where the dht11 is connected DHT dht(DHTPIN, DHT11); //define the pins used by the LoRa transceiver module #define ss 5 #define rst 14 #define dio0 2 #define BAND 433E6 //433E6 for Asia, 866E6 for Europe, 915E6 for North America //packet counter int readingID = 0; int counter = 0; String LoRaMessage = ""; float temperature = 0; float humidity = 0; //Initialize LoRa module void startLoRA() { LoRa.setPins(ss, rst, dio0); //setup LoRa transceiver module while (!LoRa.begin(BAND) && counter < 10) { Serial.print("."); counter++; delay(500); } if (counter == 10) { // Increment readingID on every new reading readingID++; Serial.println("Starting LoRa failed!"); } Serial.println("LoRa Initialization OK!"); delay(2000); } void startDHT() { if (isnan(humidity) || isnan(temperature)) { Serial.println("Failed to read from DHT sensor!"); return; } } void getReadings(){ humidity = dht.readHumidity(); temperature = dht.readTemperature(); Serial.print(F("Humidity: ")); Serial.print(humidity); Serial.print(F("% Temperature: ")); Serial.print(temperature); Serial.println(F("°C ")); } void sendReadings() { LoRaMessage = String(readingID) + "/" + String(temperature) + "&" + String(humidity) ; //Send LoRa packet to receiver LoRa.beginPacket(); LoRa.print(LoRaMessage); LoRa.endPacket(); Serial.print("Sending packet: "); Serial.println(readingID); readingID++; Serial.println(LoRaMessage); } void setup() { //initialize Serial Monitor Serial.begin(115200); dht.begin(); startDHT(); startLoRA(); } void loop() { getReadings(); sendReadings(); delay(5000); } |
ESP32 LoRa Web Server Receiver Code
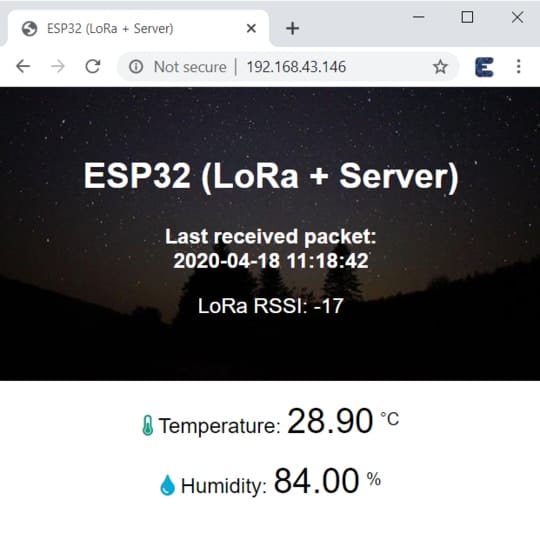
The LoRa Receiver gets incoming LoRa packets and displays the received readings on an asynchronous web server. Besides the sensor readings, it also displays the last time those readings were received and the RSSI (received signal strength indicator).
For this we need to store the image on the ESP32 filesystem (SPIFFS) along with the HTML file.
Creating index.html webpage
Copy the following code from below and paste it on Notepad. Save the file with name index.html so that final webpage can be published.
|
1 2 3 4 5 6 7 8 9 10 11 12 13 14 15 16 17 18 19 20 21 22 23 24 25 26 27 28 29 30 31 32 33 34 35 36 37 38 39 40 41 42 43 44 45 46 47 48 49 50 51 52 53 54 55 56 57 58 59 60 61 62 63 64 65 |
<!DOCTYPE HTML><html> <head> <meta name="viewport" content="width=device-width, initial-scale=1"> <link rel="icon" href="data:,"> <title>ESP32 (LoRa + Server)</title> <link rel="stylesheet" href="https://use.fontawesome.com/releases/v5.7.2/css/all.css" integrity="sha384-fnmOCqbTlWIlj8LyTjo7mOUStjsKC4pOpQbqyi7RrhN7udi9RwhKkMHpvLbHG9Sr" crossorigin="anonymous"> <style> body { margin: 0; font-family: Arial, Helvetica, sans-serif; text-align: center; } header { margin: 0; padding-top: 5vh; padding-bottom: 5vh; overflow: hidden; background-image: url(mainimage); background-size: cover; color: white; } h2 { font-size: 2.0rem; } p { font-size: 1.2rem; } .units { font-size: 1.2rem; } .readings { font-size: 2.0rem; } </style> </head> <body> <header> <h2>ESP32 (LoRa + Server)</h2> <p><strong>Last received packet:<br/><span id="timestamp">%TIMESTAMP%</span></strong></p> <p>LoRa RSSI: <span id="rssi">%RSSI%</span></p> </header> <main> <p> <i class="fas fa-thermometer-half" style="color:#059e8a;"></i> Temperature: <span id="temperature" class="readings">%TEMPERATURE%</span> <sup>°C</sup> </p> <p> <i class="fas fa-tint" style="color:#00add6;"></i> Humidity: <span id="humidity" class="readings">%HUMIDITY%</span> <sup>%</sup> </p> </main> <script> setInterval(updateValues, 10000, "temperature"); setInterval(updateValues, 10000, "humidity"); setInterval(updateValues, 10000, "rssi"); setInterval(updateValues, 10000, "timestamp"); function updateValues(value) { var xhttp = new XMLHttpRequest(); xhttp.onreadystatechange = function() { if (this.readyState == 4 && this.status == 200) { document.getElementById(value).innerHTML = this.responseText; } }; xhttp.open("GET", "/" + value, true); xhttp.send(); } </script> </body> </html> |
Creating data folder & its content
Create the folder name data and move the index.html file in it. Also download this image and place it in the same folder. The image name should be kept as mainimage. You can use any other image if you want but the image name should be same.
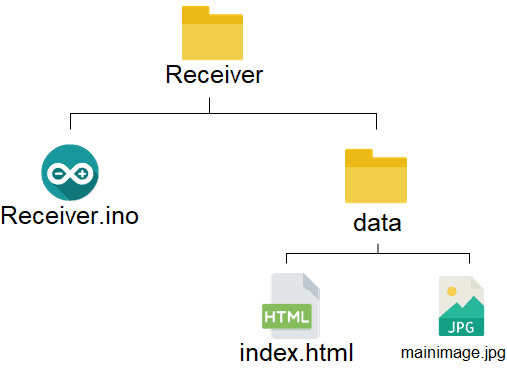
Now copy the data folder and paste it on receiver sketh folder along with ino file.
Uploading html & image to SPIFFS
After above all steps, now you can upload the now you can upload the file system:
LoRa Receiver Code
After uploading the html page and image to SPIFFS, you can copy the below code and upload the reciver code to ESP32 Board. In the below code make changes to WiFi SSID & Password.
|
1 2 |
const char* ssid = "Alexahome"; const char* password = "12345678"; |
|
1 2 3 4 5 6 7 8 9 10 11 12 13 14 15 16 17 18 19 20 21 22 23 24 25 26 27 28 29 30 31 32 33 34 35 36 37 38 39 40 41 42 43 44 45 46 47 48 49 50 51 52 53 54 55 56 57 58 59 60 61 62 63 64 65 66 67 68 69 70 71 72 73 74 75 76 77 78 79 80 81 82 83 84 85 86 87 88 89 90 91 92 93 94 95 96 97 98 99 100 101 102 103 104 105 106 107 108 109 110 111 112 113 114 115 116 117 118 119 120 121 122 123 124 125 126 127 128 129 130 131 132 133 134 135 136 137 138 139 140 141 142 143 144 145 146 147 148 149 150 151 152 153 154 155 156 157 158 159 160 161 162 163 164 165 166 167 168 169 170 171 172 173 174 175 176 177 178 179 180 181 182 183 184 185 186 187 188 189 190 191 192 193 194 195 196 197 198 199 200 201 202 203 204 205 206 207 208 209 210 211 212 213 214 215 216 217 218 219 220 221 222 223 224 225 226 227 228 229 230 231 232 233 234 235 236 237 238 239 |
// Import Wi-Fi library #include <WiFi.h> #include "ESPAsyncWebServer.h" #include <SPIFFS.h> //Libraries for LoRa #include <SPI.h> #include <LoRa.h> //Libraries for OLED Display #include <Wire.h> #include <Adafruit_GFX.h> #include <Adafruit_SSD1306.h> // Libraries to get time from NTP Server #include <NTPClient.h> #include <WiFiUdp.h> //define the pins used by the LoRa transceiver module #define ss 5 #define rst 14 #define dio0 2 #define BAND 433E6 //433E6 for Asia, 866E6 for Europe, 915E6 for North America //OLED pins #define OLED_SDA 21 #define OLED_SCL 22 #define OLED_RST -1 #define SCREEN_WIDTH 128 // OLED display width, in pixels #define SCREEN_HEIGHT 64 // OLED display height, in pixels // Replace with your network credentials const char* ssid = "Alexahome"; const char* password = "12345678"; // Define NTP Client to get time WiFiUDP ntpUDP; NTPClient timeClient(ntpUDP); // Variables to save date and time String formattedDate; String day; String hour; String timestamp; // Initialize variables to get and save LoRa data int rssi; String loRaMessage; String temperature; String humidity; String readingID; // Create AsyncWebServer object on port 80 AsyncWebServer server(80); Adafruit_SSD1306 display(SCREEN_WIDTH, SCREEN_HEIGHT, &Wire, OLED_RST); // Replaces placeholder with DHT values String processor(const String& var){ //Serial.println(var); if(var == "TEMPERATURE"){ return temperature; } else if(var == "HUMIDITY"){ return humidity; } else if(var == "TIMESTAMP"){ return timestamp; } else if (var == "RRSI"){ return String(rssi); } return String(); } //Initialize OLED display void startOLED(){ //reset OLED display via software pinMode(OLED_RST, OUTPUT); digitalWrite(OLED_RST, LOW); delay(20); digitalWrite(OLED_RST, HIGH); //initialize OLED Wire.begin(OLED_SDA, OLED_SCL); if(!display.begin(SSD1306_SWITCHCAPVCC, 0x3c, false, false)) { // Address 0x3C for 128x32 Serial.println(F("SSD1306 allocation failed")); for(;;); // Don't proceed, loop forever } display.clearDisplay(); display.setTextColor(WHITE); display.setTextSize(1); display.setCursor(0,0); display.print("LORA SENDER"); } //Initialize LoRa module void startLoRA(){ int counter; //setup LoRa transceiver module LoRa.setPins(ss, rst, dio0); //setup LoRa transceiver module while (!LoRa.begin(BAND) && counter < 10) { Serial.print("."); counter++; delay(500); } if (counter == 10) { // Increment readingID on every new reading Serial.println("Starting LoRa failed!"); } Serial.println("LoRa Initialization OK!"); display.setCursor(0,10); display.clearDisplay(); display.print("LoRa Initializing OK!"); display.display(); delay(2000); } void connectWiFi(){ // Connect to Wi-Fi network with SSID and password Serial.print("Connecting to "); Serial.println(ssid); WiFi.begin(ssid, password); while (WiFi.status() != WL_CONNECTED) { delay(500); Serial.print("."); } // Print local IP address and start web server Serial.println(""); Serial.println("WiFi connected."); Serial.println("IP address: "); Serial.println(WiFi.localIP()); display.setCursor(0,20); display.print("Access web server at: "); display.setCursor(0,30); display.print(WiFi.localIP()); display.display(); } // Read LoRa packet and get the sensor readings void getLoRaData() { Serial.print("Lora packet received: "); // Read packet while (LoRa.available()) { String LoRaData = LoRa.readString(); // LoRaData format: readingID/temperature&soilMoisture#batterylevel // String example: 1/27.43&654#95.34 Serial.print(LoRaData); // Get readingID, temperature and moisture int pos1 = LoRaData.indexOf('/'); int pos2 = LoRaData.indexOf('&'); readingID = LoRaData.substring(0, pos1); temperature = LoRaData.substring(pos1 +1, pos2); humidity = LoRaData.substring(pos2+1, LoRaData.length()); } // Get RSSI rssi = LoRa.packetRssi(); Serial.print(" with RSSI "); Serial.println(rssi); } // Function to get date and time from NTPClient void getTimeStamp() { while(!timeClient.update()) { timeClient.forceUpdate(); } // The formattedDate comes with the following format: // 2018-05-28T16:00:13Z // We need to extract date and time formattedDate = timeClient.getFormattedDate(); Serial.println(formattedDate); // Extract date int splitT = formattedDate.indexOf("T"); day = formattedDate.substring(0, splitT); Serial.println(day); // Extract time hour = formattedDate.substring(splitT+1, formattedDate.length()-1); Serial.println(hour); timestamp = day + " " + hour; } void setup() { // Initialize Serial Monitor Serial.begin(115200); startOLED(); startLoRA(); connectWiFi(); if(!SPIFFS.begin()){ Serial.println("An Error has occurred while mounting SPIFFS"); return; } // Route for root / web page server.on("/", HTTP_GET, [](AsyncWebServerRequest *request){ request->send(SPIFFS, "/index.html", String(), false, processor); }); server.on("/temperature", HTTP_GET, [](AsyncWebServerRequest *request){ request->send_P(200, "text/plain", temperature.c_str()); }); server.on("/humidity", HTTP_GET, [](AsyncWebServerRequest *request){ request->send_P(200, "text/plain", humidity.c_str()); }); server.on("/timestamp", HTTP_GET, [](AsyncWebServerRequest *request){ request->send_P(200, "text/plain", timestamp.c_str()); }); server.on("/rssi", HTTP_GET, [](AsyncWebServerRequest *request){ request->send_P(200, "text/plain", String(rssi).c_str()); }); server.on("/mainimage", HTTP_GET, [](AsyncWebServerRequest *request){ request->send(SPIFFS, "/mainimage.jpg", "image/jpg"); }); // Start server server.begin(); // Initialize a NTPClient to get time timeClient.begin(); // Set offset time in seconds to adjust for your timezone, for example: // GMT +1 = 3600 // GMT +8 = 28800 // GMT -1 = -3600 // GMT 0 = 0 timeClient.setTimeOffset(0); } void loop() { // Check if there are LoRa packets available int packetSize = LoRa.parsePacket(); if (packetSize) { getLoRaData(); getTimeStamp(); } } |
Testing the Sender & Reciver with ESP32 LoRa Web Server
Once the code is uploaded you can open the Serial Monitor and see the following sending and receiving result on Serial Monitor.

You can check the OLED display on the receiver side. You can see the OLED display displaying the IP Address.

Open any web browser either on a mobile phone or on a computer. Visit the same IP address shown in the OLED Display. You can see the beautiful display of LoRa Received message on Webserver. The received temperature and humidity data is display along with RSSI value. The time of last received packet is also display on the webpage.

Video Tutorial & Demonstration


