

In this tutorial, we will make Lora Transmitter & Receiver using Lora Module SX1278 & ESP32 Wifi Module. The communication type is a point to point and data will be transferred wirelessly from one end (transmitter) to another end (receiver).
Overview
In the last couple of years, there is a number of communication technologies available for interaction between IoT devices. The most popular ones are the Wi-Fi Technology and Bluetooth Module. But they have few limitations like limited range, limited access points & high power consumption. So LoRa technology is introduced by Semtech to fix all these issue. Using a single battery the device operates over a year.
In this tutorial, we will interface LoRa Module SX1278/76 with ESP32 Board. We will make a transmitter and receiver circuit. We will display the received parameters on 0.96″ I2C OLED Display. We will take two examples for learning Lora SX1278/76 & ESP32 Communication. First, we will transmit a simple packet and check whether the data is received at the receiver end or not. Then we will add DS18B20 Waterproof Temperature Sensor to transmitter Circuit and send the temperature value wirelessly to the receiver end. The value can be seen on OLED Display
Before getting started, you can visit the following posts:
1. Interfacing SX1278 (Ra-02) LORA Module with Arduino: Check Here
2. Sending Sensor Data Wirelessly with LoRa SX1278 & Arduino: Check Here
3. ESP8266 & LoRa SX1278 Transmitter Receiver with DHT11: Check Here
4. ESP32 LoRa Sensor Data Monitoring on Web Server: Check Here
5. ESP32 LoRa Thingspeak Gateway with LoRa Sensor Node: Check Here
Bill of Materials
Following are the components required for making this project. All the components can easily be purchased from Amazon. The components purchase link is given below.
| S.N. | Components | Quantity | Purchase Links |
|---|---|---|---|
| 1 | ESP32 Board | 2 | Amazon | AliExpress |
| 2 | LoRa Module SX1278 | 2 | Amazon | AliExpress |
| 3 | 0.96" I2C OLED Display | 1 | Amazon | AliExpress |
| 4 | Connecting Wires | 20 | Amazon | AliExpress |
| 5 | Breadboard | 1 | Amazon | AliExpress |
| 6 | DS18B20 Sensor | 1 | Amazon | AliExpress |
| 7 | Resistor 4.7K | 1 | Amazon | AliExpress |
Semtech SX1278 LoRa Module
SX1278 Module
The SX1276/77/78/79 transceivers feature the LoRa® long range modem that provides ultra-long range spread spectrum communication and high interference immunity whilst minimizing current consumption.

SX1278 can achieve a sensitivity of over -148dBm using a low-cost crystal. The high sensitivity combined with the integrated +20dBm power amplifier yields industry leading link budget making it optimal for any application requiring range or robustness. Lora SX1278 also provides significant advantages in both blocking and selectivity over conventional modulation techniques, solving the traditional design compromise between range, interference immunity and energy consumption. Learn more about it at: Semtech SX1278 Datasheet.
Semtech SX1278 Pinout
There are different versions and types of SX1278 breakout board available in market. But basically all of them has same pinout as LoRa SX1278 is an SPI module. I am using this board as shown in photos below.

This module version of SX1278 has 12 pins for interfacing with microcontroller & additional two pins for antenna.

DS18B20 Waterproof Digital Temperature Sensor:
This is a pre-wired and waterproofed version of the DS18B20 sensor. Handy for when you need to measure something far away, or in wet conditions. The Sensor can measure the temperature between -55 to 125°C (-67°F to +257°F). The cable is jacketed in PVC.
Because it is digital, there is no signal degradation even over long distances. These 1-wire digital temperature sensors are fairly precise, i.e ±0.5°C over much of the range. It can give up to 12 bits of precision from the onboard digital-to-analog converter. They work great with any microcontroller using a single digital pin.

The only downside is they use the Dallas 1-Wire protocol, which is somewhat complex and requires a bunch of code to parse out the communication. We toss in a 4.7k resistor, which is required as a pullup from the DATA to the VCC line when using the sensor.
To learn more about this, check here: Temperature Meter using DS18B20 OLED Display & Arduino
0.96″ OLED Display
This is a 0.96 inch blue OLED display module. The display module can be interfaced with any microcontroller using SPI/IIC protocols. It is having a resolution of 128×64. The package includes display board, display,4 pin male header pre-soldered to board.

OLED (Organic Light-Emitting Diode) is a self light-emitting technology composed of a thin, multi-layered organic film placed between an anode and cathode. In contrast to LCD technology, OLED does not require a backlight. OLED possesses high application potential for virtually all types of displays and is regarded as the ultimate technology for the next generation of flat-panel displays.
Required Libraries
First add these following libraries to Arduino IDE. Without these libraries the code won’t compile.
- Adafruit_SSD1306 : https://github.com/adafruit/Adafruit_SSD1306
- Adafruit_GFX : https://github.com/adafruit/Adafruit-GFX-Library
- LoRa Library: https://github.com/sandeepmistry/arduino-LoRa
- One Wire Library: https://github.com/PaulStoffregen/OneWire
- Dallas Temperature Library: https://github.com/milesburton/Arduino-Temperature-Control-Library
Simple ESP32 & LoRa SX1278/76 Transmitter Receiver
Let us run a simple sketch and check whether the LoRa module is able to communicate or not. The transmitter & Receiver circuit is the same. You can assemble the circuit in a breadboard. Assemble a pair of circuits so that one will be the transmitter and the other will be a receiver.

The connection is fairly simple. Similarly, connect the Lora SX1278 & ESP32 as follows.
| ESP32 Pins | SX1278 Pins |
|---|---|
| GND | GND |
| 3.3V | VCC |
| D5 | NSS |
| D23 | MOSI |
| D19 | MISO |
| D18 | SCK |
| D14 | RST |
| D2 | DIO0 |
![]()
Source Code for Simple ESP32 LoRa SX1278/76 Transmitter Receiver
The transmitter & receiver code is given below. Upload the transmitter & receiver code to both the ESP32 Board.
Transmitter Code
|
1 2 3 4 5 6 7 8 9 10 11 12 13 14 15 16 17 18 19 20 21 22 23 24 25 26 27 28 29 30 31 32 33 34 35 36 37 38 39 40 |
#include <LoRa.h> #include <SPI.h> #define ss 5 #define rst 14 #define dio0 2 int counter = 0; void setup() { Serial.begin(115200); while (!Serial); Serial.println("LoRa Sender"); LoRa.setPins(ss, rst, dio0); //setup LoRa transceiver module while (!LoRa.begin(433E6)) //433E6 - Asia, 866E6 - Europe, 915E6 - North America { Serial.println("."); delay(500); } LoRa.setSyncWord(0xA5); Serial.println("LoRa Initializing OK!"); } void loop() { Serial.print("Sending packet: "); Serial.println(counter); LoRa.beginPacket(); //Send LoRa packet to receiver LoRa.print("hello "); LoRa.print(counter); LoRa.endPacket(); counter++; delay(10000); } |
Receiver Code
|
1 2 3 4 5 6 7 8 9 10 11 12 13 14 15 16 17 18 19 20 21 22 23 24 25 26 27 28 29 30 31 32 33 34 35 36 37 38 39 40 41 |
#include <LoRa.h> #include <SPI.h> #define ss 5 #define rst 14 #define dio0 2 void setup() { Serial.begin(115200); while (!Serial); Serial.println("LoRa Receiver"); LoRa.setPins(ss, rst, dio0); //setup LoRa transceiver module while (!LoRa.begin(433E6)) //433E6 - Asia, 866E6 - Europe, 915E6 - North America { Serial.println("."); delay(500); } LoRa.setSyncWord(0xA5); Serial.println("LoRa Initializing OK!"); } void loop() { int packetSize = LoRa.parsePacket(); // try to parse packet if (packetSize) { Serial.print("Received packet '"); while (LoRa.available()) // read packet { String LoRaData = LoRa.readString(); Serial.print(LoRaData); } Serial.print("' with RSSI "); // print RSSI of packet Serial.println(LoRa.packetRssi()); } } |
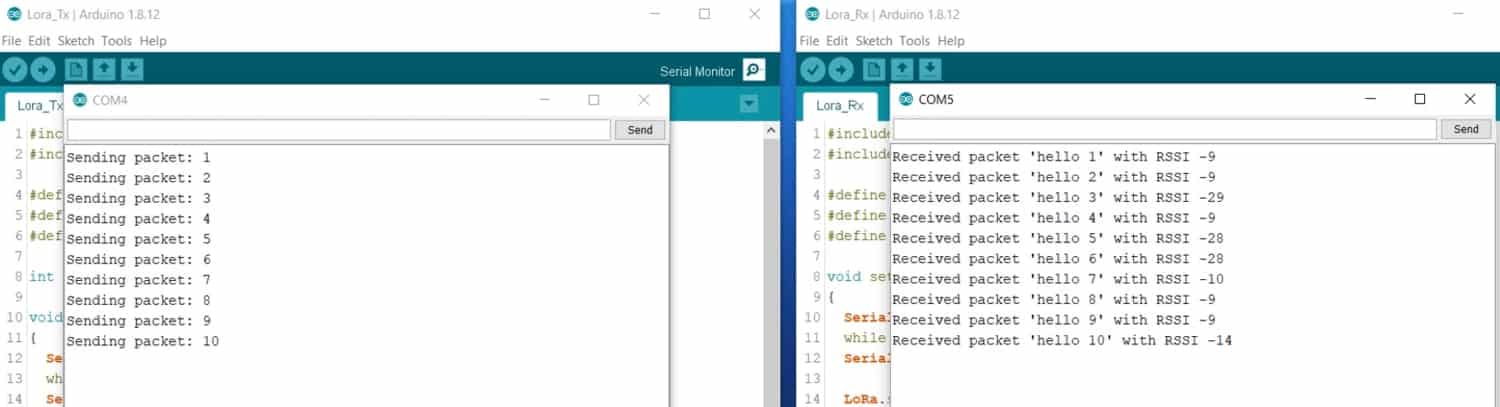
Once the code is uploaded, you can now open the serial monitor on both port and check whether the data is successfully transmitted or received.
ESP32 LoRa SX1278 Transmitter Receiver with OLED & DS18B20 Sensor
Now let us make an advanced Lora ESP32 Transmitter & Receiver Circuit. Now we will send the DS18B20 Sensor Temperature value wirelessly. In the transmitter End we will add an extra DS18B20 Temeprature Sensor with Lora SX1278 & ESP32. On the receiver end we will ad an 0.96″ I2C OLED Display to ESP32 with LoRa SX1278.


The connection between Lora SX1278 & ESP32 still remains same. But in the transmitter end, we added the DS18B20 Sensor. So, connect its input pin to GPIO4 of ESP32. Supply it with 3.3V VCC. Similarly use a 4.7K resistor as a pull-up resistor and connect it between VCC and digital input pin.
On the receiver side, I added an I2C OLED Display to ESP32 along with LoRa SX1278. Connect the SDA & SCL pin of OLED Display to GPIO21 & GPIO22 of ESP32.

Source Code for ESP32 LoRa SX1278 Transmitter Receiver with OLED & DS18B20
Transmitter Code
|
1 2 3 4 5 6 7 8 9 10 11 12 13 14 15 16 17 18 19 20 21 22 23 24 25 26 27 28 29 30 31 32 33 34 35 36 37 38 39 40 41 42 43 44 45 46 47 48 49 50 51 52 53 54 55 56 57 58 59 60 61 |
#include <LoRa.h> #include <SPI.h> #include <OneWire.h> #include <DallasTemperature.h> #define ss 5 #define rst 14 #define dio0 2 int counter = 0; // GPIO where the DS18B20 is connected to const int oneWireBus = 4; // Setup a oneWire instance to communicate with any OneWire devices OneWire oneWire(oneWireBus); // Pass our oneWire reference to Dallas Temperature sensor DallasTemperature sensors(&oneWire); void setup() { Serial.begin(115200); sensors.begin(); while (!Serial); Serial.println("LoRa Sender"); LoRa.setPins(ss, rst, dio0); //setup LoRa transceiver module while (!LoRa.begin(433E6)) //433E6 - Asia, 866E6 - Europe, 915E6 - North America { Serial.println("."); delay(500); } LoRa.setSyncWord(0xA5); Serial.println("LoRa Initializing OK!"); } void loop() { sensors.requestTemperatures(); float temperatureC = sensors.getTempCByIndex(0); Serial.print("Sending packet: "); Serial.println(counter); Serial.print("Temperature: "); Serial.print(temperatureC); Serial.println("ยบC"); Serial.println(""); LoRa.beginPacket(); //Send LoRa packet to receiver LoRa.print("Pckt: "); LoRa.println(counter); LoRa.print("Temp: "); LoRa.print(temperatureC); LoRa.println(" C"); LoRa.endPacket(); counter++; delay(4000); } |
Receiver Code
|
1 2 3 4 5 6 7 8 9 10 11 12 13 14 15 16 17 18 19 20 21 22 23 24 25 26 27 28 29 30 31 32 33 34 35 36 37 38 39 40 41 42 43 44 45 46 47 48 49 50 51 52 53 54 55 56 57 58 59 60 61 62 63 64 65 66 67 68 69 70 71 72 73 74 75 76 77 78 79 80 81 82 |
#include <LoRa.h> #include <SPI.h> #include <Wire.h> #include <Adafruit_GFX.h> #include <Adafruit_SSD1306.h> #define SCREEN_WIDTH 128 // OLED display width, in pixels #define SCREEN_HEIGHT 64 // OLED display height, in pixels #define OLED_RESET -1 // Reset pin # (or -1 if sharing Arduino reset pin) Adafruit_SSD1306 display(SCREEN_WIDTH, SCREEN_HEIGHT, &Wire, OLED_RESET); #define ss 5 #define rst 14 #define dio0 2 String LoRaData; void setup() { Serial.begin(115200); if(!display.begin(SSD1306_SWITCHCAPVCC, 0x3C)) { Serial.println(F("SSD1306 allocation failed")); for(;;); } delay(2000); display.clearDisplay(); display.setTextSize(1); display.setTextColor(WHITE); display.setCursor(0, 10); display.println("LoRa Receiver"); display.display(); while (!Serial); Serial.println("LoRa Receiver"); LoRa.setPins(ss, rst, dio0); //setup LoRa transceiver module while (!LoRa.begin(433E6)) //433E6 - Asia, 866E6 - Europe, 915E6 - North America { Serial.println("."); delay(500); } LoRa.setSyncWord(0xA5); Serial.println("LoRa Initializing OK!"); } void loop() { int packetSize = LoRa.parsePacket(); // try to parse packet if (packetSize) { Serial.println("Received packet"); while (LoRa.available()) // read packet { LoRaData = LoRa.readString(); Serial.print(LoRaData); } Serial.print("RSSI: "); // print RSSI of packet Serial.println(LoRa.packetRssi()); Serial.println(""); display.clearDisplay(); display.setTextSize(1); display.setTextColor(WHITE); display.setCursor(20, 0); display.println("LoRa Receiver"); display.setTextSize(1); display.setTextColor(WHITE); display.setCursor(0, 20); display.println(LoRaData); display.print("RSSI: "); display.println(LoRa.packetRssi()); display.display(); } } |
Once the code is uploaded, the transmitter will start and will read the temperature data. The temperature data is wirelessly send using LoRa. On the receiver side, the temperature reading is received wirelessly using LoRa. The received data is displayed on OLED Display.

Video Tutorial & Demonstration

If you want to send the temperature data to Web Server you can visit this advanced tutorial: ESP32 LoRa Sensor Data Monitoring on Web Server


3 Comments
Hello
i got error whats wrong?
Documents/Arduino/reciver_lora/reciver_lora.ino: In function ‘void setup()’:
reciver_lora:37:3: error: ‘LoRa’ was not declared in this scope
LoRa.setPins(ss, rst, dio0); //setup LoRa transceiver module
^
Documents/Arduino/reciver_lora/reciver_lora.ino: In function ‘void loop()’:
reciver_lora:56:12: error: ‘LoRa’ was not declared in this scope
while (LoRa.available()) // read packet
^
reciver_lora:58:7: error: ‘LoraData’ was not declared in this scope
LoraData = LoRa.readString();
^
reciver_lora:63:20: error: ‘LoRa’ was not declared in this scope
Serial.println(LoRa.packetRssi());
^
exit status 1
‘LoRa’ was not declared in this scope
need install the library
Hello,
Fantastic infomation and working as expected,
Have you investigated in making this project with a unique identifier? Meaning you have multiple sensors on the transmitter and depending on the sensor it will post to a desired receiver?