

Overview
In this tutorial, we will learn the Interfacing of BME680 Integrated Environmental Sensor with Arduino microcontroller. The BME680 is a Gas sensor that measures relative humidity, barometric pressure, ambient temperature, gas (VOC) & IAQ. Since pressure varies with altitude, BME680 can be used to measure the approximate altitude. Using some mathematical equation relating to temperature and humidity, we can also derive the Dew Point. All the parameters can be obtained from Arduino Adafruit BME680 Library & Code.
BME680 is a highly upgraded version of BMP180 and BME280 with extra additional features. Earlier, we made few Weather Station Project using BME280 based on ESP8266 as well as ESP32. We also made wireless weather station using BME280 & LoRa. Here we will implement the same weather station with BME680 & Arduino. Apart from the weather station, we will also measure the IAQ or Air Quality Index or Gas VOC.
Bill of Materials
The purchase link for BME680 Sensor & Arduino Board is given below along with some additional required components.
| S.N. | Components Name | Quantity | Purchase Links |
|---|---|---|---|
| 1 | Arduino Nano Board | 1 | Amazon | AliExpress |
| 2 | BME680 Sensor | 1 | Amazon | AliExpress |
| 3 | Connecting Wires | 10 | Amazon | AliExpress |
| 4 | Breadboard | 1 | Amazon | AliExpress |
BME680 Integrated Environmental Sensor
The BME680 is a digital 4-in-1 sensor with gas, humidity, pressure and temperature measurement based on proven sensing principles. The gas sensor on the BME680 can detect a wide variety of volatile organic compounds to monitor indoor air quality. The sensor has high-linearity and high-accuracy.

The BME680 is specially developed for mobile applications and wearables where size and low power consumption are critical requirements. The BME680 has features like specific operating mode, optimized power consumption, long-term stability, and high EMC robustness. In order to measure air quality, the gas sensor within the BME680 can detect a broad range of gases such as volatile organic compounds (VOC). To learn more about the BME680 Sensor, you can check BME680 Datasheet.
BME680 Specifications & Features
1. Working voltage: 1.7V to 3.6V
2. Operating Temperature range: -40~+85℃
3. Operating Humidity range: 0-100% r.H.
4. Operating Pressure range: 300-1100hPa
5. IAQ Range: 0-500 PPM
6. Interface Type: I2C(up to 3.4MHZ)/ SPI(3 and 4 wire, up to 10MHz)
7. I2C address: 0x76(default)/ 0x77(optional)
8. Standby Current: 0.29 to 0.8 uA
9. Sleep Current: 0.15 to 1 uA
10. VOC Detection & Measurement (Ethane, Isoprene, Ethanol, Acetone, Carbon Monoxide)
BME680 Pinouts
Most of the BME680 Breakout board has 6 pins which some of the boards like Grove BME680 Board, BlueDot BME680 Board or Pimoroni BME680 has more or less pins. But overall funtionality of the pins remains same.
1. VCC: Power supply pin requires 1.7V to 3.6V for operation
2. GND: GND Pin
3. SCL: Serial Clock Pin for I2C Interface/ SCK Pin for SPI Communication
4. SDA: Serial Data Pin for I2C Interface/ MOSI Pin for SPI Communication
5. SDO: MISO Pin for SPI Communication
6. CS: Chip Select Pin for SPI Interface
BME680 Typical Applications & Target Devices
- Indoor air quality
- Home automation and control
- Internet of things
- Weather forecast
- Used in handheld devices like mobile phones, tablet PCs, GPS devices, Wearables, Watches
- GPS enhancement (e.g. time-to-first-fix improvement, dead reckoning, slope detection)
- Indoor navigation (change of floor detection, elevator detection)
- Outdoor navigation, leisure and sports applications
- Vertical velocity indication (rise/sink speed)
Changing the BME680 default I2C address
The BME680 breakout has a default I2C address of 0x76. But you can change the I2C Address so that you can use up to two breakouts on the same Raspberry Pi or Arduino. To change the I2C address to 0x77 simply connect SDO to GND.
BME680 as IAQ (Indoor Air Quality) Sensor
BME680 is a metal oxide-based sensor that detects VOCs by adsorption on its sensitive layer. BME680 reacts to most volatile compounds polluting indoor air (exception CO2). The BME680 is capable of measuring the sum of VOC contaminants in the surrounding air such as outgassing from paint, furniture or garbage, high VOC levels due to cooking, food consumption and exhaled breath or sweating.
As a raw signal, BME680 will output resistance values and it changes due to varying VOC concentrations. The higher the concentration of reducing VOCs, the lower the resistance and vice versa. Since this raw signal is influenced by parameters other than VOC concentration (e.g. humidity level), the raw values are transformed to an indoor air quality (IAQ) index by smart algorithms inside BSEC.
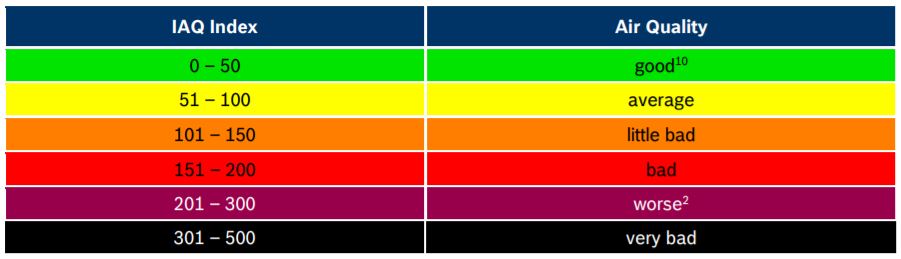
The IAQ scale ranges from 0 (clean air) to 500 (heavily polluted air). During operation, the algorithms automatically calibrate and adapt themselves to the typical environments where the sensor is operated. The calibration process considers the recent measurement history to ensure that IAQ of 25 corresponds to “typical good” air and IAQ of 250 indicates “typical polluted” air.
Circuit Diagram & Assembly
Interfacing BME680 with Arduino using I2C Interface
The BME680 Integrated Environmental Sensor has both the I2C & SPI Interface. First we will learn how to use the I2C Pins of BME680 to interface it with Arduino Board. The connection diagram is given below.

The connection between BME680 & Arduino is fairly simple. Connect the VCC pin of the BME680 to Arduino 3.3V Pin & GND to GND. Similarly, connect the I2C Pins of BME680, i.e SDA & SCL Pins to Arduino A4 & A5 Pins respectively. You can use the jumper wires and assemble the circuit on the breadboard as shown below.

Interfacing BME680 with Arduino using SPI Interface
After BME680 & Arduino I2C interfacing, we can now look for SPI interfacing. The connection diagram for BME680 SPI interface with Arduino is given below.

The SPI connection between BME680 & Arduino is fairly simple. Connect the VCC pin of the BME680 to Arduino 3.3V Pin & GND to GND. Similarly, connect the SCL, SDA, SDO, CS pin of BME680 to Arduino digital 13, 11, 12, 10 pins respectively. You can use the jumper wires and assemble the circuit on the breadboard as shown below.

Adafruit BME680 Library for Arduino
The BME680 Library developed by Adafruit can measure the temperature, humidity, pressure, altitude, dew point & gas. The library is simplified and using only few lines of code, you can interface BME680 with Arduino.
The library requires another library for a compilation called Adafruit Unified Sensor. You can download the library from the following link.
After adding the above library to the Arduino IDE, you can add BME680 Arduino Library to the Arduino IDE. The download link for the library is given below.
Source Code/program
Source Code: BME680 Arduino I2C Interface
|
1 2 3 4 5 6 7 8 9 10 11 12 13 14 15 16 17 18 19 20 21 22 23 24 25 26 27 28 29 30 31 32 33 34 35 36 37 38 39 40 41 42 43 44 45 46 47 48 49 50 51 52 53 54 55 56 57 58 59 60 61 62 63 64 65 66 67 68 69 70 71 72 73 74 75 76 77 78 79 80 81 |
#include <Wire.h> #include <Adafruit_Sensor.h> #include "Adafruit_BME680.h" #define SEALEVELPRESSURE_HPA (1013.25) Adafruit_BME680 bme; // I2C void setup() { Serial.begin(9600); while (!Serial); Serial.println(F("BME680 test")); if (!bme.begin()) { Serial.println("Could not find a valid BME680 sensor, check wiring!"); while (1); } // Set up oversampling and filter initialization bme.setTemperatureOversampling(BME680_OS_8X); bme.setHumidityOversampling(BME680_OS_2X); bme.setPressureOversampling(BME680_OS_4X); bme.setIIRFilterSize(BME680_FILTER_SIZE_3); bme.setGasHeater(320, 150); // 320*C for 150 ms } void loop() { if (! bme.performReading()) { Serial.println("Failed to perform reading :("); return; } float temperature = bme.temperature; float pressure = bme.pressure / 100.0; float altitude = bme.readAltitude(SEALEVELPRESSURE_HPA); float humidity = bme.humidity; float gas = bme.gas_resistance / 1000.0; double dewPoint = dewPointFast(temperature, humidity); Serial.print("Temperature = "); Serial.print(temperature); Serial.println(" *C"); Serial.print("Pressure = "); Serial.print(pressure); Serial.println(" hPa"); Serial.print("Humidity = "); Serial.print(humidity); Serial.println(" %"); Serial.print("Dew Point = "); Serial.print(dewPoint); Serial.println(" *C"); Serial.print("Approx. Altitude = "); Serial.print(altitude); Serial.println(" m"); Serial.print("Gas = "); Serial.print(gas); Serial.println(" KOhms"); Serial.println(); delay(2000); } double dewPointFast(double celsius, double humidity) { double a = 17.271; double b = 237.7; double temp = (a * celsius) / (b + celsius) + log(humidity * 0.01); double Td = (b * temp) / (a - temp); return Td; } |
Source Code: BME680 Arduino SPI Interface
|
1 2 3 4 5 6 7 8 9 10 11 12 13 14 15 16 17 18 19 20 21 22 23 24 25 26 27 28 29 30 31 32 33 34 35 36 37 38 39 40 41 42 43 44 45 46 47 48 49 50 51 52 53 54 55 56 57 58 59 60 61 62 63 64 65 66 67 68 69 70 71 72 73 74 75 76 77 78 79 80 81 82 83 84 85 86 87 88 89 90 91 92 93 94 95 96 97 98 99 100 101 102 103 |
#include <Wire.h> #include <SPI.h> #include <Adafruit_Sensor.h> #include "Adafruit_BME680.h" #define BME_SCK 13 #define BME_MISO 12 #define BME_MOSI 11 #define BME_CS 10 #define SEALEVELPRESSURE_HPA (1013.25) Adafruit_BME680 bme(BME_CS, BME_MOSI, BME_MISO, BME_SCK); void setup() { Serial.begin(115200); while (!Serial); Serial.println(F("BME680 async test")); if (!bme.begin()) { Serial.println(F("Could not find a valid BME680 sensor, check wiring!")); while (1); } // Set up oversampling and filter initialization bme.setTemperatureOversampling(BME680_OS_8X); bme.setHumidityOversampling(BME680_OS_2X); bme.setPressureOversampling(BME680_OS_4X); bme.setIIRFilterSize(BME680_FILTER_SIZE_3); bme.setGasHeater(320, 150); // 320*C for 150 ms } void loop() { // Tell BME680 to begin measurement. unsigned long endTime = bme.beginReading(); if (endTime == 0) { Serial.println(F("Failed to begin reading :(")); return; } Serial.print(F("Reading started at ")); Serial.print(millis()); Serial.print(F(" and will finish at ")); Serial.println(endTime); Serial.println(F("You can do other work during BME680 measurement.")); delay(50); // This represents parallel work. // There's no need to delay() until millis() >= endTime: bme.endReading() // takes care of that. It's okay for parallel work to take longer than // BME680's measurement time. // Obtain measurement results from BME680. Note that this operation isn't // instantaneous even if milli() >= endTime due to I2C/SPI latency. if (!bme.endReading()) { Serial.println(F("Failed to complete reading :(")); return; } Serial.print(F("Reading completed at ")); Serial.println(millis()); float temperature = bme.temperature; float pressure = bme.pressure / 100.0; float altitude = bme.readAltitude(SEALEVELPRESSURE_HPA); float humidity = bme.humidity; float gas = bme.gas_resistance / 1000.0; double dewPoint = dewPointFast(temperature, humidity); Serial.print("Temperature = "); Serial.print(temperature); Serial.println(" *C"); Serial.print("Pressure = "); Serial.print(pressure); Serial.println(" hPa"); Serial.print("Humidity = "); Serial.print(humidity); Serial.println(" %"); Serial.print("Dew Point = "); Serial.print(dewPoint); Serial.println(" *C"); Serial.print("Approx. Altitude = "); Serial.print(altitude); Serial.println(" m"); Serial.print("Gas = "); Serial.print(gas); Serial.println(" KOhms"); Serial.println(); delay(2000); } double dewPointFast(double celsius, double humidity) { double a = 17.271; double b = 237.7; double temp = (a * celsius) / (b + celsius) + log(humidity * 0.01); double Td = (b * temp) / (a - temp); return Td; } |
Testing & Results
You can use any of the above circuits, either the I2C Circuit or the SPI Circuit. Then upload any of the code as per the circuit diagram. Open the Serial Monitor after uploading the code to the Arduino board. You will see the following results.
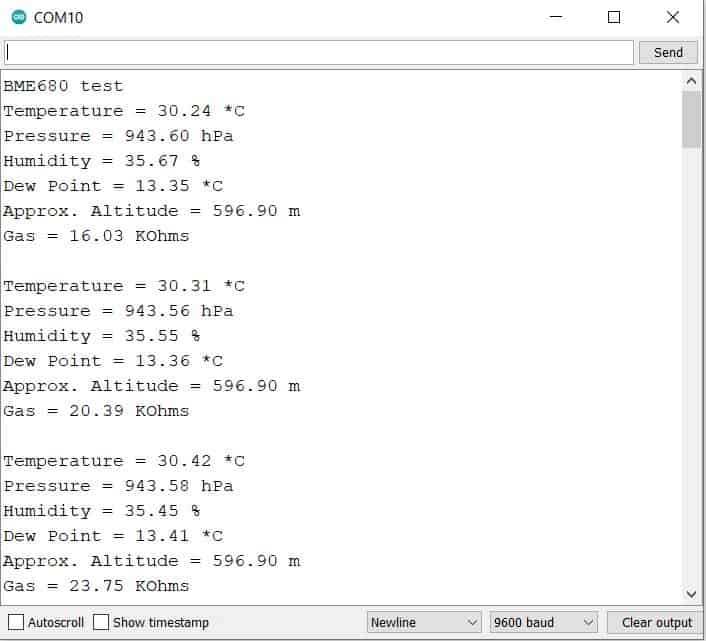
The serial monitor will display the temperature in degree Celcius, Humidity in percentage, Atmospheric pressure in hPa, Altitude in meters, Dew Point in degree Celcius and Gas as a resistance value. The sensor is used to obtain the so-called Gas Resistance and then calculate an Index of Air Quality (IAQ) from a combination of humidity and the gas content readings of the air.
Using the Adafruit BME680 Arduino Code IAQ cannot be calculated. So you need to use some other library to calculate the Index of Air Quality (IAQ), which is explained below.
Calculating BME680 IAQ using BSEC Arduino Library
The BSEC fusion library has been conceptualized to provide a higher-level signal processing and fusion for the BME680. The library receives compensated sensor values from the sensor API. It processes the BME680 signals to provide the requested sensor outputs.
The IAQ index is a function of humidity which contributes up to 25% and gas concentrations that contributes up to 75%. In this current version only Humidity and Gas concentrations are used for the index, but adding temperature would be straightforward on the basis that temperatures for humans that are too high or low add to the overall Air Quality index along with Humidity and Gas concentrations.
BSEC library is supported on 32, 16, and 8 bit MCU platforms. And unfortunately, the library is not supported by Arduino UNO, Nano, Pro Mini, etc. The library is only supported by some Arduino Boards like Arduino MEGA 2560, Arduino Zero & Arduino Due. Download the library from the given link below and use it with the supported Arduino Board.
Add the BSEC library to the Arduino IDE and follow some instruction from this link to modifiy the library.
Source Code/Program
Copy the following code and upload it to the supported Arduino Board.
|
1 2 3 4 5 6 7 8 9 10 11 12 13 14 15 16 17 18 19 20 21 22 23 24 25 26 27 28 29 30 31 32 33 34 35 36 37 38 39 40 41 42 43 44 45 46 47 48 49 50 51 52 53 54 55 56 57 58 59 60 61 62 63 64 65 66 67 68 69 70 71 72 73 74 75 76 77 78 79 80 81 82 83 84 85 86 87 88 89 90 91 92 93 94 95 96 97 98 99 100 101 102 |
#include "bsec.h" // Helper functions declarations void checkIaqSensorStatus(void); void errLeds(void); // Create an object of the class Bsec Bsec iaqSensor; String output; // Entry point for the example void setup(void) { Serial.begin(115200); Wire.begin(); iaqSensor.begin(BME680_I2C_ADDR_PRIMARY, Wire); output = "\nBSEC library version " + String(iaqSensor.version.major) + "." + String(iaqSensor.version.minor) + "." + String(iaqSensor.version.major_bugfix) + "." + String(iaqSensor.version.minor_bugfix); Serial.println(output); checkIaqSensorStatus(); bsec_virtual_sensor_t sensorList[10] = { BSEC_OUTPUT_RAW_TEMPERATURE, BSEC_OUTPUT_RAW_PRESSURE, BSEC_OUTPUT_RAW_HUMIDITY, BSEC_OUTPUT_RAW_GAS, BSEC_OUTPUT_IAQ, BSEC_OUTPUT_STATIC_IAQ, BSEC_OUTPUT_CO2_EQUIVALENT, BSEC_OUTPUT_BREATH_VOC_EQUIVALENT, BSEC_OUTPUT_SENSOR_HEAT_COMPENSATED_TEMPERATURE, BSEC_OUTPUT_SENSOR_HEAT_COMPENSATED_HUMIDITY, }; iaqSensor.updateSubscription(sensorList, 10, BSEC_SAMPLE_RATE_LP); checkIaqSensorStatus(); // Print the header output = "Timestamp [ms], raw temperature [°C], pressure [hPa], raw relative humidity [%], gas [Ohm], IAQ, IAQ accuracy, temperature [°C], relative humidity [%], Static IAQ, CO2 equivalent, breath VOC equivalent"; Serial.println(output); } // Function that is looped forever void loop(void) { unsigned long time_trigger = millis(); if (iaqSensor.run()) { // If new data is available output = String(time_trigger); output += ", " + String(iaqSensor.rawTemperature); output += ", " + String(iaqSensor.pressure); output += ", " + String(iaqSensor.rawHumidity); output += ", " + String(iaqSensor.gasResistance); output += ", " + String(iaqSensor.iaq); output += ", " + String(iaqSensor.iaqAccuracy); output += ", " + String(iaqSensor.temperature); output += ", " + String(iaqSensor.humidity); output += ", " + String(iaqSensor.staticIaq); output += ", " + String(iaqSensor.co2Equivalent); output += ", " + String(iaqSensor.breathVocEquivalent); Serial.println(output); } else { checkIaqSensorStatus(); } } // Helper function definitions void checkIaqSensorStatus(void) { if (iaqSensor.status != BSEC_OK) { if (iaqSensor.status < BSEC_OK) { output = "BSEC error code : " + String(iaqSensor.status); Serial.println(output); for (;;) errLeds(); /* Halt in case of failure */ } else { output = "BSEC warning code : " + String(iaqSensor.status); Serial.println(output); } } if (iaqSensor.bme680Status != BME680_OK) { if (iaqSensor.bme680Status < BME680_OK) { output = "BME680 error code : " + String(iaqSensor.bme680Status); Serial.println(output); for (;;) errLeds(); /* Halt in case of failure */ } else { output = "BME680 warning code : " + String(iaqSensor.bme680Status); Serial.println(output); } } } void errLeds(void) { pinMode(LED_BUILTIN, OUTPUT); digitalWrite(LED_BUILTIN, HIGH); delay(100); digitalWrite(LED_BUILTIN, LOW); delay(100); } |
The following parameters will be displayed every 3 seconds:
1. Timestamp in milliseconds
2. Raw Temperature in °C
3. Pressure in hPa
4. Raw Relative Humidity in %
5. Raw data from the gas sensor as a resistance value in Ohm
6. IAQ index
7. IAQ Accuracy
8. Temperature in °C
9. Relative Humidity in %
10. Static IAQ
11. CO2 equivalent
12. Breath VOC equivalent output

The initial value of the BME680 IAQ index is 25.00. and it stays that way for a good while. Only after several minutes does the IAQ value starts to drift.
Video Tutorial & Guide

You can also use the BME680 with ESP8266/ESP32 to design BME680 MQTT Weather Station Project.

")


1 Comment
Thanks for this great article. However, there is a small mistake which confused me! The default I2C address is 0x77 (NOT 76). It changes to 0x76 when you connect SDO to GND. See also the datasheet of the BME680 (page 39).