

Overview
In this tutorial, we will learn how to interface the MS5611 Barometer/Altimeter Sensor with Arduino Board using C/C++ Code. The MS5611 is a new generation of high-resolution altimeter sensors from MEAS Switzerland with SPI and I2C bus interface. This barometric pressure sensor is optimized for altimeters and variometers with an altitude resolution of 10 cm.
The sensor can be used in Mobile altimeters & mobile barometric measuring systems, navigation devices, Weather stations, Sports watches,
Air traffic control & Drones.
This guide explains the basic overview of MS5611 along with pinout and communication protocol details. Later we will use the MS5611 sensor with Arduino IDE & 0.96″ OLED Display and display the sensor reading on OLED. We will also make a detailed comparison between BME280 & MS5611 Sensor.
MS5611 Barometer/Altimeter Sensor
The MS5611-01BA is a high-resolution altimeter/barometer sensor from MEAS Switzerland. The sensor works with both SPI and I2C bus interface. The sensor also has an on-chip temperature sensor used to compensate for the changes in the environment and to calibrate the measurements.

The MS5611 includes a high linearity pressure sensor and an ultra-low power 24-bit ΔΣ ADC with internal factory-calibrated coefficients. It provides a precise digital 24 Bit pressure and temperature value and different operation modes that allow the user to optimize for conversion speed and current consumption.
The pressure range it can measure is between 10mbar – 1200mbar with absolute accuracy of ±1.5 mbar. The sensor is optimized for altimeters and variometers with an altitude resolution of 10cm. The temperature range that it can measure is between -40˚C to +85˚C with an accuracy of ±0.8˚C.
The module comes with a MIC5205 3.3V precise voltage regulator and voltage level translator. Therefore we can use it with 3.3V or 5V microcontroller.
To learn more about this sensor, you can refer to MS6511 Datasheet.
MS5611 Features & Specifications
- Pressure range: 10 to 1200 mbar
- Temperature range: -40 °C to 85 °C
- ADC Resolution: 24-bit
- Altitude resolution: 10 cm
- Resolution pressure: 0.012 mbar
- Resolution temperature: 0.01 °C
- Supply voltage: 1.8 to 3.6 V
- Very low current consumption: Standby max. 0.14 μA
- I²C and SPI interface
- ESD protected
- QFN housing: 5.0 x 3.0 x 0.95 mm³
- RoHS and REACH compliant
MS5611 Interfaces & & Communication Protocol

The MS5611 communicates via either I2C or SPI bus. A pin called PS is available on the sensor board. If the PS pin is pulled to LOW, then the SPI interface is enabled. Pulling PS to HIGH selects the I2C interface. By default I2C interface is available.
The MS5611 has multiple I2C Address of 0x77 and 0x76. The default I2C Address is 0x77. If we connect the CSB pin to VCC, the I2C Address becomes 0x76.
To enable &use the SPI interface, we need to connect PS (Protocol Select) pin to the ground.
MS5611 Module Pinout
The MS5611 Module has a total of 7 pins which includes Power pins, SPI Pins, I2C Pins & selection pins.
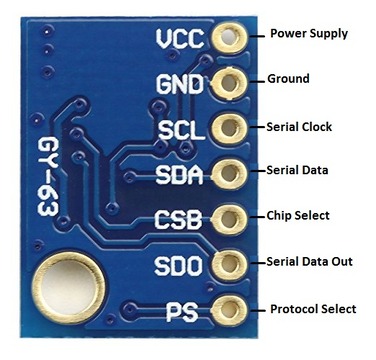
| Pin | Function |
|---|---|
| VCC | Power pin for 3.3V or 5V input. |
| GND | Common Ground & Logic. |
| SCL | SPI Clock Input pin/ I2C Clock Pin |
| SDA | Serial Data In (MOSI) pin/ I2C Data Pin |
| CSB | Chip Select pin |
| SD0 | Serial Data Out (MISO) pin |
| PS | Protocol Select pin |
Interfacing MS5611 Barometer/Altimeter Sensor with Arduino
Now let us see how we can interface the MS5611 Barometric Pressure Sensor with Arduino Board with C/C++ Code. The connection between Arduino Nano Board and MS5611 in I2C Mode is fairly simple.

Connect the VCC & GND of MS5611 to Arduino 3.3V/5V & GND Pin respectively. Connect the sensor I2C Pins SDA & SCL to Arduino A4 & A5 Pin respectively.

In this guide, we will only interface the MS5611 with Arduino in I2C Mode as an issue of heat is detected while interfacing in SPI Mode.
Source Code & Program
The Code for MS5611 can be written on Arduino IDE. But before proceeding, we need to add MS5611 Library to Arduino IDE.
Download the library and add it to the Arduino IDE using the library manager.
Now copy the following code and upload it to the Arduino Nano Board.
|
1 2 3 4 5 6 7 8 9 10 11 12 13 14 15 16 17 18 19 20 21 22 23 24 25 26 27 28 29 30 31 32 33 34 35 36 37 38 39 40 41 42 43 44 45 46 47 48 49 50 51 52 53 54 55 56 57 58 59 60 61 62 63 64 65 66 67 68 69 70 71 |
#include <Wire.h> #include <MS5611.h> MS5611 ms5611; double referencePressure; void setup() { Serial.begin(9600); // Initialize MS5611 sensor Serial.println("Initialize MS5611 Sensor"); while (!ms5611.begin()) { Serial.println("Could not find a valid MS5611 sensor, check wiring!"); delay(500); } // Get reference pressure for relative altitude referencePressure = ms5611.readPressure(); // Check settings checkSettings(); delay(2000); } void checkSettings() { Serial.print("Oversampling: "); Serial.println(ms5611.getOversampling()); } void loop() { // Read raw values uint32_t rawTemp = ms5611.readRawTemperature(); uint32_t rawPressure = ms5611.readRawPressure(); // Read true temperature & Pressure double realTemperature = ms5611.readTemperature(); long realPressure = ms5611.readPressure(); // Calculate altitude float absoluteAltitude = ms5611.getAltitude(realPressure); float relativeAltitude = ms5611.getAltitude(realPressure, referencePressure); Serial.println("--"); Serial.print(" rawTemp = "); Serial.print(rawTemp); Serial.print(", realTemp = "); Serial.print(realTemperature); Serial.println(" *C"); Serial.print(" rawPressure = "); Serial.print(rawPressure); Serial.print(", realPressure = "); Serial.print(realPressure); Serial.println(" Pa"); Serial.print(" absoluteAltitude = "); Serial.print(absoluteAltitude); Serial.print(" m, relativeAltitude = "); Serial.print(relativeAltitude); Serial.println(" m"); delay(2000); } |
After uploading the code, open the Serial Monitor. The MS5611 Barometer/Altimeter measuring parameters like temperature, pressure, and altitude can be observed in Arduino IDE.

You may move the sensor outside the room or inside the room to measure the pressure differences. You may also heat the sensor to observe the change in temperature.
Interfacing MS5611 with Arduino & OLED Display
Instead of displaying the temperature, pressure, and altitude on the Serial Monitor, we can use a 0.96″ SSD1306 I2C OLED Display.

Connect the VCC & GND of OLED Display to Arduino 3.3V/5V & GND Pin respectively. Connect the OLED I2C Pins SDA & SCL to Arduino A4 & A5 Pin respectively.

Source Code & Program
The Code requires additional SSD1306 library along with MS5611 Arduino Library. Download the library and add it to the Arduino IDE using the library manager.
Now copy the following code and upload it to the Arduino Nano Board.
|
1 2 3 4 5 6 7 8 9 10 11 12 13 14 15 16 17 18 19 20 21 22 23 24 25 26 27 28 29 30 31 32 33 34 35 36 37 38 39 40 41 42 43 44 45 46 47 48 49 50 51 52 53 54 55 56 57 58 59 60 61 62 63 64 65 66 67 68 69 70 71 72 73 74 75 76 77 78 79 80 81 82 83 84 85 86 87 88 89 90 91 92 93 94 95 96 97 98 99 100 101 102 103 104 105 106 107 108 109 110 111 112 |
#include <Wire.h> #include <Adafruit_SSD1306.h> #include <MS5611.h> //https://github.com/jarzebski/Arduino-MS5611 #define SCREEN_WIDTH 128 // OLED display width, in pixels #define SCREEN_HEIGHT 64 // OLED display height, in pixels #define OLED_RESET -1 //Reset pin # (or -1 if sharing Arduino reset pin) #define SCREEN_ADDRESS 0x3C //See datasheet for Address Adafruit_SSD1306 display(SCREEN_WIDTH, SCREEN_HEIGHT, &Wire, OLED_RESET); MS5611 ms5611; double referencePressure; void setup() { Serial.begin(9600); // Initialize MS5611 sensor Serial.println("Initialize MS5611 Sensor"); while (!ms5611.begin()) { Serial.println("Could not find a valid MS5611 sensor, check wiring!"); delay(500); } // SSD1306_SWITCHCAPVCC = generate display voltage from 3.3V internally if (!display.begin(SSD1306_SWITCHCAPVCC, SCREEN_ADDRESS)) { Serial.println(F("SSD1306 allocation failed")); for (;;); // Don't proceed, loop forever } display.clearDisplay(); display.display(); delay(500); // Get reference pressure for relative altitude referencePressure = ms5611.readPressure(); // Check settings checkSettings(); delay(2000); } void checkSettings() { Serial.print("Oversampling: "); Serial.println(ms5611.getOversampling()); } void loop() { // Read raw values uint32_t rawTemp = ms5611.readRawTemperature(); uint32_t rawPressure = ms5611.readRawPressure(); // Read true temperature & Pressure double realTemperature = ms5611.readTemperature(); long realPressure = ms5611.readPressure(); // Calculate altitude float absoluteAltitude = ms5611.getAltitude(realPressure); float relativeAltitude = ms5611.getAltitude(realPressure, referencePressure); Serial.println("--"); Serial.print(" rawTemp = "); Serial.print(rawTemp); Serial.print(", realTemp = "); Serial.print(realTemperature); Serial.println(" *C"); Serial.print(" rawPressure = "); Serial.print(rawPressure); Serial.print(", realPressure = "); Serial.print(realPressure); Serial.println(" Pa"); Serial.print(" absoluteAltitude = "); Serial.print(absoluteAltitude); Serial.print(" m, relativeAltitude = "); Serial.print(relativeAltitude); Serial.println(" m"); display.clearDisplay(); display.setTextColor(SSD1306_WHITE); display.setCursor(0, 0); display.setTextSize(1); display.print("Temperature: "); display.print(realTemperature); display.print("*C"); display.setCursor(0, 20); display.setTextSize(1); display.print("Pressure: "); display.print(realPressure); display.print("Pa"); display.setCursor(0, 40); display.setTextSize(1); display.print("Altitude: "); display.print(relativeAltitude); display.print("m"); display.display(); delay(2000); } |
After uploading the code, you can see your OLED Display displaying the value of pressure, temperature and altitude.

Since this is a portable device, you may take it anywhere and power it using a power bank.
MS5611 vs BME280 Comparision
The BME280 Sensor is similar to MS5611 as both of them can measure pressure, temperature and altitude.
So, a comparison between BME280 & MS5611 is necessary to find out which one is the best sensor and by how much there is a variation in reading.
First connect the BME280 Sensor and MS5611 to the Arduino Board via I2C Pins.

A code combining the MS5611 library and BME280 library has been created to read the value of temperature, pressure, and altitude. Therefore copy the following code and upload it to the Arduino Nano Board.
|
1 2 3 4 5 6 7 8 9 10 11 12 13 14 15 16 17 18 19 20 21 22 23 24 25 26 27 28 29 30 31 32 33 34 35 36 37 38 39 40 41 42 43 44 45 46 47 48 49 50 51 52 53 54 55 56 57 58 59 60 61 62 63 64 65 66 67 68 69 70 71 72 73 74 75 76 77 78 79 80 81 82 83 84 85 86 87 88 |
#include <Wire.h> #include <MS5611.h> #include <Adafruit_Sensor.h> #include <Adafruit_BME280.h> #define SEALEVELPRESSURE_HPA (1013.25) MS5611 ms5611; Adafruit_BME280 bme; double referencePressure; void setup() { Serial.begin(9600); // Initialize MS5611 sensor Serial.println("Initialize MS5611 & BME280 Sensor"); if (!bme.begin(0x76)) { Serial.println("Could not find a valid BME280 sensor, check wiring!"); while (1); } while (!ms5611.begin()) { Serial.println("Could not find a valid MS5611 sensor, check wiring!"); delay(500); } // Get reference pressure for relative altitude referencePressure = ms5611.readPressure(); // Check settings checkSettings(); delay(2000); } void checkSettings() { Serial.print("Oversampling: "); Serial.println(ms5611.getOversampling()); } void loop() { // Read raw values uint32_t rawTemp = ms5611.readRawTemperature(); uint32_t rawPressure = ms5611.readRawPressure(); // Read true temperature & Pressure double realTemperature = ms5611.readTemperature(); long realPressure = ms5611.readPressure(); // Calculate altitude float absoluteAltitude = ms5611.getAltitude(realPressure); float relativeAltitude = ms5611.getAltitude(realPressure, referencePressure); Serial.print("MS6511 Temperature = "); Serial.print(realTemperature); Serial.println("*C"); Serial.print("BME280 Temperature = "); Serial.print(bme.readTemperature()); Serial.println("*C"); Serial.println(""); Serial.print("MS6511 Pressure = "); Serial.print(realPressure); Serial.println("Pa"); Serial.print("BME280 Pressure = "); Serial.print(bme.readPressure()); Serial.println("Pa"); Serial.println(""); Serial.print("MS5611 Altitude = "); Serial.print(absoluteAltitude); Serial.println("m"); Serial.print("BME280 Altitude = "); Serial.print(bme.readAltitude(SEALEVELPRESSURE_HPA)); Serial.println("m"); Serial.println(""); delay(2000); } |
After uploading the code, open the Serial Monitor. The Serial Monitor will show the value of the temperature, pressure, and altitude of both sensors.

It is observed from the reading that the value of temperature for both sensors is almost the same. But there is a variation is pressure by 120-130 pascal and height variation is like 10 meter.
Video Tutorial & Guide


")


2 Comments
hello
Hi
I bought many GY 63( with Ms5611 chip) last week from Chineses vendors
all of tem indicate the half pressure instead of the full pressure (see https://github.com/RobTillaart/MS5611)
for example I read 50691 mP at home ( Z topo is 280 feet and QNH is 1018 at the closest airfield)
can add an update for your sketches?
many thanks