

Overview: Using SD Card Module with Arduino
In this tutorial, we will learn to use of SD Card Module with an Arduino microcontroller to read, write, store data or make a data logger. We can use the SD Card Module to add the desired memory to the Arduino project to store the data, Media, etc.
The Micro SD Card Reader Module is also called a Micro SD Adaptor. The Module is a simple solution for transferring data to and from a standard SD card. Hence, the tutorial covers the reading of SD Card info and the method to read and write data to SD Card.
Similarly, Building a data logger using Arduino and SD Card is so easy. The DHT11 sensor is used to sense the relative humidity & temperature and the SD card is used to save the values of the humidity and the temperature every 1 second in txt format.
Earlier, we used the SD Card Module on the project like RFID Attendance System and on Surveillance CCTV project.
Bill of Materials
For this tutorial, we recommend to buy the following list of components directly from Amazon.
| S.N. | Components Name | Quantity | Purchase Links |
|---|---|---|---|
| 1 | Arduino UNO Board | 1 | Amazon | AliExpress |
| 2 | SD Card Module | 1 | Amazon | AliExpress |
| 3 | SD Card 4-16 GB | 1 | Amazon | AliExpress |
| 4 | USB Card Reader | 1 | Amazon | AliExpress |
| 5 | DHT11 Sensor | 1 | Amazon | AliExpress |
| 6 | Jumper Wires | 10 | Amazon | AliExpress |
SD Card Module/Adapter
The SD card module is especially useful for projects that require data logging. There are actually two ways to interface with micro SD cards – SPI mode and SDIO mode. Hobbyists like us prefer SPI Mode for interfacing as it’s easy compared to SDO mode which is very complex.

The operating voltage of micro SD Cards is 3.3 V. Therefore, we cannot SD Card directly with 5V logic. But the module has an onboard ultra-low dropout regulator that converts voltages from 3.3V – 6V down to ~3.3V. There is also a Logic Level converter IC 74LVC125A on the module which converts the interface logic from 3.3V-5V to 3.3V.
Micro SD Card Module Pinout
There are total of six pins (GND, VCC, MISO, MOSI, SCK, CS) on a SD-Card Adapter.

1. GND: Ground Pin
2. VCC: +5V power supply
3. MISO: SPI output
4. MOSI: SPI input
5. SCK: Accepts clock pulses for Data Synchronization
6. CS: Chip select signal pin to enable/disable line
Preparing the micro SD card

Before you insert the micro SD card into the module, you must properly format the card. You should format the SD card as FAT16 or FAT32.

To format the SD card, insert it into your computer. Go to My Computer and right-click on the SD card. A new window pops up. Select FAT32 as a Formatting option. Then press Start to initialize the formatting process

Now the SD Card is properly formatted and you can use the SD Card with SD Card Module to use in project applications.
Interfacing SD Card Module with Arduino
Now let us learn interfacing of SD Card Module with Arduino to read & write data or to make a data logger. Since the SD Card Module works on SPI Communication protocol, thus we need to connect it to SPI Pin of Arduino Board.

Connect the SD Card Module to Arduino as per the above Circuit Diagram. For Arduino boards like UNO/Nano, the SPI pins are 13 (SCK), 12 (MISO) and 11 (MOSI).

In case, if you are using other Arduino Boards then you follow the below table for connection.

Testing the SD Card Module
To make sure everything is wired correctly and the SD card is working properly, upload the following code to the Arduino Board.Make sure you have the right board and COM port selected.
|
1 2 3 4 5 6 7 8 9 10 11 12 13 14 15 16 17 18 19 20 21 22 23 24 25 26 27 28 29 30 31 32 33 34 35 36 37 38 39 40 41 42 43 44 45 46 47 48 49 50 51 52 53 54 55 56 57 58 59 60 61 62 63 64 65 66 67 68 69 70 71 72 73 74 75 76 77 78 79 80 81 82 83 84 85 86 87 88 89 90 91 92 93 94 95 |
// include the SD library: #include <SPI.h> #include <SD.h> // set up variables using the SD utility library functions: Sd2Card card; SdVolume volume; SdFile root; // change this to match your SD shield or module; // Arduino Ethernet shield: pin 4 // Adafruit SD shields and modules: pin 10 // Sparkfun SD shield: pin 8 // MKRZero SD: SDCARD_SS_PIN const int chipSelect = 10; void setup() { // Open serial communications and wait for port to open: Serial.begin(9600); while (!Serial) { ; // wait for serial port to connect. Needed for native USB port only } Serial.print("\nInitializing SD card..."); // we'll use the initialization code from the utility libraries // since we're just testing if the card is working! if (!card.init(SPI_HALF_SPEED, chipSelect)) { Serial.println("initialization failed. Things to check:"); Serial.println("* is a card inserted?"); Serial.println("* is your wiring correct?"); Serial.println("* did you change the chipSelect pin to match your shield or module?"); while (1); } else { Serial.println("Wiring is correct and a card is present."); } // print the type of card Serial.println(); Serial.print("Card type: "); switch (card.type()) { case SD_CARD_TYPE_SD1: Serial.println("SD1"); break; case SD_CARD_TYPE_SD2: Serial.println("SD2"); break; case SD_CARD_TYPE_SDHC: Serial.println("SDHC"); break; default: Serial.println("Unknown"); } // Now we will try to open the 'volume'/'partition' - it should be FAT16 or FAT32 if (!volume.init(card)) { Serial.println("Could not find FAT16/FAT32 partition.\nMake sure you've formatted the card"); while (1); } Serial.print("Clusters: "); Serial.println(volume.clusterCount()); Serial.print("Blocks x Cluster: "); Serial.println(volume.blocksPerCluster()); Serial.print("Total Blocks: "); Serial.println(volume.blocksPerCluster() * volume.clusterCount()); Serial.println(); // print the type and size of the first FAT-type volume uint32_t volumesize; Serial.print("Volume type is: FAT"); Serial.println(volume.fatType(), DEC); volumesize = volume.blocksPerCluster(); // clusters are collections of blocks volumesize *= volume.clusterCount(); // we'll have a lot of clusters volumesize /= 2; // SD card blocks are always 512 bytes (2 blocks are 1KB) Serial.print("Volume size (Kb): "); Serial.println(volumesize); Serial.print("Volume size (Mb): "); volumesize /= 1024; Serial.println(volumesize); Serial.print("Volume size (Gb): "); Serial.println((float)volumesize / 1024.0); Serial.println("\nFiles found on the card (name, date and size in bytes): "); root.openRoot(volume); // list all files in the card with date and size root.ls(LS_R | LS_DATE | LS_SIZE); } void loop(void) { } |
Open the Serial Monitor at a baud rate of 9600 and if everything is working properly you’ll see the following message on the serial monitor.

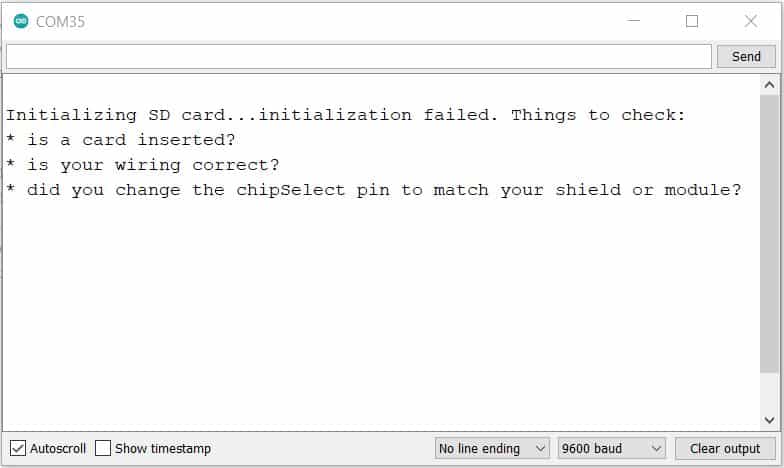
If SD Card isn’t working properly or if it fails to mount to the Board, then you might see the following messages.
Reading & Writing the data
Let us learn how you can read and write the data to SD Card with Arduino microcontroller. The SD library provides useful functions for easily write in and read from the SD card.
Copy the following sketch and upload it to the Arduino Board.
|
1 2 3 4 5 6 7 8 9 10 11 12 13 14 15 16 17 18 19 20 21 22 23 24 25 26 27 28 29 30 31 32 33 34 35 36 37 38 39 40 41 42 43 44 45 46 47 48 49 50 51 52 53 54 55 56 57 58 59 60 61 62 |
#include <SPI.h> #include <SD.h> File myFile; // change this to match your SD shield or module; const int chipSelect = 10; void setup() { // Open serial communications and wait for port to open: Serial.begin(9600); while (!Serial) { ; // wait for serial port to connect. Needed for Leonardo only } Serial.print("Initializing SD card..."); if (!SD.begin()) { Serial.println("initialization failed!"); return; } Serial.println("initialization done."); // open the file. note that only one file can be open at a time, // so you have to close this one before opening another. myFile = SD.open("test.txt", FILE_WRITE); // if the file opened okay, write to it: if (myFile) { Serial.print("Writing to test.txt..."); myFile.println("testing 1, 2, 3."); // close the file: myFile.close(); Serial.println("done."); } else { // if the file didn't open, print an error: Serial.println("error opening test.txt"); } // re-open the file for reading: myFile = SD.open("test.txt"); if (myFile) { Serial.println("test.txt:"); // read from the file until there's nothing else in it: while (myFile.available()) { Serial.write(myFile.read()); } // close the file: myFile.close(); } else { // if the file didn't open, print an error: Serial.println("error opening test.txt"); } } void loop() { // nothing happens after setup } |
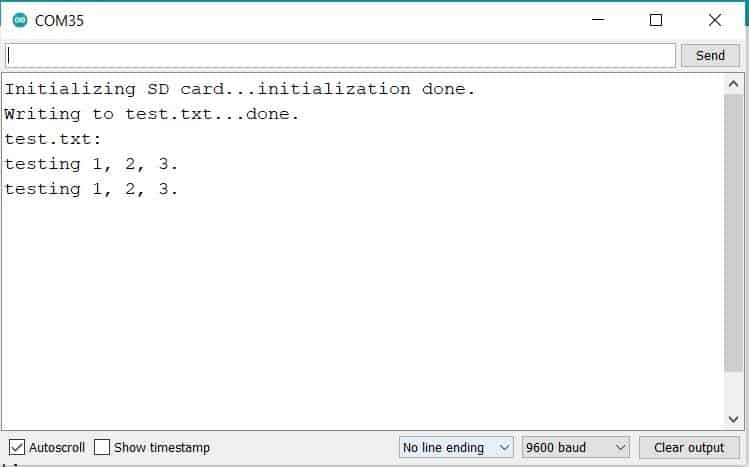
Once the code is uploaded & if everything is ok, the following will appear on the serial monitor.
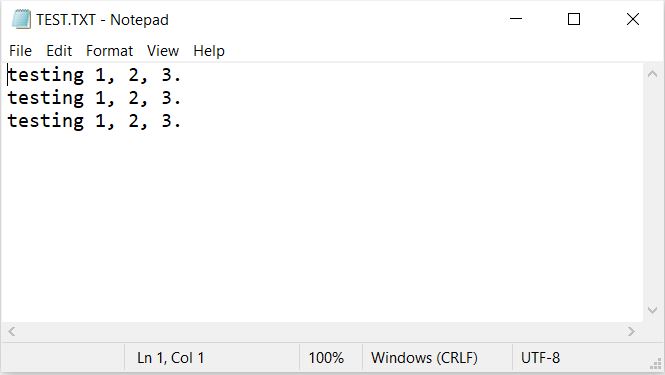
This indicates reading writing is done successfully. If you want to check about the files on SD Card, then you can open the SD Card file on your computer and see the following data in txt format.
Code Explanation
To write and read from the SD card, we include the SPI and SD libraries.
|
1 2 |
#include <SPI.h> #include <SD.h> |
We have to initialize the SD card module at the Chip Select (CS) pin 10.
|
1 |
SD.begin(10); |
To open a new file in the SD card, we then create a file object that refers to the data file.
|
1 |
dataFile = SD.open("data.txt", FILE_WRITE); |
We use the following line to write data to the currently opened file.
|
1 |
dataFile.write(data); |
We can also use the print() or println() functions to print data into the file.
|
1 2 |
dataFile.print(data); dataFile.println(data); |
Using the following line, we read the data saved on file.
|
1 |
dataFile.read(); |
We can only write within a file at once, so we need to close a file before proceeding to the next one.
|
1 |
SD.close("data.txt"); |
Arduino data logger using SD card & DHT11 sensor
Building a data logger using Arduino and SD Card is so easy. This tutorial explains how to build a simple temperature and humidity data logger with a DHT11 sensor.
The DHT11 Sensor is used to sense the relative humidity and temperature and the SD card is used to save the values of the humidity and the temperature every 1 second. The values of the temperature and humidity are saved in .TXT file on the SD card.

Connect a DHT11 Sensor to the above circuit. Here is a circuit diagram and connection for making a data logger.

Copy the following code and upload it to the Arduino Board. The code requires DHT11 Library for compilation.
|
1 2 3 4 5 6 7 8 9 10 11 12 13 14 15 16 17 18 19 20 21 22 23 24 25 26 27 28 29 30 31 32 33 34 35 36 37 38 39 40 41 42 43 44 45 46 47 48 49 50 51 52 53 54 55 56 57 58 59 60 61 62 |
// Arduino data logger with SD card and DHT11 humidity and temperature sensor #include <SPI.h> // Include SPI library (needed for the SD card) #include <SD.h> // Include SD library #include <DHT.h> // Include DHT sensor library File dataFile; #define DHTPIN 4 // DHT11 data pin is connected to Arduino pin 4 #define DHTTYPE DHT11 // DHT11 sensor is used DHT dht(DHTPIN, DHTTYPE); // Initialize DHT library void setup() { // Open serial communications and wait for port to open: Serial.begin(9600); while (!Serial) ; // wait for serial port to connect. Needed for native USB port only Serial.print("Initializing SD card..."); if (!SD.begin()) { Serial.println("initialization failed!"); while (1); } Serial.println("initialization done."); delay(2000); dht.begin(); } uint16_t line = 1; void loop() { delay(1000); // Read humidity byte RH = dht.readHumidity(); //Read temperature in degree Celsius byte Temp = dht.readTemperature(); dataFile = SD.open("DHT11Log.txt", FILE_WRITE); // if the file opened okay, write to it: if (dataFile) { Serial.print(line); Serial.print(": Temperature = "); Serial.print(Temp); Serial.print("°C, Humidity = "); Serial.print(RH); Serial.println("%"); // Write data to SD card file (DHT11Log.txt) dataFile.print(line++); dataFile.print(": Temperature = "); dataFile.print(Temp); dataFile.print("°C, Humidity = "); dataFile.print(RH); dataFile.println("%"); dataFile.close(); } // if the file didn't open, print an error: else Serial.println("error opening DHT11Log.txt"); } |
After uploading the code, open the Serial Monitor and you will see the following messages with the temperature and humidity data.

Open the SD Card on windows using the Card Reader. Then open the txt file for the data logger. You will see the following data of temperature and humidity logged on the text file.

This is how you can use the SD Card Module with Arduino to read write data and make a data logger.

")


