

Overview
In this guide, we will interface the RFID Module RC522 with Raspberry Pi Pico & RGB LED Module. Currently, the most popular RFID Module available in the Market is RC522 which is an SPI Module and operates at a frequency of 13.6MHz.
RFID (Radio Frequency Identification), also known as radio frequency identification, is a communication technology that can identify specific targets and read and write related data through radio signals without the need to establish mechanical or optical contact between the identification system and specific targets.
In this project, we will learn how to read RFID tag numbers from the RFID Reader by scanning RFID Cards. Later we will store the RFID numbers in the MicroPython Code to make an RFID Access Control System. If a registered and correct RFID tag number is found, the green/blue LED indicator will let you know. In case, if the wrong RFID is scanned, the Red LED will indicate the Card is not registered to a system disabling the Access.
Components Required
In this guide, I used Elecrow Raspberry Pi Pico Starter Kit to test different Modules. You can buy the kit and perform some other operations as well. From this kit, you can use the following components.
1. Raspberry Pi Pico Board – 1
2. RFID Module RC522 – 1
3. RFID Cards – 3
4. RGB LED Module – 1
5. Breadboard – 1
6. Jumper Wires – 4
7. Micro-USB Cable – 1
RFID RC522 Module
The RC522 RFID module based on the MFRC522 IC from NXP Semiconductor. It usually comes with an RFID card tag and a key tag. It has 1KB of memory and it is used to write a tag. Any message can be stored using this memory.

The RC522 RFID reader module is designed to create a 13.56MHz electromagnetic field and communicate with RFID tags. The reader can communicate with any microcontroller over a 4-pin SPI. In SPI Mode it can communicate with a maximum data rate of 10 Mbps. It also supports communication over I2C and UART protocols.
The RC522 RFID module can be programmed to generate an interrupt, allowing the module to alert us when a tag approaches it. The module’s operating voltage ranges from 2.5 to 3.3V, but its SPI Pin is 5V tolerant. Therefore you can connect the RC522 Module to Arduino or Raspberry Pi Pico.
Specifications
- Module interfaces SPI: Data transfer rate maximum 10 Mbit/s
- Power Voltage: 2.5-3.3 V
- Operating frequency: 13.56 MHz
- Operating current: 13-26 mA/DC 3.3 V
- Idle current: 10-13 mA/DC 3.3 V
- Sleep current: <80 uA
- Peak current: <30 mA
- Read Range: 0 ~ 35 mm (mifare1 card)
- Supported card types: Mifare1 S50, Mifare1 S70, MIFARE Ultralight, Mifare Pro, and MIFARE DESFire
RFID RC522 Pinout
The RFID RC522 communicates via SPI, I2C & UART Communication Mode. It has a total number of 9 pins.
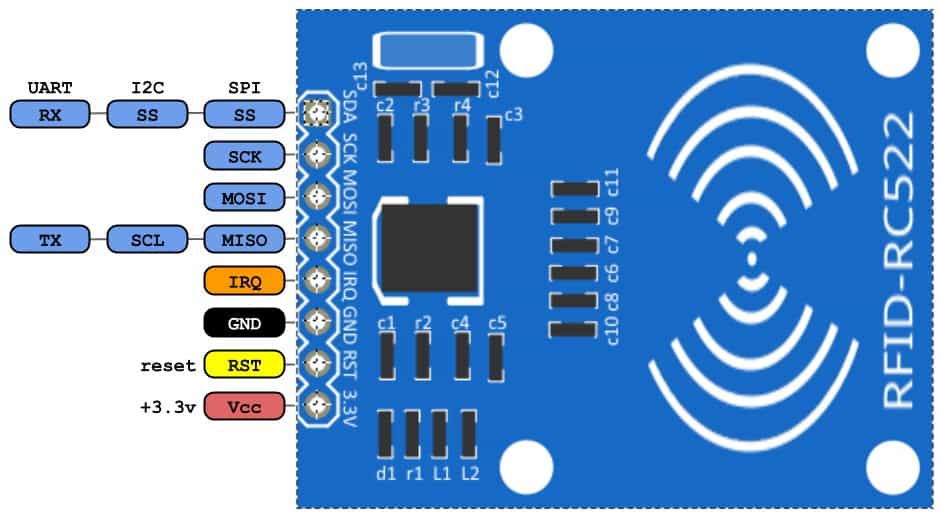
- SDA SCL: I2C Communication pins. DATA and CLOCK.
- SS SCK MOSI MISO: SPI communication pins. Slave Select, Clock, MOSI, and MISO.
- RX TX: UART Communication pins.
- IRQ: Interrupt signal from the module to indicate RFID tag detection.
- GND: Ground pin that needs to be connected to the GND pin on the Arduino.
- RST: Reset pin for the module
- VCC: Supply pin for the module (2.5V to 3.3V).
Interfacing RC522 RFID Reader Module with Raspberry Pi Pico
Now let us interface the RFID RC522 with Raspberry Pi Pico in SPI Mode. The connection diagram is fairly simple.

First connect the RFID RC522 Pins to Raspberry Pi Pico as follows.
| Raspberry Pi Pico | MFRC522 RFID module |
| GND | GND |
| 3V3 | 3.3V |
| GP5 | SDA |
| GP6 | SCK |
| GP7 | MOSI |
| GP4 | MISO |
| — | IRQ |
| GPIO22 | RST |
Then connect the RGB LED Module R, G & B Pins to GP0, GP1 & GP2 of Raspberry Pi Pico.

MicroPython Code
We will be programming the Raspberry Pi Pico with MicroPython Code to communicate with RFID RC522 Module.
The code is divided into 3 parts as:
1. mfrc522.py which is the library for RC522 Module
2. data_read.py which is the code to read the RFID Tags
3. RGB_Control.py which is used to match the RFID Tag and control the RGB LED
mfrc522.py (RC522 Library)
Copy the following code and save it to Raspberry Pi Pico with the name mfrc522.py.
|
1 2 3 4 5 6 7 8 9 10 11 12 13 14 15 16 17 18 19 20 21 22 23 24 25 26 27 28 29 30 31 32 33 34 35 36 37 38 39 40 41 42 43 44 45 46 47 48 49 50 51 52 53 54 55 56 57 58 59 60 61 62 63 64 65 66 67 68 69 70 71 72 73 74 75 76 77 78 79 80 81 82 83 84 85 86 87 88 89 90 91 92 93 94 95 96 97 98 99 100 101 102 103 104 105 106 107 108 109 110 111 112 113 114 115 116 117 118 119 120 121 122 123 124 125 126 127 128 129 130 131 132 133 134 135 136 137 138 139 140 141 142 143 144 145 146 147 148 149 150 151 152 153 154 155 156 157 158 159 160 161 162 163 164 165 166 167 168 169 170 171 172 173 174 175 176 177 178 179 180 181 182 183 184 185 186 187 188 189 190 191 192 193 194 195 196 197 198 199 200 201 202 203 204 205 206 207 208 209 210 211 212 213 214 215 216 217 218 219 220 221 222 223 224 225 226 227 228 229 230 231 232 233 234 235 236 237 238 239 240 241 242 243 244 245 246 247 248 249 250 251 252 253 254 255 256 257 258 259 260 261 262 263 264 265 266 267 268 269 270 271 272 273 274 275 276 277 278 279 280 281 282 283 284 285 286 287 288 289 290 291 292 293 294 295 296 297 298 299 300 301 302 303 304 305 306 307 308 309 310 311 312 313 314 315 316 317 318 319 320 321 322 323 324 325 326 327 328 329 330 331 332 333 334 335 336 337 338 339 340 341 342 343 344 345 346 347 348 349 350 351 352 353 354 355 356 357 358 359 360 361 362 363 364 365 366 367 368 369 370 371 372 373 374 375 376 377 378 379 380 |
from machine import Pin, SPI from os import uname class MFRC522: DEBUG = False OK = 0 NOTAGERR = 1 ERR = 2 REQIDL = 0x26 REQALL = 0x52 AUTHENT1A = 0x60 AUTHENT1B = 0x61 PICC_ANTICOLL1 = 0x93 PICC_ANTICOLL2 = 0x95 PICC_ANTICOLL3 = 0x97 def __init__(self, sck, mosi, miso, rst, cs,baudrate=1000000,spi_id=0): self.sck = Pin(sck, Pin.OUT) self.mosi = Pin(mosi, Pin.OUT) self.miso = Pin(miso) self.rst = Pin(rst, Pin.OUT) self.cs = Pin(cs, Pin.OUT) self.rst.value(0) self.cs.value(1) board = uname()[0] if board == 'WiPy' or board == 'LoPy' or board == 'FiPy': self.spi = SPI(0) self.spi.init(SPI.MASTER, baudrate=1000000, pins=(self.sck, self.mosi, self.miso)) elif (board == 'esp8266') or (board == 'esp32'): self.spi = SPI(baudrate=100000, polarity=0, phase=0, sck=self.sck, mosi=self.mosi, miso=self.miso) self.spi.init() elif board == 'rp2': self.spi = SPI(spi_id,baudrate=baudrate,sck=self.sck, mosi= self.mosi, miso= self.miso) else: raise RuntimeError("Unsupported platform") self.rst.value(1) self.init() def _wreg(self, reg, val): self.cs.value(0) self.spi.write(b'%c' % int(0xff & ((reg << 1) & 0x7e))) self.spi.write(b'%c' % int(0xff & val)) self.cs.value(1) def _rreg(self, reg): self.cs.value(0) self.spi.write(b'%c' % int(0xff & (((reg << 1) & 0x7e) | 0x80))) val = self.spi.read(1) self.cs.value(1) return val[0] def _sflags(self, reg, mask): self._wreg(reg, self._rreg(reg) | mask) def _cflags(self, reg, mask): self._wreg(reg, self._rreg(reg) & (~mask)) def _tocard(self, cmd, send): recv = [] bits = irq_en = wait_irq = n = 0 stat = self.ERR if cmd == 0x0E: irq_en = 0x12 wait_irq = 0x10 elif cmd == 0x0C: irq_en = 0x77 wait_irq = 0x30 self._wreg(0x02, irq_en | 0x80) self._cflags(0x04, 0x80) self._sflags(0x0A, 0x80) self._wreg(0x01, 0x00) for c in send: self._wreg(0x09, c) self._wreg(0x01, cmd) if cmd == 0x0C: self._sflags(0x0D, 0x80) i = 2000 while True: n = self._rreg(0x04) i -= 1 if ~((i != 0) and ~(n & 0x01) and ~(n & wait_irq)): break self._cflags(0x0D, 0x80) if i: if (self._rreg(0x06) & 0x1B) == 0x00: stat = self.OK if n & irq_en & 0x01: stat = self.NOTAGERR elif cmd == 0x0C: n = self._rreg(0x0A) lbits = self._rreg(0x0C) & 0x07 if lbits != 0: bits = (n - 1) * 8 + lbits else: bits = n * 8 if n == 0: n = 1 elif n > 16: n = 16 for _ in range(n): recv.append(self._rreg(0x09)) else: stat = self.ERR return stat, recv, bits def _crc(self, data): self._cflags(0x05, 0x04) self._sflags(0x0A, 0x80) for c in data: self._wreg(0x09, c) self._wreg(0x01, 0x03) i = 0xFF while True: n = self._rreg(0x05) i -= 1 if not ((i != 0) and not (n & 0x04)): break return [self._rreg(0x22), self._rreg(0x21)] def init(self): self.reset() self._wreg(0x2A, 0x8D) self._wreg(0x2B, 0x3E) self._wreg(0x2D, 30) self._wreg(0x2C, 0) self._wreg(0x15, 0x40) self._wreg(0x11, 0x3D) self.antenna_on() def reset(self): self._wreg(0x01, 0x0F) def antenna_on(self, on=True): if on and ~(self._rreg(0x14) & 0x03): self._sflags(0x14, 0x03) else: self._cflags(0x14, 0x03) def request(self, mode): self._wreg(0x0D, 0x07) (stat, recv, bits) = self._tocard(0x0C, [mode]) if (stat != self.OK) | (bits != 0x10): stat = self.ERR return stat, bits def anticoll(self,anticolN): ser_chk = 0 ser = [anticolN, 0x20] self._wreg(0x0D, 0x00) (stat, recv, bits) = self._tocard(0x0C, ser) if stat == self.OK: if len(recv) == 5: for i in range(4): ser_chk = ser_chk ^ recv[i] if ser_chk != recv[4]: stat = self.ERR else: stat = self.ERR return stat, recv def PcdSelect(self, serNum,anticolN): backData = [] buf = [] buf.append(anticolN) buf.append(0x70) #i = 0 ###xorsum=0; for i in serNum: buf.append(i) #while i<5: # buf.append(serNum[i]) # i = i + 1 pOut = self._crc(buf) buf.append(pOut[0]) buf.append(pOut[1]) (status, backData, backLen) = self._tocard( 0x0C, buf) if (status == self.OK) and (backLen == 0x18): return 1 else: return 0 def SelectTag(self, uid): byte5 = 0 #(status,puid)= self.anticoll(self.PICC_ANTICOLL1) #print("uid",uid,"puid",puid) for i in uid: byte5 = byte5 ^ i puid = uid + [byte5] if self.PcdSelect(puid,self.PICC_ANTICOLL1) == 0: return (self.ERR,[]) return (self.OK , uid) def tohexstring(self,v): s="[" for i in v: if i != v[0]: s = s+ ", " s=s+ "0x{:02X}".format(i) s= s+ "]" return s def SelectTagSN(self): valid_uid=[] (status,uid)= self.anticoll(self.PICC_ANTICOLL1) #print("Select Tag 1:",self.tohexstring(uid)) if status != self.OK: return (self.ERR,[]) if self.DEBUG: print("anticol(1) {}".format(uid)) if self.PcdSelect(uid,self.PICC_ANTICOLL1) == 0: return (self.ERR,[]) if self.DEBUG: print("pcdSelect(1) {}".format(uid)) #check if first byte is 0x88 if uid[0] == 0x88 : #ok we have another type of card valid_uid.extend(uid[1:4]) (status,uid)=self.anticoll(self.PICC_ANTICOLL2) #print("Select Tag 2:",self.tohexstring(uid)) if status != self.OK: return (self.ERR,[]) if self.DEBUG: print("Anticol(2) {}".format(uid)) rtn = self.PcdSelect(uid,self.PICC_ANTICOLL2) if self.DEBUG: print("pcdSelect(2) return={} uid={}".format(rtn,uid)) if rtn == 0: return (self.ERR,[]) if self.DEBUG: print("PcdSelect2() {}".format(uid)) #now check again if uid[0] is 0x88 if uid[0] == 0x88 : valid_uid.extend(uid[1:4]) (status , uid) = self.anticoll(self.PICC_ANTICOLL3) #print("Select Tag 3:",self.tohexstring(uid)) if status != self.OK: return (self.ERR,[]) if self.DEBUG: print("Anticol(3) {}".format(uid)) if self.MFRC522_PcdSelect(uid,self.PICC_ANTICOLL3) == 0: return (self.ERR,[]) if self.DEBUG: print("PcdSelect(3) {}".format(uid)) valid_uid.extend(uid[0:5]) # if we are here than the uid is ok # let's remove the last BYTE whic is the XOR sum return (self.OK , valid_uid[:len(valid_uid)-1]) #return (self.OK , valid_uid) def auth(self, mode, addr, sect, ser): return self._tocard(0x0E, [mode, addr] + sect + ser[:4])[0] def authKeys(self,uid,addr,keyA=None, keyB=None): status = self.ERR if keyA is not None: status = self.auth(self.AUTHENT1A, addr, keyA, uid) elif keyB is not None: status = self.auth(self.AUTHENT1B, addr, keyB, uid) return status def stop_crypto1(self): self._cflags(0x08, 0x08) def read(self, addr): data = [0x30, addr] data += self._crc(data) (stat, recv, _) = self._tocard(0x0C, data) return stat, recv def write(self, addr, data): buf = [0xA0, addr] buf += self._crc(buf) (stat, recv, bits) = self._tocard(0x0C, buf) if not (stat == self.OK) or not (bits == 4) or not ((recv[0] & 0x0F) == 0x0A): stat = self.ERR else: buf = [] for i in range(16): buf.append(data[i]) buf += self._crc(buf) (stat, recv, bits) = self._tocard(0x0C, buf) if not (stat == self.OK) or not (bits == 4) or not ((recv[0] & 0x0F) == 0x0A): stat = self.ERR return stat def writeSectorBlock(self,uid, sector, block, data, keyA=None, keyB = None): absoluteBlock = sector * 4 + (block % 4) if absoluteBlock > 63 : return self.ERR if len(data) != 16: return self.ERR if self.authKeys(uid,absoluteBlock,keyA,keyB) != self.ERR : return self.write(absoluteBlock, data) return self.ERR def readSectorBlock(self,uid ,sector, block, keyA=None, keyB = None): absoluteBlock = sector * 4 + (block % 4) if absoluteBlock > 63 : return self.ERR, None if self.authKeys(uid,absoluteBlock,keyA,keyB) != self.ERR : return self.read(absoluteBlock) return self.ERR, None def MFRC522_DumpClassic1K(self,uid, Start=0, End=64, keyA=None, keyB=None): for absoluteBlock in range(Start,End): status = self.authKeys(uid,absoluteBlock,keyA,keyB) # Check if authenticated print("{:02d} S{:02d} B{:1d}: ".format(absoluteBlock, absoluteBlock//4 , absoluteBlock % 4),end="") if status == self.OK: status, block = self.read(absoluteBlock) if status == self.ERR: break else: for value in block: print("{:02X} ".format(value),end="") print(" ",end="") for value in block: if (value > 0x20) and (value < 0x7f): print(chr(value),end="") else: print('.',end="") print("") else: break if status == self.ERR: print("Authentication error") return self.ERR return self.OK |
data_read.py (Reading the RFID Tag Number)
Copy the following code and save it to Raspberry Pi Pico with the name data_read.py. This is used to read the RFID Tag numbers.
|
1 2 3 4 5 6 7 8 9 10 11 12 13 14 15 16 17 18 |
from mfrc522 import MFRC522 import utime reader = MFRC522(spi_id=0,sck=6,miso=4,mosi=7,cs=5,rst=22) print("Bring TAG closer...") print("") while True: reader.init() (stat, tag_type) = reader.request(reader.REQIDL) if stat == reader.OK: (stat, uid) = reader.SelectTagSN() if stat == reader.OK: card = int.from_bytes(bytes(uid),"little",False) print("CARD ID: "+str(card)) utime.sleep_ms(500) |
Now run both of the above codes and you are ready to check the RFID Tag numbers. In my case, I will be reading the tag number of 3 RFID Cards.

Whenever the card is scanned, the RFID Tag number is displayed on Python Shell. You can copy and note down the RFID Tag number as it will be used in the next code.
RGB_Control.py (Comparision & Access Control System)
Since we read and copied the RFID Tag number in the above code, now using the following code, you can compare and make an Access Control System.
The two card numbers are stored in the following lines. You need to replace both the RFID Tag number with the tag number you copied.
|
1 |
if card == 111583217: |
Now you can copy the following code and save it to Raspberry Pi Pico with the name RGB_Control.py.
|
1 2 3 4 5 6 7 8 9 10 11 12 13 14 15 16 17 18 19 20 21 22 23 24 25 26 27 28 29 30 31 32 33 34 35 36 37 38 39 40 |
from machine import Pin from mfrc522 import MFRC522 import utime reader = MFRC522(spi_id=0,sck=6,miso=4,mosi=7,cs=5,rst=22) red = Pin(0, Pin.OUT) green = Pin(1, Pin.OUT) blue = Pin(2, Pin.OUT) print("Bring RFID TAG Closer...") print("") while True: reader.init() (stat, tag_type) = reader.request(reader.REQIDL) if stat == reader.OK: (stat, uid) = reader.SelectTagSN() if stat == reader.OK: card = int.from_bytes(bytes(uid),"little",False) if card == 111583217: print("Card ID: "+ str(card)+" PASS: Green Light Activated") red.value(0) green.value(1) blue.value(0) elif card == 495638547: print("Card ID: "+ str(card)+" PASS: Blue Light Activated") red.value(0) green.value(0) blue.value(1) else: print("Card ID: "+ str(card)+" UNKNOWN CARD! Red Light Activated") red.value(1) green.value(0) blue.value(0) |
Run the mfrc522.py and the RGB_Control.py together.
After running, you can scan the RFID Cards now. When you scan the individual know RFID tags, the Blue LED & Green LED will turn ON according to the color assignment.


Whenever you scan an unknown RFID Card, the Red LED will turn on which means the Access Control is not allowed.
This is how you can interface the RFID Module RC522 with Raspberry Pi Pico. You can implement an RFID Access control System using the project.


6 Comments
Do any of you actually test this stuff out before you copy and paste it in a webpage?
Your call to init the MFRC522 object bails out because you are supplying a keyword argument before your regular arguments. That doesn’t work in Python.
Also, nothing even functions here, even once you fix that bug. Makes one wonder what else is busted because there was no checking done.
I don’t know what you did wrong, but the code above is working just fine 😉
Works great at first build!
You’re reading the card ID here, not the data written to the card by Home Assistant or other card writer. I’m trying to figure out how to get the data but haven’t solved yet.
Has anyone had any luck reading from ISO14443A Mifare cards?
I’m getting this error
Traceback (most recent call last):
File “”, line 16, in
File “mfrc522.py”, line 150, in init
File “mfrc522.py”, line 160, in reset
File “mfrc522.py”, line 49, in _wreg
AttributeError: ‘MFRC522’ object has no attribute ‘cs’