

Overview
In this tutorial, we will display wind speed on TFT Display using ESP32 & Anemometer. The project uses an embedded board that combines a 3.5” touchscreen display and ESP32-WROVER Module with a built-in 2M pixel OV2640 camera. We will connect the Anemometer Sensor externally to the analog pin of ESP32.
An anemometer is a device used for measuring wind speed and direction. The anemometer sensor we are using here is the Adafruit anemometer. The Adafruit anemometer is capable of measuring wind speeds up to 70 m/s or 156 mph. The 3.5″ TFT Touch Screen Display uses an ILI9488 TFT LCD Driver. The screen resolution is 320×480. There are multiple external pins to connect the ESP32 display with sensors/actuators. This is the reason they are suitable for various IoT applications.
We will now see how we can use the ESP32 TFT Display along with the Anemometer Sensor to create a beautiful dynamic widget. The wind speed in miles per hour will be displayed on TFT Display along with the alert level.
Bill of Materials
Following are the list of components that you need for making this project. You can purchase all these components online.
| S.N. | Components | Quantity | Purchase Link |
|---|---|---|---|
| 1 | ESP32+TFT Touch Display | 1 | Makerfabs Link |
| 2 | Adafruit Anemometer Sensor | 1 | Adafruit |
| 3 | Type C USB Cable | 1 | Amazon | AliExpress |
| 3 | Connecting Wires | 3 | Amazon | AliExpress |
ESP32 3.5″ TFT Touch(Capacitive) with Camera
This is a beautiful 3.5” touchscreen display, based on ESP32-WROVER chip, with a built-in 2M pixel OV2640 camera. The combination of all these gives a perfect platform for multiple ESP32 Applications & Projects.

The TFT LCD driver is basically ILI9488 & has a dimension of 3.5″ with 320×480 screen resolution. The ILI9488 LCD uses SPI for communication with the ESP32 chip. The SPI main clock could be up to 60M~80M, make the display smooth enough for videos.
While the camera is not used, you can freely use all these pins with the breakout connectors. You can then connect the ESP32 display with sensors or modules & use it for any IoT applications. The ESP32 chip support Arduino or MicroPython programming
The board is having a micro SD-Card slot for attaching an external SD-Card. The SD Card can be used for storing files and images. There is a type C USB Port, basically a USB to UART converter for ESP32 programming. You can connect a Type-C data cable to the board & directly upload the code to the Board.

Specification
1. 3.5 inch display, 320×480
2. Capacitive/Resistive Touch
3. ESP32-WROVER Controller
4. WIFI/ BLE Connection.
5. Onboard USB2UART convertor for ESP32 programming
6. 2M pixel OV2640 Camera
7. OV2640 supports output images up to 2 million pixels
8. LCD 3.5-inch Amorphous-TFT-LCD for mobile-phone or handy electrical equipment
9. LCD Driver: ILI9488
10. LCD Resolution: 320*480
11. Micro SD card slot on the board
12. NS2009: A 4-wire resistive touch screen control circuit
13. FT6236: single-chip capacitive touch panel controller Integrated Circuit
14. Power supply: 5V, Type-C USB
Check some of our previous projects using this TFT Touch Screen Display:
1. ESP32 TFT Touch Display Video Games
2. ESP32 TFT Touch & Camera Projects
Adafruit Anemometer Sensor
The Adafruit Anemometer Sensor is a Three-cup type anemometer that is capable of measuring wind speed up to 70m/s or 156mph. It is composed of a shell, the wind cup, and the circuit module.

The sensor is supplied with a length of 3 core cables and three connections. A black wire to power and signal ground, a brown wire for power which can be anything from 7-24v DC, and a third blue wire that provides measurements via analog voltage. The output analog voltage will range from 0.4V (0 m/s wind) up to 2.0V (for 32.4m/s wind).
To learn more in detail about this sensor, check our previous post related to Anemometer Sensor: Anemometer Sensor Arduino Guide. You may use Ultrasonic Anemometer if you don’t want movable parts.
Specifications
- Voltage Required: 7-24v DC
- Output: 0.4V to 2V
- Testing Range: 0.5m/s to 50m/s
- Start wind speed: 0.2 m/s
- Resolution: 0.1m/s
- Accuracy: Worst case 1 meter/s
- Max Wind Speed: 70m/s
- Pin details: Pin 1 – Power (brown wire), Pin 2 – Ground (black wire), Pin 3 – Signal (blue wire)
Hardware Connections for ESP32 TFT Display with Anemometer
As TFT Touch Display and ESP32-Wrover Module are internally connected to the PCB, we only require Anemometer Sensor Connection. Connect the Anemometer Sensor as per the diagram below.

Connect the VCC and GND Pin of Anemometer Sensor to external 9V & GND. Connect the GND of the external power supply to the GND of ESP32. Similarly, connect the Anemometer input pin to GPIO35 of ESP32.
Installing TFT_eSPI Library to Arduino IDE
This is a TFT graphics library for Arduino processors with performance optimization for STM32, ESP8266 & ESP32. The library is targeted at 32-bit processors. It supports “Four wire” SPI and 8 bit parallel interfaces. The library supports some TFT displays with drivers for ILI9163, ILI9225, ILI9341, ILI9488, ST7735 etc.
You can download the library from the Github directory. But the library requires some modification for our project. So here is an edited version of the library. You can download and add it to the library folder.
Download: TFT_eSPI Library
Source Code/program
The code part requires a file called Alert.h to create a warning signal on the TFT Display.
Main Code
Open Arduino IDE and create a new file and paste the following code. You can save it with any name but with .ino extension.
|
1 2 3 4 5 6 7 8 9 10 11 12 13 14 15 16 17 18 19 20 21 22 23 24 25 26 27 28 29 30 31 32 33 34 35 36 37 38 39 40 41 42 43 44 45 46 47 48 49 50 51 52 53 54 55 56 57 58 59 60 61 62 63 64 65 66 67 68 69 70 71 72 73 74 75 76 77 78 79 80 81 82 83 84 85 86 87 88 89 90 91 92 93 94 95 96 97 98 99 100 101 102 103 104 105 106 107 108 109 110 111 112 113 114 115 116 117 118 119 120 121 122 123 124 125 126 127 128 129 130 131 132 133 134 135 136 137 138 139 140 141 142 143 144 145 146 147 148 149 150 151 152 153 154 155 156 157 158 159 160 161 162 163 164 165 166 167 168 169 170 171 172 173 174 175 176 177 178 179 180 181 182 183 184 185 186 187 188 189 190 191 192 193 194 195 196 197 198 199 200 201 202 203 204 205 206 207 208 209 210 211 212 213 214 215 216 217 218 219 220 221 222 223 224 225 226 227 228 229 230 231 232 233 234 235 236 237 238 239 240 241 242 243 244 245 246 247 248 249 250 251 252 253 254 255 256 257 258 259 260 261 262 263 264 265 266 267 268 269 270 271 272 273 274 275 276 277 278 279 280 281 282 283 284 285 286 287 288 289 290 291 292 293 294 295 296 |
#include "alert.h" // Out of range alert icon #include <TFT_eSPI.h> // Hardware-specific library #include <SPI.h> // Meter colour schemes #define RED2RED 0 #define GREEN2GREEN 1 #define BLUE2BLUE 2 #define BLUE2RED 3 #define GREEN2RED 4 #define RED2GREEN 5 #define TFT_GREY 0x2104 // Dark grey 16 bit colour TFT_eSPI tft = TFT_eSPI(); // Invoke custom library with default width and height uint32_t runTime = -99999; // time for next update int d = 0; // Variable used for the sinewave test waveform boolean range_error = 0; void setup(void) { Serial.begin(115200); tft.begin(); tft.setRotation(1); tft.fillScreen(TFT_BLACK); tft.setTextColor(TFT_WHITE, TFT_BLACK); tft.drawString("Wind Speed", 10, 10, 4); } void loop() { float sensorValue = analogRead(35); float voltage = (sensorValue / 4095) * 5; float wind_speed = mapfloat(voltage, 0.4, 2, 0, 32.4); float speed_mph = ((wind_speed * 3600) / 1609.344); Serial.print(speed_mph); Serial.println("mph"); // Test with a slowly changing value from a Sine function //d += 4; if (d >= 360) d = 0; // Set the the position, gap between meters, and inner radius of the meters int xpos = 0, ypos = 5, gap = 4, radius = 52; // Draw a large meter xpos = 480 / 2 - 160, ypos = 0, gap = 15, radius = 170; // Comment out above meters, then uncomment the next line to show large meter ringMeter(speed_mph, 0, 12, xpos, ypos, radius, "mph", BLUE2RED); // Draw analogue meter } // ######################################################################### // Draw the meter on the screen, returns x coord of righthand side // ######################################################################### int ringMeter(int value, int vmin, int vmax, int x, int y, int r, const char *units, byte scheme) { // Minimum value of r is about 52 before value text intrudes on ring // drawing the text first is an option x += r; y += r; // Calculate coords of centre of ring int w = r / 3; // Width of outer ring is 1/4 of radius int angle = 150; // Half the sweep angle of meter (300 degrees) int v = map(value, vmin, vmax, -angle, angle); // Map the value to an angle v byte seg = 3; // Segments are 3 degrees wide = 100 segments for 300 degrees byte inc = 6; // Draw segments every 3 degrees, increase to 6 for segmented ring // Variable to save "value" text colour from scheme and set default int colour = TFT_BLUE; // Draw colour blocks every inc degrees for (int i = -angle + inc / 2; i < angle - inc / 2; i += inc) { // Calculate pair of coordinates for segment start float sx = cos((i - 90) * 0.0174532925); float sy = sin((i - 90) * 0.0174532925); uint16_t x0 = sx * (r - w) + x; uint16_t y0 = sy * (r - w) + y; uint16_t x1 = sx * r + x; uint16_t y1 = sy * r + y; // Calculate pair of coordinates for segment end float sx2 = cos((i + seg - 90) * 0.0174532925); float sy2 = sin((i + seg - 90) * 0.0174532925); int x2 = sx2 * (r - w) + x; int y2 = sy2 * (r - w) + y; int x3 = sx2 * r + x; int y3 = sy2 * r + y; if (i < v) { // Fill in coloured segments with 2 triangles switch (scheme) { case 0: colour = TFT_RED; break; // Fixed colour case 1: colour = TFT_GREEN; break; // Fixed colour case 2: colour = TFT_BLUE; break; // Fixed colour case 3: colour = rainbow(map(i, -angle, angle, 0, 127)); break; // Full spectrum blue to red case 4: colour = rainbow(map(i, -angle, angle, 70, 127)); break; // Green to red (high temperature etc) case 5: colour = rainbow(map(i, -angle, angle, 127, 63)); break; // Red to green (low battery etc) default: colour = TFT_BLUE; break; // Fixed colour } tft.fillTriangle(x0, y0, x1, y1, x2, y2, colour); tft.fillTriangle(x1, y1, x2, y2, x3, y3, colour); //text_colour = colour; // Save the last colour drawn } else // Fill in blank segments { tft.fillTriangle(x0, y0, x1, y1, x2, y2, TFT_GREY); tft.fillTriangle(x1, y1, x2, y2, x3, y3, TFT_GREY); } } // Convert value to a string char buf[10]; byte len = 3; if (value > 999) len = 5; dtostrf(value, len, 0, buf); buf[len] = ' '; buf[len + 1] = 0; // Add blanking space and terminator, helps to centre text too! // Set the text colour to default tft.setTextSize(1); if (value < vmin || value > vmax) { drawAlert(x, y + 90, 50, 1); } else { drawAlert(x, y + 90, 50, 0); } tft.setTextColor(TFT_WHITE, TFT_BLACK); // Uncomment next line to set the text colour to the last segment value! tft.setTextColor(colour, TFT_BLACK); tft.setTextDatum(MC_DATUM); // Print value, if the meter is large then use big font 8, othewise use 4 if (r > 84) { tft.setTextPadding(55 * 3); // Allow for 3 digits each 55 pixels wide tft.drawString(buf, x, y, 8); // Value in middle } else { tft.setTextPadding(3 * 14); // Allow for 3 digits each 14 pixels wide tft.drawString(buf, x, y, 4); // Value in middle } tft.setTextSize(1); tft.setTextPadding(0); // Print units, if the meter is large then use big font 4, othewise use 2 tft.setTextColor(TFT_WHITE, TFT_BLACK); if (r > 84) tft.drawString(units, x, y + 60, 4); // Units display else tft.drawString(units, x, y + 15, 2); // Units display // Calculate and return right hand side x coordinate return x + r; } void drawAlert(int x, int y, int side, boolean draw) { if (draw && !range_error) { drawIcon(alert, x - alertWidth / 2, y - alertHeight / 2, alertWidth, alertHeight); range_error = 1; } else if (!draw) { tft.fillRect(x - alertWidth / 2, y - alertHeight / 2, alertWidth, alertHeight, TFT_BLACK); range_error = 0; } } // ######################################################################### // Return a 16 bit rainbow colour // ######################################################################### unsigned int rainbow(byte value) { // Value is expected to be in range 0-127 // The value is converted to a spectrum colour from 0 = blue through to 127 = red byte red = 0; // Red is the top 5 bits of a 16 bit colour value byte green = 0; // Green is the middle 6 bits byte blue = 0; // Blue is the bottom 5 bits byte quadrant = value / 32; if (quadrant == 0) { blue = 31; green = 2 * (value % 32); red = 0; } if (quadrant == 1) { blue = 31 - (value % 32); green = 63; red = 0; } if (quadrant == 2) { blue = 0; green = 63; red = value % 32; } if (quadrant == 3) { blue = 0; green = 63 - 2 * (value % 32); red = 31; } return (red << 11) + (green << 5) + blue; } // ######################################################################### // Return a value in range -1 to +1 for a given phase angle in degrees // ######################################################################### float sineWave(int phase) { return sin(phase * 0.0174532925); } //==================================================================================== // This is the function to draw the icon stored as an array in program memory (FLASH) //==================================================================================== // To speed up rendering we use a 64 pixel buffer #define BUFF_SIZE 64 // Draw array "icon" of defined width and height at coordinate x,y // Maximum icon size is 255x255 pixels to avoid integer overflow void drawIcon(const unsigned short *icon, int16_t x, int16_t y, int8_t width, int8_t height) { uint16_t pix_buffer[BUFF_SIZE]; // Pixel buffer (16 bits per pixel) tft.startWrite(); // Set up a window the right size to stream pixels into tft.setAddrWindow(x, y, width, height); // Work out the number whole buffers to send uint16_t nb = ((uint16_t)height * width) / BUFF_SIZE; // Fill and send "nb" buffers to TFT for (int i = 0; i < nb; i++) { for (int j = 0; j < BUFF_SIZE; j++) { pix_buffer[j] = pgm_read_word(&icon[i * BUFF_SIZE + j]); } tft.pushColors(pix_buffer, BUFF_SIZE); } // Work out number of pixels not yet sent uint16_t np = ((uint16_t)height * width) % BUFF_SIZE; // Send any partial buffer left over if (np) { for (int i = 0; i < np; i++) pix_buffer[i] = pgm_read_word(&icon[nb * BUFF_SIZE + i]); tft.pushColors(pix_buffer, np); } tft.endWrite(); } float mapfloat(float x, float in_min, float in_max, float out_min, float out_max) { return (x - in_min) * (out_max - out_min) / (in_max - in_min) + out_min; } |
alert.h
Open a New Tab in the same code section and paste the following code. Save the code as alert.h.
|
1 2 3 4 5 6 7 8 9 10 11 12 13 14 15 16 17 18 19 20 21 22 23 24 25 26 27 28 29 30 31 32 33 34 35 36 37 38 39 40 41 |
// We need this header file to use FLASH as storage with PROGMEM directive: #include <pgmspace.h> // Icon width and height const uint16_t alertWidth = 32; const uint16_t alertHeight = 32; // The icon file can be created with the "UTFT ImageConverter 565" bitmap to .c file creation utility, more can be pasted in here const unsigned short alert[1024] PROGMEM={ 0x0000,0x0000,0x0000,0x0000,0x0000,0x0000,0x0000,0x0000,0x0000,0x0000,0x0000,0x0000,0x0000,0x0000,0x0000,0x0000,0x0840,0x0000,0x0000,0x0000,0x0000,0x0000,0x0000,0x0000,0x0000,0x0000,0x0000,0x0000,0x0000,0x0000,0x0000,0x0000, // row 0, 32 pixels 0x0000,0x0000,0x0000,0x0000,0x0000,0x0000,0x0000,0x0000,0x0000,0x0000,0x0000,0x0000,0x0000,0x1080,0xAC66,0xEDE8,0xFE69,0xC4C6,0x2901,0x0000,0x0000,0x0000,0x0000,0x0000,0x0000,0x0000,0x0000,0x0000,0x0000,0x0000,0x0000,0x0000, // row 1, 64 pixels 0x0000,0x0000,0x0000,0x0000,0x0000,0x0000,0x0000,0x0000,0x0000,0x0000,0x0000,0x0000,0x0000,0xBCC6,0xFE68,0xFE68,0xFE6A,0xFE68,0xEDE8,0x18A1,0x0000,0x0000,0x0000,0x0000,0x0000,0x0000,0x0000,0x0000,0x0000,0x0000,0x0000,0x0000, // row 2, 96 pixels 0x0000,0x0000,0x0000,0x0000,0x0000,0x0000,0x0000,0x0000,0x0000,0x0000,0x0000,0x0000,0x8344,0xFE48,0xFE8C,0xFFDD,0xFFFF,0xFEF0,0xFE48,0xB466,0x0000,0x0000,0x0000,0x0000,0x0000,0x0000,0x0000,0x0000,0x0000,0x0000,0x0000,0x0000, // row 3, 128 pixels 0x0000,0x0000,0x0000,0x0000,0x0000,0x0000,0x0000,0x0000,0x0000,0x0000,0x0000,0x1880,0xEDC7,0xFE48,0xFF99,0xFFBC,0xFF9B,0xFFBD,0xFE6A,0xFE48,0x5A23,0x0000,0x0000,0x0000,0x0000,0x0000,0x0000,0x0000,0x0000,0x0000,0x0000,0x0000, // row 4, 160 pixels 0x0000,0x0000,0x0000,0x0000,0x0000,0x0000,0x0000,0x0000,0x0000,0x0000,0x0000,0x9BE5,0xFE28,0xFED0,0xFFBC,0xFF7A,0xFF9A,0xFF9B,0xFF35,0xFE28,0xBCA6,0x0000,0x0000,0x0000,0x0000,0x0000,0x0000,0x0000,0x0000,0x0000,0x0000,0x0000, // row 5, 192 pixels 0x0000,0x0000,0x0000,0x0000,0x0000,0x0000,0x0000,0x0000,0x0000,0x0000,0x3962,0xFE28,0xFE28,0xFF9A,0xFF79,0xFF9A,0xFF9B,0xFF9A,0xFFBD,0xFE6B,0xFE28,0x72E3,0x0000,0x0000,0x0000,0x0000,0x0000,0x0000,0x0000,0x0000,0x0000,0x0000, // row 6, 224 pixels 0x0000,0x0000,0x0000,0x0000,0x0000,0x0000,0x0000,0x0000,0x0000,0x0000,0xB465,0xFE28,0xFEF2,0xFF7A,0xFF79,0xFF7A,0xFF9A,0xFF7A,0xFF7A,0xFF78,0xFE28,0xDD67,0x0860,0x0000,0x0000,0x0000,0x0000,0x0000,0x0000,0x0000,0x0000,0x0000, // row 7, 256 pixels 0x0000,0x0000,0x0000,0x0000,0x0000,0x0000,0x0000,0x0000,0x0000,0x5A22,0xFE07,0xFE29,0xFF9B,0xFF37,0xFF58,0xFF79,0xFF79,0xFF79,0xFF58,0xFF9B,0xFEAE,0xFE07,0x93A4,0x0000,0x0000,0x0000,0x0000,0x0000,0x0000,0x0000,0x0000,0x0000, // row 8, 288 pixels 0x0000,0x0000,0x0000,0x0000,0x0000,0x0000,0x0000,0x0000,0x0000,0xC4A5,0xFE07,0xFF15,0xFF37,0xFF36,0xAD11,0x2965,0x2965,0xCDF4,0xFF37,0xFF37,0xFF79,0xFE07,0xFE07,0x2901,0x0000,0x0000,0x0000,0x0000,0x0000,0x0000,0x0000,0x0000, // row 9, 320 pixels 0x0000,0x0000,0x0000,0x0000,0x0000,0x0000,0x0000,0x0000,0x7B03,0xFDE7,0xFE4B,0xFF79,0xFEF4,0xFF15,0xB552,0x2945,0x2945,0xDE55,0xFF16,0xFF15,0xFF58,0xFED1,0xFDE7,0xAC25,0x0000,0x0000,0x0000,0x0000,0x0000,0x0000,0x0000,0x0000, // row 10, 352 pixels 0x0000,0x0000,0x0000,0x0000,0x0000,0x0000,0x0000,0x0840,0xDD26,0xFDE7,0xFF57,0xFED3,0xFED2,0xFEF4,0xBD93,0x2124,0x2124,0xDE75,0xFF14,0xFED3,0xFED3,0xFF7A,0xFE08,0xFDE7,0x49A2,0x0000,0x0000,0x0000,0x0000,0x0000,0x0000,0x0000, // row 11, 384 pixels 0x0000,0x0000,0x0000,0x0000,0x0000,0x0000,0x0000,0x9BA4,0xFDC6,0xFE6E,0xFF36,0xFE90,0xFEB1,0xFED3,0xC592,0x2124,0x2124,0xE675,0xFED3,0xFEB2,0xFEB1,0xFEF3,0xFEF3,0xFDC6,0xBC45,0x0000,0x0000,0x0000,0x0000,0x0000,0x0000,0x0000, // row 12, 416 pixels 0x0000,0x0000,0x0000,0x0000,0x0000,0x0000,0x3141,0xF5C6,0xF5C7,0xFF58,0xFE90,0xFE6F,0xFE8F,0xFEB1,0xCDB2,0x2104,0x2104,0xF6B4,0xFEB1,0xFE90,0xFE8F,0xFE90,0xFF58,0xFE0A,0xF5C6,0x72A3,0x0000,0x0000,0x0000,0x0000,0x0000,0x0000, // row 13, 448 pixels 0x0000,0x0000,0x0000,0x0000,0x0000,0x0000,0xABE4,0xF5A6,0xFEB1,0xFED3,0xFE4E,0xFE6E,0xFE6F,0xFE90,0xD5F2,0x18E3,0x18E3,0xFED4,0xFE90,0xFE6F,0xFE6F,0xFE6E,0xFE91,0xFF36,0xF5A6,0xCCA5,0x0000,0x0000,0x0000,0x0000,0x0000,0x0000, // row 14, 480 pixels 0x0000,0x0000,0x0000,0x0000,0x0000,0x5202,0xF5A6,0xF5C7,0xFF58,0xFE4D,0xFE4D,0xFE4D,0xFE4E,0xFE6F,0xDE11,0x18C3,0x18C3,0xFED3,0xFE6F,0xFE6E,0xFE4E,0xFE4D,0xFE4D,0xFF16,0xFE2C,0xF5A6,0x9363,0x0000,0x0000,0x0000,0x0000,0x0000, // row 15, 512 pixels 0x0000,0x0000,0x0000,0x0000,0x0000,0xBC44,0xF585,0xFED3,0xFE6F,0xFE2C,0xFE2C,0xFE2D,0xFE4D,0xFE4E,0xE630,0x10A2,0x2104,0xFED1,0xFE4E,0xFE4D,0xFE4D,0xFE2D,0xFE2C,0xFE4D,0xFF37,0xF586,0xF585,0x28E1,0x0000,0x0000,0x0000,0x0000, // row 16, 544 pixels 0x0000,0x0000,0x0000,0x0000,0x7282,0xF565,0xF5EA,0xFF16,0xFE0B,0xFE0B,0xFE0B,0xFE2C,0xFE2C,0xFE4D,0xF670,0x1082,0x2924,0xFEB0,0xFE2D,0xFE2C,0xFE2C,0xFE2C,0xFE0B,0xFE0B,0xFEB2,0xFE6F,0xF565,0xA383,0x0000,0x0000,0x0000,0x0000, // row 17, 576 pixels 0x0000,0x0000,0x0000,0x0840,0xD4C4,0xF565,0xFEF5,0xFE0C,0xFDE9,0xFDEA,0xFE0A,0xFE0B,0xFE0B,0xFE2C,0xFE8F,0x0861,0x2964,0xFE8F,0xFE2C,0xFE0B,0xFE0B,0xFE0B,0xFE0A,0xFDEA,0xFE0B,0xFF37,0xF586,0xF565,0x4181,0x0000,0x0000,0x0000, // row 18, 608 pixels 0x0000,0x0000,0x0000,0x9343,0xF545,0xF60C,0xFED3,0xFDC8,0xFDC8,0xFDC9,0xFDE9,0xFDEA,0xFDEA,0xFE0B,0xFE8E,0x0861,0x3184,0xFE6D,0xFE0B,0xFE0A,0xFDEA,0xFDEA,0xFDE9,0xFDC9,0xFDC9,0xFE4E,0xFEB2,0xF545,0xB3E3,0x0000,0x0000,0x0000, // row 19, 640 pixels 0x0000,0x0000,0x28E0,0xF544,0xF545,0xFF17,0xFDC8,0xFDA7,0xFDA7,0xFDC8,0xFDC8,0xFDC9,0xFDC9,0xFDE9,0xFE6C,0x10A2,0x39C4,0xFE4C,0xFDEA,0xFDE9,0xFDC9,0xFDC9,0xFDC8,0xFDC8,0xFDA7,0xFDA8,0xFF16,0xF588,0xF544,0x6222,0x0000,0x0000, // row 20, 672 pixels 0x0000,0x0000,0xA383,0xF524,0xF64E,0xFE4E,0xFD86,0xFD86,0xFD87,0xFDA7,0xFDA7,0xFDA8,0xFDC8,0xFDC8,0xFE2A,0xA469,0xB4EA,0xFE2A,0xFDC9,0xFDC8,0xFDC8,0xFDA8,0xFDA7,0xFDA7,0xFD87,0xFD86,0xFDEA,0xFED3,0xF524,0xC443,0x0000,0x0000, // row 21, 704 pixels 0x0000,0x51C1,0xF504,0xF546,0xFF16,0xF565,0xFD65,0xFD65,0xFD86,0xFD86,0xFD86,0xFDA7,0xFDA7,0xFDA7,0xFDE8,0xFE6A,0xFE4A,0xFDE8,0xFDA7,0xFDA7,0xFDA7,0xFDA7,0xFD86,0xFD86,0xFD86,0xFD65,0xFD65,0xFEB2,0xF5CA,0xF504,0x8AE2,0x0000, // row 22, 736 pixels 0x0000,0xB3A2,0xED03,0xFE92,0xFDC9,0xF543,0xF544,0xFD44,0xFD65,0xFD65,0xFD65,0xFD86,0xFD86,0xFD86,0xFDA7,0xFDC7,0xFDC7,0xFDA7,0xFD86,0xFD86,0xFD86,0xFD86,0xFD65,0xFD65,0xFD65,0xFD44,0xF544,0xFD86,0xFEF5,0xED03,0xE4C3,0x1880, // row 23, 768 pixels 0x7241,0xECE3,0xF567,0xFED3,0xF523,0xF523,0xF523,0xF543,0xF544,0xF544,0xFD65,0xFD65,0xFD65,0xFD65,0xD4E6,0x39C5,0x39A5,0xD4E6,0xFD86,0xFD65,0xFD65,0xFD65,0xFD65,0xF544,0xF544,0xF543,0xF523,0xF523,0xFE2E,0xF5EC,0xECE3,0x9B42, // row 24, 800 pixels 0xD443,0xECE3,0xFED4,0xF565,0xF502,0xF502,0xF522,0xF523,0xF523,0xF543,0xF544,0xF544,0xF544,0xFD65,0x8B64,0x18C3,0x18C3,0x8344,0xFD85,0xFD44,0xF544,0xF544,0xF544,0xF543,0xF523,0xF523,0xF522,0xF502,0xF523,0xFEF5,0xED04,0xECE3, // row 25, 832 pixels 0xECC3,0xF5AB,0xFE6F,0xF501,0xF4E1,0xF501,0xF502,0xF502,0xF522,0xF522,0xF523,0xF523,0xF523,0xFD84,0xC504,0x20E1,0x18E1,0xC4E4,0xFD84,0xF543,0xF523,0xF523,0xF523,0xF522,0xF522,0xF502,0xF502,0xF501,0xF501,0xFDC9,0xF62F,0xECC3, // row 26, 864 pixels 0xECC2,0xFE92,0xF523,0xF4E0,0xF4E0,0xF4E1,0xF4E1,0xF501,0xF501,0xF502,0xF502,0xF522,0xF522,0xF543,0xFDE3,0xFEA5,0xF6A4,0xFE04,0xF543,0xF522,0xF522,0xF522,0xF502,0xF502,0xF501,0xF501,0xF4E1,0xF4E1,0xF4E0,0xF4E1,0xFED4,0xECC2, // row 27, 896 pixels 0xECA2,0xF5EC,0xF4E0,0xF4C0,0xF4E0,0xF4E0,0xF4E0,0xF4E1,0xF4E1,0xF501,0xF501,0xF501,0xF502,0xF502,0xF542,0xFDA2,0xFDA2,0xF542,0xF502,0xF502,0xF502,0xF501,0xF501,0xF501,0xF4E1,0xF4E1,0xF4E0,0xF4E0,0xF4E0,0xF4C0,0xF5A9,0xECA2, // row 28, 928 pixels 0xECA2,0xECA2,0xECC2,0xF4C1,0xF4C1,0xF4C1,0xF4C1,0xF4C1,0xF4C1,0xF4C1,0xF4C1,0xF4E1,0xF4E2,0xF4E2,0xF4E2,0xF4E2,0xF4E2,0xF4E2,0xF4E2,0xF4E2,0xF4E2,0xF4E1,0xF4C1,0xF4C1,0xF4C1,0xF4C1,0xF4C1,0xF4C1,0xF4C1,0xECC2,0xECC3,0xECA2, // row 29, 960 pixels 0x8AC1,0xEC82,0xEC82,0xEC82,0xEC82,0xEC82,0xEC82,0xEC82,0xEC82,0xEC82,0xEC82,0xEC82,0xEC82,0xEC82,0xEC82,0xEC82,0xEC82,0xEC82,0xEC82,0xEC82,0xEC82,0xEC82,0xEC82,0xEC82,0xEC82,0xEC82,0xEC82,0xEC82,0xEC82,0xEC82,0xEC82,0x9B01, // row 30, 992 pixels 0x0000,0x1880,0x51A0,0x8AA1,0x8AA1,0x8AA1,0x8AA1,0x8AA1,0x8AA1,0x8AA1,0x8AA1,0x8AA1,0x8AA1,0x8AA1,0x8AA1,0x8AA1,0x8AA1,0x8AA1,0x8AA1,0x8AA1,0x8AA1,0x8AA1,0x8AA1,0x8AA1,0x8AA1,0x8AA1,0x8AA1,0x8AA1,0x8AA1,0x61E0,0x28E0,0x0000}; // row 31, 1024 pixels |
From the tools menu select the ESP32 Wrover Module and following other options.

Connect the ESP32 Board with Type-C USB Cable and then upload the code.
Measure Wind Speed with Anemometer on ESP32 TFT Display
After uploading the code, the TFT Display will start showing the Wind Speed data with a beautiful widget.

You can manually rotate the cup of the Anemometer to high speed in order to get the alert signal on the display.
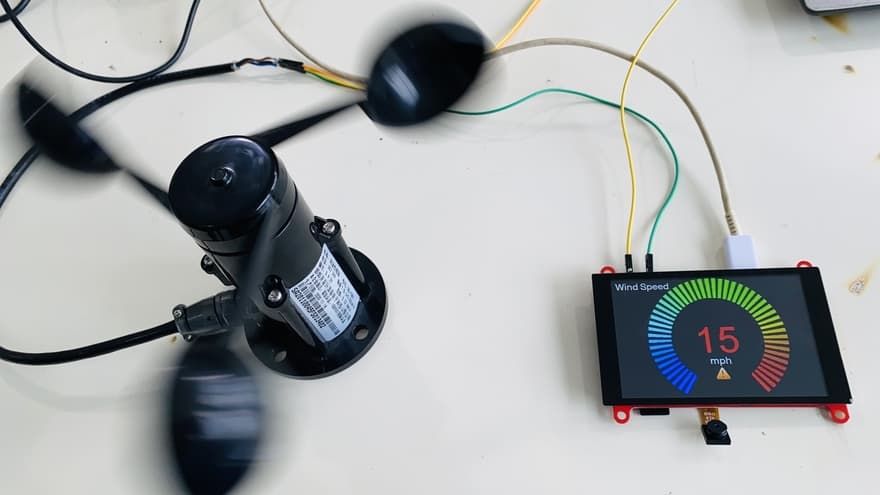
This is how you can measure the Wind Speed ESP32 and Anemometer Sensor and display the wind speed value on Beautiful widget of TFT Display.
Video Tutorial & Guide

 & Live Dashboard")


1 Comment
Interesting article. I have tried to download the modified e TFT SPi libary but google drive sais the file is on the trash . Could you please share the modified libary? tnanks in advance