

Overview
In this project, we will make few some interesting projects using ESP32 & 3.5″ TFT Touch Screen Display Camera. The customized board is manufacture by Makerfabs and has a combination of ESP32-WROVER chip + 3.5″ TFT Display + 2 MP OV2640 Camera + SD Card slot. With this cutomized board you can make plenty of ESP32 Based project.
But in this post, we will build 3 different types of the project using the product. First, we will use this board as a touch screen camera. The touchscreen camera will have the facility to capture the image and store in the SD Card for viewing later on. As a second project, we will use this product as a Touch-Based Sketch Drawing. You can draw pictures by simply using your fingers or using the Stylus. In the 3rd project, we will use this product as an Image Slide Show Viewer. You can copy multiple different images in the SD Card and later view all of them as in the slide show.
But before you start doing these projects, you can read the previous article, i.e ESP32 Video Game. The ESP32 Video game is built using the same ESP32 TFT Touch Screen Display Camera.
ESP32 3.5″ TFT Touch(Capacitive) with Camera
This is a beautiful 3.5” touchscreen display, based on ESP32-WROVER chip, with a built-in 2M pixel OV2640 camera. The combination of all these gives a perfect platform for ESP32 Application like Video Games.

The TFT LCD driver is basically ILI9488 & has a dimension of 3.5″ with 320×480 screen resolution. The ILI9488 LCD uses SPI for communication with the ESP32 chip. The SPI main clock could be up to 60M~80M, make the display smooth enough for videos. The camera module on this board is an OV2640 Camera with a 2MP resolution.
with this camera, you can make applications such as remote photography, face recognition & security system projects. While the camera is not used, you can freely use all these pins with the breakout connectors. You can then connect the ESP32 display with sensors or modules & use it for any IoT applications. The ESP32 chip support Arduino or MicroPython programming
The board is having a micro SD-Card slot for attaching an external SD-Card. The SD Card can be used for storing files and images. There is a type C USB Port, basically a USB to UART converter for ESP32 programming. You can connect a Type-C data cable to the board & directly upload the code to the Board.

Specification
1. 3.5 inch display, 320×480
2. Capacitive/Resistive Touch
3. ESP32-WROVER Controller
4. WIFI/ BLE Connection.
5. Onboard USB2UART convertor for ESP32 programming
6. 2M pixel OV2640 Camera
7. OV2640 supports output images up to 2 million pixels
8. LCD 3.5-inch Amorphous-TFT-LCD for mobile-phone or handy electrical equipment
9. LCD Driver: ILI9488
10. LCD Resolution: 320*480
11. Micro SD card slot on the board
12. NS2009: A 4-wire resistive touch screen control circuit
13. FT6236: single-chip capacitive touch panel controller Integrated Circuit
14. Power supply: 5V, Type-C USB
Purchase Link
There are two versions of ESP32 3.5″ TFT Touch Screen with Camera. One is the Capacitive Type and the other the resistive type. You can use any of the display that you want. The purchase Link for both the display is given below.
1. Resistive Type ESP32 TFT Touch Screen Camera – Purchase Link
2. Capacitive Type ESP32 TFT Touch Screen Camera – Purchase Link
ESP32 Board Manager & Library Installation
1.ESP32 Board Package Installation
You need to add ESP32 Board Package to the Arduino IDE. To do that Select “File>Preferences>settings>Additional Boards Manager URLs” to fill the link: https://dl.espressif.com/dl/package_esp32_index.json. After that download the ESP32 Package from Board Manager.
2. LovyanGFX Library Installation
LovyanGFX Library is a library for LCD Graphics driver with touch for ESP32 and SAMD51. It supports the TFT Touch Screen Display like ILI9163, ILI9342, ILI9341, ILI9486, ILI9488, ST7735, ST7789, ST7796, SSD1351. Download and add this library to the Arduino IDE.
LovyanGFX Library
Now let us see some of the ESP32 TFT Display Projects.
Project 1: ESP32 Touch Screen Camera
The ESP32 Touch Camera use ILI9488 TFT Touch Display, which comes with resistive or capacitive screens. It has an OV2640 camera and SD card slot. It can be used as a webcam or an electronic album or a digital camera.

But in this project, we will use the product as a Touch Screen Camera. You can take photos with an OV2640 camera and preview them in real-time on a TFT screen. And then, you can save photos to the SD card in BMP Format. The photos that were taken can be later viewed through the TFT screen.
Download the ESP32 Touch Screen Camera Code/Program from the link below.
Unzip the code folder and then open the camera.ino file. The Arduino IDE will open with so many different tabs. In the code part, you need to make little changes as per the type of Touch Screen. Makes changes in the following line of the code to select the touchscreen type, either it is resistive or capacitive.
|
1 2 |
/#define NS2009_TOUCH //Resistive screen driver #define FT6236_TOUCH //Capacitive screen driver |
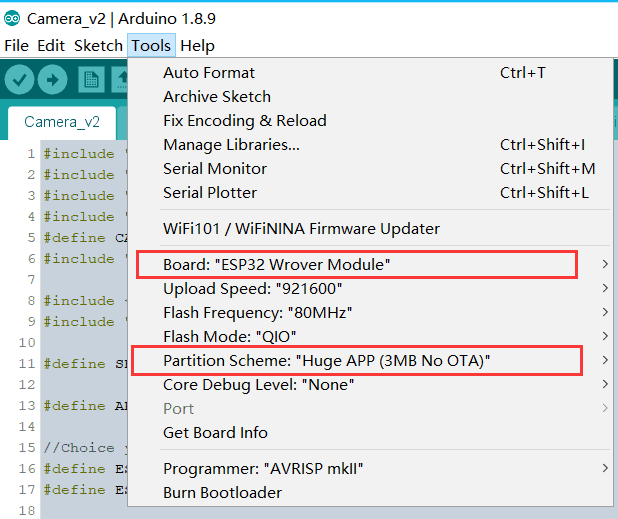
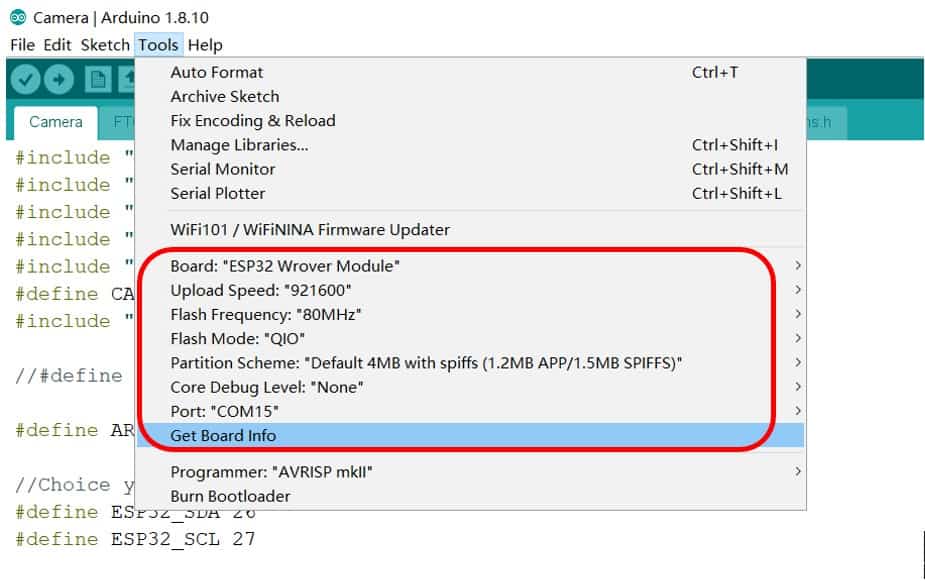
From the Tools Part select the ESP32 Wrover Module. Also select the partition Scheme as “Huge App 3MB (No OTA)“.
Now you can upload the code to the ESP32 Module. And after uploading the code, you can start capturing the photos and view them on Display.

Project 2: ESP32 Touch Screen Drawing

Since the embedded board has the 3.5″ Capacitive/Resistive TFT Touch Screen LCD Based on ILI9488, you can use it for painting or drawing applications. You can use your hand or stylus (resistance screen) to draw on the screen.
Download the ESP32 Touch Screen Drawing Code/Program from the link below.
Unzip the code folder and then open the touch_draw_v2.ino file. The Arduino IDE will open with so many different tabs. Select/Comment/Uncomment the Capacitive or Resistive type Touch Screen Display in the code. And then you can upload the code to the ESP32 Dev Board.
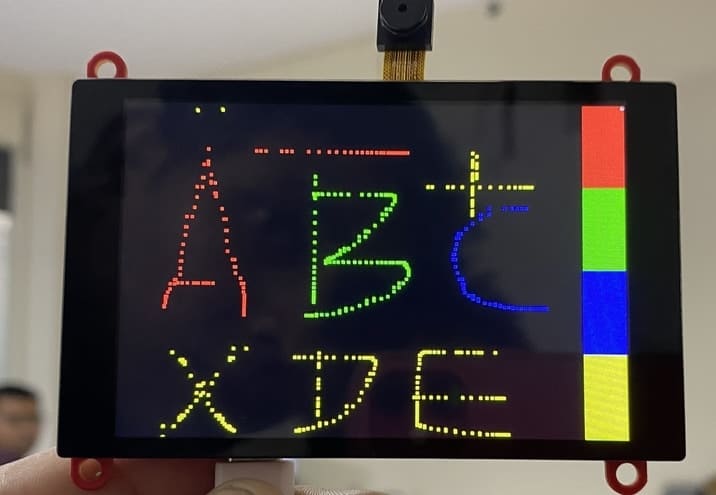
After you upload the code, the TFT Display will start displaying the Dashboard with color selection on the side. You can choose any color and start drawing anything that you want.
Project 3: ESP32 Slide Show Viewer

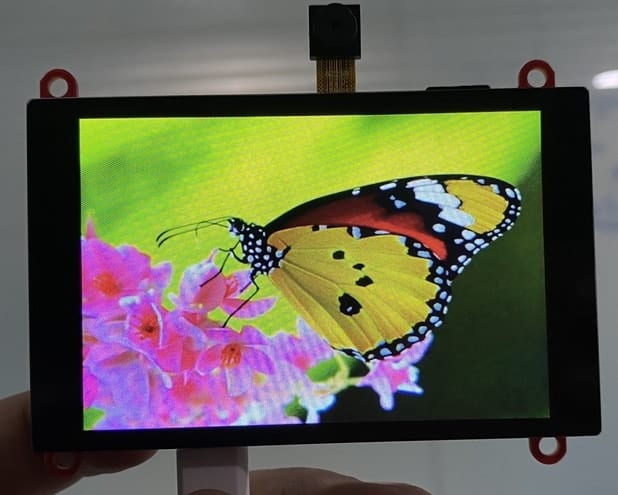
Apart from taking pictures and drawing, you can use this ESP32 Touchscreen Display as a Slide Show Viewer. For this choose few pictures with resolution 480×320 and rename them as number 1, 2, 3, 4, ……, n. The Picture should be in.bmp format. The jpeg and png formats are not supported.
Download the ESP32 Slide Show Viewer Code/Program from the link below.
Unzip the code folder and then open the SD2TFT.ino file. The Arduino IDE will open with so many different tabs. You can now compile the code & upload the code to the ESP32 Dev Board. Such a cool ESP32 TFT Touch Screen Projects.
Once the code is uploaded, the slide show begins.
Video Tutorial & Guide

You can make more ESP32 TFT Display Projects using the same module. Thus ESP32 Touch Camera can be used in many application from gaming to drawing or imaging.
Apart from this, here are a few ESP32 TFT Display based great projects for you:
1. ESP32 DHT11 Weather Monitoring on TFT Touch Display
2. Measure Wind Speed with Anemometer on ESP32 TFT Display
3. Ultrasonic Range Finder with ESP32 TFT Display & HC-SR04
 & Live Dashboard")


3 Comments
Hi all. I got compiling error: ‘LGFX_SPI’ in namespace ‘lgfx’ does not name a template type for the line:
static lgfx::LGFX_SPI tft;
how to fix?
Thanks.
Same prolem here. Help would be appreciated.
And Also here.