Close Menu
  • Articles
    • Learn Electronics
    • Product Review
    • Tech Articles
  • Electronics Circuits
    • 555 Timer Projects
    • Op-Amp Circuits
    • Power Electronics
  • Microcontrollers
    • Arduino Projects
    • STM32 Projects
    • AMB82-Mini IoT AI Camera
    • BLE Projects
  • IoT Projects
    • ESP8266 Projects
    • ESP32 Projects
    • ESP32 MicroPython
    • ESP32-CAM Projects
    • LoRa/LoRaWAN Projects
  • Raspberry Pi
    • Raspberry Pi Projects
    • Raspberry Pi Pico Projects
    • Raspberry Pi Pico W Projects
  • Electronics Calculator
Facebook X (Twitter) Instagram
  • About Us
  • Disclaimer
  • Privacy Policy
  • Contact Us
  • Advertise With Us
Facebook X (Twitter) Instagram Pinterest YouTube LinkedIn
How To Electronics
  • Articles
    • Learn Electronics
    • Product Review
    • Tech Articles
  • Electronics Circuits
    • 555 Timer Projects
    • Op-Amp Circuits
    • Power Electronics
  • Microcontrollers
    • Arduino Projects
    • STM32 Projects
    • AMB82-Mini IoT AI Camera
    • BLE Projects
  • IoT Projects
    • ESP8266 Projects
    • ESP32 Projects
    • ESP32 MicroPython
    • ESP32-CAM Projects
    • LoRa/LoRaWAN Projects
  • Raspberry Pi
    • Raspberry Pi Projects
    • Raspberry Pi Pico Projects
    • Raspberry Pi Pico W Projects
  • Electronics Calculator
How To Electronics
Home » Mars Rover Robot Replica using ESP32 CAM & Arduino
ESP32-CAM Projects Product Review

Mars Rover Robot Replica using ESP32 CAM & Arduino

Mamtaz AlamBy Mamtaz AlamUpdated:February 2, 20255 Mins Read
Share Facebook Twitter LinkedIn Telegram Reddit WhatsApp
Mars Rover Robot Replica using ESP32 CAM & Arduino
Share
Facebook Twitter LinkedIn Pinterest Email Reddit Telegram WhatsApp

Overview

This article will explore a replica of the Mars Rover Robot designed using Arduino and the ESP32 Camera Module, along with various sensors and modules. This robot is based on the same universal rocker-bogie system that NASA’s real Mars rovers employ. The robotic kit, designed by Sunfounder, is named the GalaxyRVR Robot.

The GalaxyRVR Robot is capable of traversing all kinds of terrains, including rocky mountains, sandy beaches, and grassy fields. Its suspension system ensures smooth mobility across these diverse surfaces. Equipped with an ESP32 Cam, a high-definition camera module, the robot provides a first-person view, offering live visualization of everything captured by the camera. Additionally, the ultrasonic sensor enables the robot to detect and avoid obstacles.


Purchase Links

The SunFounder GalaxyRVR Mars Rover Kit for Arduino can be purchased from the official Sunfounder Website or from the Amazon store.

  • SunFounder Website: Buy from SunFounder
  • Amazon: Buy from Amazon

The kit contains all the necessary components and tools required to build and assemble the Mars Rover Robot.


What’s in the kit?

The kit contains a comprehensive set of components and tools for assembling a robot. Here’s what’s inside:

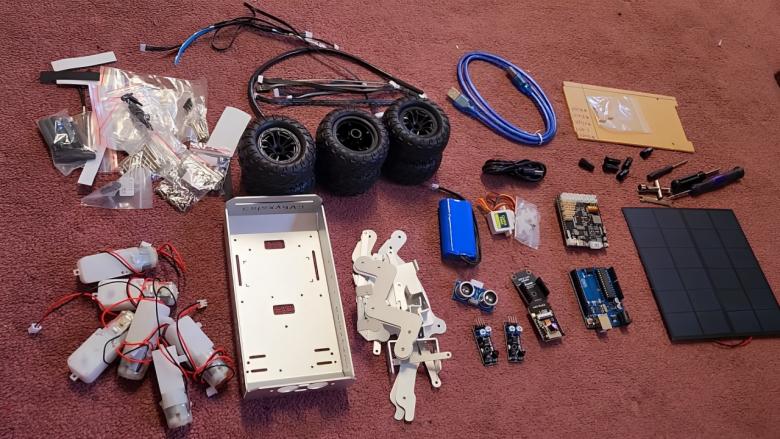
  1. Chassis/Main Body: Made of pure aluminum, ensuring lightweight and durability.
  2. Motors: Essential for driving the moving parts of the robot.
  3. Aluminum Casing: Provides protection and structural support for the internal components.
  4. Sensors and Modules:
    • Ultrasonic Sensor HC-SR04: Used for obstacle detection.
    • IR Sensor Module: A pair included for infrared detection.
    • ESP32 Camera Module: Allows for live video streaming and visualization.
    • ESP32 Camera Adapter Board: Where the ESP32 Cam module fits.
  5. Microcontrollers:
    • Arduino UNO Board: Acts as the brain of the project.
    • GalaxyRVR Shield: Custom-made to connect the ESP32 CAM, Arduino, and all sensor modules.
  6. Power Supply:
    • 7.4V, 2000mAh 18650 Lithium-ion Battery: Powers the robot.
    • Solar Panel: Rated at 6V and 660mA, can charge the battery fully in approximately 7.2 hours.
  7. Assembly Tools: Tools provided for assembling the robot.
  8. Hardware Accessories:
    • Screws, Knots, Stand-offs, and Connectors: For assembling and securing components.
    • Servo Motor: Similar to an SG-90 motor, used for precise control of movement.
    • Data Cables: For the Arduino Board and a Type-C cable for charging.
    • Connector Wires: For connecting various components.
    • RGB LED Strip: A pair is included for aesthetic enhancements.
    • Acrylic Casing: For covering and protecting the body parts.
  9. Wheels: Includes six wheels suitable for a rocker-bogie system, fitting perfectly with the casing and motors.

This kit is designed to offer everything needed to build a functional robot capable of navigating, streaming video, and detecting obstacles.


Assembly of Mars Rover Robot

The assembly process of the Arduino & ESP32 CAM Based Mars Rover Robot, guided by Sunfounder’s detailed manual, is straightforward and enjoyable. The manual features colorful illustrations and clear instructions that simplify the construction of a functional Mars Rover Robot. Following the manual step-by-step, I found the assembly process very easy.

GalaxyRVR Build Guide 1 - Constructing the Rocker-Bogie System
Watch this video on YouTube.

I started by connecting the wheels and motors to the robot’s body. This setup involved using jumper wires to establish the physical and electrical connections among all the components. The ESP32 camera module, which can rotate via a servo motor, was then integrated, adding dynamic visual capabilities to the robot.

Mars Rover Robot ESP32 CAM Arduino

The final steps involved installing the battery and acrylic cases at the bottom of the robot for power and protection. The solar panel was mounted on top, serving as the roof and an alternative energy source, which effectively completes the Mars Rover Robot’s assembly.


Operation & Controlling of Mars Rover Robot

Now lets operate the robot. For that, the first thing that you need to do is install the Sunfounder controller App from the playstore. Then open the app and connect it to the ESP32 Cam using the WiFi Access Point.

You will be immediately able to see the live feed of the video. The app has the control and functionality buttons to control the robot.
Using the App, you can move the robot in any direction and on any surface.

https://how2electronics.com/wp-content/uploads/2024/06/First-Person-View.mp4

As you can see here, the robot can move in any direction in a muddy road. The robot can also move in stepped surface, graveled path which has small stones. The rocker-bogie system perfectly stabilizes the robot and hence a perfect balance is maintained without an issue.

https://how2electronics.com/wp-content/uploads/2024/06/Run-on-Any-Surface.mp4

The robot can also do the stairs movement and can climb the sloppy terrain. No matter the surface is rocky or full with stones, it can still move forward and backward as expected.

https://how2electronics.com/wp-content/uploads/2024/06/Run-on-Stone-Rock.mp4

It can move in the grassland as well. The grassland here has fully grown large grass, still the robot is making smooth balanced movements.

https://how2electronics.com/wp-content/uploads/2024/06/Robot-running-on-Grass.mp4

The Ultrasonic sensor in the robot could be used for detecting obstacle. Hence it is used as Obstacle Avoidance Robot.

https://how2electronics.com/wp-content/uploads/2024/06/Obstacle-Avoidance-Robot.mp4

The best thing about the robot, its power harnessing capability using the solar panel. The Solar Panel has a rating of 6V and 660mA. Theoretically it takes 7.2 hours to fully charge the battery.

https://how2electronics.com/wp-content/uploads/2024/06/Solar-Charging.mp4

For me this robot is full of mystery and has too many awesome features. I would really love to operate this robot for fun.


Video Tutorial & Guide

Mars Rover Robot Replica using ESP32 CAM & Arduino with Rocker Bogie System
Watch this video on YouTube.

Share. Facebook Twitter Pinterest LinkedIn Tumblr Email Reddit Telegram WhatsApp
Previous ArticleBuild AD8495 K-Type Thermocouple ESP32 WebServer
Next Article Square Wave Generator Circuit with Op Amp IC LM358

Related Posts

KAIWEETS KTI-W01 Thermal Imaging Camera In-Depth Review

KAIWEETS KTI-W01 Thermal Imaging Camera: In-Depth Review

Updated:April 1, 2025
DIY Spiderbot Hexapod Robot using ESP32-CAM FOV

DIY Spiderbot Hexapod Robot using ESP32-CAM FOV

Updated:February 2, 20254K
MyArm 300 PI 2023 - Portable 7-Axis Robotic Arm Review

MyArm 300 Pi Unboxing & Usage – Portable 7-Axis Robotic Arm

Updated:February 2, 2025
PlayStation 5 vs Xbox Series X Compared

PlayStation 5 vs Xbox Series X Compared

Updated:October 14, 2023
The Best 60W Electric Soldering Iron Station

The Best 60W Electric Soldering Iron Station – Test & Review

Updated:June 28, 2025
Mecanum Wheel Robot using Arduino & ESP32 CAM

Mecanum Wheel Robot using Arduino & ESP32 CAM

Updated:June 15, 202310K
Add A Comment

CommentsCancel reply

Latest Posts
IoT Based PM & Air Quality Monitoring System using ESP32

IoT Based PM & Air Quality Monitoring System using ESP32

May 31, 2026
DIY ESP32 MLX90640 IR Thermal Camera with Live Web Display

DIY ESP32 MLX90640 IR Thermal Camera with Live Web Display

May 10, 2026
IoT Activity Tracker with ESP32 & Accelerometer Gyroscope

IoT Activity Tracker with ESP32 & Accelerometer/Gyroscope

May 2, 2026
A Guide to Sourcing Obsolete ICs for Vintage Projects

Beyond AliExpress: A Guide to Sourcing Obsolete ICs for Vintage Projects

April 21, 2026

ESP32 IoT Vehicle Motion Analyzer with MPU6050 & LIS3MDL

April 27, 2026
Building a Smart Sensor Node with a BLE Microcontroller

Building a Smart Sensor Node with a BLE Microcontroller

February 26, 2026
High-Accuracy Pitch, Roll, Yaw with ESP32 & BNO08x IMU

High-Accuracy Pitch, Roll, Yaw with ESP32 & BNO08x IMU

April 27, 2026
DIY Colorimeter using AS7265x Spectroscopy Sensor & ESP32

DIY Colorimeter using AS7265x Spectroscopy Sensor & ESP32

February 1, 2026
Top Posts & Pages
  • 12V DC to 220V AC Inverter Circuit & PCB
    12V DC to 220V AC Inverter Circuit & PCB
  • IoT AC Energy Meter with PZEM-004T & ESP32 WebServer
    IoT AC Energy Meter with PZEM-004T & ESP32 WebServer
  • IoT Based PM & Air Quality Monitoring System using ESP32
    IoT Based PM & Air Quality Monitoring System using ESP32
  • ECG Graph Monitoring with AD8232 ECG Sensor & Arduino
    ECG Graph Monitoring with AD8232 ECG Sensor & Arduino
  • Buck Converter: Basics, Working, Design & Application
    Buck Converter: Basics, Working, Design & Application
  • How to use INA226 DC Current Sensor with Arduino
    How to use INA226 DC Current Sensor with Arduino
  • ESP32 CAN Bus Tutorial | Interfacing MCP2515 CAN Module with ESP32
    ESP32 CAN Bus Tutorial | Interfacing MCP2515 CAN Module with ESP32
  • Pulse Rate (BPM) Monitor using Arduino & Pulse Sensor
    Pulse Rate (BPM) Monitor using Arduino & Pulse Sensor
Categories
  • Arduino Projects (197)
  • Articles (60)
    • Learn Electronics (19)
    • Product Review (15)
    • Tech Articles (28)
  • Electronics Circuits (46)
    • 555 Timer Projects (21)
    • Op-Amp Circuits (7)
    • Power Electronics (13)
  • IoT Projects (204)
    • ESP32 MicroPython (7)
    • ESP32 Projects (81)
    • ESP32-CAM Projects (15)
    • ESP8266 Projects (76)
    • LoRa/LoRaWAN Projects (22)
  • Microcontrollers (38)
    • AMB82-Mini IoT AI Camera (4)
    • BLE Projects (18)
    • STM32 Projects (19)
  • Raspberry Pi (93)
    • Raspberry Pi Pico Projects (57)
    • Raspberry Pi Pico W Projects (12)
    • Raspberry Pi Projects (24)
Follow Us
  • Facebook
  • Twitter
  • Pinterest
  • Instagram
  • YouTube
About Us

“‘How to Electronics’ is a vibrant community for electronics enthusiasts and professionals. We deliver latest insights in areas such as Embedded Systems, Power Electronics, AI, IoT, and Robotics. Our goal is to stimulate innovation and provide practical solutions for students, organizations, and industries. Join us to transform learning into a joyful journey of discovery and innovation.

Copyright © How To Electronics. All rights reserved.
  • About Us
  • Disclaimer
  • Privacy Policy
  • Contact Us
  • Advertise With Us

Type above and press Enter to search. Press Esc to cancel.

Ad Blocker Enabled!
Ad Blocker Enabled!
Looks like you're using an ad blocker. Please allow ads on our site. We rely on advertising to help fund our site.