

Overview
In this project, we will use BME680 Sensor with ESP8266 for Monitoring Indoor Air Quality (IAQ) using the BSEC Library & IoT Cloud platform called Blynk Application. Earlier we build Indoor Environment Monitoring System with ESP32 & TFT Color LCD Screen. You can check the guide.
In previous projects, we got to know about the BME680 integrated Environmental Sensor. First, we interfaced BME680 with Arduino & designed a simple weather station project. Further, we made an IoT-based Weather Station using ESP32 & BME680 Sensor. We monitored the weather data on the MQTT Platform called Ubidots. But the drawback of the project was, we could only measure the environmental parameters like temperature, humidity, pressure, altitude, dew point, and Gas Resistance. We were unable to calculate the IAQ Value, i.e. Index of Air Quality. We could not even get the equivalent CO2 Reading and also the percentage of Volatile Organic Compounds.

So in this article, we will use a highly advanced BME680 Library called BSEC library, which stands for Bosch Sensortec Environment Cluster. Using this library we can get the value of IAQ and also the equivalent carbon dioxide or Total Volatile Organic Compound. The Blynk Cloud platform is used to monitor environmental data remotely. The ESP8266 connects to the WiFi network & uploads the data regularly to the Blynk server. In this way, we can use BME680 Sensor with ESP8266 for monitoring Indoor Air Quality or IAQ on Blynk App.
Bill of Materials
The list of components that we need for making this IoT-based project can be found below. You can purchase all the components from the Amazon links.
| S.N. | Components Name | Quantity | Purchase Links |
|---|---|---|---|
| 1 | NodeMCU ESP8266 Board or Wemos D1 Mini | 1 | Amazon | AliExpress |
| 2 | BME680 Sensor | 1 | Amazon | AliExpress |
| 3 | Connecting Wires | 6 | Amazon | AliExpress |
| 4 | Breadboard | 1 | Amazon | AliExpress |
| 5 | Micro-USB Cable | 1 | Amazon | AliExpress |
BME680 Integrated Environmental Sensor
The BME680 is a digital 4-in-1 sensor with gas, humidity, pressure and temperature measurement based on proven sensing principles. The BME680 is the upgraded and better version of its previous versions like BMP180, BMP280 or BME280. The gas sensor on the BME680 can detect a wide variety of volatile organic compounds to monitor indoor air quality. The sensor has high-linearity and high-accuracy.

The BME680 is specially developed for mobile applications and wearables where size and low power consumption are critical requirements. In order to measure air quality, the gas sensor within the BME680 can detect a broad range of gases such as volatile organic compounds (VOC).
The sensor operates between 1.7V to 3.6V. The standby power consumption of this module is 0.29 to 0.8 uA and while in sleep mode the power consumption is between 0.15 to 1 uA. The temperature measurement range of the BME680 Sensor is -40~+85℃. And the humidity measurement range is 0-100%. It can measure the Air quality index (IAQ) from 0-500 PPM.
The default I2C Address of the sensor is 0x76 but it can be changed to 0x77 simply by connecting SDO to GND.To learn more about the BME680 Sensor, you can check BME680 Datasheet.
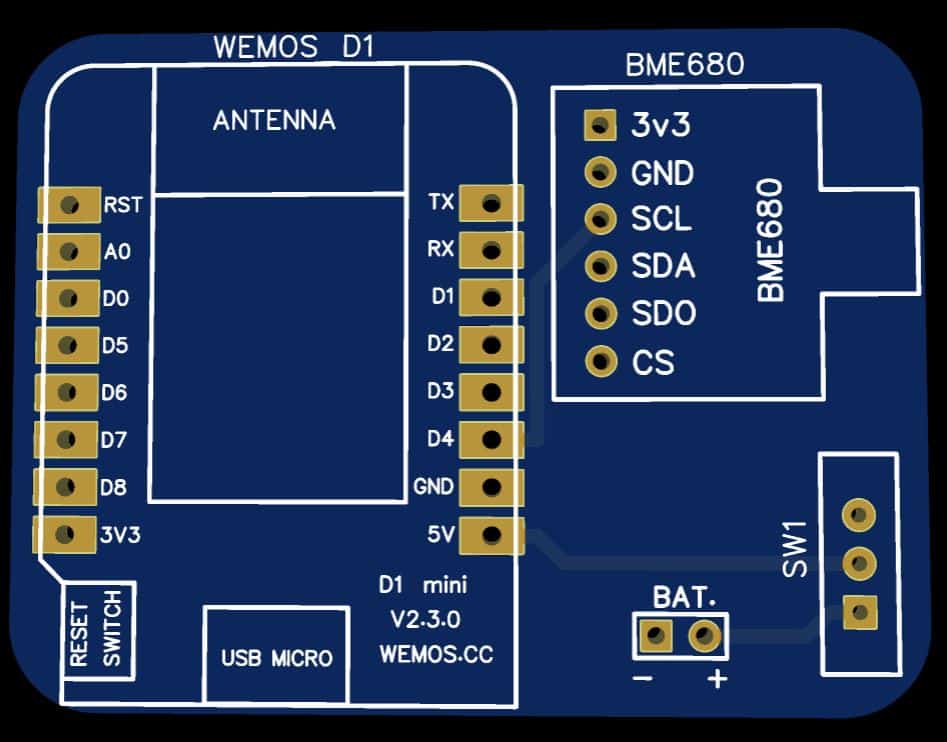
Circuit: Interfacing BME680 with ESP8266
The main component used in this project is Wemos D1 Mini Board. You can also use NodeMCU Board. All these boards have ESP8266-12E Chip, which is a 32 Bit highly advanced and fast controller. The chip has a built-in WiFi chip that has the ability to upload the data to the internet or server using a WiFi Network.

Here is a connection diagram between Wemos D1 Mini or ESP8266 & BME680 Sensor. Connect the BME680 SCL & SDA Pin to D4 & D3 of Wemos Board. Supply the sensor as 3.3V VCC through 3.3V Pin of Wemos Board.
Connect the SDO to GND. Connecting the SDO pin from the BME680 to the GND is important because the original code was programmed to use the alternative I2C address (0x77). You can access this I2C address from the BME680 sensor by connecting the SDO pin to the Ground.

You can try this connection on a breadboard or simply use your own custom-designed PCB Board. I prefer a breadboard connection for testing the circuit.
Project PCB Gerber File & PCB Ordering Online
If you don’t want to assemble the circuit on a breadboard and you want PCB for the project, then here is the PCB for you. The PCB Board for BME680 ESP8266 Wemos D1 is designed using EasyEDA online Circuit Schematics & PCB designing tool. The PCB looks something like below.

The Gerber File for the PCB is given below. You can simply download the Gerber File and order the PCB from ALLPCB at 1$ only.
You can use this Gerber file to order high quality PCB for this project. To do that visit the ALLPCB official website by clicking here: https://www.allpcb.com/.

You can now upload the Gerber File by choosing the Quote Now option. From these options, you can choose the Material Type, Dimensions, Quantity, Thickness, Solder Mask Color and other required parameters.

After filling all details, select your country and shipping method. Finally you can place the order.
You can assemble the components on the PCB Board.
BME680 BSEC Library
The BME680 uses a complicated and advanced library called BSEC Library for calculating IAQ & other gas parameters. BSEC means Bosch Sensortec Environment Cluster. The library has been conceptualized to provide a higher-level signal processing and fusion for the BME680. The library receives compensated sensor values from the sensor API. It processes the BME680 signals to provide the requested sensor outputs. Check the BSEC Github Repository for more details.
The library is supported by a 32, 16 & 8-bit controller. It doesn’t support most of the Arduino Boards but supports ARM Controllers, ESP8266, ESP32, MSP430 & Raspberry Pi.

You can install the library from the library manager as well.
Solving BSEC Library Compilation issue
Before using this library you need to modify some system files as per the instructions.
- Go up to the following folder:
|
1 |
C:\Users\username\AppData\Local\Arduino15\packages\esp8266\hardware\esp8266\3.0.0 |
- Open the file platform.txt.
- Look for the following piece of code on line 96
|
1 2 3 4 5 6 7 8 |
# These can be overridden in platform.local.txt compiler.c.extra_flags= compiler.c.elf.extra_flags= compiler.S.extra_flags= compiler.cpp.extra_flags= compiler.ar.extra_flags= compiler.objcopy.eep.extra_flags= compiler.elf2hex.extra_flags= |
- Now we need to add this little piece of code at the bottom.
|
1 |
compiler.libraries.ldflags= |
- Now look for the following piece of code on line 112:
|
1 2 |
## Combine gc-sections, archives, and objects recipe.c.combine.pattern="{compiler.path}{compiler.c.elf.cmd}" {build.exception_flags} -Wl,-Map "-Wl,{build.path}/{build.project_name}.map" {compiler.c.elf.flags} {compiler.c.elf.extra_flags} -o "{build.path}/{build.project_name}.elf" -Wl,--start-group {object_files} "{archive_file_path}" {compiler.c.elf.libs} -Wl,--end-group "-L{build.path}" |
- We need to add these lines to the above code:
|
1 |
{compiler.libraries.ldflags} |
You may find difficulty in finding the exact lines. So I would suggest deleting the entire above code from line 112 and replace with the following code.
|
1 2 |
## Combine gc-sections, archives, and objects recipe.c.combine.pattern="{compiler.path}{compiler.c.elf.cmd}" {build.exception_flags} -Wl,-Map "-Wl,{build.path}/{build.project_name}.map" {compiler.c.elf.flags} {compiler.c.elf.extra_flags} -o "{build.path}/{build.project_name}.elf" -Wl,--start-group {object_files} "{archive_file_path}" {compiler.c.elf.libs} {compiler.libraries.ldflags} -Wl,--end-group "-L{build.path}" |
- The final step is to save the file. That’s it, now you can close it.
Source Code: Indoor Air Quality Monitoring BME680
Here is a basic simple example code to retrieve BME680 IAQ value & other gas parameters. You can use this code for Indoor Air Quality Monitoring.
The BME680 can have two different I2C addresses depending on how it’s set up: 0x76 or 0x77. Your code currently uses BME680_I2C_ADDR_PRIMARY, which is usually 0x76.
|
1 2 3 4 5 6 7 8 9 10 11 12 13 14 15 16 17 18 19 20 21 22 23 24 25 26 27 28 29 30 31 32 33 34 35 36 37 38 39 40 41 42 43 44 45 46 47 48 49 50 51 52 53 54 55 56 57 58 59 60 61 62 63 64 65 66 67 68 69 70 71 72 73 74 75 76 77 78 79 80 81 82 83 84 85 86 87 88 89 90 91 92 93 94 95 96 97 98 99 100 101 102 103 104 105 106 107 108 109 110 111 112 113 114 115 116 117 118 119 120 121 122 123 124 125 126 127 128 129 130 131 132 133 134 135 136 137 138 139 |
#include "bsec.h" // Helper functions declarations void checkIaqSensorStatus(void); void errLeds(void); // Create an object of the class Bsec Bsec iaqSensor; String output; // Entry point for the example void setup(void) { Serial.begin(115200); Wire.begin(0, 2); iaqSensor.begin(0X77, Wire); //0x76 or 0x77 output = "\nBSEC library version " + String(iaqSensor.version.major) + "." + String(iaqSensor.version.minor) + "." + String(iaqSensor.version.major_bugfix) + "." + String(iaqSensor.version.minor_bugfix); Serial.println(output); checkIaqSensorStatus(); bsec_virtual_sensor_t sensorList[10] = { BSEC_OUTPUT_RAW_TEMPERATURE, BSEC_OUTPUT_RAW_PRESSURE, BSEC_OUTPUT_RAW_HUMIDITY, BSEC_OUTPUT_RAW_GAS, BSEC_OUTPUT_IAQ, BSEC_OUTPUT_STATIC_IAQ, BSEC_OUTPUT_CO2_EQUIVALENT, BSEC_OUTPUT_BREATH_VOC_EQUIVALENT, BSEC_OUTPUT_SENSOR_HEAT_COMPENSATED_TEMPERATURE, BSEC_OUTPUT_SENSOR_HEAT_COMPENSATED_HUMIDITY, }; iaqSensor.updateSubscription(sensorList, 10, BSEC_SAMPLE_RATE_LP); checkIaqSensorStatus(); // Print the header output = "Timestamp [ms], raw temperature [°C], pressure [hPa], raw relative humidity [%], gas [Ohm], IAQ, IAQ accuracy, temperature [°C], relative humidity [%], Static IAQ, CO2 equivalent, breath VOC equivalent"; Serial.println(output); } // Function that is looped forever void loop(void) { unsigned long time_trigger = millis(); if (iaqSensor.run()) { // If new data is available output = String(time_trigger); output += ", " + String(iaqSensor.rawTemperature); output += ", " + String(iaqSensor.pressure); output += ", " + String(iaqSensor.rawHumidity); output += ", " + String(iaqSensor.gasResistance); output += ", " + String(iaqSensor.iaq); output += ", " + String(iaqSensor.iaqAccuracy); output += ", " + String(iaqSensor.temperature); output += ", " + String(iaqSensor.humidity); output += ", " + String(iaqSensor.staticIaq); output += ", " + String(iaqSensor.co2Equivalent); output += ", " + String(iaqSensor.breathVocEquivalent); Serial.println(output); // Serial.print("Pressure: "); // Serial.print(iaqSensor.pressure); // Serial.println(" Pa"); // // Serial.print("Temperature: "); // Serial.print(iaqSensor.temperature); // Serial.println(" *C"); // // Serial.print("Humidity: "); // Serial.print(iaqSensor.humidity); // Serial.println(" %"); // // Serial.print("IAQ: "); // Serial.print(iaqSensor.iaq); // Serial.println(" PPM"); // // Serial.print("CO2 Equivalent: "); // Serial.print(iaqSensor.co2Equivalent); // Serial.println(" PPM"); // // Serial.print("Breath VOC Equivalent: "); // Serial.print(iaqSensor.breathVocEquivalent); // Serial.println(" PPM"); // Serial.println(); } else { checkIaqSensorStatus(); } } // Helper function definitions void checkIaqSensorStatus(void) { if (iaqSensor.status != BSEC_OK) { if (iaqSensor.status < BSEC_OK) { output = "BSEC error code : " + String(iaqSensor.status); Serial.println(output); for (;;) errLeds(); /* Halt in case of failure */ } else { output = "BSEC warning code : " + String(iaqSensor.status); Serial.println(output); } } if (iaqSensor.bme680Status != BME680_OK) { if (iaqSensor.bme680Status < BME680_OK) { output = "BME680 error code : " + String(iaqSensor.bme680Status); Serial.println(output); for (;;) errLeds(); /* Halt in case of failure */ } else { output = "BME680 warning code : " + String(iaqSensor.bme680Status); Serial.println(output); } } } void errLeds(void) { pinMode(LED_BUILTIN, OUTPUT); digitalWrite(LED_BUILTIN, HIGH); delay(100); digitalWrite(LED_BUILTIN, LOW); delay(100); } |
Go to the tools and select the Wemos D1 Board from the list. You can also select NodeMCU Board from the list if you are using NodeMCU Board. Then select the COM port & finally hit the upload button to upload the code.
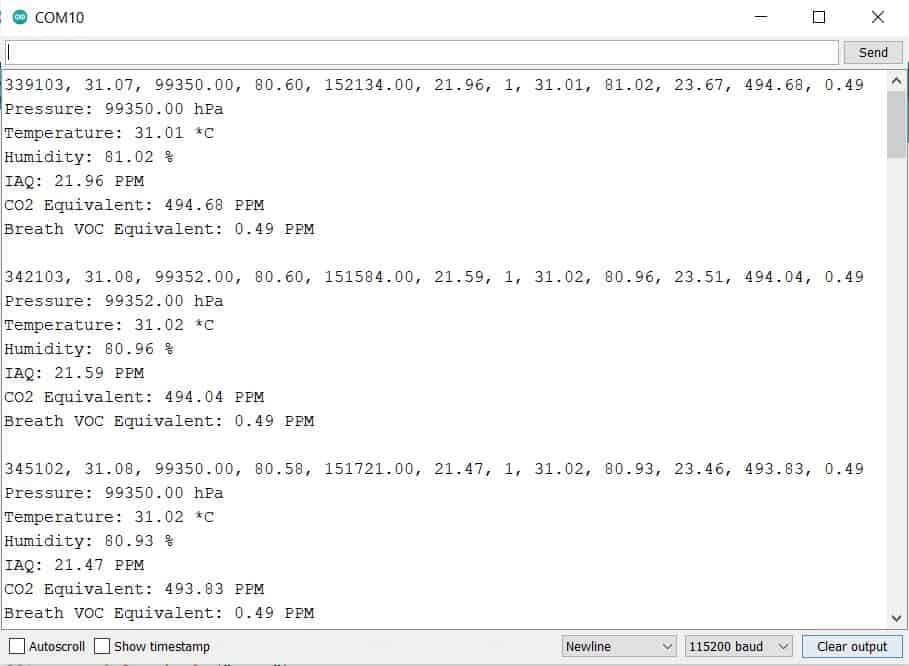
Open the Serial Monitor now.

The following parameters will be displayed every 3 seconds:
1. Timestamp in milliseconds
2. Raw Temperature in °C
3. Pressure in hPa
4. Raw Relative Humidity in %
5. Raw data from the gas sensor as a resistance value in Ohm
6. IAQ index
7. IAQ Accuracy (begins at 0 after startup, goes to 1 after a few minutes, and reaches 3 when the sensor is calibrated).
8. Temperature in °C
9. Relative Humidity in %
10. Static IAQ
11. CO2 equivalent (estimation of the CO2 equivalent in ppm in the environment)
12. Breath VOC equivalent output (estimates the total VOC concentration in ppm in the environment)
After BME680 sensor reading get stable, you can check the correct value of IAQ, CO2 & VOC.

In the above code, you can uncomment the following lines to get a better parameter reading with the units of each variable.
|
1 2 3 4 5 6 7 8 9 10 11 12 13 14 15 16 17 18 19 20 21 22 23 24 |
Serial.print("Pressure: "); Serial.print(iaqSensor.pressure); Serial.println(" Pa"); Serial.print("Temperature: "); Serial.print(iaqSensor.temperature); Serial.println(" *C"); Serial.print("Humidity: "); Serial.print(iaqSensor.humidity); Serial.println(" %"); Serial.print("IAQ: "); Serial.print(iaqSensor.iaq); Serial.println(" PPM"); Serial.print("CO2 Equivalent: "); Serial.print(iaqSensor.co2Equivalent); Serial.println(" PPM"); Serial.print("Breath VOC Equivalent: "); Serial.print(iaqSensor.breathVocEquivalent); Serial.println(" PPM"); Serial.println(); |
Again upload the code after doing the modification. Then open the Serial Monitor to get the following reading.
Setting Up Blynk Application
Now we need to setup the Blynk Application so that we can receive the BME680 Sensor data from ESP8266. The Blynk Application used here is for BME680 Indoor Air Quality Monitoring.
Blynk is an application that runs over Android and IOS devices to monitor any IoT based application using Smartphones. It allows you to create your Graphical user interface for IoT application. Here we will display the IoT Indoor Air Quality Data on Blynk Application.
- So download and install the Blynk Application from Google Play Store. IOS users can download from the App Store. Once the installation is completed, open the app & sign-up using your Email id and Password.
- From the dashboard create a new project and select NodeMCU Board & Wifi Connection.
-
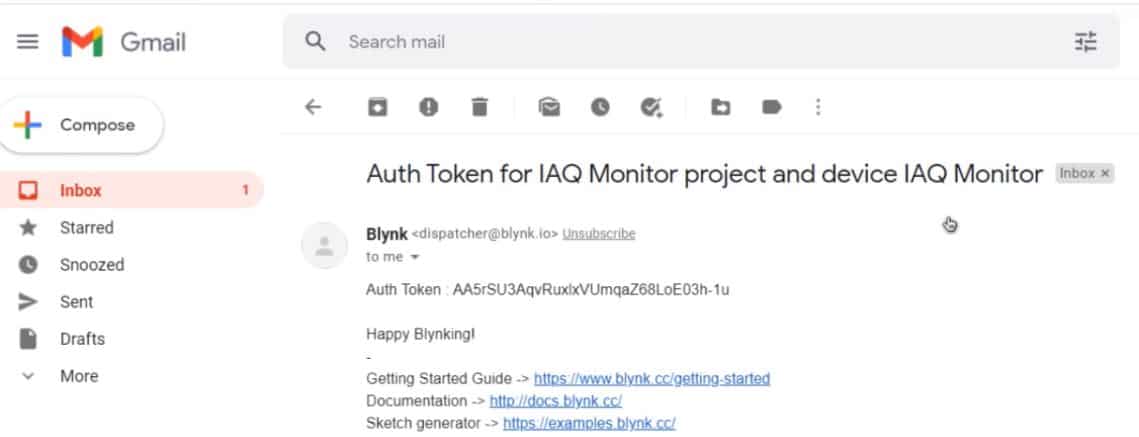
Then drag & drop or add 6 widgets and assign the variable as per code and then email the authentication code.
-
You will get the authentication code in the mail. Copy this authentication code. This will be used in your code.
Source Code/Program
Here is a final code for BME680 & ESP8266 integrated with BSEC Library for Blynk Application. Before uploading the code you need to add Blynk Library to the Arduino IDE Library folder.
Please make changes to the WiFi SSID, Password & Blynk Authentication Token.
|
1 2 3 |
char auth[] = "605c2d780fd*******d7a31611"; char ssid[] = "*************************"; char pass[] = "************************"; |
The complete code is given below.
|
1 2 3 4 5 6 7 8 9 10 11 12 13 14 15 16 17 18 19 20 21 22 23 24 25 26 27 28 29 30 31 32 33 34 35 36 37 38 39 40 41 42 43 44 45 46 47 48 49 50 51 52 53 54 55 56 57 58 59 60 61 62 63 64 65 66 67 68 69 70 71 72 73 74 75 76 77 78 79 80 81 82 83 84 85 86 87 88 89 90 91 92 93 94 95 96 97 98 99 100 101 102 103 104 105 106 107 108 109 110 111 112 113 114 115 116 117 118 119 120 121 122 123 124 125 126 127 128 129 130 131 132 133 134 135 136 137 138 139 140 141 142 143 144 145 146 147 148 149 150 151 152 153 154 155 156 |
#include "bsec.h" #include <Blynk.h> #include <ESP8266WiFi.h> #include <BlynkSimpleEsp8266.h> char auth[] = "***********************"; // You should get Auth Token in the Blynk App. char ssid[] = "***********************"; // Your WiFi credentials. char pass[] = "***********************"; // Helper functions declarations void checkIaqSensorStatus(void); void errLeds(void); // Create an object of the class Bsec Bsec iaqSensor; String output; // Entry point for the example void setup(void) { Serial.begin(115200); Wire.begin(0, 2); Blynk.begin(auth, ssid, pass); iaqSensor.begin(BME680_I2C_ADDR_PRIMARY, Wire); output = "\nBSEC library version " + String(iaqSensor.version.major) + "." + String(iaqSensor.version.minor) + "." + String(iaqSensor.version.major_bugfix) + "." + String(iaqSensor.version.minor_bugfix); Serial.println(output); checkIaqSensorStatus(); bsec_virtual_sensor_t sensorList[10] = { BSEC_OUTPUT_RAW_TEMPERATURE, BSEC_OUTPUT_RAW_PRESSURE, BSEC_OUTPUT_RAW_HUMIDITY, BSEC_OUTPUT_RAW_GAS, BSEC_OUTPUT_IAQ, BSEC_OUTPUT_STATIC_IAQ, BSEC_OUTPUT_CO2_EQUIVALENT, BSEC_OUTPUT_BREATH_VOC_EQUIVALENT, BSEC_OUTPUT_SENSOR_HEAT_COMPENSATED_TEMPERATURE, BSEC_OUTPUT_SENSOR_HEAT_COMPENSATED_HUMIDITY, }; iaqSensor.updateSubscription(sensorList, 10, BSEC_SAMPLE_RATE_LP); checkIaqSensorStatus(); // Print the header output = "Timestamp [ms], raw temperature [°C], pressure [hPa], raw relative humidity [%], gas [Ohm], IAQ, IAQ accuracy, temperature [°C], relative humidity [%], Static IAQ, CO2 equivalent, breath VOC equivalent"; Serial.println(output); } // Function that is looped forever void loop(void) { unsigned long time_trigger = millis(); if (iaqSensor.run()) // If new data is available { output = String(time_trigger); output += ", " + String(iaqSensor.rawTemperature); output += ", " + String(iaqSensor.pressure); output += ", " + String(iaqSensor.rawHumidity); output += ", " + String(iaqSensor.gasResistance); output += ", " + String(iaqSensor.iaq); output += ", " + String(iaqSensor.iaqAccuracy); output += ", " + String(iaqSensor.temperature); output += ", " + String(iaqSensor.humidity); output += ", " + String(iaqSensor.staticIaq); output += ", " + String(iaqSensor.co2Equivalent); output += ", " + String(iaqSensor.breathVocEquivalent); Serial.println(output); Serial.print("Pressure: "); Serial.print((iaqSensor.pressure)/1000); Serial.println(" hPa"); Serial.print("Temperature: "); Serial.print(iaqSensor.temperature); Serial.println(" *C"); Serial.print("Humidity: "); Serial.print(iaqSensor.humidity); Serial.println(" %"); Serial.print("IAQ: "); Serial.print(iaqSensor.iaq); Serial.println(" PPM"); Serial.print("CO2 Equivalent: "); Serial.print(iaqSensor.co2Equivalent); Serial.println(" PPM"); Serial.print("Breath VOC Equivalent: "); Serial.print(iaqSensor.breathVocEquivalent); Serial.println(" PPM"); Serial.println(); Blynk.run(); // Initiates Blynk Blynk.virtualWrite(V1, (iaqSensor.pressure)/1000); // For Pressure Blynk.virtualWrite(V2, iaqSensor.temperature); // For Temperature Blynk.virtualWrite(V3, iaqSensor.humidity); // For Humidity Blynk.virtualWrite(V4, iaqSensor.iaq); //For Index of Air Quality Blynk.virtualWrite(V5, iaqSensor.co2Equivalent); // For CO2 Blynk.virtualWrite(V6, iaqSensor.breathVocEquivalent); // For Breath VoC } else { checkIaqSensorStatus(); } } // Helper function definitions void checkIaqSensorStatus(void) { if (iaqSensor.status != BSEC_OK) { if (iaqSensor.status < BSEC_OK) { output = "BSEC error code : " + String(iaqSensor.status); Serial.println(output); for (;;) errLeds(); /* Halt in case of failure */ } else { output = "BSEC warning code : " + String(iaqSensor.status); Serial.println(output); } } if (iaqSensor.bme680Status != BME680_OK) { if (iaqSensor.bme680Status < BME680_OK) { output = "BME680 error code : " + String(iaqSensor.bme680Status); Serial.println(output); for (;;) errLeds(); /* Halt in case of failure */ } else { output = "BME680 warning code : " + String(iaqSensor.bme680Status); Serial.println(output); } } } void errLeds(void) { pinMode(LED_BUILTIN, OUTPUT); digitalWrite(LED_BUILTIN, HIGH); delay(100); digitalWrite(LED_BUILTIN, LOW); delay(100); } |
Indoor Air Quality Monitoring using BME680 & ESP8266 on Blynk
The ESP8266 Board will try connecting to the wifi Network using the given SSID & Password. The BME680 IAQ data is uploaded to Blynk Application after the interval of every 3 seconds. The data can be observed on Serial Monitor as well as Blynk Application.

The data changes whenever the sensor pushes some values. The beautiful gauge for pressure, temperature, humidity, IAQ, CO2 & VOC will appear here. This is how you can use BME680 with ESP8266 to monitor the indoor air quality as well as outdoor air quality. It’s a very simple and nice way of monitoring the environmental air quality on Blynk Cloud.
Video Tutorial & Guide

 & Live Dashboard")


12 Comments
Hi.
1. it’s possible use other pin like D1 & D2?
2. Can use other board like ESP01 for this project?
you cant use other pins as the sensor requires I2C pin only. You can’t use ESP-01
in this https://how2electronics.com/esp32-bme680-weather-station-iaq-monitoring-on-mqtt/ Node MCU you using pin D1 & D2. i’m confusing.
hi.. why the library cannot find file as you show above?? window -library-bsec library-esp8266 but it not have like above.. or becouse it new library?? teach me or contact me as soon as posibble thank you in advance..
You can use other pins with the Wire.begin(0, 2); 😉
Hi. How to repaire platform.txt at Macos operation system.
my monitor serial appears like this :
⸮n⸮l⸮b|⸮⸮⸮rb⸮b⸮nnlnnbbp⸮$blrlp⸮n⸮l⸮bn⸮n⸮⸮b⸮⸮nn’l⸮l⸮nn$nr⸮n⸮l⸮b|⸮⸮⸮rb⸮b⸮nnlnnbbp⸮$blrlp⸮n⸮l⸮bn⸮n⸮⸮b⸮⸮nn’l⸮l⸮nn$nr⸮n⸮l⸮b|⸮⸮⸮rb⸮b⸮nnlnnbbp⸮$blrlp⸮n⸮l⸮bn⸮n⸮⸮b⸮⸮nn’l⸮l⸮nn$nr⸮n⸮l⸮b|⸮⸮
How to handle it?
My monitor serial appears like this. How to handle it?
⸮n⸮l⸮b|⸮⸮⸮rb⸮b⸮nnlnnbbp⸮$blrlp⸮n⸮l⸮bn⸮n⸮⸮b⸮⸮nn’l⸮l⸮nn$nr⸮n⸮l⸮b|⸮⸮⸮rb⸮b⸮nnlnnbbp⸮$blrlp⸮n⸮l⸮bn⸮n⸮⸮b⸮⸮nn’l⸮l⸮nn$nr⸮n⸮l⸮b|⸮⸮⸮rb⸮b⸮nnlnnbbp⸮$blrlp⸮n⸮l⸮bn⸮n⸮⸮b⸮⸮nn’l⸮l⸮nn$nr⸮n⸮l⸮b|⸮⸮⸮rb⸮b⸮nnlnnbbp⸮$blrlp⸮n⸮l⸮bn⸮n⸮⸮b⸮⸮nn’l⸮l⸮nn$nr
Check the baud rate?
Would you please consider modifying the code for use with a 18650 battery via a 220k resistor for battery monitoring and then sending the Wemos D1 pro Mini into deep sleep and recover the data every 2 minutes. With Wemos into deep sleep the battery could be run from a solar panel via a charge controller and last years without attention. Battery voltage could be via the D1 Pro Mini A0 socket.
Can I apply these codes for Tuya?
Hello,
which version of Blynk do you use?
The old one or the new one?
Thanks