

Overview
In this post, we will be interfacing SGP30 CO2 & TVOC Sensor with Arduino and display the value on OLED Screen. The SGP30 Sensor is capable of detecting equivalent Carbon dioxide & Total Volatile Organic Compound from atmosphere. In earlier project, we measured CO2 & TVOC using CCS811 Gas Sensor & also BME680 integrated environmental sensor.
But SGP30 is a completely different sensor and has the ability to give proper reading quickly. While the CCS811 requires a burn-in of 48 hours and a run-in of 20 minutes the SGP30 is ready to go after just 15 seconds.
In this project, we will first read the CO2 & TVOC value from SGP30 Sensor using the Arduino Sparkfun library & display their value on Serial Monitor. The sensor can also measure the ethanol and Hydrogen (H2) values in raw values. Later we will display the sensor reading on a 0.96″ I2C OLED Display and test the sensor by introducing some perfume near the sensor.
Bill of Materials
You can purchase the following components from Amazon.
| S.N. | Components Name | Quantity | Purchase Links |
|---|---|---|---|
| 1 | Arduino Nano Board | 1 | Amazon | AliExpress |
| 2 | SGP30 Air Quality Sensor | 1 | Amazon | AliExpress |
| 3 | 0.96" I2C OLED Display | 1 | Amazon | AliExpress |
| 4 | Connecting Wires | 20 | Amazon | AliExpress |
| 5 | Breadboard | 1 | Amazon | AliExpress |
SGP30 Air Quality Sensor
The SGP30 Gas Sensor is an air quality sensor used to measure VOC and eCO2. This is a very fine air quality sensor from the sensor experts at Sensirion. The sensor has an I2C interface. It gives fully calibrated output signals with a typical accuracy of 15% within measured values. The SGP combines multiple metal-oxide sensing elements on one chip to provide more detailed air quality signals. This module provides TVOC(Total Volatile Organic Compounds) and CO2eq output with outstanding long-term stability and low power consumption. This makes it a perfect choice for indoor air quality detection using Arduino or any other microcontroller.

The Sensirion SGP30 is a digital multi-pixel gas sensor that can easily integrate with air purifiers or demand-controlled ventilation. The sensor is powered by Sensirion’s CMOSens®technology that integrates a complete sensor system on a single chip featuring a temperature-controlled micro hotplate, and two preprocessed indoor air quality signals. As the first metal-oxide gas sensor featuring multiple sensing elements on one chip, the SGP30 provides more detailed information. Check SGP30 Datasheet for more information.
It outputs equivalent CO2 in ppm and Total Volatile Organic Compounds (TVOC) in ppb. The sensor also gives access to its raw measurement values of Ethanol and H2. The SGP30 boasts high stability with low long-term drift. With its continuous baseline compensation algorithm, readings stay accurate over time. You can even fine-tune your readings by interfacing with an external humidity sensor to add humidity compensation.
Features & Specifications
- Sensiron SGP30 TVOC and eCO2 sensor
- TVOC sensing from 0-60,000 ppb (parts per billion)
- CO2 sensing from 400 to 60,000 ppm (parts per million)
- 1Hz sampling rate
- I2C interface(address 0x58)
- 3.3V or 5V compatible
- Raspberry Pi-compatible pinout (pins 1, 3, 5, 7, 9)
- Compatible with all models of Raspberry Pi, and Arduino
Applications
- Air purifier
- demand-controlled ventilation
- IoT applications
- New house air condition monitor
SGP30 Sparkfun Arduino Library
The library for SGP30 is developed by Adafruit as well as Sparkfun. But we will use SGP30 Sparkfun Arduino Library in this project.

You can download the SGP30 Library from Github Link. Download the library and add to your Arduino IDE through library manager.
Interfacing SGP30 CO2 & TVOC Sensor with Arduino
Now let us interface the SGP30 Sensor with Arduino Board. The connection diagram between Arduino & SGP30 is very simple.

Connect the VCC & GND pin of SGP30 to Arduino 3.3V & GND pin respectively. Since SGP30 is an I2C module, so connect its SDA & SCL pin to Arduino A4 & A5 pin respectively.

Source Code/Program: Reading CO2 & TVOC
The following code is taken from the example of Sparkfun SGP30 library. The code outputs measurements of total VOCs (TVOC) in parts per billion (ppb), carbon dioxide (CO2) equivalent in parts per million (ppm).
|
1 2 3 4 5 6 7 8 9 10 11 12 13 14 15 16 17 18 19 20 21 22 23 24 25 26 27 28 29 30 31 32 33 |
#include "SparkFun_SGP30_Arduino_Library.h" // Click here to get the library: http://librarymanager/All#SparkFun_SGP30 #include <Wire.h> SGP30 mySensor; //create an object of the SGP30 class void setup() { Serial.begin(9600); Wire.begin(); //Initialize sensor if (mySensor.begin() == false) { Serial.println("No SGP30 Detected. Check connections."); while (1); } //Initializes sensor for air quality readings //measureAirQuality should be called in one second increments after a call to initAirQuality mySensor.initAirQuality(); } void loop() { //First fifteen readings will be //CO2: 400 ppm TVOC: 0 ppb delay(1000); //Wait 1 second //measure CO2 and TVOC levels mySensor.measureAirQuality(); Serial.print("CO2: "); Serial.print(mySensor.CO2); Serial.print(" ppm\tTVOC: "); Serial.print(mySensor.TVOC); Serial.println(" ppb"); } |
From the board manager, select the Arduino board that you are using. Also, select the COM port. Then hit the upload button to upload the code to the Arduino Board.
Once code uploading completes, open serial monitor.

Initially the Serial monitor will display the CO2 value as 400ppm & TVOC value as 0ppb. After 15-20 readings the sensor will get stable as it gets heated. Then the sensor value will be correctly displayed.

Source Code/Program: Reading Ethanol & Hydrogen (H2)
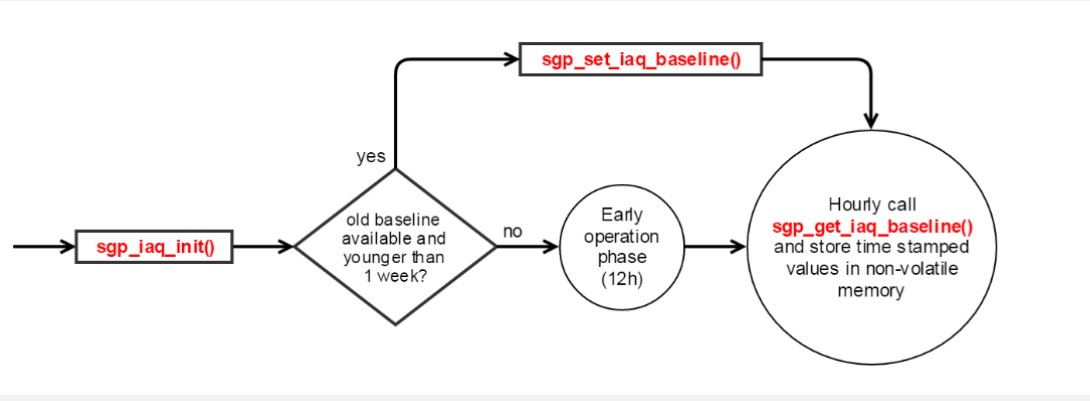
The SGP30 uses a dynamic baseline compensation algorithm and on-chip calibration parameters to provide two complimentary air quality signals. The baseline should be stored in EEPROM. When there is no baseline value in EEPROM at the first time power-ON or the baseline record is older than seven days. The sensor has to run for 12 hours until the baseline can be stored. You can refer to the program flow chart below.
The H2_Signal and Ethanol_signal, Both signals can be used to calculate gas concentrations c relative to a reference concentration cref by ln(C/Cref)=(Serf-Sout)/a with a = 512, sref the H2_signal or Ethanol_signal output at the reference concentration, and sout = Sout_H2 or Sout = Sout_EthOH.
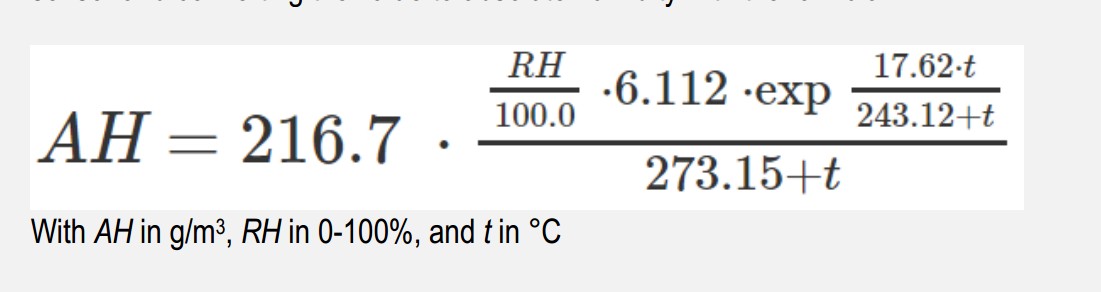
For more accurate measurement, You can set the absolute humidity compensation, the Default value is 11.57g/m3, A little troublesome is that you should get the relative humidity value of the environment from another way Because there is no humidity measurement part integrated into SGP30.
Here is the complete code that reads CO2, TVOC, H2 & Ethanol value.
|
1 2 3 4 5 6 7 8 9 10 11 12 13 14 15 16 17 18 19 20 21 22 23 24 25 26 27 28 29 30 31 32 33 34 35 36 37 38 39 40 41 42 43 |
#include "SparkFun_SGP30_Arduino_Library.h" // Click here to get the library: http://librarymanager/All#SparkFun_SGP30 #include <Wire.h> SGP30 mySensor; //create an object of the SGP30 class long t1, t2; void setup() { Serial.begin(9600); Wire.begin(); //Sensor supports I2C speeds up to 400kHz Wire.setClock(400000); //Initialize sensor if (mySensor.begin() == false) { Serial.println("No SGP30 Detected. Check connections."); while (1); } //Initializes sensor for air quality readings //measureAirQuality should be called in one second increments after a call to initAirQuality mySensor.initAirQuality(); t1 = millis(); } void loop() { //First fifteen readings will be //CO2: 400 ppm TVOC: 0 ppb t2 = millis(); if ( t2 >= t1 + 1000) //only will occur if 1 second has passed { t1 = t2; //measure CO2 and TVOC levels mySensor.measureAirQuality(); Serial.print("CO2: "); Serial.print(mySensor.CO2); Serial.print(" ppm\tTVOC: "); Serial.print(mySensor.TVOC); Serial.println(" ppb"); //get raw values for H2 and Ethanol mySensor.measureRawSignals(); Serial.print("Raw H2: "); Serial.print(mySensor.H2); Serial.print(" \tRaw Ethanol: "); Serial.println(mySensor.ethanol); } } |
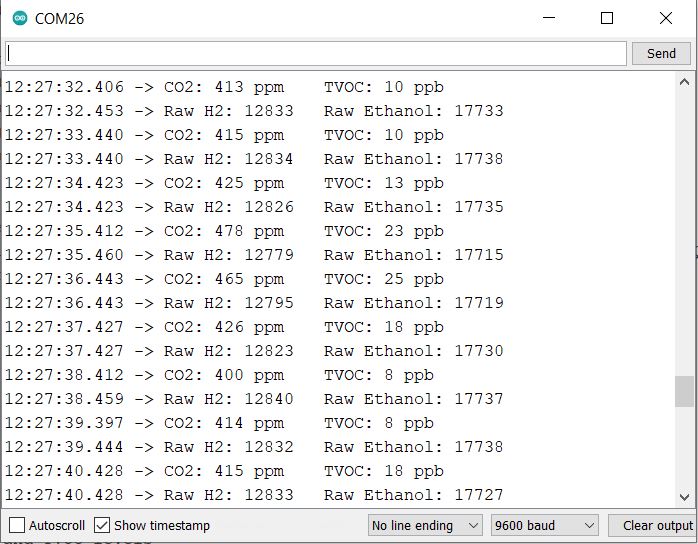
Once the code is uploaded, you can again open the Serial monitor. Observe the reading after 15-20 readings, you will be able to see CO2, TVOC, H2 & Ethanol values. Note: The H2 & Ethanol values are only the raw values.
Displaying CO2 & TVOC value on OLED Display
Now lets display the CO2 & TVOC value on some display module instead of displaying on Serial Monitor. The best module for that is 0.96″ I2C OLED Display. The connection diagram is fairly simple again.

The OLED display is also an I2C Module. Therefore connect it directly with the I2C Pin of the Arduino Board.

Source Code/Program for OLED Display
The SSD1306 OLED Display requires two libraries for compilation. Download the following libraries and add them to the library folder.
- Adafruit SSD1306 Library: https://github.com/adafruit/Adafruit_SSD1306
- Adafruit GFX Library: https://github.com/adafruit/Adafruit-GFX-Library
Copy the following code and upload it to the Arduino Board.
|
1 2 3 4 5 6 7 8 9 10 11 12 13 14 15 16 17 18 19 20 21 22 23 24 25 26 27 28 29 30 31 32 33 34 35 36 37 38 39 40 41 42 43 44 45 46 47 48 49 50 51 52 53 54 55 56 57 58 59 60 61 62 63 64 65 66 67 68 69 |
#include "SparkFun_SGP30_Arduino_Library.h" // Click here to get the library: http://librarymanager/All#SparkFun_SGP30 #include <Wire.h> #include <Adafruit_GFX.h> #include <Adafruit_SSD1306.h> #define SCREEN_WIDTH 128 // OLED display width, in pixels #define SCREEN_HEIGHT 64 // OLED display height, in pixels #define OLED_RESET 4 // Reset pin # (or -1 if sharing Arduino reset pin) #define SCREEN_ADDRESS 0x3C // 0x3D for 128x64, 0x3C for 128x32 Adafruit_SSD1306 display(SCREEN_WIDTH, SCREEN_HEIGHT, &Wire, OLED_RESET); SGP30 mySensor; //create an object of the SGP30 class void setup() { Serial.begin(9600); Wire.begin(); if (!display.begin(SSD1306_SWITCHCAPVCC, SCREEN_ADDRESS)) { Serial.println(F("SSD1306 allocation failed")); for (;;); // Don't proceed, loop forever } display.clearDisplay(); //Initialize sensor if (mySensor.begin() == false) { Serial.println("No SGP30 Detected. Check connections."); while (1); } //Initializes sensor for air quality readings //measureAirQuality should be called in one second increments after a call to initAirQuality mySensor.initAirQuality(); } void loop() { //First fifteen readings will be //CO2: 400 ppm TVOC: 0 ppb delay(1000); //Wait 1 second //measure CO2 and TVOC levels mySensor.measureAirQuality(); Serial.print("CO2: "); Serial.print(mySensor.CO2); Serial.print(" ppm\tTVOC: "); Serial.print(mySensor.TVOC); Serial.println(" ppb"); display.setCursor(0, 10); //oled display display.setTextSize(2); display.setTextColor(WHITE); display.print("CO2:"); display.print(mySensor.CO2); display.setTextSize(1); display.print("ppm"); display.setCursor(0, 40); //oled display display.setTextSize(2); display.setTextColor(WHITE); display.print("TVOC:"); display.print(mySensor.TVOC); display.setTextSize(1); display.print("ppb"); display.display(); display.clearDisplay(); } |
The OLED Display will initialize and start displaying the CO2 & TVOC Value. Initially, it will display the CO2 & TVOC value as 400ppm & 0ppb respectively.

After 15-20 reading the OLED will start displaying the correct stable value.
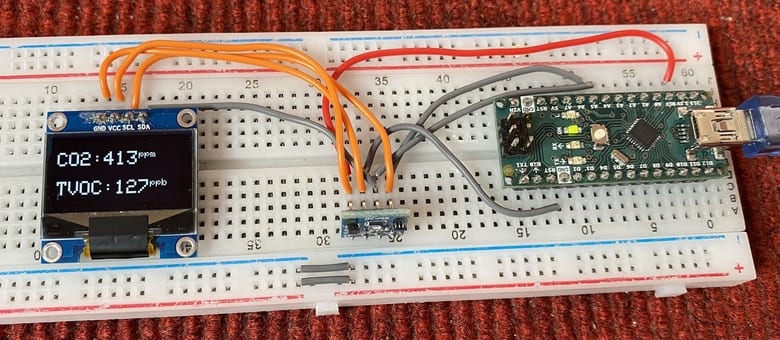
To test the sensor working, you can bring perfume, spray, or any organic compound near the sensor. The sensor will display the value in large digits in ppm & ppb.

Video Tutorial & Guide

This is how you can use SGP30 CO2 & TVOC Sensor with Arduino. You can also use this sensor in Indoor Environment Monitoring with ESP32 & TFT LCD Display.

")


2 Comments
Great tutorial, thank you!
When I use the sensor, it displays only CO2 values above 400 ppm, even outside.
This seems odd to me. Are those readings trustworthy?
“Based on analysis from NOAA’s Global Monitoring Lab, global average atmospheric carbon dioxide was 414.72 parts per million (“ppm” for short) in 2021..”