Close Menu
  • Articles
    • Learn Electronics
    • Product Review
    • Tech Articles
  • Electronics Circuits
    • 555 Timer Projects
    • Op-Amp Circuits
    • Power Electronics
  • Microcontrollers
    • Arduino Projects
    • STM32 Projects
    • AMB82-Mini IoT AI Camera
    • BLE Projects
  • IoT Projects
    • ESP8266 Projects
    • ESP32 Projects
    • ESP32 MicroPython
    • ESP32-CAM Projects
    • LoRa/LoRaWAN Projects
  • Raspberry Pi
    • Raspberry Pi Projects
    • Raspberry Pi Pico Projects
    • Raspberry Pi Pico W Projects
  • Electronics Calculator
Facebook X (Twitter) Instagram
  • About Us
  • Disclaimer
  • Privacy Policy
  • Contact Us
  • Advertise With Us
Facebook X (Twitter) Instagram Pinterest YouTube LinkedIn
How To Electronics
  • Articles
    • Learn Electronics
    • Product Review
    • Tech Articles
  • Electronics Circuits
    • 555 Timer Projects
    • Op-Amp Circuits
    • Power Electronics
  • Microcontrollers
    • Arduino Projects
    • STM32 Projects
    • AMB82-Mini IoT AI Camera
    • BLE Projects
  • IoT Projects
    • ESP8266 Projects
    • ESP32 Projects
    • ESP32 MicroPython
    • ESP32-CAM Projects
    • LoRa/LoRaWAN Projects
  • Raspberry Pi
    • Raspberry Pi Projects
    • Raspberry Pi Pico Projects
    • Raspberry Pi Pico W Projects
  • Electronics Calculator
How To Electronics
Home » Interfacing PIR Motion Sensor with Raspberry Pi Pico
Raspberry Pi Raspberry Pi Pico Projects

Interfacing PIR Motion Sensor with Raspberry Pi Pico

Mamtaz AlamBy Mamtaz AlamUpdated:December 23, 20233 Mins Read
Share Facebook Twitter LinkedIn Telegram Reddit WhatsApp
PIR Motion Sensor Raspberry Pi Pico
Share
Facebook Twitter LinkedIn Pinterest Email Reddit Telegram WhatsApp

Overview

In this tutorial, we will learn how to use PIR Motion Sensor with Raspberry Pi Pico for Human Detection. We will detect whether someone was present in the sensor detection area through the Raspberry Pi Pico. If a person is detected, the light will be turned on, and the light will be automatically turned off after a period of time. You can check the PIR Sensor Arduino Tutorial for learning more in detail.

Connecting PIR sensors to a microcontroller is really simple. The PIR acts as a digital output, it can be high voltage or low voltage, so all you need to do is listen for the pin to flip high (detected) or low (not detected) by listening to a digital input on your Arduino.


Components Required

In this guide, I used Elecrow Raspberry Pi Pico Starter Kit to test different Modules. You can buy the kit and perform some other operations as well. From this kit, you can use the following components.

1. Raspberry Pi Pico Board -1
2. PIR Motion Sensor – 1
3. RGB LED Module – 1
4. Breadboard -1
5. Jumper Wires – 10
6. Micro-USB Cable


PIR Motion Sensor

A passive infrared (PIR) sensor recognizes infrared light emitted from nearby objects. You may assume that “passive” IR sensors mean these devices are less complicated than their active counterparts, but you’d be mistaken. A passive IR sensor’s functionality may be more difficult to understand.

First, realize that everything — humans, animals, even inanimate objects — emits a certain amount of IR radiation. How much IR radiation they emit relates to the body or object’s warmth and material makeup. Humans can’t see IR, but we’ve designed electronic detection devices to pick up these signals. PIR sensors are used in thermal sensing applications, such as security and motion detection. They are commonly used in security alarms, motion detection alarms, and automatic lighting applications.

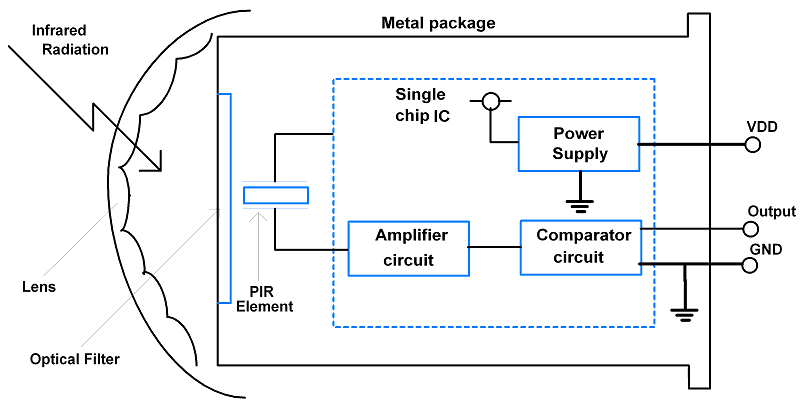
Passive infrared (PIR) sensors use a pair of pyroelectric sensors to detect heat energy in the surrounding environment. These two sensors sit beside each other, and when the signal differential between the two sensors changes (if a person enters the room, for example), the sensor will engage. That may mean it triggers an alarm, notifies authorities, or maybe turns on a floodlight. IR radiation focuses on each of the two pyroelectric sensors using a series of lenses constructed as the sensor’s housing. These lenses widen the device’s sensing area. While the lens setup and sensor electronics are sophisticated technology, these units are easy to use in a practical application.


Circuit Diagram & Hardware Setup

The circuit for interfacing PIR Motion Sensor with Raspberry Pi Pico is given below. The RGB LED on the circuit will get activated whenever the motion is detected.

PIR Motion Sensor Raspberry Pi Pico

Connect the PIR Sensor VCC, GND & Out pin to Raspberry Pi Pico 5V (VBUS), GND & GP0 Pin.

Similarly connect the R, G & B Pin of the RGB LED to Raspberry Pi Pico GP2, GP3 & GP4 Pin respectively. Connect the GND Pin of RGB LED to Pico GND Pin.


MicroPython Code/Program

Copy the following code and paste it into the Thonny Editor.

1
2
3
4
5
6
7
8
9
10
11
12
13
14
15
16
17
18
19
20
21
22
from machine import Pin,PWM
from  utime  import sleep
PIR = Pin(0, Pin.IN, Pin.PULL_DOWN)
Led_R = PWM(Pin(2))
Led_G = PWM(Pin(3))
Led_B = PWM(Pin(4))
Led_R.freq(2000)  
Led_G.freq(2000)  
Led_B.freq(2000)
 
if __name__ == '__main__':
    while True:
        print(PIR.value())
        if PIR.value() == 1:
            Led_R.duty_u16(65535)
            Led_G.duty_u16(65535)
            Led_B.duty_u16(65535)
            sleep(3)
        else:
            Led_R.duty_u16(0)
            Led_G.duty_u16(0)
            Led_B.duty_u16(0)

Run the script and start testing the above-connected circuit.

When you bring your hand infront of the PIR Sensor, the RGB LED will turn ON for 3 seconds. When no motion is detected, there is no turning ON/OFF LED.

Share. Facebook Twitter Pinterest LinkedIn Tumblr Email Reddit Telegram WhatsApp
Previous ArticleVoice Activated Light with Sound Sensor & Raspberry Pi Pico
Next Article Dark Activated Night Lamp using LDR & Raspberry Pi Pico

Related Posts

ADXL375 Accelerometer with Raspberry Pi Pico & MicroPython

ADXL375 Accelerometer with Raspberry Pi Pico & MicroPython

Updated:July 24, 2025
Interface BMI160 with Raspberry Pi Pico & MicroPython

Interface BMI160 with Raspberry Pi Pico & MicroPython

Updated:February 2, 20253K
Shift Register 74HC595 with Raspberry Pi Pico & MicroPython

Shift Register 74HC595 with Raspberry Pi Pico & MicroPython

Updated:February 2, 202513K
Interfacing XBee Module with Raspberry Pi Pico & MicroPython

Interfacing XBee Module with Raspberry Pi Pico & MicroPython

Updated:February 2, 20253K
Modbus RTU with Raspberry Pi Pico & Micropython

Modbus RTU with Raspberry Pi Pico & MicroPython

Updated:February 2, 20258K
Fever Detector with MLX90640 & OpenCV Raspberry Pi

Thermal Fever Detector with MLX90640 & OpenCV Raspberry Pi

Updated:February 2, 20256K
Add A Comment

CommentsCancel reply

Latest Posts
IoT Based PM & Air Quality Monitoring System using ESP32

IoT Based PM & Air Quality Monitoring System using ESP32

May 31, 2026
DIY ESP32 MLX90640 IR Thermal Camera with Live Web Display

DIY ESP32 MLX90640 IR Thermal Camera with Live Web Display

May 10, 2026
IoT Activity Tracker with ESP32 & Accelerometer Gyroscope

IoT Activity Tracker with ESP32 & Accelerometer/Gyroscope

May 2, 2026
A Guide to Sourcing Obsolete ICs for Vintage Projects

Beyond AliExpress: A Guide to Sourcing Obsolete ICs for Vintage Projects

April 21, 2026

ESP32 IoT Vehicle Motion Analyzer with MPU6050 & LIS3MDL

April 27, 2026
Building a Smart Sensor Node with a BLE Microcontroller

Building a Smart Sensor Node with a BLE Microcontroller

February 26, 2026
High-Accuracy Pitch, Roll, Yaw with ESP32 & BNO08x IMU

High-Accuracy Pitch, Roll, Yaw with ESP32 & BNO08x IMU

April 27, 2026
DIY Colorimeter using AS7265x Spectroscopy Sensor & ESP32

DIY Colorimeter using AS7265x Spectroscopy Sensor & ESP32

February 1, 2026
Top Posts & Pages
  • How to use INA219 DC Current Sensor Module with Arduino
    How to use INA219 DC Current Sensor Module with Arduino
  • 12V DC to 220V AC Inverter Circuit & PCB
    12V DC to 220V AC Inverter Circuit & PCB
  • Buck Converter: Basics, Working, Design & Application
    Buck Converter: Basics, Working, Design & Application
  • Designing of MPPT Solar Charge Controller using Arduino
    Designing of MPPT Solar Charge Controller using Arduino
  • How to use INA226 DC Current Sensor with Arduino
    How to use INA226 DC Current Sensor with Arduino
  • IoT AC Energy Meter with PZEM-004T & ESP32 WebServer
    IoT AC Energy Meter with PZEM-004T & ESP32 WebServer
  • ECG Graph Monitoring with AD8232 ECG Sensor & Arduino
    ECG Graph Monitoring with AD8232 ECG Sensor & Arduino
  • How to use Modbus RTU with ESP32 to read Sensor Data
    How to use Modbus RTU with ESP32 to read Sensor Data
Categories
  • Arduino Projects (197)
  • Articles (60)
    • Learn Electronics (19)
    • Product Review (15)
    • Tech Articles (28)
  • Electronics Circuits (46)
    • 555 Timer Projects (21)
    • Op-Amp Circuits (7)
    • Power Electronics (13)
  • IoT Projects (204)
    • ESP32 MicroPython (7)
    • ESP32 Projects (81)
    • ESP32-CAM Projects (15)
    • ESP8266 Projects (76)
    • LoRa/LoRaWAN Projects (22)
  • Microcontrollers (38)
    • AMB82-Mini IoT AI Camera (4)
    • BLE Projects (18)
    • STM32 Projects (19)
  • Raspberry Pi (93)
    • Raspberry Pi Pico Projects (57)
    • Raspberry Pi Pico W Projects (12)
    • Raspberry Pi Projects (24)
Follow Us
  • Facebook
  • Twitter
  • Pinterest
  • Instagram
  • YouTube
About Us

“‘How to Electronics’ is a vibrant community for electronics enthusiasts and professionals. We deliver latest insights in areas such as Embedded Systems, Power Electronics, AI, IoT, and Robotics. Our goal is to stimulate innovation and provide practical solutions for students, organizations, and industries. Join us to transform learning into a joyful journey of discovery and innovation.

Copyright © How To Electronics. All rights reserved.
  • About Us
  • Disclaimer
  • Privacy Policy
  • Contact Us
  • Advertise With Us

Type above and press Enter to search. Press Esc to cancel.

Ad Blocker Enabled!
Ad Blocker Enabled!
Looks like you're using an ad blocker. Please allow ads on our site. We rely on advertising to help fund our site.