

Overview
This tutorial is about Arducam Mega Camera, as we will be interfacing this 5MP SPI Camera with Raspberry Pi Pico. Recently Arducam launched a legendary camera solution that helps you connect one or more cameras to any microcontroller without the least effort. It is particularly targeted for battery-powered IoT devices, embedded machine vision, and artificial intelligence applications. Arducam Mega Camera can work with any microcontroller with a single standard SPI interface.
In this project we will interface 5-megapixel Arducam Mega Camera with Raspberry Pi Pico and do the various operations including image capturing with various pixel resolutions. We will also stream some videos with the help of the Raspberry Pi Pico Board. Arducam has released Arducam Mega SDK for this camera module which makes the programming very simple. So, let’s go through this camera & its operations in detail.
Arducam Mega Camera
The Arducam Mega Camera is a legendary camera solution that helps you connect one or more cameras to any microcontroller without or the least effort. It is basically targeted for battery-powered IoT devices, embedded machine vision, and artificial intelligence applications.

Arducam Mega can work with any microcontroller with a single standard SPI interface. Only 4 pins (GPIOs) are required excluding VCC & GND. No memory is required for register settings or frame buffers. It is fully compatible with 3.3V & 5V systems. The camera can be directly used with Arduino, STM8/STM32, ESP8266/ESP32, Raspberry Pi Pico & other MCU systems.
The camera is specially designed for energy-saving applications. You can completely switch off the camera when your MCU is sleeping, without worrying about loading long register settings, as it does for you instantly (less than 100 ms) and automatically. There are two versions of Arducam Mega cameras, one with 3MP(fixed focus) and the other with 5MP(autofocus). It comes with a default enclosure, you can mount it easily wherever you want.

The best thing about the camera is you can use more than 4 camera modules at the same time for still images and readout in a sequential way.

The SDK is fully open-source with comprehensive architecture, which allows you to add a new MCU without effort. You can manipulate the camera through the API methods as if you are using a DSLR camera via button clicks. With the MIT license, you can integrate our SDK source code into your own code without any concern.
Specifications & Features
| Arducam Mega – 3MP | Arducam Mega – 5MP-AF | |
| Interface | SPI (4-wire) | SPI (4-wire) |
| Speed | 8Mhz | 8Mhz |
| Optical Size | 1/4″ | 1/4″ |
| Shutter Type | Rolling | Rolling |
| Sensor Resolution | 2048×1536 | 2592×1944 |
| Still Resolution | 320×240 640×480 1280×720 1600×1200 1920×1080 2048×1536 |
320×240 640×480 1280×720 1600×1200 1920×1080 2592×1944 |
| Power Supply | 3.3V/5V | 3.3V/5V |
| Power Consumption | ≤750 mW | ≤1W |
| Wake-Up Time | 42ms | 94ms |
| Focus | 60cm~INF | 8cm~INF (Autofocus) |
| Focal ratio (F-Stop) | F2.8 | F2.0 |
| Focal length | 3.3mm | 3.3mm |
| View Angle | 68.75 Degrees (Diagonal) | 68.75 Degrees (Diagonal) |
| Output Format | RGB/YUV/JPEG | RGB/YUV/JPEG |
| Dimensions | 33x33x17 mm | 33x33x17 mm |
Pinouts
The Arducam Mega can work with any Microcontroller with a single standard SPI interface (either native or mimic one).

Only four pins (GPIOs) are required excluding VCC and GND.
Brief of Arducam Mega SDK
Arducam has released Arducam Mega SDK for Arducam Mega camera. The SDK is a C and C++ package, containing convenience classes and functions that help in most common tasks while using Arducam Mega API. We support both C API and C++ API. The SDK contains the HAL layer and Arducam Mega Cam protocol layer and API.

Arducam SDK library provides C API and C++ API. Regarding API’s function, Users can get details from C API Reference and C++ API Reference.

The function of the Arducam Mega Cam protocol layer is used to communicate with the SPI camera. The function of the HAL layer is used to be compatible with multiple platforms. At present, the SDK has supported Arduino UNO/Arduino Mega2560/ ESP32 /ESP8266/STM32/MSP430/Raspberry Pi Pico platform. The Platform specific SPI bus driver is used to communicate with a specific hardware platform. If users want to adapt the SDK on your own specific platform, you should modify this layer and the HAL layer.
Interfacing 5MP SPI Camera with Raspberry Pi Pico
Now let us see how we can interface 5-megapixel SPI Camera with Raspberry Pi Pico. The connection diagram is fairly simple as shown in the image below.

Following is the connection between Raspberry Pi Pico Board & 5MP Camera.
| Camera Pin | Raspberry Pi Pico Board |
| VCC | 5V |
| GND | GND |
| SCK | GP2 |
| MISO | GP4 |
| MOSI | GP3 |
| CS | GP7 |
You can directly connect the Camera with Raspberry Pi Pico Board using the jumper wires.

Arducam Mega Camera Library Installation
The Arducam has released the library for Raspberry Pi Pico & other microcontrollers. The environment configuration and use is based on Arduino IDE.
Downloaded the library file & copy the extracted folder to the Arduino library folder.

Source Code/Program
After the library is added to the Library folder, you can use the example code from the library example to test the Camera.
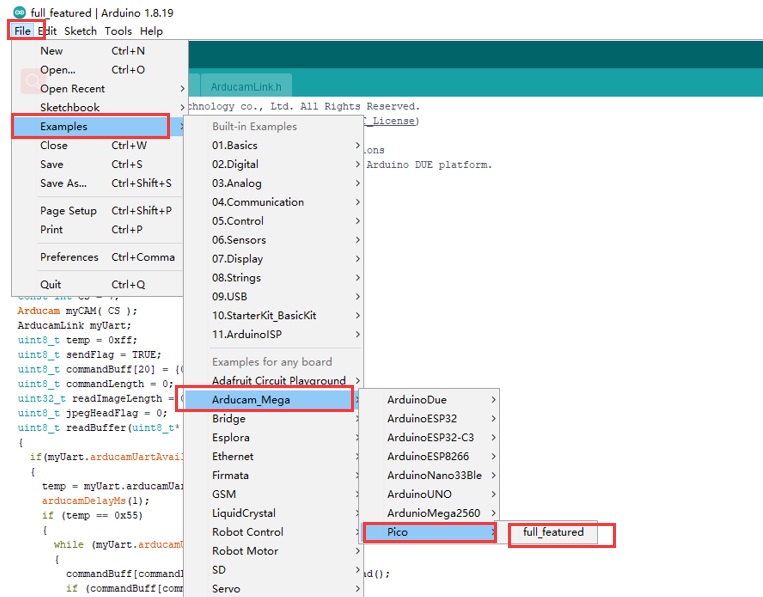
There are multiple examples for this project, but we will use an example called full_featured to test the camera.

After selecting the example, select the Raspberry Pi Pico from the Board list. Also, select the Raspberry Pi Pico COM port. Then click on the upload button to upload the code to the Raspberry Pi Pico Board.
Testing the Camera
To test the Camera working we need some GUI visulization software. So download the Arducam software from the following link.
After downloading, install the software on your computer.
After installation, Select the Raspberry Pi Pico port number, the baud rate is 921600, and click open.

Now the Camera gets connected to the visualization software. Therefore you can move the camera in different directions to see everything on GUI Screen.

You can click the image button to take a photo. You can click the close button to close the display window. You can also select the resolution & format.

Click the Video button to enable video streaming mode, the default resolution is 320X240. Click the close button to disable video streaming mode.
The auto exposure is enabled by default. When using manual exposure, you need to turn off the automatic exposure function.
The auto gain is enabled by default. When using manual gain, you need to turn off the automatic gain function.
The software has a feature for brightness control, contrast control, EV control, saturation control, special effects control, white balance control, and focus control.
The autofocus control is available on the 5MP Arducam Mega Camera. You can enable or disable this feature. Enable or disable the continuous focus function, the default is to disable the continuous focus function.
| Parameter | Function |
| Open | Enable the focus function |
| SingleTime | Enable single focus |
| Persistent | Enable continuous focus |
| Stop | Pause autofocus |
| Close | Turn off focus |

That’s all from this tutorial. This camera has the ability to empower the future of IoT as this is the best camera solution for any MCU-based, low-power IoT and embedded vision applications/systems. If you want to use this camera with higher-level controllers, you can follow a few of the guides below.
- Arducam Mega Camera with Arduino UNO
- Arducam Mega Camera with ESP8266
- Arducam Mega Camera with ESP32
Video Tutorail & Guide


3 Comments
does this camera work with python
Yes it does
So far I did not found an example-code to use this camera with python. Maybe you can describe how to get it to work with python? Thx