Close Menu
  • Articles
    • Learn Electronics
    • Product Review
    • Tech Articles
  • Electronics Circuits
    • 555 Timer Projects
    • Op-Amp Circuits
    • Power Electronics
  • Microcontrollers
    • Arduino Projects
    • STM32 Projects
    • AMB82-Mini IoT AI Camera
    • BLE Projects
  • IoT Projects
    • ESP8266 Projects
    • ESP32 Projects
    • ESP32 MicroPython
    • ESP32-CAM Projects
    • LoRa/LoRaWAN Projects
  • Raspberry Pi
    • Raspberry Pi Projects
    • Raspberry Pi Pico Projects
    • Raspberry Pi Pico W Projects
  • Electronics Calculator
Facebook X (Twitter) Instagram
  • About Us
  • Disclaimer
  • Privacy Policy
  • Contact Us
  • Advertise With Us
Facebook X (Twitter) Instagram Pinterest YouTube LinkedIn
How To Electronics
  • Articles
    • Learn Electronics
    • Product Review
    • Tech Articles
  • Electronics Circuits
    • 555 Timer Projects
    • Op-Amp Circuits
    • Power Electronics
  • Microcontrollers
    • Arduino Projects
    • STM32 Projects
    • AMB82-Mini IoT AI Camera
    • BLE Projects
  • IoT Projects
    • ESP8266 Projects
    • ESP32 Projects
    • ESP32 MicroPython
    • ESP32-CAM Projects
    • LoRa/LoRaWAN Projects
  • Raspberry Pi
    • Raspberry Pi Projects
    • Raspberry Pi Pico Projects
    • Raspberry Pi Pico W Projects
  • Electronics Calculator
How To Electronics
Home » Getting started with DWIN HMI TFT LCD Display
Articles Product Review

Getting started with DWIN HMI TFT LCD Display

Mamtaz AlamBy Mamtaz AlamUpdated:February 27, 20245 Comments5 Mins Read
Share Facebook Twitter LinkedIn Telegram Reddit WhatsApp
DWIN HMI TFT LCD Display
Share
Facebook Twitter LinkedIn Pinterest Email Reddit Telegram WhatsApp

Overview

This guide is about DWIN HMI Touch Screen TFT LCD Display. HMI Means Human-Machine Interface. DWIN is specialized in making HMI Touch screen displays that are compatible with all microcontrollers like Arduino, STM32, PIC, and 8051 families of Microcontrollers.

This is a Getting Started tutorial with 7-inch DWIN HMI TFT LCD Display. We will see the architecture, features, board design, components, and specifications. We will also learn about the TTL & RS232 interfaces. Using the DGUS software you can create UI and with SD Card you can load the firmware on display memory.


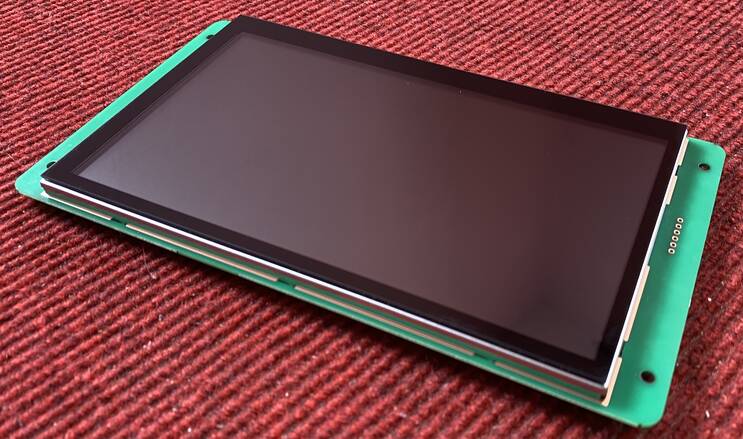
DWIN HMI (DMG80480C070_03WTC) Display

Recently I got this Smart Touch screen TFT-Display from the DWIN. The model of the display that I got is DMG80480C070_04WTC.

You can order any LCD Screen of your choice from Aliexpress or send an email to: [email protected]


Meaning of DMG80480C070_03WTC

  • The First two letters DM mean DWIN Smart LCM Product Line
  • G means (18-bit/24-bit) 262K colors
  • 80480 means 800 by 480-pixel resolution
  • C means Commercial grade display
  • 070 means a 7.0-inch Display size
  • 03 means a Basic type of screen
  • W stands for Wide Temperature
  • TC Stands for Capacitive touch panel
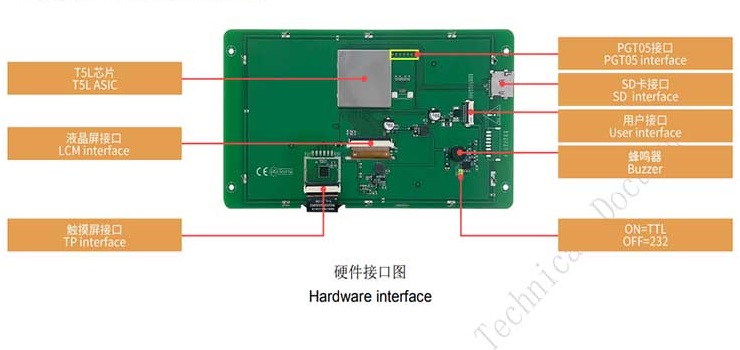
Hardware Interface

Here you can see different hardware interfaces of this product.

    • T5L0 Interface
    • LCM Interface
    • TP Interface
    • PGT05 Interface
    • SD Card Interface
    • User Interface
    • Buzzer
    • ON=TTL, OFF=232 Interface


You can see the SD Card Adapter, a buzzer, and a User Interface to connect the FCC-10 terminal block.

DMG80480C070_03WTC

You can change the TTL Interface mode or RS232 mode from here. Just solder these two terminals as shown here to enable TTL Interface. By default, the module is in RS232 Interface.


HDL662B Adaptor Board + FCC Connecter + USB Cable

Here we are provided with an HDL662B Adaptor board. This board is nothing but a USB to TTL board.

HDL662B Adaptor Board

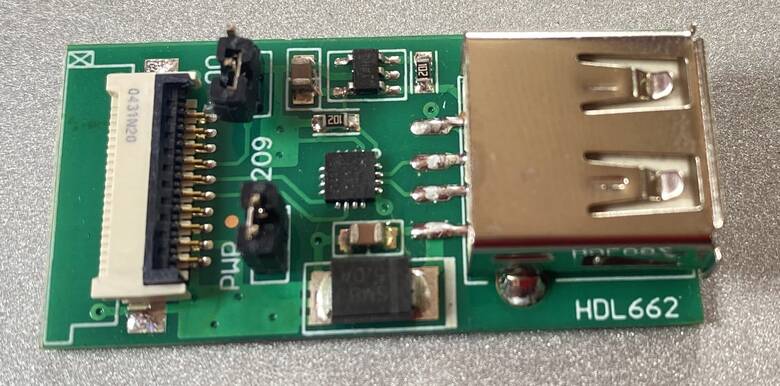
Then we have here FCC cable which is supplied with this HDL board.

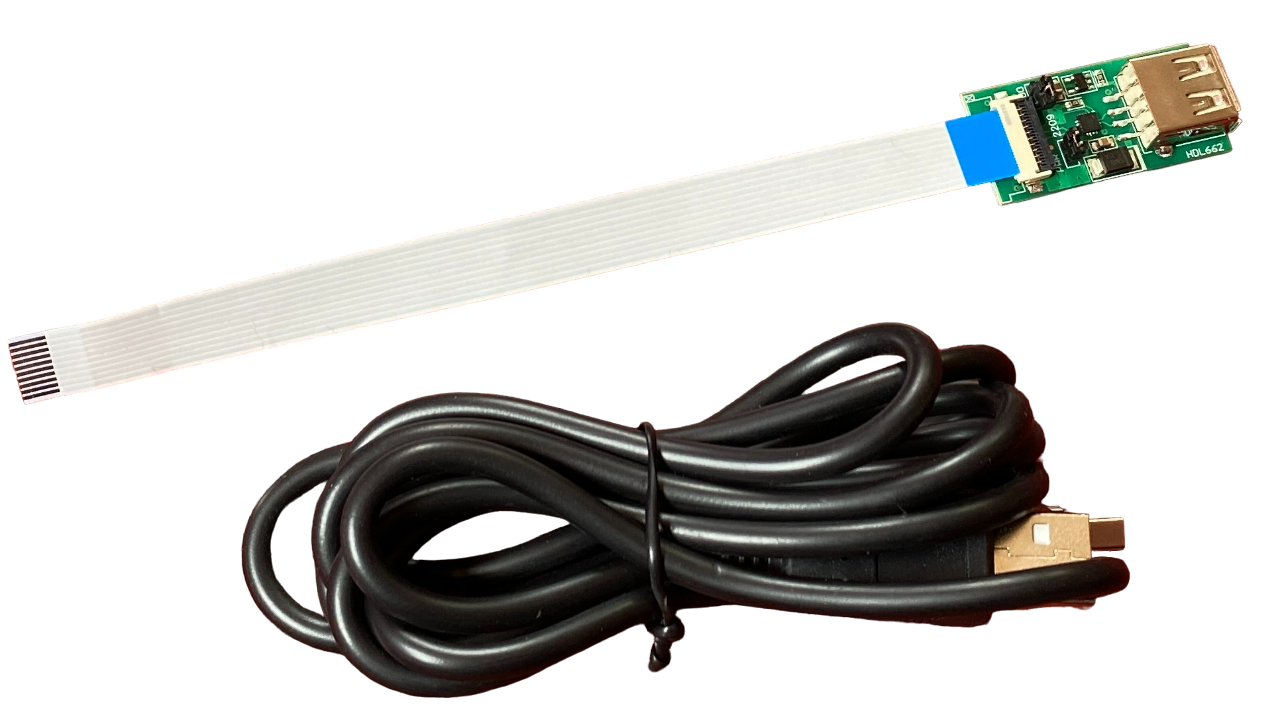
On the LCD board, you can see the flip-open connector. Just flip open the connector and insert the FCC cable. Keep in mind that the blue ends should be on top. Now you can just press the lock so the FCC cable is locked.

Getting started with DWIN HMI TFT LCD Display

In the same way, another end of the FCC cable is connected to the HDL by keeping the blue end on the top. Now here we have a male-to-male USB cable. So, one end is connected to this HDL board and another END is connected to your PC.


Getting started with DWIN HMI TFT LCD Display

To get started with DWIN HMI TFT LCD Display, you need to follow a few steps.


Formatting SD Card

One of the method to load the firmware to the T5L DWIN LCD Display is by using the SD Card. An SD Card of up to 16GB can be used to download the firmware files. We can easily insert the Micro SD card into the SD Card slot on the backside.

SD Card DWIN LCD Display

But we need to format this SD card in a FAT32 file system. You can insert the SD Card into your computer using the SD Card Adapter and perform a quick format.


DGUS Software & HDL662B Driver

Visit the official website of dwin-global.com.
Under the Download, section Go to tools and Download the DGUS-DWIN Graphic utilized software i.e DGUS software and XR21X Driver. This driver is for the HDL662B board.

After downloading, extract both files.

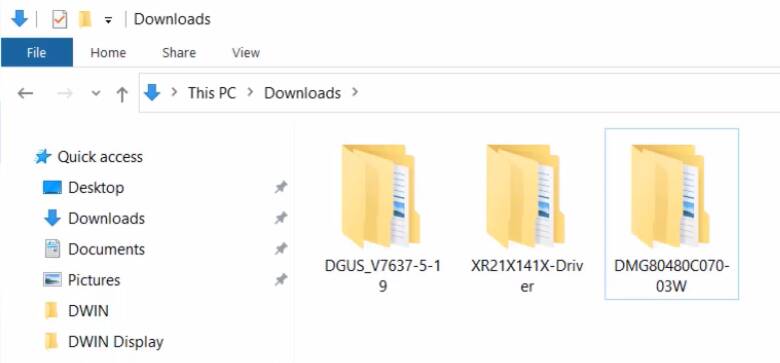
Inside the XR21X folder, there are driver files. You need to install the driver on your PC to establish the communication between HDL662B and your PC. Double-click the executable file to launch the driver installer. Now click on Install to install the driver on your Windows PC.

We don’t need to install this DGUS software. Under this DGUS folder, you can see some executables files. Which includes tools like the ICL tool, font generating tool, image resizing tool, etc. inside this DGUS Software.


Flashing Firmware using SD Card

In this part, we will flash the default firmware using the SD Card. The other method to flash the firmware is using the DGUS Software.

First download the default firmware or a factory demo firmware from here.

Download Factory Demo Firmware

Extract the firmware folder, you will get different folders inside it. We need the firmware for Capacitive Touch Screen. The firmware folder is named as ‘WTC‘.

We need to copy following file into your SD Card folder. The SD Card should have a folder called DWIN_SET. Copy all the files to this folder.

After copying the file, remove the SD Card from your computer and insert it into the SD Card slot of DWIN LCD Display. Then power the display using the USB Cable. The firmware downloading process will start automatically.

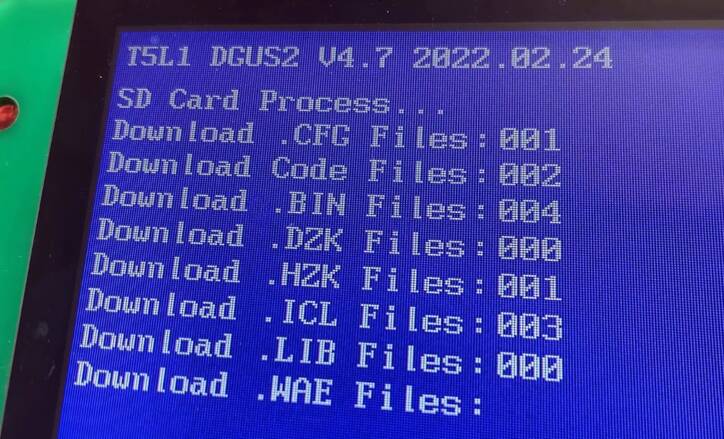
Once firmware download is completed, disconnect the power supply and then remove the SD Card.

Power the DWIN Display using the USB Cable again.

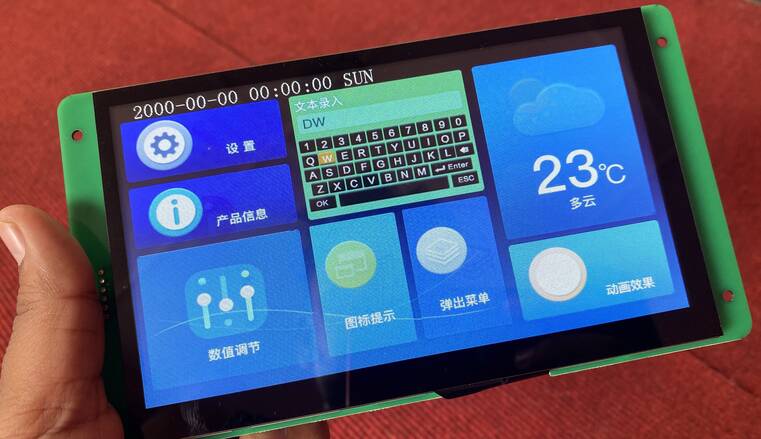
Congratulations the default factory demo firmware is running on your display now.

DWIN HMI TFT LCD Display


Flashing Firmware using TL5 Download Tool

Alternatively, if you don’t have an SD Card you can use the T5L Tool in DGUS Software to flash the UI onto your LCD Display.

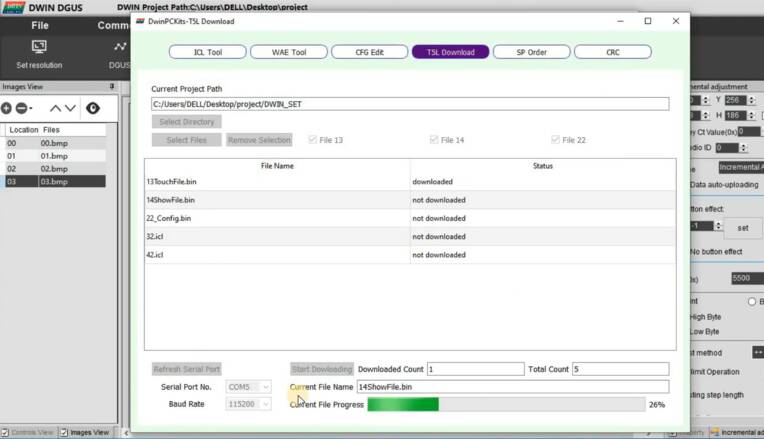
Here, select all these files which are available in the DWIN_SET folder as shown here. After that, select the COM port of the HDL board. You can see the COM port from Device Manager on Windows. Now you can click on Start downloading button.


Video Tutorial & Guide

Getting Started with DWIM HMI TFT LCD Display || Create Beautiful GUI without Programming
Watch this video on YouTube.

The next part of this tutorial includes creating UI and interfacing DWIN LCD Display with Arduino. For that you can follow the DWIN LCD Arduino Interfacing Guide.

You you want to display the sensor data on DWIN LCD Display and control Home Appliances you can follow the tutorial below.

The project is titled as DWIN Smart Home Controller and you can make it using ESP32. Simialry, we have made another project called AC Energy Meter with DWIN HMI LCD Display.

Share. Facebook Twitter Pinterest LinkedIn Tumblr Email Reddit Telegram WhatsApp
Previous Article8×32 MAX7219 Dot Matrix LED Display with Arduino
Next Article Interfacing DWIN HMI TFT LCD Display with Arduino

Related Posts

A Guide to Sourcing Obsolete ICs for Vintage Projects

Beyond AliExpress: A Guide to Sourcing Obsolete ICs for Vintage Projects

Speed-Run Translations: Making Fast-Moving Meme Videos Accessible Worldwide

The Future of Video Production: Adding Emotion with AI Voice Generators

Updated:August 26, 2025
A Beginner’s Guide to Building Compact Electronic Circuits at Home

A Beginner’s Guide to Building Compact Electronic Circuits at Home

Updated:August 5, 2025
Why DIY IoT Prototype Fails at Scale Hidden Component‑Sourcing Trap

Why DIY IoT Prototype Fails at Scale: Hidden Component‑Sourcing Trap

Microchip ATECC608A CryptoAuthentication Devices

Securing IoT Devices With Microchip ATECC608A

View 5 Comments

5 Comments

  1. Mohsin on October 27, 2022 4:20 AM

    Thank you sooo much for guiding us

    Reply
  2. Wassim on January 16, 2023 9:23 PM

    Can you please help me, i flash the firmware to the dwin tft and it had error, no, the screen is white, how to fix it please : my mail is [email protected] thanks

    Reply
  3. rohanparvatiyar on May 2, 2023 6:02 AM

    Hi Wasim were you able to resolve the issue as i’m facing the same

    Reply
  4. Raj Kumar on January 19, 2024 7:49 AM

    can we connect with PLC ?
    RK

    Reply
  5. Raj Kumar on January 19, 2024 7:57 AM

    can we connect with PLC ?
    RK

    Reply

CommentsCancel reply

Latest Posts
ESP32 Fingerprint Attendance System with Live Web Dashboard

ESP32 Fingerprint Attendance System with Live Web Dashboard

June 16, 2026
IoT Based PM & Air Quality Monitoring System using ESP32

IoT Based PM & Air Quality Monitoring System using ESP32

June 14, 2026
DIY ESP32 MLX90640 IR Thermal Camera with Live Web Display

DIY ESP32 MLX90640 IR Thermal Camera with Live Web Display

May 10, 2026
IoT Activity Tracker with ESP32 & Accelerometer Gyroscope

IoT Activity Tracker with ESP32 & Accelerometer/Gyroscope

May 2, 2026
A Guide to Sourcing Obsolete ICs for Vintage Projects

Beyond AliExpress: A Guide to Sourcing Obsolete ICs for Vintage Projects

April 21, 2026

ESP32 IoT Vehicle Motion Analyzer with MPU6050 & LIS3MDL

April 27, 2026
Building a Smart Sensor Node with a BLE Microcontroller

Building a Smart Sensor Node with a BLE Microcontroller

February 26, 2026
High-Accuracy Pitch, Roll, Yaw with ESP32 & BNO08x IMU

High-Accuracy Pitch, Roll, Yaw with ESP32 & BNO08x IMU

April 27, 2026
Top Posts & Pages
  • IoT Based PM & Air Quality Monitoring System using ESP32
    IoT Based PM & Air Quality Monitoring System using ESP32
  • How to use LDR Sensor Module with Arduino
    How to use LDR Sensor Module with Arduino
  • 12V DC to 220V AC Inverter Circuit & PCB
    12V DC to 220V AC Inverter Circuit & PCB
  • Buck Converter: Basics, Working, Design & Application
    Buck Converter: Basics, Working, Design & Application
  • IoT AC Energy Meter with PZEM-004T & ESP32 WebServer
    IoT AC Energy Meter with PZEM-004T & ESP32 WebServer
  • How to use Modbus RTU with ESP32 to read Sensor Data
    How to use Modbus RTU with ESP32 to read Sensor Data
  • ECG Graph Monitoring with AD8232 ECG Sensor & Arduino
    ECG Graph Monitoring with AD8232 ECG Sensor & Arduino
  • Silicon Controlled Rectifier (SCR): Construction, Working & Applications
    Silicon Controlled Rectifier (SCR): Construction, Working & Applications
Categories
  • Arduino Projects (197)
  • Articles (60)
    • Learn Electronics (19)
    • Product Review (15)
    • Tech Articles (28)
  • Electronics Circuits (46)
    • 555 Timer Projects (21)
    • Op-Amp Circuits (7)
    • Power Electronics (13)
  • IoT Projects (205)
    • ESP32 MicroPython (7)
    • ESP32 Projects (82)
    • ESP32-CAM Projects (15)
    • ESP8266 Projects (76)
    • LoRa/LoRaWAN Projects (22)
  • Microcontrollers (38)
    • AMB82-Mini IoT AI Camera (4)
    • BLE Projects (18)
    • STM32 Projects (19)
  • Raspberry Pi (93)
    • Raspberry Pi Pico Projects (57)
    • Raspberry Pi Pico W Projects (12)
    • Raspberry Pi Projects (24)
Follow Us
  • Facebook
  • Twitter
  • Pinterest
  • Instagram
  • YouTube
About Us

“‘How to Electronics’ is a vibrant community for electronics enthusiasts and professionals. We deliver latest insights in areas such as Embedded Systems, Power Electronics, AI, IoT, and Robotics. Our goal is to stimulate innovation and provide practical solutions for students, organizations, and industries. Join us to transform learning into a joyful journey of discovery and innovation.

Copyright © How To Electronics. All rights reserved.
  • About Us
  • Disclaimer
  • Privacy Policy
  • Contact Us
  • Advertise With Us

Type above and press Enter to search. Press Esc to cancel.

Ad Blocker Enabled!
Ad Blocker Enabled!
Looks like you're using an ad blocker. Please allow ads on our site. We rely on advertising to help fund our site.