Close Menu
  • Articles
    • Learn Electronics
    • Product Review
    • Tech Articles
  • Electronics Circuits
    • 555 Timer Projects
    • Op-Amp Circuits
    • Power Electronics
  • Microcontrollers
    • Arduino Projects
    • STM32 Projects
    • AMB82-Mini IoT AI Camera
    • BLE Projects
  • IoT Projects
    • ESP8266 Projects
    • ESP32 Projects
    • ESP32 MicroPython
    • ESP32-CAM Projects
    • LoRa/LoRaWAN Projects
  • Raspberry Pi
    • Raspberry Pi Projects
    • Raspberry Pi Pico Projects
    • Raspberry Pi Pico W Projects
  • Electronics Calculator
Facebook X (Twitter) Instagram
  • About Us
  • Disclaimer
  • Privacy Policy
  • Contact Us
  • Advertise With Us
Facebook X (Twitter) Instagram Pinterest YouTube LinkedIn
How To Electronics
  • Articles
    • Learn Electronics
    • Product Review
    • Tech Articles
  • Electronics Circuits
    • 555 Timer Projects
    • Op-Amp Circuits
    • Power Electronics
  • Microcontrollers
    • Arduino Projects
    • STM32 Projects
    • AMB82-Mini IoT AI Camera
    • BLE Projects
  • IoT Projects
    • ESP8266 Projects
    • ESP32 Projects
    • ESP32 MicroPython
    • ESP32-CAM Projects
    • LoRa/LoRaWAN Projects
  • Raspberry Pi
    • Raspberry Pi Projects
    • Raspberry Pi Pico Projects
    • Raspberry Pi Pico W Projects
  • Electronics Calculator
How To Electronics
Home » AD8495 K-Type Thermocouple Amplifier Raspberry Pi Pico
Raspberry Pi Raspberry Pi Pico Projects

AD8495 K-Type Thermocouple Amplifier Raspberry Pi Pico

Mamtaz AlamBy Mamtaz AlamUpdated:February 2, 20254 Mins Read
Share Facebook Twitter LinkedIn Telegram Reddit WhatsApp
AD8495 K-Type Thermocouple Amplifier Raspberry Pi Pico
Share
Facebook Twitter LinkedIn Pinterest Email Reddit Telegram WhatsApp

Overview

In this tutorial we will be interfacing AD8495 Analog Output K-Type Thermocouple Amplifier with Raspberry Pi Pico using MicroPython Code. Earlier we used MAX6675 Thermocouple Amplifier with Arduino which is an SPI module. Similarly, we interfaced AD8495 with Arduino as well. The AD8495 is an analog output thermocouple amplifier.

The AD8495 thermocouple amplifiers provide a simple, low cost solution for measuring thermocouple temperatures. This hookup guide will help you to connect AD8495 K-Type Thermocouple Amplifier with Raspberry Pi Pico. The using the datasheet and the mathematical equation for temperature measurement, we will develop a MicroPython Code to read the temperature values.


Bill of Materials

Here are the list of components required for this tutorial.

S.N.ComponentsQuantityPurchase Link
1Raspberry Pi Pico1Amazon | AliExpress
2AD8495 K-Type Thermocouple Amplifier1Amazon | AliExpress
3Jumper Wires10Amazon | AliExpress | SunFounder
4Breadboard1Amazon | AliExpress | SunFounder


AD8495 K-Type Thermocouple Amplifier

The AD8495 K-Type Thermocouple Amplifier, developed by Analog Devices, is particularly suited for applications requiring high precision. As part of the AD8494/AD8495/AD8496/AD8497 family, it integrates precision instrumentation amplifiers with a cold junction compensator to directly produce a 5 mV/°C output from a K-type thermocouple signal.

AD8495 k-Type Thermocouple Amplifier

This device simplifies the process of temperature measurement by combining an ice point reference with a precalibrated amplifier. This facilitates its use either as a standalone thermometer or as part of a switched output setpoint controller. Specifically calibrated for K-type (chromel-alumel) thermocouples through laser wafer trimming, the AD8495 ensures high accuracy across its optimized ambient temperature range. It supports a wide variety of supply voltages, from 3 V for direct interfacing with low-supply ADCs to up to 36 V for industrial systems requiring broad common-mode input ranges.

AD8495 k-Type Thermocouple Amplifier with Thermocouple

The temperature readings can be easily obtained by measuring the output voltage and applying the equation:

Temperature = (Vout – 1.25) / 0.005 V

For instance, a voltage reading of 1.5VDC translates to a temperature of 50°C. The device’s design minimizes self-heating with a total supply current of 180 μA when unloaded, although it is capable of delivering over ±5 mA to a load. This amplifier comes with a fully assembled PCB, which includes the AD8495 and a TLVH431 1.25V precision voltage reference, a 2-pin terminal block for easy connection to a thermocouple, and a pin header for breadboard integration. Refer to the AD8495 Datasheet for more information.


AD8495 Features & Specifications

  • Works with any K-type thermocouple
  • Will not work with any other kind of thermocouple other than K type.
  • Easy to use analog output.
  • Temp range with 5V power: -250°C to +750°C output(0 to 5VDC)
  • Temp range with 3.3V power: -250°C to +410°C output(0 to 3.3VDC)
  • Sensing Accuracy Range: ± 1°C around room temperature, ± 2°C for −25°C to +400°C
  • Sensing Temperature Max: 400°C
  • Sensing Temperature Min: -25°C
  • Supply Voltage: 3-18V DC

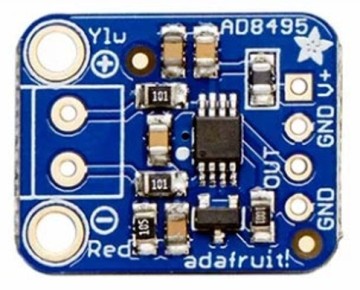
AD8495 Breakout Board Pinout

Power & Output Pins

  • V+ – This is the power pin. This board works with 3.3V and 5V power.
  • GND – Common ground pins
  • OUT – This is the output voltage pin. Read using an analog input.

Thermocouple Terminal

  • Red- – Connect the red or – wire on your thermocouple to this side of the screw terminal.
  • Ylw+ – Connect the yellow or + wire on your thermocouple to this side of the screw terminal.


Interfacing AD8495 K-Type Thermocouple Amplifier Raspberry Pi Pico

Now let us interface the AD8495 Analog K-Type Thermocouple Amplifier with Raspberry Pi Pico. The connection is very straight forward.

AD8495 K-Type Thermocouple Amplifier Raspberry Pi Pico

  • Connect the VCC of the AD8495 to the 3.3V Pi Pico.
  • Connect the GND of the AD8495 to a GND pin on the Pi Pico.
  • Finally, connect the Vout (output) of the AD8495 to GP26 of Pi Pico.

AD8495 Raspberry Pi Pico MicroPython

You may use a breadboard to place the AD8495 Module. Then, install the thermocouple on the thermocouple terminal of AD8495.


MicroPython Code

Now, lets write MicroPython Code Raspberry Pi Pico to read the AD8495 K-Type Thermocouple Amplifier Temperature values.

The following code runs on a Raspberry Pi Pico and uses an AD8495 analog thermocouple amplifier to measure temperature. It creates an Analog-to-Digital Converter (ADC) object for reading voltage from the AD8495, converts this voltage to temperature in Celsius, and then to Fahrenheit.

It continuously prints the measured temperature in both Celsius and Fahrenheit, along with the voltage reading, pausing for 0.5 seconds between each reading.

1
2
3
4
5
6
7
8
9
10
11
12
13
14
15
16
17
18
19
20
21
22
23
24
25
26
27
28
29
30
import machine
import time
 
# Create an ADC object on pin 26 (ADC0), which corresponds to physical pin 32 on the Pico
ad8495 = machine.ADC(26)
 
# Constants for calculations
VREF = 3.3  # Reference voltage for the Pico ADC
ADC_RESOLUTION = 65535  # 16-bit ADC resolution
 
def get_voltage(adc_pin):
    """Convert the ADC reading to voltage."""
    return (adc_pin.read_u16() * VREF) / ADC_RESOLUTION
 
def celsius_to_fahrenheit(celsius):
    """Convert Celsius to Fahrenheit."""
    return (celsius * 9 / 5) + 32
 
while True:
    # Calculate the temperature from the AD8495 in Celsius
    temperature_c = (get_voltage(ad8495) - 1.25) / 0.005
    # Convert the temperature to Fahrenheit
    temperature_f = celsius_to_fahrenheit(temperature_c)
    
    # Print the temperatures and voltage
    print("Temperature: {:.2f} °C / {:.2f} °F".format(temperature_c, temperature_f))
    print("Voltage: {:.2f} V".format(get_voltage(ad8495)))
    
    # Wait for 0.5 seconds before the next reading
    time.sleep(0.5)


Copy the above code and paste it on the editor window of Thonny IDE. Save the file to raspberry Pi Pico Board with any name. Then run the code.

The code will print the analog voltage and then covert the voltage into temperature in both Celsius & Fahrenheit. The following image shows the value of room temperature.

You can heat the thermocouple tip to observe the rise in temperature reading.

The maximum voltage Raspberry Pi Pico ADC can accept is 3.3V. Therefore the maximum temperature that can be sensed is +410°C.

This is how we can interface AD8495 K-Type Thermocouple Amplifier Raspberry Pi Pico using the MicroPython code to read the temperature reading.

Share. Facebook Twitter Pinterest LinkedIn Tumblr Email Reddit Telegram WhatsApp
Previous ArticleBuilding a Raspberry Pi Pico W & LM35 Web Server
Next Article Design for Manufacturing (DFM) – PCB Design & Analysis

Related Posts

ADXL375 Accelerometer with Raspberry Pi Pico & MicroPython

ADXL375 Accelerometer with Raspberry Pi Pico & MicroPython

Updated:July 24, 2025
Interface BMI160 with Raspberry Pi Pico & MicroPython

Interface BMI160 with Raspberry Pi Pico & MicroPython

Updated:February 2, 20253K
Shift Register 74HC595 with Raspberry Pi Pico & MicroPython

Shift Register 74HC595 with Raspberry Pi Pico & MicroPython

Updated:February 2, 202513K
Interfacing XBee Module with Raspberry Pi Pico & MicroPython

Interfacing XBee Module with Raspberry Pi Pico & MicroPython

Updated:February 2, 20253K
Modbus RTU with Raspberry Pi Pico & Micropython

Modbus RTU with Raspberry Pi Pico & MicroPython

Updated:February 2, 20258K
Fever Detector with MLX90640 & OpenCV Raspberry Pi

Thermal Fever Detector with MLX90640 & OpenCV Raspberry Pi

Updated:February 2, 20256K
Add A Comment

CommentsCancel reply

Latest Posts
IoT Based PM & Air Quality Monitoring System using ESP32

IoT Based PM & Air Quality Monitoring System using ESP32

May 31, 2026
DIY ESP32 MLX90640 IR Thermal Camera with Live Web Display

DIY ESP32 MLX90640 IR Thermal Camera with Live Web Display

May 10, 2026
IoT Activity Tracker with ESP32 & Accelerometer Gyroscope

IoT Activity Tracker with ESP32 & Accelerometer/Gyroscope

May 2, 2026
A Guide to Sourcing Obsolete ICs for Vintage Projects

Beyond AliExpress: A Guide to Sourcing Obsolete ICs for Vintage Projects

April 21, 2026

ESP32 IoT Vehicle Motion Analyzer with MPU6050 & LIS3MDL

April 27, 2026
Building a Smart Sensor Node with a BLE Microcontroller

Building a Smart Sensor Node with a BLE Microcontroller

February 26, 2026
High-Accuracy Pitch, Roll, Yaw with ESP32 & BNO08x IMU

High-Accuracy Pitch, Roll, Yaw with ESP32 & BNO08x IMU

April 27, 2026
DIY Colorimeter using AS7265x Spectroscopy Sensor & ESP32

DIY Colorimeter using AS7265x Spectroscopy Sensor & ESP32

February 1, 2026
Top Posts & Pages
  • Buck Converter: Basics, Working, Design & Application
    Buck Converter: Basics, Working, Design & Application
  • 12V DC to 220V AC Inverter Circuit & PCB
    12V DC to 220V AC Inverter Circuit & PCB
  • How to use INA226 DC Current Sensor with Arduino
    How to use INA226 DC Current Sensor with Arduino
  • How to use Modbus RTU with ESP32 to read Sensor Data
    How to use Modbus RTU with ESP32 to read Sensor Data
  • Designing of MPPT Solar Charge Controller using Arduino
    Designing of MPPT Solar Charge Controller using Arduino
  • IoT Based ECG Monitoring with AD8232 ECG Sensor & ESP32
    IoT Based ECG Monitoring with AD8232 ECG Sensor & ESP32
  • Boost Converter: Basics, Working, Design & Application
    Boost Converter: Basics, Working, Design & Application
  • IoT Based Electricity Energy Meter using ESP32 & Blynk
    IoT Based Electricity Energy Meter using ESP32 & Blynk
Categories
  • Arduino Projects (197)
  • Articles (60)
    • Learn Electronics (19)
    • Product Review (15)
    • Tech Articles (28)
  • Electronics Circuits (46)
    • 555 Timer Projects (21)
    • Op-Amp Circuits (7)
    • Power Electronics (13)
  • IoT Projects (204)
    • ESP32 MicroPython (7)
    • ESP32 Projects (81)
    • ESP32-CAM Projects (15)
    • ESP8266 Projects (76)
    • LoRa/LoRaWAN Projects (22)
  • Microcontrollers (38)
    • AMB82-Mini IoT AI Camera (4)
    • BLE Projects (18)
    • STM32 Projects (19)
  • Raspberry Pi (93)
    • Raspberry Pi Pico Projects (57)
    • Raspberry Pi Pico W Projects (12)
    • Raspberry Pi Projects (24)
Follow Us
  • Facebook
  • Twitter
  • Pinterest
  • Instagram
  • YouTube
About Us

“‘How to Electronics’ is a vibrant community for electronics enthusiasts and professionals. We deliver latest insights in areas such as Embedded Systems, Power Electronics, AI, IoT, and Robotics. Our goal is to stimulate innovation and provide practical solutions for students, organizations, and industries. Join us to transform learning into a joyful journey of discovery and innovation.

Copyright © How To Electronics. All rights reserved.
  • About Us
  • Disclaimer
  • Privacy Policy
  • Contact Us
  • Advertise With Us

Type above and press Enter to search. Press Esc to cancel.

Ad Blocker Enabled!
Ad Blocker Enabled!
Looks like you're using an ad blocker. Please allow ads on our site. We rely on advertising to help fund our site.