

Stopwatch Using Arduino & LCD – Start Stop Reset Button
In this project, we have designed Simple Stopwatch Using Arduino & LCD Display with Start, Stop & Reset Button. A stopwatch will always have 2 buttons or modes, a start, and a stop mode. It may have other features but it will always have these. Additionally, we have added reset function too. This can be done with the pressing reset button of Arduino.
The millis feature of the Arduino Code allows the Arduino to display the functions up to the value in milliseconds to 100% accuracy. We can display up to 4 digits after the decimal point. But here we just displayed 3 digits. Earlier we build Stopwatch using ESP32. You can also make Stopwatch Using Digit using Segment Display which is more cost effective and cheaper compared to LCD version.
Components Required
Following are the components that are required to make a stopwatch using Arduino. You can purchase all these components from the Amazon links.
| S.N. | Components Name | Quantity | Purchase Link |
|---|---|---|---|
| 1 | Arduino UNO/Nano Board | 1 | Amazon | AliExpress |
| 2 | 16x2 LCD Display | 1 | Amazon | AliExpress |
| 3 | Potentiometer 10K | 1 | Amazon | AliExpress |
| 4 | Push Button Switch | 2 | Amazon | AliExpress |
| 5 | Connecting Wires | 10 | Amazon | AliExpress |
| 6 | Breadboard | 1 | Amazon | AliExpress |
Circuit Diagram & Hardware Connections
Here is a connection diagram for Stopwatch designed using Arduino, 16×2 LCD Display and two push button switch.

Connect the push buttons to Arduino digital pins 4 and 5. Digital pin 4 is used for the start button, while digital pin 5 is used for the stop or reset button.
Connect the RS (Register Select) pin to Arduino digital pin 8, and the E (Enable) pin to digital pin 9. The LCD’s four data lines—D4, D5, D6, and D7—are then connected to digital pins 10, 11, 12, and 13, respectively. To adjust the LCD contrast, a potentiometer is often used: the middle terminal of the potentiometer is connected to the Vo pin (Pin 3 of LCD), while one of the outer terminals connects to 5V and the other to GND.
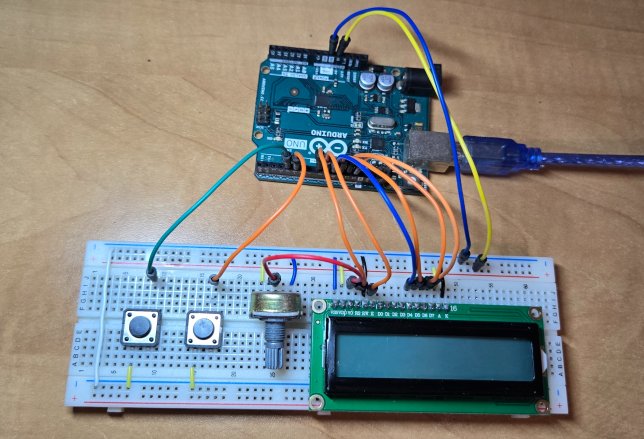
Assemble the circuit on breadboard as shown in the image above.
Source Code/Program:
Here is the Arduino code that functions as a simple stopwatch that allows the user to start, pause, and reset timing events with two physical buttons.
|
1 2 3 4 5 6 7 8 9 10 11 12 13 14 15 16 17 18 19 20 21 22 23 24 25 26 27 28 29 30 31 32 33 34 35 36 37 38 39 40 41 42 43 44 45 46 47 48 49 50 51 52 53 54 55 56 57 58 59 60 61 62 63 64 65 66 67 68 69 70 71 72 73 74 75 76 77 78 79 80 81 82 83 84 85 86 87 88 89 90 91 92 93 94 95 96 97 98 99 100 101 102 103 104 105 106 107 108 109 110 |
#include <LiquidCrystal.h> // Initialize the LCD: (RS, E, D4, D5, D6, D7) LiquidCrystal lcd(8, 9, 10, 11, 12, 13); // Define button pins const int startButtonPin = 4; // Button to start timer const int stopButtonPin = 5; // Button to stop timer (and later to reset) // Define states for the timer enum TimerState {IDLE, RUNNING, STOPPED}; TimerState timerState = IDLE; unsigned long startTime = 0; // Time when the timer was started unsigned long elapsedTime = 0; // Elapsed time in milliseconds void setup() { lcd.begin(16, 2); lcd.clear(); Serial.begin(9600); // Setup button pins with internal pull-ups pinMode(startButtonPin, INPUT_PULLUP); pinMode(stopButtonPin, INPUT_PULLUP); } void loop() { switch(timerState) { case IDLE: // Clear the display and show the idle message lcd.clear(); lcd.setCursor(0, 0); lcd.print("Press Start"); // Also clear the second row so nothing overlaps later lcd.setCursor(0, 1); lcd.print(" "); // Wait for the start button to be pressed if (digitalRead(startButtonPin) == LOW) { delay(50); // Debounce delay while (digitalRead(startButtonPin) == LOW) { delay(10); // Wait for button release } // Clear the display and record the starting time before switching states lcd.clear(); startTime = millis(); timerState = RUNNING; } break; case RUNNING: // Always clear row 1 so nothing from the idle state remains lcd.setCursor(0, 1); lcd.print(" "); // If the stop button is pressed, capture the time and move to STOPPED state if (digitalRead(stopButtonPin) == LOW) { delay(50); // Debounce delay while (digitalRead(stopButtonPin) == LOW) { delay(10); // Wait for button release } elapsedTime = millis() - startTime; timerState = STOPPED; } else { // Otherwise, update the elapsed time continuously elapsedTime = millis() - startTime; } // Display the updated time on row 0 displayTime(elapsedTime); break; case STOPPED: // Show the final time on row 0 and ensure row 1 is clear displayTime(elapsedTime); lcd.setCursor(0, 1); lcd.print(" "); // If the stop button is pressed again, reset to the IDLE state if (digitalRead(stopButtonPin) == LOW) { delay(50); // Debounce delay while (digitalRead(stopButtonPin) == LOW) { delay(10); // Wait for button release } lcd.clear(); timerState = IDLE; } break; } } // Helper function to format and display the elapsed time on row 0. void displayTime(unsigned long timeInMillis) { // Calculate minutes, seconds, and milliseconds unsigned int minutes = timeInMillis / 60000; unsigned int seconds = (timeInMillis % 60000) / 1000; unsigned int milliseconds = timeInMillis % 1000; // Create a formatted string "MM:SS:MMM" (always 9 characters) char timeStr[10]; // 9 characters + null terminator sprintf(timeStr, "%02u:%02u:%03u", minutes, seconds, milliseconds); // Display the formatted time on the first row lcd.setCursor(0, 0); lcd.print(timeStr); // Optionally, also output the time to the Serial Monitor Serial.print("Time: "); Serial.println(timeStr); } |
Copy the above code to the Arduino IDE editor window. Select the Arduino board and the COM port. Click on upload button to upload the code.
Working of Arduino StopWatch Timer
This code implements a basic stopwatch using an Arduino connected to a standard LCD. It defines three states—IDLE, RUNNING, and STOPPED—using an enumerated type to manage the stopwatch’s behavior. Two buttons are used for user interaction: one to start the timer and one to stop (and later reset) it. The LCD is initialized to display two rows of characters, and the program uses the Serial Monitor for optional time output.
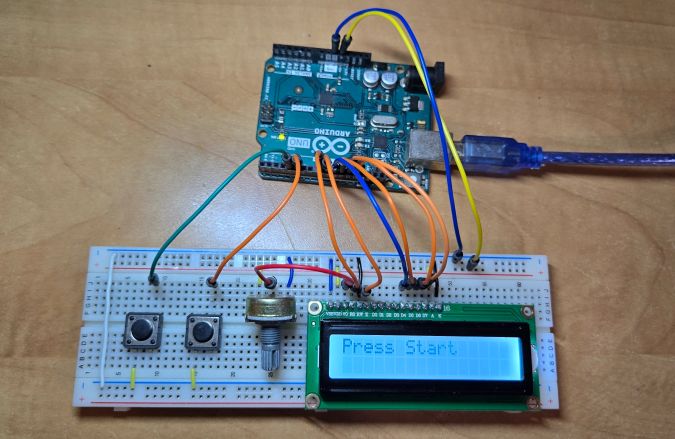
In the IDLE state, the display shows the message “Press Start” and waits for the start button to be pressed.
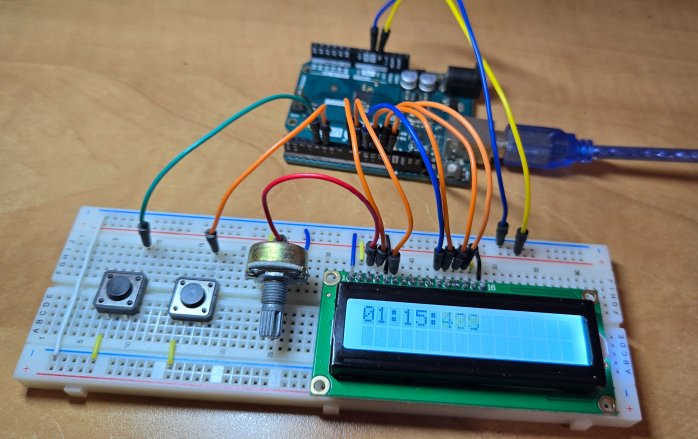
When the button is activated (with a debounce delay to ensure stable input), the program clears the display, records the current time using the millis() function, and transitions to the RUNNING state. In this state, the stopwatch continuously calculates the elapsed time by subtracting the recorded start time from the current time, formatting this elapsed time into minutes, seconds, and milliseconds, and then displaying it on the LCD.
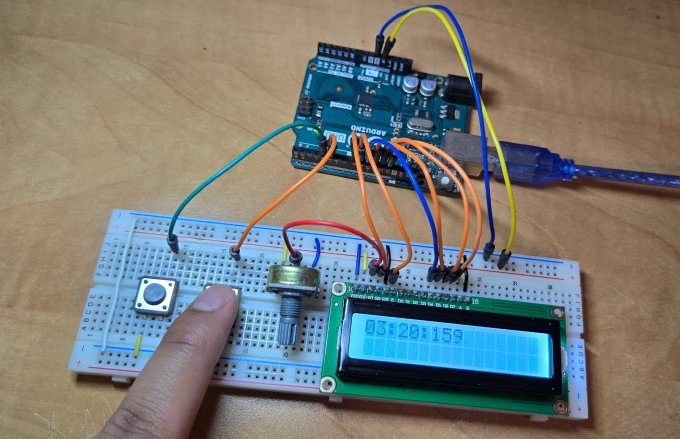
While in the RUNNING state, if the stop button is pressed, the program again debounces the input, calculates the final elapsed time, and then transitions to the STOPPED state. In the STOPPED state, the final time remains displayed on the LCD.
If the stop button is pressed once more in this state, the code resets the system back to the IDLE state by clearing the display and showing the “Press Start” message again, readying the stopwatch for another timing session.

")


11 Comments
Hello!
Im trying to change this code to fit my project.
Wat im trying to create is a timecounter thet counts when a button i pushed in. And then stoped and resetted when button is relesed.
Is this possible in some easy way with thos code? 🙂
Tnx for help and sorry fore the bad english spelling.
I am wondering about using an Arduino to do something similar. What I want is efectively a staopwatch, started by one contact, stopped by another, mutually exclusive. It also needs to output the time in character form to a dot matrix printer, The same output will also be parsed into a spreadsheet on a laptop.
Does that sound possible? .
I made a Stopwatch with 2 buttons, I want that a button run the timer and pause if I press it again, and the other to reset the chronometer. I did the stopwach run but i can’t make it pause, rerun and reset, can you help me?
there is the code
#include <LiquidCrystal.h>
LiquidCrystal lcd(12,11,4,5,6,7);
int botao1 = 8;
int botao2 = 9;
int estadoBotao1 = 0;
int estadoBotao2 = 0;
int sec, min, hora;
unsigned long zero;
void cronometro();
void pausa();
void setup(){
lcd.begin(16, 2);
lcd.setCursor(0,0);
lcd.print(“Cronometro do”);
delay(200);
lcd.setCursor(1,1);
lcd.print(“Ian Rapini ._.”);
delay(800);
lcd.clear();
pinMode(botao1, INPUT);
pinMode(botao2, INPUT);
sec = 0;
min = 0;
hora = 0;
zero = 0;
delay(300);
}
void loop(){
}
void cronometro(){
estadoBotao2 = digitalRead(botao2);
estadoBotao1 = digitalRead(botao1);
lcd.clear();
lcd.print(“Clique no Botao”);
delay(100);
if(estadoBotao2 == HIGH){
sec = 0;
min = 0;
hora = 0;
zero = 0;
lcd.clear();
{
sec++;
zero = millis();
}
if(sec > 59)
{
lcd.setCursor(10, 1);
lcd.print(” “);
sec = 0;
min++;
}
if(min > 59)
{
lcd.setCursor(5, 1);
lcd.print(” “);
min = 0;
hora++;
}
if(hora == 24){
hora = 0;
}
lcd.setCursor(2, 0);
lcd.print(hora);
lcd.setCursor(4, 0);
lcd.print(“h”);
delay(100);
lcd.setCursor(0, 1);
lcd.print(min);
lcd.setCursor(2, 1);
lcd.print(“m”);
delay(100);
lcd.setCursor(5, 1);
lcd.print(sec);
lcd.setCursor(7, 1);
lcd.print(“s”);
delay(100);
}
if(estadoBotao1 == HIGH){
while(estadoBotao2 == LOW){
sec = 0;
min = 0;
hora = 0;
zero = 0;
lcd.clear();
}
}
}
}
made a Stopwatch with 2 buttons, I want that a button run the timer and pause if I press it again, and the other to reset the chronometer. I did the stopwach run but i can’t make it pause, rerun and reset, can you help me?
there is the code
#include <LiquidCrystal.h>
LiquidCrystal lcd(12,11,4,5,6,7);
int botao1 = 8;
int botao2 = 9;
int estadoBotao1 = 0;
int estadoBotao2 = 0;
int sec, min, hora;
unsigned long zero;
void cronometro();
void pausa();
void setup(){
lcd.begin(16, 2);
lcd.setCursor(0,0);
lcd.print(“Cronometro do”);
delay(200);
lcd.setCursor(1,1);
lcd.print(“Ian Rapini ._.”);
delay(800);
lcd.clear();
pinMode(botao1, INPUT);
pinMode(botao2, INPUT);
sec = 0;
min = 0;
hora = 0;
zero = 0;
delay(300);
}
void loop(){
}
void cronometro(){
estadoBotao2 = digitalRead(botao2);
estadoBotao1 = digitalRead(botao1);
lcd.clear();
lcd.print(“Clique no Botao”);
delay(100);
if(estadoBotao2 == HIGH){
sec = 0;
min = 0;
hora = 0;
zero = 0;
lcd.clear();
{
sec++;
zero = millis();
}
if(sec > 59)
{
lcd.setCursor(10, 1);
lcd.print(” “);
sec = 0;
min++;
}
if(min > 59)
{
lcd.setCursor(5, 1);
lcd.print(” “);
min = 0;
hora++;
}
if(hora == 24){
hora = 0;
}
lcd.setCursor(2, 0);
lcd.print(hora);
lcd.setCursor(4, 0);
lcd.print(“h”);
delay(100);
lcd.setCursor(0, 1);
lcd.print(min);
lcd.setCursor(2, 1);
lcd.print(“m”);
delay(100);
lcd.setCursor(5, 1);
lcd.print(sec);
lcd.setCursor(7, 1);
lcd.print(“s”);
delay(100);
}
if(estadoBotao1 == HIGH){
while(estadoBotao2 == LOW){
sec = 0;
min = 0;
hora = 0;
zero = 0;
lcd.clear();
}
}
}
}
Hi i have tm1637 ,can u help with code for?
No, sorry. I looked up what it is. I don’t have one. There appears to be plenty of stuff on line.
hey, I have made the same circuit but this code is not working. can you please guide me about it?
I have not worked on it for a bit. I’ll look if it is an old version. Are you using the same LCD shield? I found it quite difficult to get breadboard connections working reliably.
Is it doing anything? If backlight isn’t working, there is a connection issue.
I booted up a version I have. Not checked which code. It had progressed. The display was not updated, but it uses pin 3 to earth to start, pin 2 to stop. Done this way to use tape switches to operate. You should be able to see this in the code.
how to make the iteration of the stopwatch 0.5 s (500ms) ?