

This project is about 2.4-inch Nextion Display Based Mobile Phone using GSM Module & Arduino.
Overview
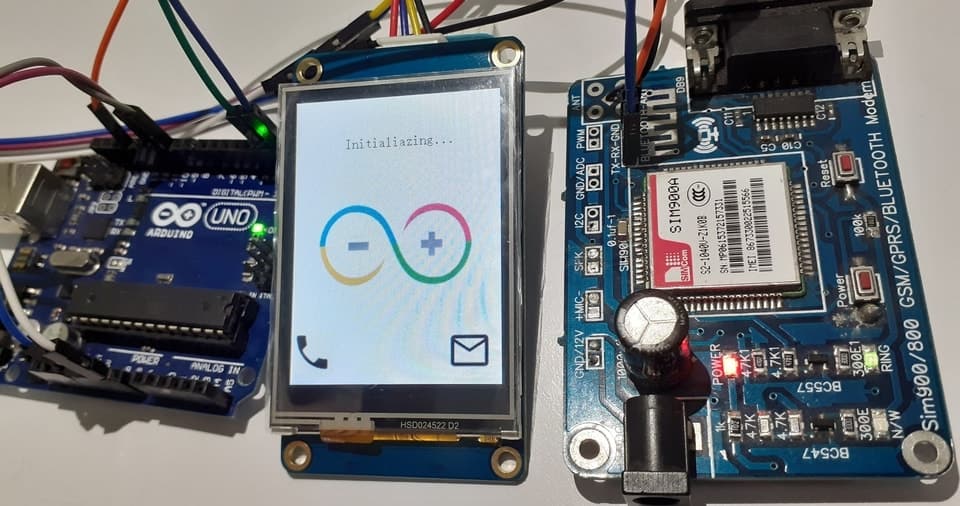
In this project, I will introduce you to my Home Made Mobile Phone that is capable of making and receiving calls and SMS. I interfaced GSM Module SIM800/SIM900 with Arduino UNO Microcontroller. I also used a display to visualize GUI interfaces. I selected a new 2.4-inch Nextion TFT Intelligent LCD Touch Display. The 2.4-inch NX3224T024 Nextion display displays everything like normal Mobile Phone. You can make calls, receive calls, send an SMS and receive an SMS.
If you are interested in making yours, this guide will help you a lot.
For making this project, we need a microcontroller. So I used an Arduino UNO Board. We also need a GSM module. So you can use either SIM800 or SIM900, anything will work. For GUI Display, we need a TFT LCD. So I used Nextion NX3224T024 – Generic 2.4″ TFT LCD Touch Display.
You can check my previous similar project here: Simple Keypad Phone using Arduino & GSM Module with LCD Display
Bill of Materials
Following are the components required for making Mobile Phone at Home. All the components can be easily purchased from Amazon. The components purchase link is given below.
| S.N. | Components | Quantity | Purchase Links |
|---|---|---|---|
| 1 | Arduino UNO | 1 | Amazon | AliExpress |
| 2 | NX3224T024 2.4 inch Nextion Display | 1 | Amazon |
| 3 | SIM800/900 GSM Module | 1 | Amazon | AliExpress |
| 4 | SD Card 16/32 GB | 1 | Amazon | AliExpress |
| 5 | Card Reader | 1 | Amazon | AliExpress |
| 6 | 5V Power Supply | 1 | Amazon | AliExpress |
| 7 | 12V Power Supply | 1 | Amazon | AliExpress |
| 8 | Connecting Wires | 10 | Amazon | AliExpress |
| 9 | Breadboard | 1 | Amazon | AliExpress |
SIM800 GSM Module
SIM800 is a quad-band GSM/GPRS module designed for the global market. It works on frequencies GSM 850MHz, EGSM 900MHz, DCS 1800MHz and PCS 1900MHz. SIM800 features GPRS multi-slot class 12/ class 10 (optional) and supports the GPRS coding schemes CS-1, CS-2, CS-3 and CS-4. With a tiny configuration of 24*24*3mm, SIM800 can meet almost all the space requirements in users’ applications, such as M2M, smartphone, PDA and other mobile devices.

SIM800 has 68 SMT pads and provides all hardware interfaces between the module and customers’ boards. SIM800 is designed with a power-saving technique so that the current consumption is as low as 1.2mA in sleep mode. SIM800 integrates TCP/IP protocol and extended TCP/IP AT commands which are very useful for data transfer applications.
Nextion NX3224T024 2.4″ TFT LCD Touch Display
Nextion is a Seamless Human Machine Interface (HMI) solution that provides a control and visualization interface between a human and a process, machine, application or appliance. Nextion includes a hardware part (a series of TFT boards) and a software part (the Nextion editor). The Nextion TFT board uses only one serial port to communicate. It lets users avoid the hassle of wiring.

It’s easy to adapt Nextion family HMI to existing projects. Users just need to provide it as a UART. NX2432T024 is a powerful 2.4” HMI, which is a member of the Nextion family. Features include a 2.4″ TFT 320 x 240 resistive touch screen display, 4M Flash, 2K Byte RAM, 65k colors.

Using Nextion Editor you can design the GUI. Nextion editor has mass components such as button, text, progress bar, slider, instrument panel, etc. to enrich the interface design. Furthermore, the drag-and-drop function ensures that users spend less time in programming.
Circuit: Nextion Display Based Mobile Phone using GSM & Arduino
Let us see the circuit & connection now. Both the GSM Module and Nextion Display are UART Module.

Connect the SIM800 GSM Module TX & RX pins with RX & TX pins of Arduino. For Nextion Display we will use software serial to interface with Arduino. So, connect the Nextion NX3224T024 Tx, Rx pins with Arduino Digital Pin 10 and 11. Supply GSM Module with 12V and Arduino with 5V.

Setting Up GUI in Nextion Display
To make Nextion display the interfaces, the first thing to do is to design an HMI file in the Nextion Editor. This editor allows you to design your interfaces using plug-and-play components like (Text, button, progress bar, pictures, gauge, checkbox, radio box and much more), for which you can set codes & properties for each of these components.
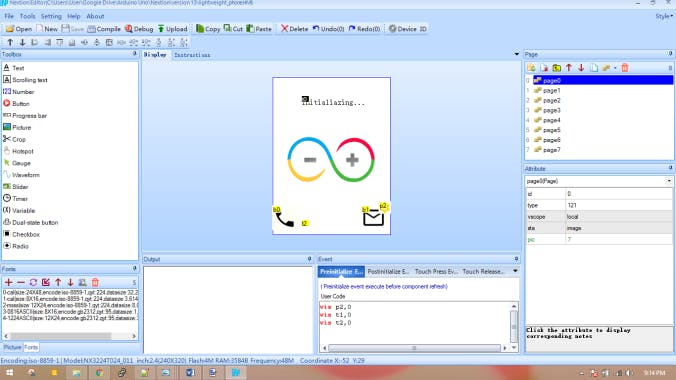
In this project, 8 pages are used to make the interactive GUI. Programming the Nextion display is a bit time-consuming process especially when implementing complex features like Numpad & keyboards. So from below you can download all the final file.
Follow the following steps to make the Nextion Display finally workable. You can follow the video instruction below.
1. Download the file above and extract it.
2. Copy the .tft file & paste into SD card. Make sure the SD card is formatted to FAT32.
3. Once copied, insert the SD card into the Nextion and then connect its 5V & GND to Arduino to power it up.
4. Wait for the .tft to upload.
5. Power it off once uploading is complete.
5. Now securely remove the SD card and then again power on. So your GUI is ready now.
Source Code/Program
Here is a source code/program for interfacing GSM Module & Nextion Display with Arduino. Copy the code and upload to the Arduino Board. The original developer of this project & code is Avishek Hardin
|
1 2 3 4 5 6 7 8 9 10 11 12 13 14 15 16 17 18 19 20 21 22 23 24 25 26 27 28 29 30 31 32 33 34 35 36 37 38 39 40 41 42 43 44 45 46 47 48 49 50 51 52 53 54 55 56 57 58 59 60 61 62 63 64 65 66 67 68 69 70 71 72 73 74 75 76 77 78 79 80 81 82 83 84 85 86 87 88 89 90 91 92 93 94 95 96 97 98 99 100 101 102 103 104 105 106 107 108 109 110 111 112 113 114 115 116 117 118 119 120 121 122 123 124 125 126 127 128 129 130 131 132 133 134 135 136 137 138 139 140 141 142 143 144 145 146 147 148 149 150 151 152 153 154 155 156 157 158 159 160 161 162 163 164 165 166 167 168 169 170 171 172 173 174 175 176 177 178 179 180 181 182 183 184 185 186 187 188 189 190 191 192 193 194 195 196 197 198 199 200 201 202 203 204 205 206 207 208 209 210 211 212 213 214 215 216 217 218 219 220 221 222 223 224 225 226 227 228 229 230 231 232 233 234 235 236 237 238 239 240 241 242 243 244 245 246 247 248 249 250 251 252 253 254 255 256 257 258 259 260 261 262 263 264 265 266 267 268 269 270 271 272 273 274 275 276 277 278 279 280 281 282 283 284 285 286 287 288 289 290 291 292 293 294 295 296 297 298 299 300 301 302 303 304 305 306 307 308 309 310 311 312 313 314 315 316 317 318 319 320 321 322 323 324 325 326 327 328 329 330 331 332 333 334 335 336 337 338 339 340 341 342 343 344 345 |
#include <SoftwareSerial.h> SoftwareSerial nextionSerial(10, 11); //Rx, Tx char msisdn[30], ATcomm[30]; String rawMsg, pageNum, msg, pls; void setup(){ //Initialize HardwareSerial|SoftwareSerial|GSM module|Nextion display. Perform GSM Location Update. Serial.begin(9600); nextionSerial.begin(9600); while(!Serial) { ; } power_on(); delay(3000); } void loop(){ while(nextionSerial.available()){rawMsg.concat(char(nextionSerial.read())); } delay(10); //Read the SoftwareSerial if(!nextionSerial.available()) { if(rawMsg.length()) { pageNum = rawMsg[rawMsg.length()-4]; //Read Nextion: get the page number. msg = rawMsg.substring(1, rawMsg.length()-4); //Read Nextion: get the Raw Msges from Nextion. if((pageNum == "0") && (msg.length() != 0)){querySMS(msg); } //Read Nextion: page0, Query all SMS from the GSM Buffer. if((pageNum == "1") && (msg.length() != 0)){connectCall(msg); } //Read Nextion: page1, Dial and Call the B-number. if((pageNum == "2") && (msg.length() != 0)){releaseCall(msg); } //Read Nextion: page2, Release the call. if((pageNum == "3") && (msg.length() != 0)){sendSMS(msg); } //Read Nextion: Page3, Get the content typed in page 3 and send SMS. if((pageNum == "5") && (msg.length() != 0)){answerCall(msg); } //Read Nextion: page5, Answer Incoming calls. if((pageNum == "6") && (msg.length() != 0)){delReadSMS(msg); } //Read Nextion: page6, Delete read SMS. if((pageNum == "7") && (msg.length() != 0)){delSMS(msg); } //Read Nextion: page7, Delete all SMS (incl unread) from the GSM Buffer. rawMsg=""; pageNum=""; msg=""; } } while(Serial.available()) { pls=Serial.readString(); } //Read the HardwareSerial. if(!Serial.available() && pls.length()) { if(pls.indexOf("NO CARRIER") != -1) { //Goto to page0, if B-party Hang up. String nextionCallStr = "page page0"; writeString(nextionCallStr); sendATcommand("AT", "OK", 2000); } if(pls.indexOf("BUSY") != -1) { //Goto to page0, if B-Number rejects incoming calls. String nextionCallStr = "page page0"; writeString(nextionCallStr); sendATcommand("AT", "OK", 2000); } if(pls.indexOf("NO ANSWER") != -1) { //Goto to page0, if B-Number does not answer incoming calls. String nextionCallStr = "page page0"; writeString(nextionCallStr); sendATcommand("AT", "OK", 2000); } if(pls.indexOf("+CLIP") != -1) { //Goto to page5, for any incoming calls. int msisdnFirstDelim = pls.indexOf("\""); int msisdnSeconddDelim = pls.indexOf("\"", msisdnFirstDelim+1); String mobNum = pls.substring(msisdnFirstDelim+1, msisdnSeconddDelim); String nextionCallStr = "page page5"; writeString(nextionCallStr); nextionCallStr = "page5.t1.txt=\""+mobNum+"\""; writeString(nextionCallStr); nextionCallStr = "page5.t0.txt=\"Incoming Call\""; writeString(nextionCallStr); nextionCallStr = "page5.p0.pic=20"; writeString(nextionCallStr); sendATcommand("AT", "OK", 2000); } if(pls.indexOf("+CMTI") != -1) { //If new Msges|Query Msges|Display star picture. smsComputation(); String nextionCallStr = "vis p2,1"; writeString(nextionCallStr); } pls=""; } } void power_on(){ //Initialize GSM module, perform Location Update, latch to cellular network, read GSM SMS buffer. uint8_t answer = 0; while(answer == 0){answer = sendATcommand("AT", "OK", 2000); } while((sendATcommand("AT+CREG?", "+CREG: 0,1", 500) || sendATcommand("AT+CREG?", "+CREG: 0,5", 500)) == 0); writeString("page0.t0.txt=\"Searching...\"");delay(2000); searchNetwork(); delay(2000); smsComputation(); } int8_t sendATcommand(char* ATcommand, char* expected_answer, unsigned int timeout) { //Function to send AT commands and read responses to/from the GSM module. uint8_t x=0, answer=0; char GSMreponse[100]; unsigned long previous; memset(GSMreponse, '\0', 100); delay(100); while(Serial.available()>0) Serial.read(); Serial.println(ATcommand); previous = millis(); do{if(Serial.available() != 0){GSMreponse[x] = Serial.read(); x++; if(strstr(GSMreponse, expected_answer) != NULL){answer = 1; } } } while((answer == 0) &&((millis() - previous) < timeout)); return answer; } void searchNetwork(){ //Function to search for available cellular networks|Get network registration|Send attched network to Nextion display. String sendCOPScommand, readCOPScommad, networkOperator, sendNetOperator; int startCOPS=-1, copsFirstcomma, copsSecondcomma, copsNL; while(Serial.available())(Serial.read()); sendCOPScommand="AT+COPS?"; Serial.println(sendCOPScommand); while(!Serial.available()); while(Serial.available()) { readCOPScommad=Serial.readString(); } if(readCOPScommad.indexOf("+COPS:") != -1) { copsFirstcomma=readCOPScommad.indexOf(",", startCOPS+1); copsSecondcomma=readCOPScommad.indexOf(",", copsFirstcomma+2); copsNL=readCOPScommad.indexOf("\n", copsSecondcomma+1); networkOperator=readCOPScommad.substring(copsSecondcomma+2, copsNL-2); sendNetOperator="page0.t0.txt=\""+networkOperator+"\""; writeString(sendNetOperator); } sendCOPScommand=readCOPScommad=networkOperator=""; copsFirstcomma=copsNL=0; } void querySMS(String querySMSContent) { //Function to query all SMS from the GSM buffer. Serial.println(querySMSContent); } void connectCall(String conCallContent){ //Function to Initiate Mobile Originated Call To Dial B-Number. String nextionCallStr = "page2.t0.txt=\"Connecting\""; writeString(nextionCallStr); while((sendATcommand("AT+CREG?", "+CREG: 0,1", 500) || //0,1: User registered, home network. sendATcommand("AT+CREG?", "+CREG: 0,5", 500)) == 0); //0,5: User registered, roaming. conCallContent.toCharArray(msisdn, rawMsg.length()); sprintf(ATcomm, "ATD%s;", msisdn); sendATcommand(ATcomm, "OK", 10000); nextionCallStr = "page2.t0.txt=\"Calling\""; writeString(nextionCallStr); memset(msisdn, '\0', 30); memset(ATcomm, '\0', 30); } void releaseCall(String relCallContent) { //Function to Hang up a call Serial.println(relCallContent); } void sendSMS(String sendSMSContent){ //Function to get content typed from Nextion|select SMS Message Format|Send SMS Message to B-number. int firstDelim = sendSMSContent.indexOf(byte(189)); int secondDelim = sendSMSContent.indexOf(byte(189), firstDelim+1); String smsContent = sendSMSContent.substring(0, firstDelim); String phoneNumber = sendSMSContent.substring(firstDelim+1, secondDelim); while((sendATcommand("AT+CREG?", "+CREG: 0,1", 500) || sendATcommand("AT+CREG?", "+CREG: 0,5", 500)) == 0); if(sendATcommand("AT+CMGF=1", "OK", 2500)){phoneNumber.toCharArray(msisdn, msg.length()); sprintf(ATcomm, "AT+CMGS=\"%s\"", msisdn); if(sendATcommand(ATcomm, ">", 2000)) { Serial.println(smsContent); Serial.write(0x1A); if(sendATcommand("", "OK", 20000)) { Serial.println("message sent"); } else{Serial.println("error sending"); } } else{Serial.println("not found >"); } }smsContent=""; phoneNumber=""; memset(msisdn, '\0', 30); memset(ATcomm, '\0', 30); } void answerCall(String ansCallContent) { //Function to change Nextion text and picture, if Incoming call is accepted. Serial.println(ansCallContent); String nextionCallStr = "page5.t0.txt=\"Connected\""; writeString(nextionCallStr); nextionCallStr = "page5.p0.pic=21"; writeString(nextionCallStr); } void smsComputation() { //Function to Read SMS from GSM buffer. Normally, SMS buffer size=20 & select only 10 SMS. int startCPMS=-1, CPMS1comma, CPMS2comma, msgCount=0; int startCMGR=-1, cmgrIndex, cmgrNLindex, smsNLindex; String sendCPMScommand, readCPMScommand, CPMSMsgCount; String sendCMGRcommand, readCMGRcommand, inCMGR, inSMS, dspCount; sendCPMScommand = "AT+CPMS?"; Serial.println(sendCPMScommand); while(!Serial.available()); while(Serial.available()) { readCPMScommand=Serial.readString(); } if(readCPMScommand.indexOf("+CPMS:") != -1) { CPMS1comma = readCPMScommand.indexOf(",", startCPMS+1); CPMS2comma = readCPMScommand.indexOf(",", CPMS1comma+1); CPMSMsgCount = readCPMScommand.substring(CPMS1comma+1, CPMS2comma); msgCount = CPMSMsgCount.toInt(); dspCount="page6.t51.txt=\""+CPMSMsgCount+"\""; writeString(dspCount); if((msgCount > 0) && (msgCount <= 10)){writeString("page6.p1.pic=35"); } if(msgCount > 10){writeString("page6.p1.pic=34"); } int spotSelect = 0; while(Serial.available())(Serial.read()); if(msgCount != 0) { for(int iSMS=20; iSMS>0; iSMS--) { sendCMGRcommand="AT+CMGR="+String(iSMS, DEC); Serial.println(sendCMGRcommand); while(!Serial.available()); while(Serial.available()) { readCMGRcommand=Serial.readString(); } if((readCMGRcommand.indexOf("+CMGR:")!=-1) && (spotSelect<(50))) { cmgrIndex = readCMGRcommand.indexOf("+CMGR:", startCMGR+1); cmgrNLindex = readCMGRcommand.indexOf("\n", cmgrIndex+1); inCMGR = readCMGRcommand.substring(cmgrIndex, cmgrNLindex-1); smsNLindex = readCMGRcommand.indexOf("\n", cmgrNLindex+1); inSMS = readCMGRcommand.substring(cmgrNLindex+1, smsNLindex-1); readSMS(inCMGR, inSMS, iSMS, spotSelect); spotSelect=spotSelect+5; } startCMGR=-1; cmgrIndex=cmgrNLindex=smsNLindex=0; inCMGR=inSMS=readCMGRcommand=""; } } }readCPMScommand=CPMSMsgCount=""; startCPMS=-1; CPMS1comma=CPMS2comma=msgCount=0; } void readSMS(String readinCMGR, String readinSMS, int readiSMS ,int readinspotSelect) { //Function to parse the loaded SMS from GSM module and present to Nextion display. int startComma=-1, firstColon, firstComma, secondComma, thirdComma; String smsSeqNum, smsStatus, smsBNumber, smsDateTime, actualSMS; String startOfPage="page6.t", middleOfPage=".txt=\"", pageContent; firstColon = readinCMGR.indexOf(":", startComma+1); firstComma = readinCMGR.indexOf(",", startComma+1); secondComma = readinCMGR.indexOf(",", firstComma+1); thirdComma = readinCMGR.indexOf(",", secondComma+1); smsSeqNum = String(readiSMS); smsStatus = readinCMGR.substring(firstColon+7, firstComma-1); smsBNumber = readinCMGR.substring(firstComma+2, secondComma-1); smsDateTime = readinCMGR.substring(thirdComma+2, readinCMGR.length()-1); actualSMS = readinSMS.substring(0, readinSMS.length()); pageContent = startOfPage + readinspotSelect + middleOfPage + smsStatus+"\""; writeString(pageContent);readinspotSelect++; pageContent = startOfPage + readinspotSelect + middleOfPage + smsBNumber+"\""; writeString(pageContent);readinspotSelect++; pageContent = startOfPage + readinspotSelect + middleOfPage + smsSeqNum+"\""; writeString(pageContent);readinspotSelect++; pageContent = startOfPage + readinspotSelect + middleOfPage + smsDateTime+"\""; writeString(pageContent);readinspotSelect++; pageContent = startOfPage + readinspotSelect + middleOfPage + actualSMS+"\""; writeString(pageContent); smsSeqNum=smsStatus=smsBNumber=smsDateTime=actualSMS=pageContent=""; firstColon=firstComma=secondComma=thirdComma=readinspotSelect=0; } void delReadSMS(String inDelReadSMS) { //Function to delete only read SMS from the GSM Buffer. Serial.println(inDelReadSMS); } void delSMS(String indelSMS) { //Function to delete all (Read/Unread) SMS from the GSM Buffer. Serial.println(indelSMS); } void writeString(String stringData) { //Function to send commands to the Nextion display. for(int i=0; i < stringData.length(); i++) { nextionSerial.write(stringData[i]); } nextionSerial.write(0xff); nextionSerial.write(0xff); nextionSerial.write(0xff); } |
Once the code is uploaded, your Nextion Display Based Mobile Phone using GSM & Arduino is ready. Now you can simply make call or SMS just like a normal touch screen phone.

Video Tutorial & Demonstration for Mobile Phone using GSM & Arduino
Watch the full video below. The video explains about all the necessary steps and process for making this Simple DIY Mobile Phone using GSM Module & Arduino.


")


7 Comments
Hi, fine project.
But how can I do calls? Is there a audio input and outout?
The GSM Module has a port for an external mic and speaker. You can connect.
can you show diagram for sim900 gprs shield? and do we need some extra coding for it? and my network is still initializing om screen. its not searching any network
is it possible to save data, like call logs or message log.. even it date and time only?
Hi am veary new to all of this and when i saw you webpage i just had to give this a try. Even bought the display for the project. but I’m having a problem with the loading of the tft file i haave never used Nextion Editor before and can’t fugure out how to setup the tft file error is
Model does not match
Device Model: MX3224K024_011R
I hope you can help out with this. Many many thanks if you can !
Thank you for sharing. When i upload .tft into display the following mistake occures : ‘the system detects multiple tft files can not be upgraded please reove the extra tft files. But for sure, i have only one tft file in sd card which you shared. Do you know how to solve the issue ?
yes, it is possible to save it if you code a program to save the call.