


In this post we will interface SHT31 Humidity & Temperature Sensor with ESP32 Board. Thus using ESP32 & SHT31, we will create build an asynchronous web server and display the temperature-humidity value on a web page. The web server we’ll build updates the readings automatically without the need to refresh the web page.
Overview
There are various humidity & temperature sensors like DHT11 & HTU21D. But while talking about the accuracy none of them are suitable for industrial level temperature humidity monitoring due to the accuracy and precision. They have poor accuracy as well as sensitivity. So here we will use the SHT31 Temperature/Humidity sensor. They are the finest & highest-accuracy devices you can get. It is a digital sensor with an I2C interface which makes for easy reading of humidity and temperature. The SHT31 sensor has an excellent ±2% relative humidity and ±0.3°C temperature accuracy for most uses.
In this project we will interface SHT31 Temperature/Humidity Sensor with ESP32. We will learn how to read humidity and temperature value with SHT31 & ESP32. We will also build an asynchronous ESP32 web server using the ESPAsyncWebServer library with the SHT31 that displays temperature and humidity using Arduino IDE. The web server we’ll build updates the readings automatically without the need to refresh the web page.
If you want to learn more about SHT31 you can check our earlier post:
1. Interfacing SHT3x Humidity & Temperature Sensor with Arduino
2. ESP8266 SHT31 Humidity Temperature Monitoring on Thingspeak
Bill of Materials
Following are the components required for this simple IOT project. All the components can be easily purchased from Amazon. The component purchase link is given below.
| S.N. | Components | Quantity | Purchase Links |
|---|---|---|---|
| 1 | ESP32 Board | 1 | Amazon | AliExpress |
| 2 | SHT31 Sensor | 1 | Amazon | AliExpress |
| 3 | Connecting Wires | 5 | Amazon | AliExpress |
| 4 | Breadboard | 1 | Amazon | AliExpress |
SHT31 Humidity Temperature Sensor
SHT31 is the next generation of Sensirion’s temperature and humidity sensors. The SHT31 has increased intelligence, reliability, and improved accuracy specifications compared to its predecessor. Its functionality includes enhanced signal processing, temperature, and humidity that can be read out using I2C communications. This I2C Mini Module makes it easy to read temperature and humidity using our standardized sensor footprint. Plug into a Particle interface module for cloud access from anywhere in the world.

All I2C Mini Modules are designed to operate at 5V DC. Using a convenient 4-Pin plug, devices can be daisy-chained onto the I2C Bus, eliminating the need for soldering. Simply plug together the devices you need for your next automation application.
Features of SHT31 Sensor
1. Dual Purpose Temperature and Humidity Sensor
2. Accuracy of ±2% Relative Humidity
3. 0-100% Humidity Sensing Range
4. -40 to +125°C (-40 to +257°F) Operating Temperature
5. 8-Second Sensor Response Time
6. 0x44 Start Address
7. Modular SHT31 breakout board
Schematic: Interfacing SHT31 with ESP32
Here is the schematic for Interfacing SHT31 Humidity Temperature Sensor with ESP32.

Connect the VCC pin of SHT31 to 3.3V of ESP32 & GND to GND. Connect the SCL & SDA pin of SHT31 to ESP32 SCL (GPIO22) & SDA (GPIO21) pin respectively as shown in the figure above.

Asynchronous Web Server
To build the webserver we’ll use the ESPAsyncWebServer library that provides an easy way to build an asynchronous web server. Building an asynchronous web server has several advantages as mentioned below:
1. Handle more than one connection at the same time
2. When you send the response, you are immediately ready to handle other connections while the server is taking care of sending the response in the background
3. Simple template processing engine to handle templates
4. And much more.
Source Code/program
The source code for ESP32 SHT31 Webserver is given below. You can copy this code and upload it to ESP32 Board. But before that you need few libraries. So download the libraries from the link below.
|
1 2 3 4 5 6 7 8 9 10 11 12 13 14 15 16 17 18 19 20 21 22 23 24 25 26 27 28 29 30 31 32 33 34 35 36 37 38 39 40 41 42 43 44 45 46 47 48 49 50 51 52 53 54 55 56 57 58 59 60 61 62 63 64 65 66 67 68 69 70 71 72 73 74 75 76 77 78 79 80 81 82 83 84 85 86 87 88 89 90 91 92 93 94 95 96 97 98 99 100 101 102 103 104 105 106 107 108 109 110 111 112 113 114 115 116 117 118 119 120 121 122 123 124 125 126 127 128 129 130 131 132 133 134 135 136 137 138 139 140 141 142 143 144 145 146 147 148 149 150 151 152 153 154 155 156 157 158 |
#include "WiFi.h" #include "ESPAsyncWebServer.h" #include <Arduino.h> #include <Wire.h> #include "Adafruit_SHT31.h" // Replace with your network credentials const char* ssid = "BYNARK"; const char* password = "bynark@123"; Adafruit_SHT31 sht31 = Adafruit_SHT31(); // Create AsyncWebServer object on port 80 AsyncWebServer server(80); String readSHT31Temperature(){ float t = sht31.readTemperature(); if (! sht31.begin(0x44)) // Set to 0x45 for alternate i2c addr { Serial.println("SHT31 test"); while (1) delay(1); } if (isnan(t)) { Serial.println("Failed to read temperature!"); return "--"; } else { Serial.print(""); Serial.print("Temperature: "); Serial.println(t); return String(t); } } String readSHT31Humidity() { float h = sht31.readHumidity(); if (isnan(h)) { Serial.println("Failed to read Humidity!"); return "--"; } else { Serial.print("Humidity: "); Serial.println(h); Serial.println(""); return String(h); } } const char index_html[] PROGMEM = R"rawliteral( <!DOCTYPE HTML><html> <head> <meta name="viewport" content="width=device-width, initial-scale=1"> <link rel="stylesheet" href="https://use.fontawesome.com/releases/v5.7.2/css/all.css" integrity="sha384-fnmOCqbTlWIlj8LyTjo7mOUStjsKC4pOpQbqyi7RrhN7udi9RwhKkMHpvLbHG9Sr" crossorigin="anonymous"> <style> html { font-family: Arial; display: inline-block; margin: 0px auto; text-align: center; } h2 { font-size: 3.0rem; } p { font-size: 3.0rem; } .units { font-size: 1.2rem; } .sht31-labels{ font-size: 1.5rem; vertical-align:middle; padding-bottom: 15px; } </style> </head> <body> <h2>ESP32 SHT31 Web Server</h2> <p> <i class="fas fa-thermometer-half" style="color:#059e8a;"></i> <span class="sht31-labels">Temperature</span> <span id="temperature">%TEMPERATURE%</span> <sup class="units">°C</sup> </p> <p> <i class="fas fa-tint" style="color:#00add6;"></i> <span class="sht31-labels">Humidity</span> <span id="humidity">%HUMIDITY%</span> <sup class="units">%</sup> </p> </body> <script> setInterval(function ( ) { var xhttp = new XMLHttpRequest(); xhttp.onreadystatechange = function() { if (this.readyState == 4 && this.status == 200) { document.getElementById("temperature").innerHTML = this.responseText; } }; xhttp.open("GET", "/temperature", true); xhttp.send(); }, 10000 ) ; setInterval(function ( ) { var xhttp = new XMLHttpRequest(); xhttp.onreadystatechange = function() { if (this.readyState == 4 && this.status == 200) { document.getElementById("humidity").innerHTML = this.responseText; } }; xhttp.open("GET", "/humidity", true); xhttp.send(); }, 10000 ) ; </script> </html>)rawliteral"; // Replaces placeholder with sht31 values String processor(const String& var){ //Serial.println(var); if(var == "TEMPERATURE"){ return readSHT31Temperature(); } else if(var == "HUMIDITY"){ return readSHT31Humidity(); } return String(); } void setup(){ // Serial port for debugging purposes Serial.begin(115200); // Connect to Wi-Fi WiFi.begin(ssid, password); while (WiFi.status() != WL_CONNECTED) { delay(1000); Serial.println("Connecting to WiFi.."); } // Print ESP32 Local IP Address Serial.println(WiFi.localIP()); // Route for root / web page server.on("/", HTTP_GET, [](AsyncWebServerRequest *request){ request->send_P(200, "text/html", index_html, processor); }); server.on("/temperature", HTTP_GET, [](AsyncWebServerRequest *request){ request->send_P(200, "text/plain", readSHT31Temperature().c_str()); }); server.on("/humidity", HTTP_GET, [](AsyncWebServerRequest *request){ request->send_P(200, "text/plain", readSHT31Humidity().c_str()); }); // Start server server.begin(); } void loop(){ } |
ESP32 SHT31 Web Server Demonstration
After uploading, open the Serial Monitor at a baud rate of 115200. Press the ESP32 reset button. The ESP32 IP address should be printed in the serial monitor along with the humidity and temperature value.
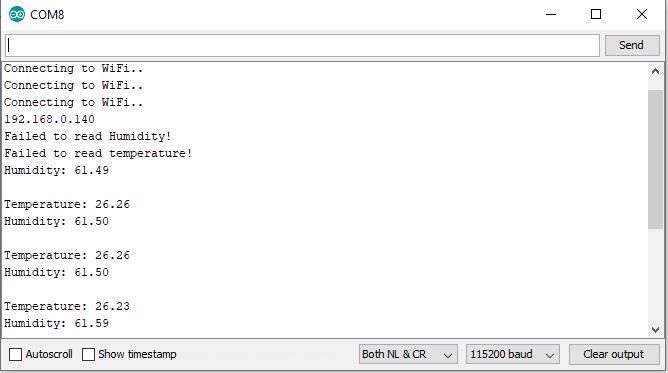
Now copy the IP Address and then open a browser and type the ESP32 IP address. Your web server should display the latest sensor readings. You will notice that the temperature and humidity readings are updated automatically without the need to refresh the web page.






1 Comment
it is not working! Always reconnect wifi!