

Overview
In this project, we’ll interface an LM35 Temperature Sensor with an ESP32 to make a digital thermometer. Unlike using an Arduino and a 16*2 LCD for display, here we’ll employ the ESP32’s capability to host a web server. Earlier we used LM35 with Arduino to display the temperature reading on LCD screen.
The Web Server presents the temperature readings directly on a webpage which can be accessible through any standard web browser. This approach not only modernizes the display method but also enables remote temperature monitoring over a local network.
The LM35 Temperature Sensor is an analog sensor whose output is proportional to the temperature in Centigrade. It offers a temperature measurement range from -55°C to +150°C with an accuracy of +/- 0.75°C. This wide range and high accuracy make the LM35 an excellent choice for a variety of temperature-sensing applications.
Bill of Materials
We need the following components for designing a digital thermometer using LM35 Temperature Sensor & ESP32.
| S.N. | Components Name | Quantity | Purchase Links |
|---|---|---|---|
| 1 | ESP32 Board | 1 | Amazon | AliExpress |
| 2 | LM35 Temperature Sensor | 1 | Amazon | AliExpress |
| 3 | Connecting Wires | 5 | Amazon | AliExpress |
| 4 | Breadboard | 1 | Amazon | AliExpress |
LM35 Temperature Sensor

The LM35 series are precise temperature sensors with an output voltage linear to the Centigrade temperature, eliminating the need to subtract a constant voltage for Centigrade scaling unlike Kelvin-calibrated sensors. It achieves typical accuracies of ±0.25°C at room temperature and ±0.75°C across a -55°C to 150°C range without external calibration.

Its cost-effectiveness is ensured by wafer-level trimming and calibration. The LM35’s low-output impedance, linear output, and inherent calibration facilitate easy interfacing with circuitry. It operates on single or dual power supplies, drawing only 60 µA, which minimizes self-heating to under 0.1°C in still air.
Features
- Calibrated directly in Degree Celsius (Centigrade)
- Linear at 10.0 mV/°C scale factor
- 0.5°C accuracy guarantee-able (at a25°C)
- Rated for full -55°C to a 150°C range.s
- Suitable for remote applications
- Low cost due to wafer-level trimming
- Operates from 4 to 30 volts
- Less than 60 mA current drain
- Low self-heating, 0.08°C instill an air
- Non-linearity only 0.25°C typical
- Low impedance output, 0.1Ωfor 1 mA load
Working of LM35 Temperature Sensor
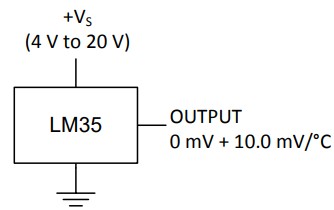
The LM35 temperature sensor operates based on a linear scale factor, specified as +10 millivolts (mV) per degree Centigrade. This means for every 10 mV increase in output from the sensor’s output pin (Vout), the temperature reading increases by 1°C. For instance, if the sensor outputs 100 mV at Vout, this corresponds to a temperature of 10°C. This linearity holds true for negative temperatures as well; a -100 mV output indicates -10°C.
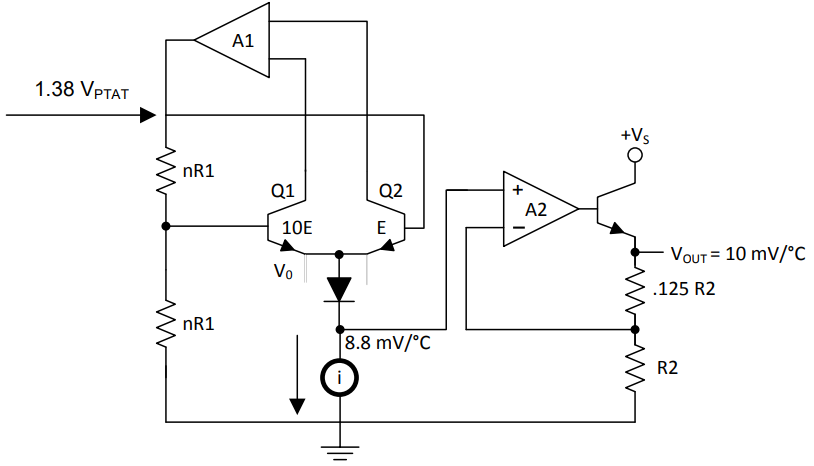
The sensor’s functionality is derived from its internal design, featuring two transistors with a significant difference in emitter area. One transistor has ten times the emitter area of the other, resulting in a tenfold difference in current density given that the same current flows through both. This discrepancy generates a voltage across resistor R1 that is proportional to the absolute temperature, yielding an output that is nearly linear within the operational range. Any minor deviations from linearity are corrected by a special circuit that adjusts the slightly curved voltage-temperature relationship.
An amplifier in the circuit ensures the voltage at the base of one transistor (Q1) aligns with the proportional to absolute temperature (PTAT) value by comparing the outputs from the two transistors. Another amplifier then converts this PTAT voltage, representing the absolute temperature in Kelvin, into a reading in either Fahrenheit or Celsius, depending on the specific model of the sensor (LM34 for Fahrenheit, LM35 for Celsius).
Interfacing LM35 Temperature Sensor with ESP32
Let’s interface the LM35 Temperature Sensor with the ESP32 Development Board. The process for connecting the sensor is straightforward.

- Connect the VCC of the LM35 to the 5V (Vin) on the ESP32.
- Connect the GND of the LM35 to a GND pin on the ESP32.
- Finally, connect the Vout (output) of the LM35 to one of the ESP32’s analog input pins (e.g., GPIO33)

For making the connections, a breadboard can be useful, allowing you to use jumper wires to easily connect the LM35 to the ESP32 without soldering.
Source Code/Program for Reading LM35 Temperature Value with ESP32
Let us look at the code for reading temperature readings from the LM35 Temperature Sensor using the ESP32 Board. The ESP32 uses a different approach for analog reading compared to Arduino, accounting for its 3.3V operating voltage and the capability to calibrate ADC readings for more accurate voltage measurement.
For the ESP32, the temperature calculation is slightly adapted to fit its characteristics:
This formula is based on the LM35’s property of outputting a linear voltage increase of 10mV per degree Celsius increase in temperature. The ESP32 reads the analog value from the LM35, calibrates this reading to obtain the voltage in millivolts (using ADC calibration functions), and then divides it by 10 to convert this voltage into the corresponding temperature in Celsius.
The following code reads temperature data from an LM35 sensor connected to an ESP32 and calculates the temperature in both Celsius and Fahrenheit. It then prints these temperature readings to the Serial Monitor every second, allowing for real-time monitoring of the sensor’s output.
|
1 2 3 4 5 6 7 8 9 10 11 12 13 14 15 16 17 18 19 20 21 22 23 24 25 26 27 28 29 30 31 32 33 34 35 36 37 38 39 40 41 42 43 44 45 46 47 48 49 50 51 52 53 54 55 56 57 58 |
#include "esp_adc_cal.h" // Define the GPIO pin where the LM35 temperature sensor is connected #define LM35_SENSOR_PIN 33 // Function prototype for reading and calibrating the ADC value uint32_t readAndCalibrateADC(int rawADCValue); void setup() { // Initialize serial communication at 115200 baud to print the temperature readings Serial.begin(115200); } void loop() { // Variables to store raw ADC value, voltage in millivolts, and temperatures in Celsius and Fahrenheit int rawADCValue = 0; float voltageInMilliVolts = 0.0; float temperatureInCelsius = 0.0; float temperatureInFahrenheit = 0.0; // Read the raw ADC value from the LM35 sensor rawADCValue = analogRead(LM35_SENSOR_PIN); // Calibrate the raw ADC value and convert it to voltage in millivolts voltageInMilliVolts = readAndCalibrateADC(rawADCValue); // Calculate the temperature in Celsius. The LM35 outputs 10mV per degree Celsius. temperatureInCelsius = voltageInMilliVolts / 10; // Convert the temperature to Fahrenheit temperatureInFahrenheit = (temperatureInCelsius * 1.8) + 32; // Print the temperature readings in both Celsius and Fahrenheit Serial.print("Temperature = "); Serial.print(temperatureInCelsius); Serial.print(" °C, "); Serial.print("Temperature = "); Serial.print(temperatureInFahrenheit); Serial.println(" °F"); // Delay for a short period before reading the temperature again delay(1000); // Delay of 1 second } // Function to read and calibrate the raw ADC value to voltage in millivolts uint32_t readAndCalibrateADC(int rawADCValue) { // ADC calibration characteristics esp_adc_cal_characteristics_t adcCharacteristics; // Characterize the ADC at attenuation of 11dB and width of 12 bits esp_adc_cal_characterize(ADC_UNIT_1, ADC_ATTEN_DB_11, ADC_WIDTH_BIT_12, 1100, &adcCharacteristics); // Convert the raw ADC value to calibrated voltage in millivolts return esp_adc_cal_raw_to_voltage(rawADCValue, &adcCharacteristics); } |
Upload the code to the ESP32 Board. Then open the Serial Monitor after uploading is completed.
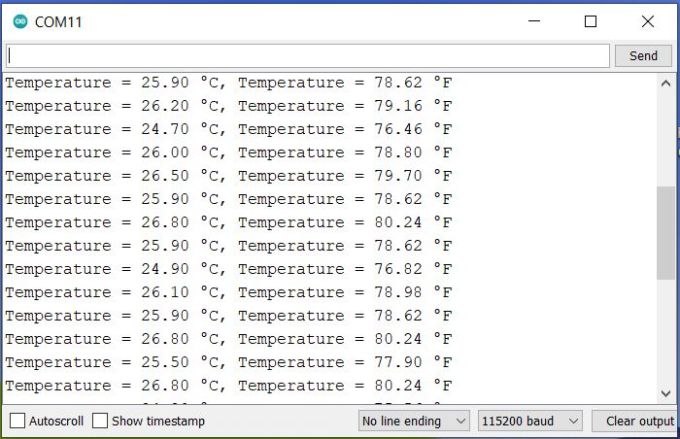
The Serial Monitor will show the value of temperature reading in both Celsius and Fahrenheit readings.
Displaying the LM35 Temperature Sensor Readings on ESP32 Web Server
Instead of displaying the temperature reading on a Serial Monitor, let’s create a web page where the ESP32 pushes the LM35 Temperature reading every second. The ESP32 connects to a Wi-Fi network and hosts a web server accessible via its IP address. It displays the real-time temperature updates and offers a JSON endpoint (“/readTemp”) for fetching the latest temperature readings.
This webpage is designed to display temperature readings in both Celsius and Fahrenheit. Styled with CSS for a clean and user-friendly interface, it features a responsive layout that adjusts for mobile screens. The webpage dynamically updates the temperature data every second via JavaScript, without needing to refresh the page manually.
Main .ino file
Open a new sketch in Arduino IDE and save the following code with any name.
From these lines change the Wi-Fi SSID & Password & replace them with yours.
|
1 2 3 |
// Replace these with your WiFi network settings const char* ssid = "*****************"; const char* password = "*****************"; |
That’s the only change you need for this sketch. Now you are good to go.
|
1 2 3 4 5 6 7 8 9 10 11 12 13 14 15 16 17 18 19 20 21 22 23 24 25 26 27 28 29 30 31 32 33 34 35 36 37 38 39 40 41 42 43 44 45 46 47 48 49 50 51 52 53 54 55 56 57 58 59 60 61 62 63 64 65 66 67 68 69 70 71 72 73 74 75 76 77 78 79 80 81 82 83 84 85 86 87 88 89 90 91 92 93 94 95 96 97 98 99 100 101 102 |
#include <WiFi.h> #include <WebServer.h> #include "esp_adc_cal.h" #include "html.h" WebServer server(80); #define LM35_SENSOR_PIN 33 // Function prototype for reading and calibrating the ADC value uint32_t readAndCalibrateADC(int rawADCValue); // Variables to store raw ADC value, voltage in millivolts, and temperatures in Celsius and Fahrenheit int rawADCValue = 0; float voltageInMilliVolts = 0.0; float temperatureInCelsius = 0.0; float temperatureInFahrenheit = 0.0; // Replace these with your WiFi network settings const char* ssid = "*****************"; const char* password = "*****************"; void MainPage() { String _html_page = html_page; /*Read The HTML Page*/ server.send(200, "text/html", _html_page); /*Send the code to the web server*/ } void Temp() { // Prepare a JSON string that includes both Celsius and Fahrenheit temperatures String json = "{"; json += "\"celsius\": " + String(temperatureInCelsius, 2) + ","; json += "\"fahrenheit\": " + String(temperatureInFahrenheit, 2); json += "}"; server.send(200, "application/json", json); //Send updated temperature values to the web server } void setup(void) { Serial.begin(115200); /*Set the baudrate to 115200*/ WiFi.mode(WIFI_STA); /*Set the WiFi in STA Mode*/ WiFi.begin(ssid, password); Serial.print("Connecting to "); Serial.println(ssid); delay(1000); /*Wait for 1000mS*/ while (WiFi.waitForConnectResult() != WL_CONNECTED) { Serial.print("."); } Serial.print("Connected to "); Serial.println(ssid); Serial.print("Your Local IP address is: "); Serial.println(WiFi.localIP()); /*Print the Local IP*/ server.on("/", MainPage); /*Display the Web/HTML Page*/ server.on("/readTemp", Temp); /*Display the updated Temperature and Humidity value*/ server.begin(); /*Start Server*/ delay(1000); /*Wait for 1000mS*/ } void loop(void) { // Read the raw ADC value from the LM35 sensor rawADCValue = analogRead(LM35_SENSOR_PIN); // Calibrate the raw ADC value and convert it to voltage in millivolts voltageInMilliVolts = readAndCalibrateADC(rawADCValue); // Calculate the temperature in Celsius. The LM35 outputs 10mV per degree Celsius. temperatureInCelsius = voltageInMilliVolts / 10; // Convert the temperature to Fahrenheit temperatureInFahrenheit = (temperatureInCelsius * 1.8) + 32; server.handleClient(); // Print the temperature readings in both Celsius and Fahrenheit Serial.print("Temperature = "); Serial.print(temperatureInCelsius); Serial.print(" °C, "); Serial.print("Temperature = "); Serial.print(temperatureInFahrenheit); Serial.println(" °F"); // Delay for a short period before reading the temperature again delay(1000); // Delay of 1 second } // Function to read and calibrate the raw ADC value to voltage in millivolts uint32_t readAndCalibrateADC(int rawADCValue) { // ADC calibration characteristics esp_adc_cal_characteristics_t adcCharacteristics; // Characterize the ADC at attenuation of 11dB and width of 12 bits esp_adc_cal_characterize(ADC_UNIT_1, ADC_ATTEN_DB_11, ADC_WIDTH_BIT_12, 1100, &adcCharacteristics); // Convert the raw ADC value to calibrated voltage in millivolts return esp_adc_cal_raw_to_voltage(rawADCValue, &adcCharacteristics); } |
html.h file
Open another sketch and paste the following HTML code to the sketch editor. Save the file with the name “html.h” on the same folder that has the main ino file.
|
1 2 3 4 5 6 7 8 9 10 11 12 13 14 15 16 17 18 19 20 21 22 23 24 25 26 27 28 29 30 31 32 33 34 35 36 37 38 39 40 41 42 43 44 45 46 47 48 49 50 51 52 53 54 55 56 57 58 59 60 61 62 63 64 65 66 67 68 69 70 71 72 73 74 75 76 77 78 79 80 81 82 83 84 85 86 87 88 89 90 91 |
const char html_page[] PROGMEM = R"rawString( <!DOCTYPE html> <html lang="en"> <head> <meta charset="UTF-8"> <meta name="viewport" content="width=device-width, initial-scale=1.0"> <title>Temperature Monitor</title> <style> body { margin: 0; padding: 20px; /* Add some padding around */ font-family: 'Arial', sans-serif; background-color: #e4f5fc; color: #555; display: block; /* Change from flex to block */ //background-image: linear-gradient(to bottom, #cfd9df 0%, #e2ebf0 100%); } .container { text-align: center; padding: 2em; background: white; border-radius: 10px; box-shadow: 0 4px 15px rgba(0,0,0,0.1); max-width: 500px; margin: 20px auto; /* Adjust top margin, auto for horizontal centering */ } h1 { color: #0d47a1; font-weight: 300; margin-bottom: 0.3em; } .temperature { display: inline-block; background: #0d47a1; color: #fff; padding: 0.3em 1em; border-radius: 5px; margin: 0.5em 0; font-size: 1.5em; box-shadow: 0 2px 10px rgba(0,0,0,0.1); } .temperature span { display: block; font-size: 3em; font-weight: bold; } .degree-symbol { font-size: 0.6em; vertical-align: super; } @media (max-width: 600px) { .container { padding: 1em; margin: 20px auto; /* Adjust for mobile */ } .temperature span { font-size: 2em; } } </style> </head> <body> <div class="container"> <h1>ESP32 LM35 Temperature</h1> <div class="temperature"> <span id="TempValueCelsius">--</span> <span class="degree-symbol">°C</span> </div> <div class="temperature"> <span id="TempValueFahrenheit">--</span> <span class="degree-symbol">°F</span> </div> </div> <script> setInterval(function() { var xhttp = new XMLHttpRequest(); xhttp.onreadystatechange = function() { if (this.readyState == 4 && this.status == 200) { var data = JSON.parse(this.responseText); document.getElementById("TempValueCelsius").innerHTML = data.celsius; document.getElementById("TempValueFahrenheit").innerHTML = data.fahrenheit; } }; xhttp.open("GET", "readTemp", true); xhttp.send(); }, 1000); // Refresh every 1 second </script> </body> </html> )rawString"; |
From the board manager select the ESP32 board that you are using. Then select the ‘COM’ port. Finally, you can hit the upload button to upload the code.
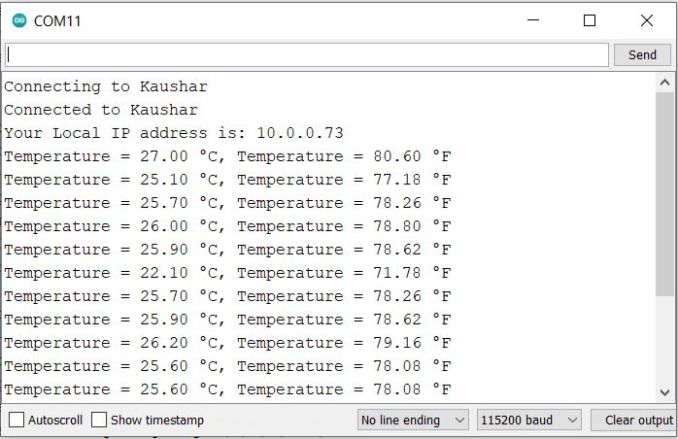
Once, the code uploading is done, open your Serial Monitor. You will see the ESP32 connecting to the Wi-Fi network using the credentials on the code. Once connected, the Serial Monitor will show the value of temperatures in both Celsius & Fahrenheit scales. It also prints the IP Address of the ESP32.
Go to your web browser and enter the copied IP Address. After entering the IP address of the ESP32 into your web browser and hitting Enter, you will be directed to the ESP32’s web server homepage. This page, as defined in the HTML code within your ESP32 sketch, will display the temperature data captured from the LM35 sensor.
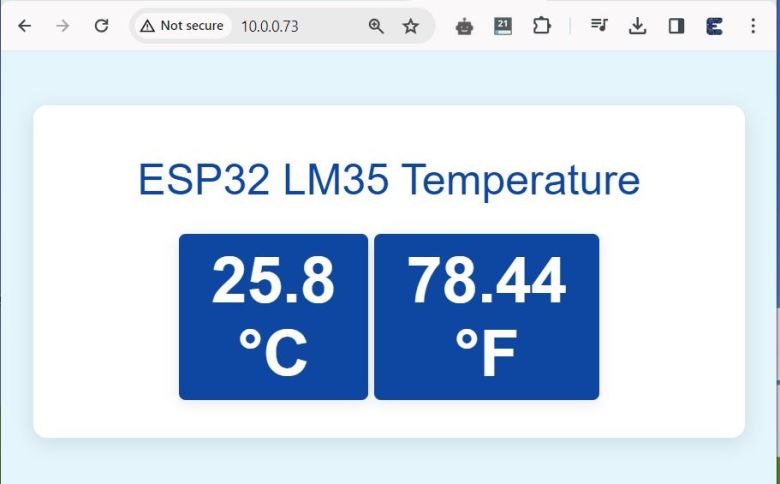
You’ll see real-time temperature readings in both Celsius and Fahrenheit, visually presented in a user-friendly format. The temperature on the webpage will refresh at set intervals, providing live temperature monitoring without needing to manually reload the page.
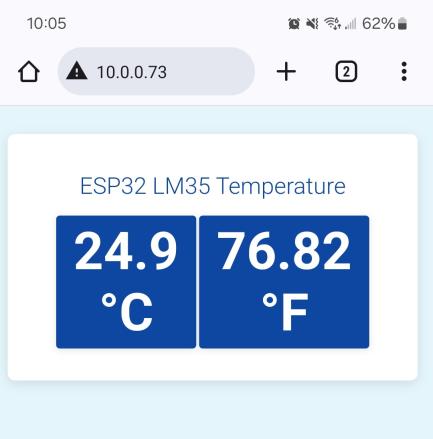
You can observe the same reading from a Mobile dashboard as well.
Additionally, for more interactive or data-driven applications, accessing the “/readTemp” endpoint on the same IP address (e.g., http://[ESP32_IP_Address]/readTemp) will return the latest temperature readings in a JSON format.
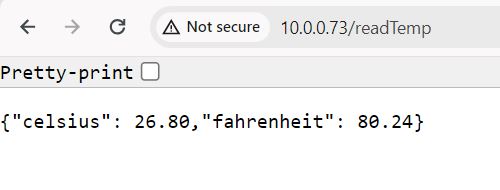
This feature can be particularly useful for integrating temperature data into other applications or services that require real-time data in a programmable format.


3 Comments
Thanks D
How is this a precise sensor? I see variations from 22 to 27! That’s what I also see myself. So no criticism towards you!
Great presentation of the subject! Very easy to follow, so Ty!
I would like to know how you mount the board and especially the sensor for best results.
thank you