

In this project we will make IoT Based Patient Health Monitoring System & Monitor the Health Status of Patient on ESP32 Web Server.
Overview
With tons of new healthcare technology start-ups, IoT is rapidly revolutionizing the healthcare industry. Keeping track of the health status of your patient at home is a difficult task because of the busy schedules and our daily life work. Specially old age patients should be periodically monitored. So we propose an innovative system that automated this task with ease. Our device puts forward a smart patient health tracking system using Web Server so that the Patient health parameters like Heart Rate and Blood Oxygen level along with body temperature can be monitored.
So in this project, we will learn how to make IoT Based Patient Health Monitoring System Project. We will use the MAX30100/102 Pulse Oximeter sensor to measure the Heart Rate/Pulse(BPM) as well as the Blood Oxygen Level(SpO2). We will use a DS18B20 Temperature Sensor to measure the temperature of the body. Similarly Patient needs to be placed in a room with a certain temperature and humidity level so that he doesn’t feel uncomfortable. In order to do that we need to monitor the room temperature and humidity as well. So we will be using DHT11 Humidity & Temperature Sensor.
Here is the earlier basic version of this project using Pulse Sensor & LM35 Temperature Sensor, you can follow that as well: IoT Based Patient Health Monitoring using ESP8266 & Arduino
Bill of Materials
Following are the components required for making this project. All the components can be purchased from Amazon. The components purchased link is given below.
| S.N. | Components Name | Quantity | Purchase Links |
|---|---|---|---|
| 1 | ESP32 Board | 1 | Amazon | AliExpress |
| 2 | MAX30100 Pulse Oximeter Sensor | 1 | Amazon | AliExpress |
| 3 | DS18B20 Sensor | 1 | Amazon | AliExpress |
| 4 | DHT11 Sensor | 1 | Amazon | AliExpress |
| 5 | Resistor 4.7K | 1 | Amazon | AliExpress |
| 6 | Connecting Wires | 10 | Amazon | AliExpress |
| 7 | Breadboard | 1 | Amazon | AliExpress |
MAX30100 Pulse Oximeter Sensor
The sensor is integrated pulse oximetry and heart-rate monitor sensor solution. It combines two LED’s, a photodetector, optimized optics, and low-noise analog signal processing to detect pulse and heart-rate signals. It operates from 1.8V and 3.3V power supplies and can be powered down through software with negligible standby current, permitting the power supply to remain connected at all times.

The device has two LEDs, one emitting red light, another emitting infrared light. For pulse rate, only the infrared light is needed. Both the red light and infrared light is used to measure oxygen levels in the blood. When the heart pumps blood, there is an increase in oxygenated blood as a result of having more blood. As the heart relaxes, the volume of oxygenated blood also decreases. By knowing the time between the increase and decrease of oxygenated blood, the pulse rate is determined.
It turns out, oxygenated blood absorbs more infrared light and passes more red light while deoxygenated blood absorbs red light and passes more infrared light. This is the main function of the MAX30100: it reads the absorption levels for both light sources and stored them in a buffer that can be read via I2C.
To learn more about MAX30100 Pulse Oximeter you can follow this post: Blood Oxygen & Heart Rate Monitor with MAX30100 & Arduino
DS18B20 Temperature Sensor
This is a pre-wired and waterproofed version of the DS18B20 sensor. Handy for when you need to measure something far away, or in wet conditions. The Sensor can measure the temperature between -55 to 125°C (-67°F to +257°F). The cable is jacketed in PVC.
Because it is digital, there is no signal degradation even over long distances. These 1-wire digital temperature sensors are fairly precise, i.e ±0.5°C over much of the range. It can give up to 12 bits of precision from the onboard digital-to-analog converter. They work great with any microcontroller using a single digital pin.

The only downside is they use the Dallas 1-Wire protocol, which is somewhat complex and requires a bunch of code to parse out the communication. We toss in a 4.7k resistor, which is required as a pullup from the DATA to the VCC line when using the sensor.
To learn more about DS18B20 Temperature Sensor you can follow this post: Interfacing Multiple DS18B20 Temperature Sensors to Arduino
DHT11 Humidity & Temperature Sensor
The DHT11 is a basic, ultra low-cost digital temperature and humidity sensor. It uses a capacitive humidity sensor and a thermistor to measure the surrounding air, and spits out a digital signal on the data pin (no analog input pins needed).

It’s fairly simple to use, but requires careful timing to grab data. The only real downside of this sensor is you can only get new data from it once every 2 seconds, so when using the library, sensor readings can be up to 2 seconds old.
To learn more about DHT11 Humidity/Temperature Sensor you can follow this post: Interfacing DHT11 Humdity & Temperature Sensor with Arduino & LCD
IoT Based Patient Health Monitoring on ESP32 Web Server
Now let us begin with the designing of IoT Based Patient Health Monitoring on ESP32 Web Server. So the circuit digram for interfacing MAX30100, DHT11 & DS18B20 with ESP32 is given below.

All the sensor can work at 3.3V VCC. So connect their VCC to 3.3V Power Supply. Connect the GND to GND. MAX30100 is an I2C Sensor, so connect its SDA & SCL pin to GPIO21 & GPIO22. Connect its INT pin to GPIO19 of ESP32. The output pin of DHT11 is connected to GPIO18 of ESP32. Similarly, the output pin of DS18B20 is connected to GPIO5 of ESP32. A 4.7K pull-up resistor is connected between output pin & VCC pin of DS18B20.

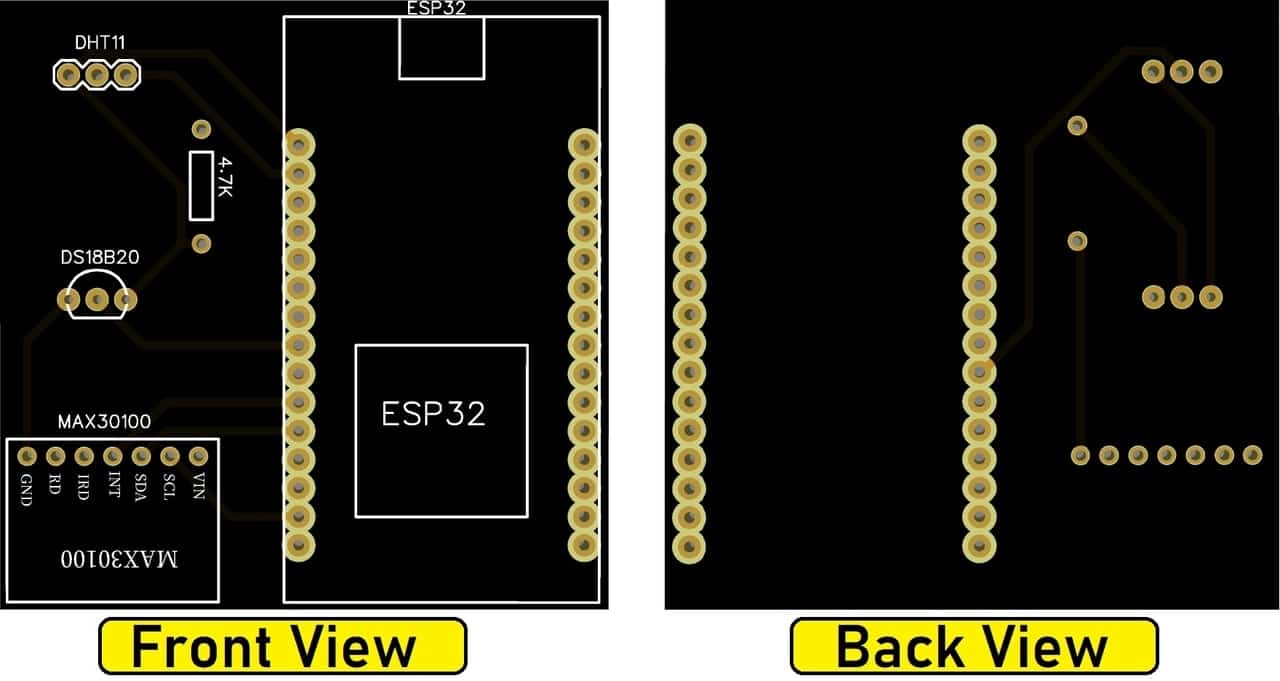
Here I assembled the circuit on a breadboard. So it doesn’t look nice and isn’t portable. So I designed a PCB for it using EasyEDA PCB Designing tool.
PCB Designing, Gerber File & PCB Ordering
The PCB for IoT Based Patient Health Monitoring has been designed in EasyEDA online PCB making tool. Below is the front view and Back View of the PCB.
The Gerber File for the PCB is given below. You can simply download the Gerber File and order the PCB from ALLPCB at 1$ only.
You can use this Gerber file to order high quality PCB for this project. To do that visit the ALLPCB official website by clicking here: https://www.allpcb.com/.

You can now upload the Gerber File by choosing the Quote Now option. From these options, you can choose the Material Type, Dimensions, Quantity, Thickness, Solder Mask Color and other required parameters.

After filling all details, select your country and shipping method. Finally you can place the order.
Source Code/Program
The Program/Source Code for IoT Based Patient Health Monitoring on ESP32 Web Server is given below. You need to install a few libraries for source code compilation. The library link is given below as well. Download all the libraries and add to the Arduino IDE.
1. Arduino MAX30100 Library
2. OneWire Library
3. Dallas Temperature Library
4. DHT11 Library
Make changes in the Wifi SSID & Password.
|
1 2 3 4 5 6 7 8 9 10 11 12 13 14 15 16 17 18 19 20 21 22 23 24 25 26 27 28 29 30 31 32 33 34 35 36 37 38 39 40 41 42 43 44 45 46 47 48 49 50 51 52 53 54 55 56 57 58 59 60 61 62 63 64 65 66 67 68 69 70 71 72 73 74 75 76 77 78 79 80 81 82 83 84 85 86 87 88 89 90 91 92 93 94 95 96 97 98 99 100 101 102 103 104 105 106 107 108 109 110 111 112 113 114 115 116 117 118 119 120 121 122 123 124 125 126 127 128 129 130 131 132 133 134 135 136 137 138 139 140 141 142 143 144 145 146 147 148 149 150 151 152 153 154 155 156 157 158 159 160 161 162 163 164 165 166 167 168 169 170 171 172 173 174 175 176 177 178 179 180 181 182 183 184 185 186 187 188 189 190 191 192 193 194 195 196 197 198 199 200 201 202 203 204 205 206 207 208 209 210 211 212 213 214 215 216 217 218 219 220 221 222 223 224 225 226 227 228 229 230 231 232 233 234 |
#include <WiFi.h> #include <WebServer.h> #include <Wire.h> #include "MAX30100_PulseOximeter.h" #include <OneWire.h> #include <DallasTemperature.h> #include <dht.h> #define DHT11_PIN 18 #define DS18B20 5 #define REPORTING_PERIOD_MS 1000 float temperature, humidity, BPM, SpO2, bodytemperature; /*Put your SSID & Password*/ const char* ssid = "Alexahome"; // Enter SSID here const char* password = "12345678"; //Enter Password here dht DHT; PulseOximeter pox; uint32_t tsLastReport = 0; OneWire oneWire(DS18B20); DallasTemperature sensors(&oneWire); WebServer server(80); void onBeatDetected() { Serial.println("Beat!"); } void setup() { Serial.begin(115200); pinMode(19, OUTPUT); delay(100); Serial.println("Connecting to "); Serial.println(ssid); //connect to your local wi-fi network WiFi.begin(ssid, password); //check wi-fi is connected to wi-fi network while (WiFi.status() != WL_CONNECTED) { delay(1000); Serial.print("."); } Serial.println(""); Serial.println("WiFi connected..!"); Serial.print("Got IP: "); Serial.println(WiFi.localIP()); server.on("/", handle_OnConnect); server.onNotFound(handle_NotFound); server.begin(); Serial.println("HTTP server started"); Serial.print("Initializing pulse oximeter.."); if (!pox.begin()) { Serial.println("FAILED"); for (;;); } else { Serial.println("SUCCESS"); pox.setOnBeatDetectedCallback(onBeatDetected); } pox.setIRLedCurrent(MAX30100_LED_CURR_7_6MA); // Register a callback for the beat detection } void loop() { server.handleClient(); pox.update(); sensors.requestTemperatures(); int chk = DHT.read11(DHT11_PIN); temperature = DHT.temperature; humidity = DHT.humidity; BPM = pox.getHeartRate(); SpO2 = pox.getSpO2(); bodytemperature = sensors.getTempCByIndex(0); if (millis() - tsLastReport > REPORTING_PERIOD_MS) { Serial.print("Room Temperature: "); Serial.print(DHT.temperature); Serial.println("°C"); Serial.print("Room Humidity: "); Serial.print(DHT.humidity); Serial.println("%"); Serial.print("BPM: "); Serial.println(BPM); Serial.print("SpO2: "); Serial.print(SpO2); Serial.println("%"); Serial.print("Body Temperature: "); Serial.print(bodytemperature); Serial.println("°C"); Serial.println("*********************************"); Serial.println(); tsLastReport = millis(); } } void handle_OnConnect() { server.send(200, "text/html", SendHTML(temperature, humidity, BPM, SpO2, bodytemperature)); } void handle_NotFound(){ server.send(404, "text/plain", "Not found"); } String SendHTML(float temperature,float humidity,float BPM,float SpO2, float bodytemperature){ String ptr = "<!DOCTYPE html>"; ptr +="<html>"; ptr +="<head>"; ptr +="<title>ESP32 Patient Health Monitoring</title>"; ptr +="<meta name='viewport' content='width=device-width, initial-scale=1.0'>"; ptr +="<link href='https://fonts.googleapis.com/css?family=Open+Sans:300,400,600' rel='stylesheet'>"; ptr +="<style>"; ptr +="html { font-family: 'Open Sans', sans-serif; display: block; margin: 0px auto; text-align: center;color: #444444;}"; ptr +="body{margin: 0px;} "; ptr +="h1 {margin: 50px auto 30px;} "; ptr +=".side-by-side{display: table-cell;vertical-align: middle;position: relative;}"; ptr +=".text{font-weight: 600;font-size: 19px;width: 200px;}"; ptr +=".reading{font-weight: 300;font-size: 50px;padding-right: 25px;}"; ptr +=".temperature .reading{color: #F29C1F;}"; ptr +=".humidity .reading{color: #3B97D3;}"; ptr +=".BPM .reading{color: #FF0000;}"; ptr +=".SpO2 .reading{color: #955BA5;}"; ptr +=".bodytemperature .reading{color: #F29C1F;}"; ptr +=".superscript{font-size: 17px;font-weight: 600;position: absolute;top: 10px;}"; ptr +=".data{padding: 10px;}"; ptr +=".container{display: table;margin: 0 auto;}"; ptr +=".icon{width:65px}"; ptr +="</style>"; ptr +="</head>"; ptr +="<body>"; ptr +="<h1>ESP32 Patient Health Monitoring</h1>"; ptr +="<h3>www.how2electronics.com</h3>"; ptr +="<div class='container'>"; ptr +="<div class='data temperature'>"; ptr +="<div class='side-by-side icon'>"; ptr +="<svg enable-background='new 0 0 19.438 54.003'height=54.003px id=Layer_1 version=1.1 viewBox='0 0 19.438 54.003'width=19.438px x=0px xml:space=preserve xmlns=http://www.w3.org/2000/svg xmlns:xlink=http://www.w3.org/1999/xlink y=0px><g><path d='M11.976,8.82v-2h4.084V6.063C16.06,2.715,13.345,0,9.996,0H9.313C5.965,0,3.252,2.715,3.252,6.063v30.982"; ptr +="C1.261,38.825,0,41.403,0,44.286c0,5.367,4.351,9.718,9.719,9.718c5.368,0,9.719-4.351,9.719-9.718"; ptr +="c0-2.943-1.312-5.574-3.378-7.355V18.436h-3.914v-2h3.914v-2.808h-4.084v-2h4.084V8.82H11.976z M15.302,44.833"; ptr +="c0,3.083-2.5,5.583-5.583,5.583s-5.583-2.5-5.583-5.583c0-2.279,1.368-4.236,3.326-5.104V24.257C7.462,23.01,8.472,22,9.719,22"; ptr +="s2.257,1.01,2.257,2.257V39.73C13.934,40.597,15.302,42.554,15.302,44.833z'fill=#F29C21 /></g></svg>"; ptr +="</div>"; ptr +="<div class='side-by-side text'>Room Temperature</div>"; ptr +="<div class='side-by-side reading'>"; ptr +=(int)temperature; ptr +="<span class='superscript'>°C</span></div>"; ptr +="</div>"; ptr +="<div class='data humidity'>"; ptr +="<div class='side-by-side icon'>"; ptr +="<svg enable-background='new 0 0 29.235 40.64'height=40.64px id=Layer_1 version=1.1 viewBox='0 0 29.235 40.64'width=29.235px x=0px xml:space=preserve xmlns=http://www.w3.org/2000/svg xmlns:xlink=http://www.w3.org/1999/xlink y=0px><path d='M14.618,0C14.618,0,0,17.95,0,26.022C0,34.096,6.544,40.64,14.618,40.64s14.617-6.544,14.617-14.617"; ptr +="C29.235,17.95,14.618,0,14.618,0z M13.667,37.135c-5.604,0-10.162-4.56-10.162-10.162c0-0.787,0.638-1.426,1.426-1.426"; ptr +="c0.787,0,1.425,0.639,1.425,1.426c0,4.031,3.28,7.312,7.311,7.312c0.787,0,1.425,0.638,1.425,1.425"; ptr +="C15.093,36.497,14.455,37.135,13.667,37.135z'fill=#3C97D3 /></svg>"; ptr +="</div>"; ptr +="<div class='side-by-side text'>Room Humidity</div>"; ptr +="<div class='side-by-side reading'>"; ptr +=(int)humidity; ptr +="<span class='superscript'>%</span></div>"; ptr +="</div>"; ptr +="<div class='data Heart Rate'>"; ptr +="<div class='side-by-side icon'>"; ptr +="<svg enable-background='new 0 0 40.542 40.541'height=40.541px id=Layer_1 version=1.1 viewBox='0 0 40.542 40.541'width=40.542px x=0px xml:space=preserve xmlns=http://www.w3.org/2000/svg xmlns:xlink=http://www.w3.org/1999/xlink y=0px><g><path d='M34.313,20.271c0-0.552,0.447-1,1-1h5.178c-0.236-4.841-2.163-9.228-5.214-12.593l-3.425,3.424"; ptr +="c-0.195,0.195-0.451,0.293-0.707,0.293s-0.512-0.098-0.707-0.293c-0.391-0.391-0.391-1.023,0-1.414l3.425-3.424"; ptr +="c-3.375-3.059-7.776-4.987-12.634-5.215c0.015,0.067,0.041,0.13,0.041,0.202v4.687c0,0.552-0.447,1-1,1s-1-0.448-1-1V0.25"; ptr +="c0-0.071,0.026-0.134,0.041-0.202C14.39,0.279,9.936,2.256,6.544,5.385l3.576,3.577c0.391,0.391,0.391,1.024,0,1.414"; ptr +="c-0.195,0.195-0.451,0.293-0.707,0.293s-0.512-0.098-0.707-0.293L5.142,6.812c-2.98,3.348-4.858,7.682-5.092,12.459h4.804"; ptr +="c0.552,0,1,0.448,1,1s-0.448,1-1,1H0.05c0.525,10.728,9.362,19.271,20.22,19.271c10.857,0,19.696-8.543,20.22-19.271h-5.178"; ptr +="C34.76,21.271,34.313,20.823,34.313,20.271z M23.084,22.037c-0.559,1.561-2.274,2.372-3.833,1.814"; ptr +="c-1.561-0.557-2.373-2.272-1.815-3.833c0.372-1.041,1.263-1.737,2.277-1.928L25.2,7.202L22.497,19.05"; ptr +="C23.196,19.843,23.464,20.973,23.084,22.037z'fill=#26B999 /></g></svg>"; ptr +="</div>"; ptr +="<div class='side-by-side text'>Heart Rate</div>"; ptr +="<div class='side-by-side reading'>"; ptr +=(int)BPM; ptr +="<span class='superscript'>BPM</span></div>"; ptr +="</div>"; ptr +="<div class='data Blood Oxygen'>"; ptr +="<div class='side-by-side icon'>"; ptr +="<svg enable-background='new 0 0 58.422 40.639'height=40.639px id=Layer_1 version=1.1 viewBox='0 0 58.422 40.639'width=58.422px x=0px xml:space=preserve xmlns=http://www.w3.org/2000/svg xmlns:xlink=http://www.w3.org/1999/xlink y=0px><g><path d='M58.203,37.754l0.007-0.004L42.09,9.935l-0.001,0.001c-0.356-0.543-0.969-0.902-1.667-0.902"; ptr +="c-0.655,0-1.231,0.32-1.595,0.808l-0.011-0.007l-0.039,0.067c-0.021,0.03-0.035,0.063-0.054,0.094L22.78,37.692l0.008,0.004"; ptr +="c-0.149,0.28-0.242,0.594-0.242,0.934c0,1.102,0.894,1.995,1.994,1.995v0.015h31.888c1.101,0,1.994-0.893,1.994-1.994"; ptr +="C58.422,38.323,58.339,38.024,58.203,37.754z'fill=#955BA5 /><path d='M19.704,38.674l-0.013-0.004l13.544-23.522L25.13,1.156l-0.002,0.001C24.671,0.459,23.885,0,22.985,0"; ptr +="c-0.84,0-1.582,0.41-2.051,1.038l-0.016-0.01L20.87,1.114c-0.025,0.039-0.046,0.082-0.068,0.124L0.299,36.851l0.013,0.004"; ptr +="C0.117,37.215,0,37.62,0,38.059c0,1.412,1.147,2.565,2.565,2.565v0.015h16.989c-0.091-0.256-0.149-0.526-0.149-0.813"; ptr +="C19.405,39.407,19.518,39.019,19.704,38.674z'fill=#955BA5 /></g></svg>"; ptr +="</div>"; ptr +="<div class='side-by-side text'>Blood Oxygen</div>"; ptr +="<div class='side-by-side reading'>"; ptr +=(int)SpO2; ptr +="<span class='superscript'>%</span></div>"; ptr +="</div>"; ptr +="<div class='data Body Temperature'>"; ptr +="<div class='side-by-side icon'>"; ptr +="<svg enable-background='new 0 0 19.438 54.003'height=54.003px id=Layer_1 version=1.1 viewBox='0 0 19.438 54.003'width=19.438px x=0px xml:space=preserve xmlns=http://www.w3.org/2000/svg xmlns:xlink=http://www.w3.org/1999/xlink y=0px><g><path d='M11.976,8.82v-2h4.084V6.063C16.06,2.715,13.345,0,9.996,0H9.313C5.965,0,3.252,2.715,3.252,6.063v30.982"; ptr +="C1.261,38.825,0,41.403,0,44.286c0,5.367,4.351,9.718,9.719,9.718c5.368,0,9.719-4.351,9.719-9.718"; ptr +="c0-2.943-1.312-5.574-3.378-7.355V18.436h-3.914v-2h3.914v-2.808h-4.084v-2h4.084V8.82H11.976z M15.302,44.833"; ptr +="c0,3.083-2.5,5.583-5.583,5.583s-5.583-2.5-5.583-5.583c0-2.279,1.368-4.236,3.326-5.104V24.257C7.462,23.01,8.472,22,9.719,22"; ptr +="s2.257,1.01,2.257,2.257V39.73C13.934,40.597,15.302,42.554,15.302,44.833z'fill=#F29C21 /></g></svg>"; ptr +="</div>"; ptr +="<div class='side-by-side text'>Body Temperature</div>"; ptr +="<div class='side-by-side reading'>"; ptr +=(int)bodytemperature; ptr +="<span class='superscript'>°C</span></div>"; ptr +="</div>"; ptr +="</div>"; ptr +="</body>"; ptr +="</html>"; return ptr; } |
Results & Working of the Project
Once the code is uploaded, you can open the serial monitor. The ESP32 will try to connect to a network. Once connected, it will display the IP Address.

Copy the IP Address and paste it on any of the Web Browser and hit enter. You will see the room temperature, room humidity, Heart Rate, Blood Oxygen Level, Body Temperature, etc.

Similarly you can also view the Patient Health Status on Mobile Phone. Simple copy the IP Address and paste on the browser of Mobile Phone.

Video Tutorial & Demonstration


52 Comments
hi sir, i am getting an ” invalid conversion from int to const char* ” error on the line ” WebServer server(80); ” PLEASE HELP
Hi dear. I can using LCD display ..
Plz help me.
WARNING: Spurious .github folder in ‘Adafruit Fingerprint Sensor Library’ library
WARNING: Category ‘Hardware Interface’ in library Arduino (Firmata) is not valid. Setting to ‘Uncategorized’
WARNING: Spurious .github folder in ‘Blynk’ library
WARNING: Category ‘Control’ in library NeuralNetwork is not valid. Setting to ‘Uncategorized’
D:\proj library\IOT_proj\IOT_proj.ino:2:23: fatal error: WebServer.h: No such file or directory
#include <WebServer.h>
compilation terminated.
exit status 1
Error compiling for board NodeMCU 1.0 (ESP-12E Module).
Please help me to solve this errors
Thankyou
Select ESP32 Board from board manager. Seems like you are compiling for ESP12E Board
Mr.Alam
i have selected ESP32 board but still getting same error.
can you please help me.
please mail me solutions
[email protected]
As per the requirements I have shouldered a small wire from resistor side to other side but still it’s not working the oximeter is getting overheated. Error shown on serial monitor is:- Initializing pulse oximeter…FAILED. What to do? Pls help
hello sir,
i make this project Iot based health monitoring system on ESP we server, there is an error show when the code is compile.
the error is “webServer.h” file is not a file or directory.
please guide me to solve this issue
(fatal error: WebServer.h: No such file or directory
#include
WebServer.h: No such file or directory)
Sir can you give the full name of which esp32 you are using because I don’t find any esp32 library like you are using for pcb designing
In file included from C:\Users\HP\Documents\Arduino\libraries\DHTLib\dht.h:18:0,
from C:\Users\HP\Documents\Arduino\libraries\DHTLib\dht.cpp:30:
C:\Users\HP\Documents\Arduino\libraries\DHTLib\dht.cpp: In member function ‘int dht::_readSensor(uint8_t, uint8_t)’:
C:\Users\HP\AppData\Local\Arduino15\packages\esp32\hardware\esp32\1.0.4\cores\esp32/Arduino.h:106:91: error: cannot convert ‘volatile uint32_t* {aka volatile unsigned int*}’ to ‘volatile uint8_t* {aka volatile unsigned char*}’ in initialization
#define portInputRegister(port) ((volatile uint32_t*)((port)?GPIO_IN1_REG:GPIO_IN_REG))
^
C:\Users\HP\Documents\Arduino\libraries\DHTLib\dht.cpp:116:29: note: in expansion of macro ‘portInputRegister’
volatile uint8_t *PIR = portInputRegister(port);
Dear Sir
I am facing following error
Can you suggest
In file included from C:\Users\admin\Documents\Arduino\libraries\DHTLib\dht.h:18:0,
from C:\Users\admin\Documents\Arduino\libraries\DHTLib\dht.cpp:30:
C:\Users\admin\Documents\Arduino\libraries\DHTLib\dht.cpp: In member function ‘int dht::_readSensor(uint8_t, uint8_t)’:
C:\Users\admin\AppData\Local\Arduino15\packages\esp32\hardware\esp32\1.0.5\cores\esp32/Arduino.h:106:91: error: cannot convert ‘volatile uint32_t* {aka volatile unsigned int*}’ to ‘volatile uint8_t* {aka volatile unsigned char*}’ in initialization
#define portInputRegister(port) ((volatile uint32_t*)((port)?GPIO_IN1_REG:GPIO_IN_REG))
^
C:\Users\admin\Documents\Arduino\libraries\DHTLib\dht.cpp:116:29: note: in expansion of macro ‘portInputRegister’
volatile uint8_t *PIR = portInputRegister(port);
^
Multiple libraries were found for “WiFi.h”
Used: C:\Users\admin\AppData\Local\Arduino15\packages\esp32\hardware\esp32\1.0.5\libraries\WiFi
Not used: D:\Android Studio\arduino-nightly-windows\arduino-nightly\libraries\WiFi
Multiple libraries were found for “WebServer.h”
Used: C:\Users\admin\AppData\Local\Arduino15\packages\esp32\hardware\esp32\1.0.5\libraries\WebServer
Not used: C:\Users\admin\Documents\Arduino\libraries\Webduino-master
exit status 1
Error compiling for board ESP32 Dev Module.
Regards
Dipankar
This also my problem but i think this is site owner is not respond to their audience
if your problem is solved please help me its my humble requeat to you
Same problem
Did you solved this error? I’m also getting same error. If you found it please help me.
Could you please show the wiring diagram with breadboard? I am a little confused about wiring.
My email is [email protected]
How to resolve this error in this project
“Error compiling for board ESP32 Dev Module”
please help me
Arduino: 1.8.13 (Windows Store 1.8.42.0) (Windows 10), Board: “ESP32 Dev Module, Disabled, Default 4MB with spiffs (1.2MB APP/1.5MB SPIFFS), 240MHz (WiFi/BT), QIO, 80MHz, 4MB (32Mb), 921600, None”
In file included from C:\Users\ADMIN\Documents\Arduino\libraries\DHTLib\dht.h:18:0,
C:\Users\ADMIN\Documents\Arduino\libraries\DHTLib\dht.cpp: In member function ‘int dht::_readSensor(uint8_t, uint8_t)’:
C:\Users\ADMIN\Documents\ArduinoData\packages\esp32\hardware\esp32\1.0.6\cores\esp32/Arduino.h:106:91: error: cannot convert ‘volatile uint32_t* {aka volatile unsigned int}’ to ‘volatile uint8_t {aka volatile unsigned char*}’ in initialization
#define portInputRegister(port) ((volatile uint32_t*)((port)?GPIO_IN1_REG:GPIO_IN_REG))
C:\Users\ADMIN\Documents\Arduino\libraries\DHTLib\dht.cpp:116:29: note: in expansion of macro ‘portInputRegister’
Multiple libraries were found for “WiFi.h”
Used: C:\Users\ADMIN\Documents\ArduinoData\packages\esp32\hardware\esp32\1.0.6\libraries\WiFi
Not used: C:\Program Files\WindowsApps\ArduinoLLC.ArduinoIDE_1.8.42.0_x86__mdqgnx93n4wtt\libraries\WiFi
exit status 1
Error compiling for board ESP32 Dev Module.
This report would have more information with
“Show verbose output during compilation”
option enabled in File -> Preferences.
please help me to overcome from these errors
same reply
Have u got the correct program
no
Dear sir,
I am getting same error for DHT.h.
i hane include all lib. as u say.
but not compile for esp32
dear sir,
i’m not able to get data from oximeter and Dallas Temperature sensors simultaneously,
by de-attaching dallas temp. sensor, the oximeter and DTH sensor works fine!!
have you any solution?
i’m doing this project as my final year project and im getting the same error…2 month left for us to submit the work and im really confused..iduno what to do
I too , you succeeded with the error ?
Bro u solved it
Did you solve the problem ? Please help
Hi! Did you solve the problem with max30100 and another sensor? Mine doesn’t show values when I use a temperature sensor,max30100 shows 0. Please help me! Thanks!
Omkar did you got it’s solution please reply
Hello, I am trying to connect to you please repy my previous doubt.
Hi, I’m still waiting for a solution to my library problem:
In file included from C:\Users\admin\Documents\Arduino\libraries\DHTLib\dht.h:18:0,
from C:\Users\admin\Documents\Arduino\libraries\DHTLib\dht.cpp:30:
C:\Users\admin\Documents\Arduino\libraries\DHTLib\dht.cpp: In member function ‘int dht::_readSensor(uint8_t, uint8_t)’:
Why don’t you get any support?
Ce site s’appel comment ?
ET cette application de smartphone .
I solved the dhtlib-Problem using this tutorial with the librarys from their and parts of the code:
https://randomnerdtutorials.com/esp32-dht11-dht22-temperature-humidity-sensor-arduino-ide/
How can I get an automatic refresh of the data on the website?
Hello, I have now solved the problem with the “refresh”. At the moment I still have problems with the sensor for pulse and oxygen. Display value always 0.
Unfortunately, I have not yet been able to solve the problem with the MAX30100.
I get the same output in the serial monitor as in the tutorial above. Only zeros for Pulse and Oxygen.
What could this be?
Please, need help!!!
Hello, it seems that the MAX30100 sensor is a bad design. As can be seen in the video, the resistances must be bridged.
Who can manufacture and send me such a bridged sensor? Against payment, of course!
Hello Mr Alam,
I used the purple GY-Max30100 as a pulse/oxi sensor.
First I tried your project with the Arduino and OLED. That worked very well.
Then I recreated the above project using the same sensor. Unfortunately I only get the value 0 for BMP and SpO2.
Can you help me to find the error.
Many Thanks
I have now used a purple Pulse/Oxi Sensor GY-max30100. But unfortunately the values are still only 0.
Greetings Mr. Alam,
Are you avaiable?
Greetings,
Is there a code for those who have the MAX30102 I2C Pulse Oximeter Sensor?
sir can you help me with it “Error compiling for board ESP32 Dev Module.”
same
have you figured it out?
What your problem solution
..if face same problem with me
hi do you have full code please
can you help me with the code you have please im having trouble
Hi Mr.Alam im having trouble it states that {Error compiling for ESP32}
Hi i have same problem, did you figure it out
Dht11 library is not working
Can you please help me
webserver.h library not found pls someone help regarding this issue
hello,
i am experiencing the same issue. if you could please let me know what you did to solve this issue.
same here brother
me also getting this problem but i can’t solution it, anyone can help me???