

Overview
In this tutorial, we will design an Industrial Product Counter using ESP32 CAM Module & OpenCV. The detection is done through the python code at the server, i.e. our computer, using the OpenCV library. The objects are detected using the basic principle of comparing the color of the background with respect to the object’s color. For e.g, if the background is white and the object is also white then it won’t be detecting any object, but if the background is white and the object is of different color then surely it detects the object.
Here we have used the ESP32-CAM module, which is a small camera module with the ESP32-S chip that costs approximately $10. Besides the OV2640 camera and several GPIOs to connect peripherals, it also features a microSD card slot that can be useful to store images taken with the camera.
In this tutorial, we will go through its features, pins description, and the method to program this device using FTDI Module. Apart from this, we will also install Python and Libraries required. Later we will go through the python code that we will be using for Industrial Product Counter with ESP32 CAM & OpenCV. This is an essential tutorial as you will be able to use any sort of Image processing or Machine Learning on the live video without having to write it on Arduino IDE.
Bill of Materials
The following is the list of Bill of Materials for building an Object Counting using ESP32 Camera. You can purchase all these components from Amazon.
| S.N. | Components | Quantity | Purchase Links |
|---|---|---|---|
| 1 | ESP32-CAM Board AI-Thinker | 1 | Amazon | AliExpress |
| 2 | FTDI Module | 1 | Amazon | AliExpress |
| 3 | Micro-USB Cable | 1 | Amazon | AliExpress |
| 4 | Jumper Wires | 10 | Amazon | AliExpress |
ESP32 CAM Module
The ESP32 Based Camera Module developed by AI-Thinker. The controller is based on a 32-bit CPU & has a combined Wi-Fi + Bluetooth/BLE Chip. It has a built-in 520 KB SRAM with an external 4M PSRAM. Its GPIO Pins have support like UART, SPI, I2C, PWM, ADC, and DAC.

The module combines with the OV2640 Camera Module which has the highest Camera Resolution up to 1600 × 1200. The camera connects to the ESP32 CAM Board using a 24 pins gold plated connector. The board supports an SD Card of up to 4GB. The SD Card stores capture images.
To learn in detail about the ESP32 Camera Module you can refer to our previous Getting Started Tutorial.
ESP32-CAM FTDI Connection
The board doesn’t have a programmer chip. So In order to program this board, you can use any type of USB-to-TTL Module. There are so many FTDI Module available based on CP2102 or CP2104 Chip or any other chip.
Make a following connection between FTDI Module and ESP32 CAM module.

| ESP32-CAM | FTDI Programmer |
| GND | GND |
| 5V | VCC |
| U0R | TX |
| U0T | RX |
| GPIO0 | GND |
Connect the 5V & GND Pin of ESP32 to 5V & GND of FTDI Module. Similarly, connect the Rx to UOT and Tx to UOR Pin. And the most important thing, you need to short the IO0 and GND Pin together. This is to put the device in programming mode. Once programming is done you can remove it.
Project PCB Gerber File & PCB Ordering Online
If you don’t want to assemble the circuit on a breadboard and you want PCB for the project, then here is the PCB for you. The PCB Board for ESP32 CAM Board is designed using EasyEDA online Circuit Schematics & PCB designing tool. The PCB looks something like below.

The Gerber File for the PCB is given below. You can simply download the Gerber File and order the PCB from ALLPCB at 1$ only.
You can use this Gerber file to order high quality PCB for this project. To do that visit the ALLPCB official website by clicking here: https://www.allpcb.com/.

You can now upload the Gerber File by choosing the Quote Now option. From these options, you can choose the Material Type, Dimensions, Quantity, Thickness, Solder Mask Color and other required parameters.

After filling all details, select your country and shipping method. Finally you can place the order.
You can assemble the components on the PCB Board.

Installing ESP32CAM Library
Here we will not use the general ESP webserver example rather another streaming process. Therefore we need to add another ESPCAM library. The esp32cam library provides an object oriented API to use OV2640 camera on ESP32 microcontroller. It is a wrapper of esp32-camera library.

Go to the following Github Link and download the zip library as in the image
Once downloaded add this zip library to Arduino Libray Folder. To do so follow the following steps:
Open Arduino -> Sketch -> Include Library -> Add .ZIP Library… -> Navigate to downloaded zip file -> add
Source Code/Program for ESP32 CAM Module
Here is a source code for Object Counting with ESP32 CAM Module. Copy the code and paste it in the Arduino IDE.
|
1 2 3 4 5 6 7 8 9 10 11 12 13 14 15 16 17 18 19 20 21 22 23 24 25 26 27 28 29 30 31 32 33 34 35 36 37 38 39 40 41 42 43 44 45 46 47 48 49 50 51 52 53 54 55 56 57 58 59 60 61 62 63 64 65 66 67 68 69 70 71 72 73 74 75 76 77 78 79 80 81 82 83 84 85 86 87 88 89 90 91 92 |
#include <WebServer.h> #include <WiFi.h> #include <esp32cam.h> const char* WIFI_SSID = "ssid"; const char* WIFI_PASS = "password"; WebServer server(80); static auto loRes = esp32cam::Resolution::find(320, 240); static auto midRes = esp32cam::Resolution::find(350, 530); static auto hiRes = esp32cam::Resolution::find(800, 600); void serveJpg() { auto frame = esp32cam::capture(); if (frame == nullptr) { Serial.println("CAPTURE FAIL"); server.send(503, "", ""); return; } Serial.printf("CAPTURE OK %dx%d %db\n", frame->getWidth(), frame->getHeight(), static_cast<int>(frame->size())); server.setContentLength(frame->size()); server.send(200, "image/jpeg"); WiFiClient client = server.client(); frame->writeTo(client); } Void handleJpgLo() { if (!esp32cam::Camera.changeResolution(loRes)) { Serial.println("SET-LO-RES FAIL"); } serveJpg(); } Void handleJpgHi() { if (!esp32cam::Camera.changeResolution(hiRes)) { Serial.println("SET-HI-RES FAIL"); } serveJpg(); } Void handleJpgMid() { if (!esp32cam::Camera.changeResolution(midRes)) { Serial.println("SET-MID-RES FAIL"); } serveJpg(); } Void setup(){ Serial.begin(115200); Serial.println(); { using namespace esp32cam; Config cfg; cfg.setPins(pins::AiThinker); cfg.setResolution(hiRes); cfg.setBufferCount(2); cfg.setJpeg(80); bool ok = Camera.begin(cfg); Serial.println(ok ? "CAMERA OK" : "CAMERA FAIL"); } WiFi.persistent(false); WiFi.mode(WIFI_STA); WiFi.begin(WIFI_SSID, WIFI_PASS); while (WiFi.status() != WL_CONNECTED) { delay(500); } Serial.print("http://"); Serial.println(WiFi.localIP()); Serial.println(" /cam-lo.jpg"); Serial.println(" /cam-hi.jpg"); Serial.println(" /cam-mid.jpg"); server.on("/cam-lo.jpg", handleJpgLo); server.on("/cam-hi.jpg", handleJpgHi); server.on("/cam-mid.jpg", handleJpgMid); server.begin(); } Void loop() { server.handleClient(); } |
Before Uploading the code you have to make a small change to the code. Change the SSID and password variable and in accordance with your WiFi network.
Now compile and upload it to the ESP32 CAM Board. But during uploading, you have to follow few steps every time.
- Make sure the IO0 pin is shorted with the ground when you have pressed the upload button.
- If you see the dots and dashes while uploading press the reset button immediately
- Once the code is uploaded, remove the I01 pin shorting with Ground and press the reset button once again.
- If the output is the Serial monitor is still not there then press the reset button again.
Now you can see a similar output as in the image below.

Congratulations, half of the work is done now.
Python Library Installation
For the live stream of video to be visible on our computer we need to write a Python script that will enable us to retrieve the frames of the video. The first step is to install Python. Go to python.org and download Python.
Once download, install Python.
Then Go to the command prompt and install NumPy and OpenCV libraries.
- type: pip install numpy and press enter. After the installation is done.
- type: pip install opencv-python and press enter, close the command prompt.
Now open Idle code editor or any other python code editor.
Python Code + Industrial Product Counter with ESP32 CAM
The method of color detection and object tracking is already explained in previous article. You can check the ESP32 CAM Color Detection & Tracking for more details. Even for the Product Counter with ESP32 CAM, we will be applying the same method.
To detect the object the python code uses a step-by-step method of image or frame conversion. At first, it tries to convert the RGB image to Grayscale such that the difference in magnitude of color is greatly visible and mathematical operations can be performed easily. After that to blend in the colors, we blur the image, now the canny edge detection takes place where it easily detects the edges, thus now to properly join the edges detected we dilate the image. In the end, we retrieve the number of closed figures after detecting edges.
The complete code for Industrial Product Counter or Object Counting using ESP32 CAM & OpenCV is written in Python Script. Now open Idle code editor or any python code editor. After that copy and paste the code below, in the editor.
|
1 2 3 4 5 6 7 8 9 10 11 12 13 14 15 16 17 18 19 20 21 22 23 24 25 26 27 28 29 30 31 32 33 34 35 36 37 |
import cv2 import urllib.request import numpy as np url='http://192.168.1.61/' ##'''cam.bmp / cam-lo.jpg /cam-hi.jpg / cam.mjpeg ''' cv2.namedWindow("live transmission", cv2.WINDOW_AUTOSIZE) while True: img_resp=urllib.request.urlopen(url+'cam-lo.jpg') imgnp=np.array(bytearray(img_resp.read()),dtype=np.uint8) img=cv2.imdecode(imgnp,-1) gray=cv2.cvtColor(img,cv2.COLOR_BGR2GRAY) canny=cv2.Canny(cv2.GaussianBlur(gray,(11,11),0),30,150,3) dilated=cv2.dilate(canny,(1,1),iterations=2) (Cnt,_)=cv2.findContours(dilated.copy(),cv2.RETR_EXTERNAL,cv2.CHAIN_APPROX_NONE) k=img cv2.drawContours(k,cnt,-1,(0,255,0),2) cv2.imshow("mit contour",canny) cv2.imshow("live transmission",img) key=cv2.waitKey(5) if key==ord('q'): break elif key==ord('a'): cow=len(cnt) print(cow) cv2.destroyAllWindows() |
Change the IP address copied from Arduino Serial Monitor and update it in the URL variable in the above code. Then save the code and run it.
Testing the Object Counting with ESP32 CAM
Once you run the code a pop-up window with the name “Live Transmission” appears, showing the live video, and another window named “mit contour” with detected edges appears on the desktop.
In the below images I have tried to count playing cards.
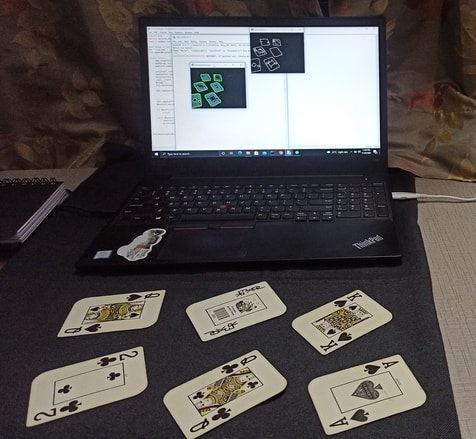
The counted object is displayed on Python Monitor. Here I used 6 playing cards and placed them in front of the ESP32 CAM. The monitor displayed 6 cards.

In another project, I have counted coins.

Similarly, you can count numerous things as shown in the video below. This is how you can design your own Industrial Product Counter using ESP32 CAM & OpenCV.
Video Tutorial & Guide


7 Comments
C:\Users\Prithvi\Documents\Arduino\libraries\esp32cam-main\src\esp32cam.cpp: In member function ‘esp32cam::ResolutionList esp32cam::CameraClass::listResolutions() const’:
C:\Users\Prithvi\Documents\Arduino\libraries\esp32cam-main\src\esp32cam.cpp:30:3: error: ‘camera_sensor_info_t’ was not declared in this scope
camera_sensor_info_t* info = esp_camera_sensor_get_info(&sensor->id);
^
C:\Users\Prithvi\Documents\Arduino\libraries\esp32cam-main\src\esp32cam.cpp:30:25: error: ‘info’ was not declared in this scope
camera_sensor_info_t* info = esp_camera_sensor_get_info(&sensor->id);
^
C:\Users\Prithvi\Documents\Arduino\libraries\esp32cam-main\src\esp32cam.cpp:30:70: error: ‘esp_camera_sensor_get_info’ was not declared in this scope
camera_sensor_info_t* info = esp_camera_sensor_get_info(&sensor->id);
^
Iam getting this error……please help
All Void calls need to be downcast to void
I got the error while using the python code in the Spyder
HTTPError: Not Found
please give me the file to count the quantity.
file counts.py
same problem.. did you resolve it?
Same error here too. Did u resolve?
after lots of efforts, finally working..