Close Menu
  • Articles
    • Learn Electronics
    • Product Review
    • Tech Articles
  • Electronics Circuits
    • 555 Timer Projects
    • Op-Amp Circuits
    • Power Electronics
  • Microcontrollers
    • Arduino Projects
    • STM32 Projects
    • AMB82-Mini IoT AI Camera
    • BLE Projects
  • IoT Projects
    • ESP8266 Projects
    • ESP32 Projects
    • ESP32 MicroPython
    • ESP32-CAM Projects
    • LoRa/LoRaWAN Projects
  • Raspberry Pi
    • Raspberry Pi Projects
    • Raspberry Pi Pico Projects
    • Raspberry Pi Pico W Projects
  • Electronics Calculator
Facebook X (Twitter) Instagram
  • About Us
  • Disclaimer
  • Privacy Policy
  • Contact Us
  • Advertise With Us
Facebook X (Twitter) Instagram Pinterest YouTube LinkedIn
How To Electronics
  • Articles
    • Learn Electronics
    • Product Review
    • Tech Articles
  • Electronics Circuits
    • 555 Timer Projects
    • Op-Amp Circuits
    • Power Electronics
  • Microcontrollers
    • Arduino Projects
    • STM32 Projects
    • AMB82-Mini IoT AI Camera
    • BLE Projects
  • IoT Projects
    • ESP8266 Projects
    • ESP32 Projects
    • ESP32 MicroPython
    • ESP32-CAM Projects
    • LoRa/LoRaWAN Projects
  • Raspberry Pi
    • Raspberry Pi Projects
    • Raspberry Pi Pico Projects
    • Raspberry Pi Pico W Projects
  • Electronics Calculator
How To Electronics
Home » Smart Electronic Voting Machine Using Arduino & LCD Display
Arduino Projects

Smart Electronic Voting Machine Using Arduino & LCD Display

Mamtaz AlamBy Mamtaz AlamUpdated:August 22, 20222 Comments2 Mins Read
Share Facebook Twitter LinkedIn Telegram Reddit WhatsApp
Electronic Voting Machine Arduino
Share
Facebook Twitter LinkedIn Pinterest Email Reddit Telegram WhatsApp

Smart Electronic Voting Machine Using Arduino

This project is all about Simple & Smart Electronic Voting Machine Using Arduino. The basic idea of this project is to create an electronic voting machine that will help to eradicate defrauding of the manual voting systems and prior versions of electronic voting.

The system is provided with n number of the switch where n is the number of a political party. Here the voter will be allowed to proceed for choosing their preferred candidate from the panel of buttons. The final vote is then displayed onto an LCD for the satisfaction of voters. In the end, the result can be automatically calculated by pressing the result button.


Bill of Materials

S.N.Components NameQuantityPurchase Links
1Arduino UNO Board1Amazon | AliExpress
216x2 LCD Display1Amazon | AliExpress
3Potentiometer 10K1Amazon | AliExpress
4Push Button Switch 4Amazon | AliExpress
5Connecting Wires20Amazon | AliExpress
6Breadboard1Amazon | AliExpress

Block Diagram

Block Diagram Electronic Voting Machine Using Arduino

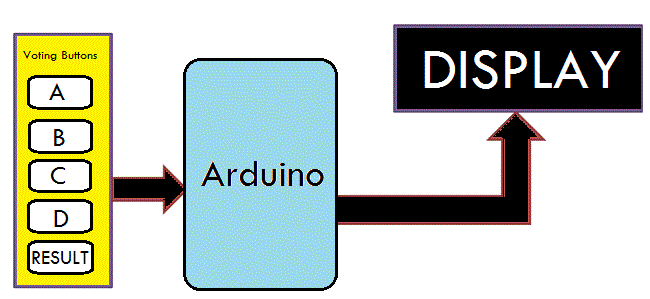
In this project, i.e Smart Electronic Voting Machine Using Arduino, we have used four pushbuttons for four different candidates who are taking part in the election. We can increase the number of the candidate as per requirement. When any voter press any of four buttons then respecting voting value will increment by one each time. After the whole voting process, the result button can be pressed to display the result.


Circuit Diagram

Circuit Diagram Electronic Voting Machine

Assemble the circuit as shown in the figure above. Connect the 5 push buttons to digital pin 7,6,5,4,3 of Arduino. Similarly connect pin 4,6, 11, 12, 13, 14 of LCD to digital pin 13, 12, 11, 10, 9, 8 of Arduino.


Working of the Project

Here Arduino is the heart and brain of this system. Arduino controls the complete voting processes like reading button, incrementing vote value, generating a result, and sending vote and result in LCD Display.

Here we have added five buttons that are assigned for team A, team B, team C, team D, and the last button is used for calculating or displaying results.

Below are some of the pictures for this project that tells a clear story about working on this project.

  • 1
  • 2
  • 3
  • 4
  • 5

  • 1
  • 2
  • 3
  • 4
  • 5


Source Code/Program

1
2
3
4
5
6
7
8
9
10
11
12
13
14
15
16
17
18
19
20
21
22
23
24
25
26
27
28
29
30
31
32
33
34
35
36
37
38
39
40
41
42
43
44
45
46
47
48
49
50
51
52
53
54
55
56
57
58
59
60
61
62
63
64
65
66
67
68
69
70
71
72
73
74
75
76
77
78
79
80
81
82
83
84
85
86
87
88
89
90
91
92
93
94
95
96
97
98
99
100
101
102
103
104
105
106
107
108
109
110
111
112
113
114
115
116
117
118
119
120
121
122
123
124
125
126
127
128
129
130
131
132
133
134
135
136
#include<LiquidCrystal.h>
LiquidCrystal lcd(13, 12, 11, 10, 9, 8);
 
#define S1 7
#define S2 6
#define S3 5
#define S4 4
#define S5 3
int vote1=0;
int vote2=0;
int vote3=0;
int vote4=0;
void setup()
{
pinMode(S1, INPUT);
pinMode(S2,INPUT);
pinMode(S3,INPUT);
pinMode(S4,INPUT);
pinMode(S5,INPUT);
lcd.begin(16, 2);
lcd.print(" Electronic ");
lcd.setCursor(0,1);
lcd.print(" Voting Machine ");
delay(4000);
digitalWrite(S1, HIGH);
digitalWrite(S2, HIGH);
digitalWrite(S3, HIGH);
digitalWrite(S4, HIGH);
digitalWrite(S5, HIGH);
lcd.clear();
lcd.setCursor(1,0);
lcd.print("A");
lcd.setCursor(5,0);
lcd.print("B");
lcd.setCursor(9,0);
lcd.print("C");
lcd.setCursor(13,0);
lcd.print("D");
}
void loop()
{
lcd.setCursor(1,0);
lcd.print("A");
lcd.setCursor(1,1);
lcd.print(vote1);
lcd.setCursor(5,0);
lcd.print("B");
lcd.setCursor(5,1);
lcd.print(vote2);
lcd.setCursor(9,0);
lcd.print("C");
lcd.setCursor(9,1);
lcd.print(vote3);
lcd.setCursor(13,0);
lcd.print("D");
lcd.setCursor(13,1);
lcd.print(vote4);
if(digitalRead(S1)==0)
vote1++;
while(digitalRead(S1)==0);
if(digitalRead(S2)==0)
vote2++;
while(digitalRead(S2)==0);
if(digitalRead(S3)==0)
vote3++;
while(digitalRead(S3)==0);
if(digitalRead(S4)==0)
vote4++;
while(digitalRead(S4)==0);
if(digitalRead(S5)==0)
{
int vote=vote1+vote2+vote3+vote4;
if(vote)
{
if((vote1 > vote2 && vote1 > vote3 && vote1 > vote4))
{
lcd.clear();
lcd.print("A is Winner");
delay(3000);
lcd.clear();
}
else if((vote2 > vote1 && vote2 > vote3 && vote2 > vote4))
{
lcd.clear();
lcd.print("B is Winner");
delay(3000);
lcd.clear();
}
else if((vote3 > vote1 && vote3 > vote2 && vote3 > vote4))
{
lcd.clear();
lcd.print("C is Winner");
delay(3000);
lcd.clear();
}
else if(vote4 > vote1 && vote4 > vote2 && vote4 > vote3)
{
lcd.setCursor(0,0);
lcd.clear();
lcd.print("D is Winner");
delay(3000);
lcd.clear();
}
 
else if(vote4 > vote1 && vote4 > vote2 && vote4 > vote3)
{
lcd.setCursor(0,0);
lcd.clear();
lcd.print("D is Winner");
delay(3000);
lcd.clear();
}
 
else
{
lcd.clear();
lcd.print(" Tie Up Or ");
lcd.setCursor(0,1);
lcd.print(" No Result ");
delay(3000);
lcd.clear();
}
 
}
else
{
lcd.clear();
lcd.print("No Voting....");
delay(3000);
lcd.clear();
}
vote1=0;vote2=0;vote3=0;vote4=0,vote=0;
lcd.clear();
}
 
}

}


Video Tutorial

Smart Electronic Voting Machine Using Arduino
Watch this video on YouTube.

Share. Facebook Twitter Pinterest LinkedIn Tumblr Email Reddit Telegram WhatsApp
Previous ArticleArduino Ultrasonic Range Finder with HC-SR04 on OLED Display
Next Article Heart Shaped LED Flasher Circuit using 555 Timer

Related Posts

DC Energy Meter using Arduino

Build a DC Energy Meter using Arduino – 32V/5A

Updated:August 26, 20252K
Interfacing ADXL375 Accelerometer with Arduino

Interfacing ADXL375 Accelerometer with Arduino (±200g)

Updated:June 28, 2025
PZEM-004T Arduino Energy Meter

DIY AC Energy Meter using PZEM-004T & Arduino

Updated:March 6, 20258K
Interfacing BMI160 Accelerometer & Gyroscope with Arduino

Interfacing BMI160 Accelerometer & Gyroscope with Arduino

Updated:February 2, 20259K
Password Based Door Lock Security System Using Arduino & Keypad

Password Based Door Lock Security System Using Arduino & Keypad

Updated:February 2, 20252436K
Earthquake Detector Alarm with with Accelerometer & Arduino

Earthquake Detector Alarm with Accelerometer & Arduino

Updated:February 2, 2025661K
View 2 Comments

2 Comments

  1. Omobo Timilehin on April 25, 2021 7:41 PM

    Good afternoon
    I need help on th i project and its important
    Anyone willing to help me?

    Reply
  2. Amir suhail on February 9, 2022 11:12 AM

    I need help on voting project

    Reply

CommentsCancel reply

Latest Posts
ESP32 Fingerprint Attendance System with Live Web Dashboard

ESP32 Fingerprint Attendance System with Live Web Dashboard

June 21, 2026
IoT Based PM & Air Quality Monitoring System using ESP32

IoT Based PM & Air Quality Monitoring System using ESP32

June 14, 2026
DIY ESP32 MLX90640 IR Thermal Camera with Live Web Display

DIY ESP32 MLX90640 IR Thermal Camera with Live Web Display

May 10, 2026
IoT Activity Tracker with ESP32 & Accelerometer Gyroscope

IoT Activity Tracker with ESP32 & Accelerometer/Gyroscope

May 2, 2026
A Guide to Sourcing Obsolete ICs for Vintage Projects

Beyond AliExpress: A Guide to Sourcing Obsolete ICs for Vintage Projects

April 21, 2026

ESP32 IoT Vehicle Motion Analyzer with MPU6050 & LIS3MDL

April 27, 2026
Building a Smart Sensor Node with a BLE Microcontroller

Building a Smart Sensor Node with a BLE Microcontroller

February 26, 2026
High-Accuracy Pitch, Roll, Yaw with ESP32 & BNO08x IMU

High-Accuracy Pitch, Roll, Yaw with ESP32 & BNO08x IMU

April 27, 2026
Top Posts & Pages
  • ESP32 Fingerprint Attendance System with Live Web Dashboard
    ESP32 Fingerprint Attendance System with Live Web Dashboard
  • IoT AC Energy Meter with PZEM-004T & ESP32 WebServer
    IoT AC Energy Meter with PZEM-004T & ESP32 WebServer
  • 12V DC to 220V AC Inverter Circuit & PCB
    12V DC to 220V AC Inverter Circuit & PCB
  • Buck Converter: Basics, Working, Design & Application
    Buck Converter: Basics, Working, Design & Application
  • How to use INA226 DC Current Sensor with Arduino
    How to use INA226 DC Current Sensor with Arduino
  • LD2410 Sensor with ESP32 - Human Presence Detection
    LD2410 Sensor with ESP32 - Human Presence Detection
  • ECG Graph Monitoring with AD8232 ECG Sensor & Arduino
    ECG Graph Monitoring with AD8232 ECG Sensor & Arduino
  • Designing of MPPT Solar Charge Controller using Arduino
    Designing of MPPT Solar Charge Controller using Arduino
Categories
  • Arduino Projects (197)
  • Articles (60)
    • Learn Electronics (19)
    • Product Review (15)
    • Tech Articles (28)
  • Electronics Circuits (46)
    • 555 Timer Projects (21)
    • Op-Amp Circuits (7)
    • Power Electronics (13)
  • IoT Projects (205)
    • ESP32 MicroPython (7)
    • ESP32 Projects (82)
    • ESP32-CAM Projects (15)
    • ESP8266 Projects (76)
    • LoRa/LoRaWAN Projects (22)
  • Microcontrollers (38)
    • AMB82-Mini IoT AI Camera (4)
    • BLE Projects (18)
    • STM32 Projects (19)
  • Raspberry Pi (93)
    • Raspberry Pi Pico Projects (57)
    • Raspberry Pi Pico W Projects (12)
    • Raspberry Pi Projects (24)
Follow Us
  • Facebook
  • Twitter
  • Pinterest
  • Instagram
  • YouTube
About Us

“‘How to Electronics’ is a vibrant community for electronics enthusiasts and professionals. We deliver latest insights in areas such as Embedded Systems, Power Electronics, AI, IoT, and Robotics. Our goal is to stimulate innovation and provide practical solutions for students, organizations, and industries. Join us to transform learning into a joyful journey of discovery and innovation.

Copyright © How To Electronics. All rights reserved.
  • About Us
  • Disclaimer
  • Privacy Policy
  • Contact Us
  • Advertise With Us

Type above and press Enter to search. Press Esc to cancel.

Ad Blocker Enabled!
Ad Blocker Enabled!
Looks like you're using an ad blocker. Please allow ads on our site. We rely on advertising to help fund our site.