

Overview: Internet with A9G Low Power GPRS+GPS Module
In this tutorial, we will learn about GPRS Internet Connectivity with A9G Low Power GPRS+GPS Module & Arduino. We will use the AT Commands to connect the A9G Module to Internet. As discussed in Previous Tutorial that A9G is low-powered GPRS GPS Module for IoT Applications, so we will use this module for a Simple IoT Projects.
There is no need for wifi rather Cellular IoT is preferred for Internet Connectivity. We will interface DHT11 Humidity Temperature Sensor with the Maduino Zero A9G board. We will then read the temperature and humidity data and send it wirelessly over Thingspeak Server.
But before moving ahead, I will highly recommend you to go through these basic getting started tutorials to learn more about Maduino A9G Board.
1. Getting Started with A9G Low Power GSM/GPRS+GPS Module with Arduino
2. GPS Tracker using A9G GPRS/GPS Module & Arduino
AT Commands for GPRS Internet Connections
Here are the list of few AT Commands that are required for GPRS Connectivity and data transmission over a TCP Protocol.
![]()
|
1 |
1. AT+CREG? |
This command is used to check whether we are registered to the network or not. If it shows 1, 1 as a response then this means that we are registered and can move ahead.
|
1 |
2. AT+CGATT |
This command is similar to the CREG command. If its response is 1 then we are connected to the network.
|
1 |
3. AT+CIPSTATUS |
This command is used to check whether the IP is connected or Not. If its response is “INITIAL” then it means that we are connected. If it shows something else then there is some problem.
|
1 |
4. AT+CGDCONT=1 |
This command is used to connect to the Internet. In this command, we need to specify the APN and IP as well in the format given as AT+CGDCONT=1, “IP”, “www”
|
1 |
5. AT+HTTPGET |
This command is used to send an HTTP get a request to any server link. Its format is AT+HTTPGET=”server link”.
|
1 |
6. AT+CIPMODE |
This is used for selecting TCP/IP application mode. ‘0’ os non-transparent mode and ‘1’ is the transparent mode.
|
1 |
7. AT+CIPACK |
This command checks the state of data transmission. It will return the amount of data sent, data acknowledged by the server, and data not confirmed by the server.
Getting Temperature Humidity data from DHT11 Sensor
Before Sending the Humidity Temperature Sensor Data directly to the Thingspeak Server using A9G GPRS Internet Connectivity, we need to learn how we can retrieve data from DHT11 Sensor and display it on OLED Display.
The Maduino A9G Board has a slot for 0.96″ I2C OLED Display where we can directly connect the OLED Display. Similarly, DHT11 Sensor has 3 pins VCC, GND & Signal. Connect the VCC to 3.3V, GND to GND & Signal to D3 of Maduino Zero A9G Board.

Now after the Hardware Setup is done, you can add the following libraries to the Arduino Library Folder. And then you can upload the below code to the Maduino Zero Board.
1. Adafruit GFX Library: https://github.com/adafruit/Adafruit-GFX-Library
2. SSD130 OLED Library: https://github.com/adafruit/Adafruit_SSD1306
3. DHT11 Library: https://github.com/adafruit/DHT-sensor-library
|
1 2 3 4 5 6 7 8 9 10 11 12 13 14 15 16 17 18 19 20 21 22 23 24 25 26 27 28 29 30 31 32 33 34 35 36 37 38 39 40 41 42 43 44 45 46 47 48 49 50 51 52 53 54 55 56 57 58 59 60 61 62 63 64 65 66 67 68 69 70 71 72 73 74 75 76 77 78 79 80 81 82 83 84 85 86 87 88 89 90 91 92 93 94 95 96 97 98 99 100 101 102 103 104 105 106 107 108 109 110 111 112 113 114 115 116 117 118 119 120 121 122 123 124 125 126 127 128 129 130 131 132 133 134 135 136 137 138 139 140 141 142 143 144 145 146 147 148 149 150 151 152 153 154 155 156 157 158 159 160 161 162 163 164 165 166 167 168 169 170 171 172 173 174 175 176 177 178 179 180 181 182 183 184 185 186 187 188 189 190 191 192 193 194 195 196 197 198 199 200 201 |
#include <stdio.h> #include <string.h> #include <Wire.h> #include <Adafruit_GFX.h> #include <Adafruit_SSD1306.h> #include <DHT.h> #include <DHT_U.h> //*******for senser ********** float humidity;//humidity float temperature;//temperature #define DHTPIN 3 //D3 #define DHTTYPE DHT11 DHT dht(DHTPIN, DHTTYPE); String showString="";// #define SCREEN_WIDTH 128 // OLED display width, in pixels #define SCREEN_HEIGHT 64 // OLED display height, in pixels // Declaration for an SSD1306 display connected to I2C (SDA, SCL pins) Adafruit_SSD1306 display(SCREEN_WIDTH, SCREEN_HEIGHT, &Wire, -1); void(* resetFunc) (void) = 0; //declare reset function at address 0 #define DEBUG true int PWR_KEY = 9; int RST_KEY = 6; int LOW_PWR_KEY = 5; bool ModuleState=false; unsigned long timeCount; void setup() { dht.begin();//sensor begin pinMode(PWR_KEY, OUTPUT); pinMode(RST_KEY, OUTPUT); pinMode(LOW_PWR_KEY, OUTPUT); digitalWrite(RST_KEY, LOW); digitalWrite(LOW_PWR_KEY, HIGH); digitalWrite(PWR_KEY, HIGH); SerialUSB.begin(115200); //while (!SerialUSB) { ; // wait for serial port to connect } Serial1.begin(115200); SerialUSB.println("Start to run!"); /** digitalWrite(PWR_KEY, LOW); delay(3000); digitalWrite(PWR_KEY, HIGH); delay(5000); ModuleState=moduleStateCheck(); if(ModuleState==false)//if it's off, turn on it. { digitalWrite(PWR_KEY, LOW); delay(3000); digitalWrite(PWR_KEY, HIGH); delay(5000); SerialUSB.println("Now turnning the A9/A9G on."); } **/ //GPS test //sendData("AT+GPS=1", 1000, DEBUG);//1: turn on GPS 0:Turn off GPS //sendData("AT+GPSRD=10", 1000, DEBUG);//Read NEMA information every 10 seconds //sendData("AT+LOCATION=2", 1000, DEBUG);//AT+LOCATION=X //1:Get base address, 2:get gps address //sendData("AT+CCID", 3000, DEBUG); //sendData("AT+CREG?", 3000, DEBUG); //sendData("AT+CGATT=1", 1000, DEBUG); //sendData("AT+CGACT=1,1", 1000, DEBUG); //sendData("AT+CGDCONT=1,\"IP\",\"CMNET\"", 1000, DEBUG); //sendData("AT+CIPSTART=\"TCP\",\"www.mirocast.com\",80", 2000, DEBUG); if (!display.begin(SSD1306_SWITCHCAPVCC, 0x3C)) { // Address 0x3D for 128x64 Serial.println(F("SSD1306 allocation failed")); for (;;) { SerialUSB.println("Now reset the maduino zero"); delay(1000); resetFunc();//restart delay(20); } } delay(500); display.clearDisplay(); display.setTextSize(2); display.setTextColor(WHITE); display.setCursor(0, 0); //Display static text display.println("how2electronics.com"); display.println("A9/A9G GPS Tracker!"); display.display(); delay(2000); timeCount=millis(); SerialUSB.println(" A9/A9G GPS Test Begin!"); display.clearDisplay(); } void loop() { if(millis()-timeCount>1000) { humidity = dht.readHumidity(); temperature = dht.readTemperature(); SerialUSB.println("humidity is " + (String)humidity); SerialUSB.println("temperature is " + (String)temperature); //if (!isnan(humidity) && !isnan(temperature)) { //SerialUSB.println("Read from DHT sensor!"); showString = "Humidity: " + (String)humidity + "%" + "\r\n" +"Temp.: "+(String)temperature + "C"; } SerialUSB.println(showString); display.clearDisplay(); display.setTextSize(2); display.setTextColor(WHITE); display.setCursor(0, 0); display.println(showString); display.display(); timeCount=millis();//refresh } while (Serial1.available() > 0) { display.clearDisplay(); String cstring = Serial1.readString(); SerialUSB.print(cstring);//SerialUSB.write(Serial1.read()); display.setTextSize(2); display.setTextColor(WHITE); display.setCursor(0, 0); display.println(cstring); display.display(); yield(); } while (SerialUSB.available() > 0) { Serial1.write(SerialUSB.read()); yield(); } } bool moduleStateCheck() { int i = 0; bool moduleState=false; for (i = 0; i < 10; i++) { String msg = String(""); msg = sendData("AT", 1000, DEBUG); if (msg.indexOf("OK") >= 0) { SerialUSB.println("A9/A9G Module had turned on."); moduleState=true; return moduleState; } delay(500); } return moduleState; } String sendData(String command, const int timeout, boolean debug) { String response = ""; Serial1.println(command); long int time = millis(); while ((time + timeout) > millis()) { while (Serial1.available()) { char c = Serial1.read(); response += c; } } if (debug) { SerialUSB.print(response); } return response; } |
After uploading the code, now you can see the DHT11 Temperature Humidity Data on OLED Display.

Setting up Thingspeak
Now we need to setup the Thingspeak Account. To set up Thingspeak follow the following Steps:

Step 1: Visit https://thingspeak.com/ and create your account by filling up the details.
Step 2: Create a New Channel by Clicking on “Channel” & fill up the following details as shown in the image below.

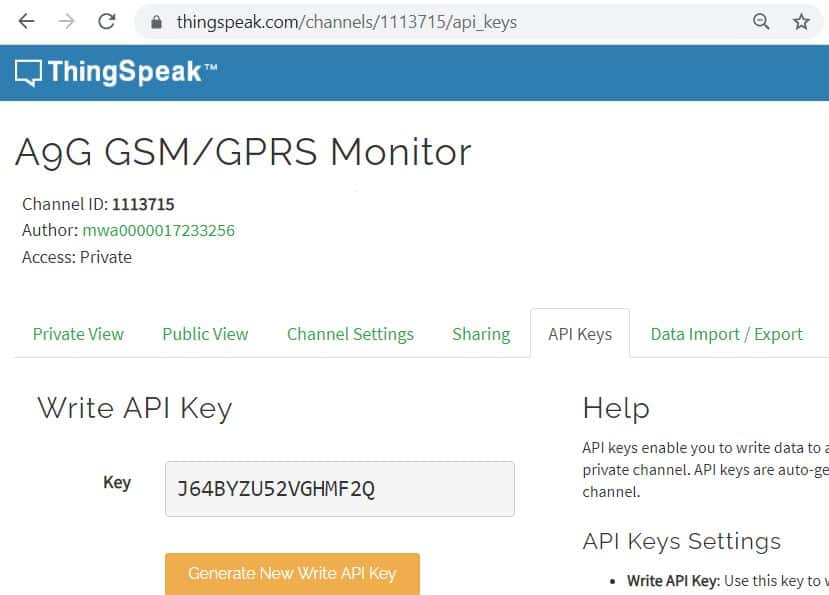
Step 3: Click on API Key, you will see the “Write API Key“. Copy the API Key. This is very important, it will be required in Code Part.
Step 4: You can click on the “Private View” & customize the display window as you want.
So, that’s all from the Thingspeak Setup Part. Now let us move to the programming Part.
Sending DHT11 Data to Thingspeak with Cellular IoT
Now lets use the AT command as discussed above to send the DHT11 Humidity Temperature Data to Thingspeak Server.
|
1 2 |
//**********api write key****************** const String apiKey="J64BYZU52VGHMF2Q"; |
In the below code change the API Key from the line above.
|
1 |
sendData("AT+CGDCONT=1,\"IP\",\"ntnet\"", 3000, DEBUG); |
This line appears twice in the code. from this line change the APN. Every Cellular Network Provider has the own APN. For example, I am in Nepal and I am using Nepal Telecom SIM Card, so its APN is ‘ntnet’. Contact your network provider to get the APN details.
|
1 |
//sendData("AT+CIPSTART=\"TCP\",\"www.how2electronics.com\",80", 2000, DEBUG);// |
This code is only for sending the data to Thingspeak Server. In case if you want to send the data to any Server using TCP Connection, uncomment this line and remove the Thinspeak Server Line.
Here is a complete code for the A9G GPRS Internet Connection Project.
|
1 2 3 4 5 6 7 8 9 10 11 12 13 14 15 16 17 18 19 20 21 22 23 24 25 26 27 28 29 30 31 32 33 34 35 36 37 38 39 40 41 42 43 44 45 46 47 48 49 50 51 52 53 54 55 56 57 58 59 60 61 62 63 64 65 66 67 68 69 70 71 72 73 74 75 76 77 78 79 80 81 82 83 84 85 86 87 88 89 90 91 92 93 94 95 96 97 98 99 100 101 102 103 104 105 106 107 108 109 110 111 112 113 114 115 116 117 118 119 120 121 122 123 124 125 126 127 128 129 130 131 132 133 134 135 136 137 138 139 140 141 142 143 144 145 146 147 148 149 150 151 152 153 154 155 156 157 158 159 160 161 162 163 164 165 166 167 168 169 170 171 172 173 174 175 176 177 |
#include <stdio.h> #include <string.h> #include <DHT.h> #include <DHT_U.h> //*******for senser ********** float humidity;//humidity float temperature;//temperature #define DHTPIN 3 //D3 #define DHTTYPE DHT11 DHT dht(DHTPIN, DHTTYPE); void(* resetFunc) (void) = 0; //declare reset function at address 0 #define DEBUG true int PWR_KEY = 9; int RST_KEY = 6; int LOW_PWR_KEY = 5; bool ModuleState=false; unsigned long timeCount; //**********api write key****************** const String apiKey="J64BYZU52VGHMF2Q"; String showString=""; void setup() { pinMode(PWR_KEY, OUTPUT); pinMode(RST_KEY, OUTPUT); pinMode(LOW_PWR_KEY, OUTPUT); digitalWrite(RST_KEY, LOW); digitalWrite(LOW_PWR_KEY, HIGH); digitalWrite(PWR_KEY, HIGH); Serial1.begin(115200); digitalWrite(PWR_KEY, LOW); delay(3000); digitalWrite(PWR_KEY, HIGH); delay(10000); SerialUSB.begin(115200); SerialUSB.println("Hello!"); SerialUSB.println("There need some time to initialize!"); delay(16000); dht.begin();//sensor begin humidity = dht.readHumidity(); temperature = dht.readTemperature(); Serial1.begin(115200); //while (!SerialUSB) { ;// wait for serial port to connect } ModuleState=moduleStateCheck(); if(ModuleState==false)//if it's off, turn on it. { digitalWrite(PWR_KEY, LOW); delay(3000); digitalWrite(PWR_KEY, HIGH); delay(10000); SerialUSB.println("Now turnning the A9/A9G on."); } #if 1 //GPS test sendData("AT+GPS=0", 1000, DEBUG);//1: turn on GPS 0:Turn off GPS //GSM Test sendData("AT+CCID", 3000, DEBUG); //get SIM sendData("AT+CREG?", 3000, DEBUG); sendData("AT+CGATT=1", 3000, DEBUG); sendData("AT+CGACT=1,1", 3000, DEBUG); sendData("AT+CGDCONT=1,\"IP\",\"ntnet\"", 3000, DEBUG); sendData("AT+CSQ", 1000, DEBUG); // //sendData("AT+CIPSTART=\"TCP\",\"www.how2electronics.com\",80", 2000, DEBUG);// String cmdString= "AT+HTTPGET=\"http://api.thingspeak.com/update.json?api_key=" + apiKey + "&field1=" + (String)temperature +"&field2=" + (String)humidity + "&field3=0.0&field4=0.0" + "\""; sendData(cmdString,5000,DEBUG); #endif timeCount=millis(); SerialUSB.println("A9/A9G Test Begin!"); } void loop() { #if 1 if(millis()-timeCount>30000) //60000ms { humidity = dht.readHumidity(); temperature = dht.readTemperature(); SerialUSB.println("humidity is " + (String)humidity); SerialUSB.println("temperature is " + (String)temperature); //if (!isnan(humidity) && !isnan(temperature)) { //SerialUSB.println("Read from DHT sensor!"); showString = "Humidity:" + (String)humidity + "%" + "\r\n" +"Temperature:"+(String)temperature + "C"; } SerialUSB.println(showString); sendData("AT+CGATT=1", 1000, DEBUG); sendData("AT+CGACT=1,1", 1000, DEBUG); sendData("AT+CGDCONT=1,\"IP\",\"Ntnet\"", 1000, DEBUG); String cmdString= "AT+HTTPGET=\"http://api.thingspeak.com/update.json?api_key=" + apiKey + "&field1=" + (String)temperature +"&field2=" + (String)humidity + "&field3=0.0&field4=0.0" + "\""; SerialUSB.println(cmdString); sendData(cmdString,5000,DEBUG); delay(5000); timeCount=millis();//refresh } #endif while (Serial1.available() > 0) { String cstring = Serial1.readString(); SerialUSB.print(cstring);//SerialUSB.write(Serial1.read()); yield(); } while (SerialUSB.available() > 0) { Serial1.write(SerialUSB.read()); yield(); } } bool moduleStateCheck() { int i = 0; bool state=false; for (i = 0; i < 10; i++) { String msg = String(""); msg = sendData("AT", 1000, DEBUG); if (msg.indexOf("OK") >= 0) { SerialUSB.println("A9/A9G Module had turned on."); state=true; return state; } delay(500); } return state; } String sendData(String command, const int timeout, boolean debug) { String response = ""; Serial1.println(command); long int time = millis(); while ((time + timeout) > millis()) { while (Serial1.available()) { char c = Serial1.read(); response += c; } } if (debug) { SerialUSB.print(response); } return response; } |
After uploading code to the Maduino Zero Board, open the Serial Monitor, the Serial Monitor will automatically start displaying the following events.


Make sure the GSM network is available in your area. Also, make sure that the SIM Card has data balance.
Now you can open the Thingspeak Private View and check the logged humidity temperature data.

Well that’s all from the A9G GPRS Connection part. I hope you learn how to connect A9G GPRS GPS Module to the Internet.
Video Tutorial & Complete Guide


1 Comment
is it possible to send data to firebase using this a9g module?