Close Menu
  • Articles
    • Learn Electronics
    • Product Review
    • Tech Articles
  • Electronics Circuits
    • 555 Timer Projects
    • Op-Amp Circuits
    • Power Electronics
  • Microcontrollers
    • Arduino Projects
    • STM32 Projects
    • AMB82-Mini IoT AI Camera
    • BLE Projects
  • IoT Projects
    • ESP8266 Projects
    • ESP32 Projects
    • ESP32 MicroPython
    • ESP32-CAM Projects
    • LoRa/LoRaWAN Projects
  • Raspberry Pi
    • Raspberry Pi Projects
    • Raspberry Pi Pico Projects
    • Raspberry Pi Pico W Projects
  • Electronics Calculator
Facebook X (Twitter) Instagram
  • About Us
  • Disclaimer
  • Privacy Policy
  • Contact Us
  • Advertise With Us
Facebook X (Twitter) Instagram Pinterest YouTube LinkedIn
How To Electronics
  • Articles
    • Learn Electronics
    • Product Review
    • Tech Articles
  • Electronics Circuits
    • 555 Timer Projects
    • Op-Amp Circuits
    • Power Electronics
  • Microcontrollers
    • Arduino Projects
    • STM32 Projects
    • AMB82-Mini IoT AI Camera
    • BLE Projects
  • IoT Projects
    • ESP8266 Projects
    • ESP32 Projects
    • ESP32 MicroPython
    • ESP32-CAM Projects
    • LoRa/LoRaWAN Projects
  • Raspberry Pi
    • Raspberry Pi Projects
    • Raspberry Pi Pico Projects
    • Raspberry Pi Pico W Projects
  • Electronics Calculator
How To Electronics
Home » How to Flash or Upgrade Firmware on ESP8266 (ESP-01)
ESP8266 Projects

How to Flash or Upgrade Firmware on ESP8266 (ESP-01)

Mamtaz AlamBy Mamtaz AlamUpdated:February 2, 20254 Mins Read
Share Facebook Twitter LinkedIn Telegram Reddit WhatsApp
How to Flash or Upgrade Firmware on ESP8266 (ESP-01)
Share
Facebook Twitter LinkedIn Pinterest Email Reddit Telegram WhatsApp

Overview

In this guide, we will learn how to Flash or Upgrade Firmware on a generic ESP8266 module also known as ESP-01 or ESP8266-01. The generic ESP8266-01 is the best module for simple IoT projects used with Arduino. But sometimes it doesn’t work and therefore we need to flash compatible firmware on it so it can work smoothly with the hardware. The ESP-01 is currently the old chip and therefore it has very old default firmware.

Updating or flashing the firmware on an ESP8266-01 is about maintaining the module’s efficiency, security, and compatibility with the evolving needs of IoT applications. In this guide, we will cover the hardware connection with the FTDI Module and also download the latest firmware and the flash download tool. Using the flash downloader tool, we will flash or upgrade the firmware on ESP8266 (ESP-01).


Tools Required

We need the following tools for this tutorial. You can purchase all the tools from given links:

S.N.ComponentsQuantityPurchase Links
1ESP8266-01 Module1Amazon | AliExpress
2FTDI Module (USB-to-TTL Converter)1Amazon | AliExpress
3Connecting Jumper Wires10Amazon | AliExpress
4Micro-USB Cable1Amazon | AliExpress
5Breadboard1Amazon | AliExpress


ESP8266-01 Module (ESP-01)

The ESP8266-01 or ESP-01 is a Wi-Fi module that allows microcontrollers access to a Wi-Fi network. This module is a self-contained SOC (System On a Chip) that doesn’t necessarily need a microcontroller to manipulate inputs and outputs as you would normally do with an Arduino.

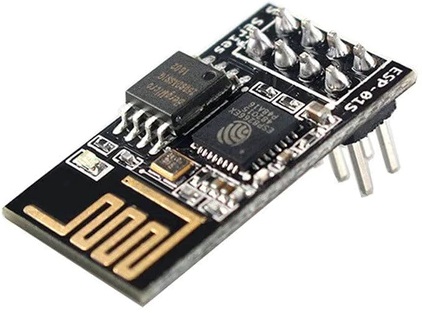
Depending on the version of the ESP8266, it is possible to have up to 9 GPIOs (General Purpose Input Output).

ESP8266-01 Pinout

Thus, we can give a microcontroller internet access like the Wi-Fi shield does to the Arduino, or we can simply program the ESP8266-01 to not only have access to a Wi-Fi network, but to act as a microcontroller as well. This dual functionality not only makes the ESP8266 highly adaptable for various projects but also offers a cost-effective and space-saving solution.


Why do we need to flash or upgrade firmware on ESP8266 Module?

There are several reasons why we need to flash or upgrade firmware on ESP8266 (ESP-01) Module. Some of the common reasons are:

  1. Enhanced Features and Performance: New firmware versions often come with new features, improvements, or optimizations that can enhance the performance of your ESP8266-01 module.
  2. Bug Fixes: Firmware updates usually fix known bugs and issues in previous versions. This can lead to more stable and reliable operation of your device.
  3. Compatibility: Updating the firmware can ensure compatibility with newer software, libraries, or IoT platforms.
  4. Custom Firmware: Sometimes, you might want to flash custom firmware that is tailored to specific needs or projects, offering more flexibility and control over the module’s functionality.
  5. Overcoming Limitations of Factory Firmware: The default firmware on ESP8266 modules might have limitations in terms of functionality or performance. Flashing a new firmware can overcome these limitations.

How to Flash or Upgrade Firmware on ESP8266 (ESP-01)

Now lets see how we can update of flash firmware on generic ESP8266-01 Module using the FTDI Module (USB-to-TTL Converter). We need to do the hardware connection first and then go through the flashing process

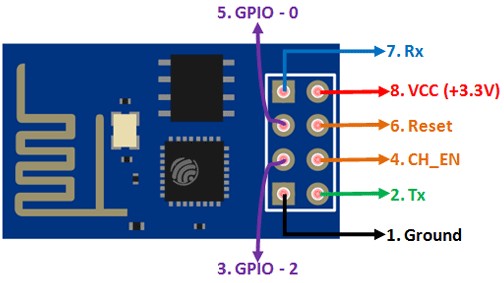
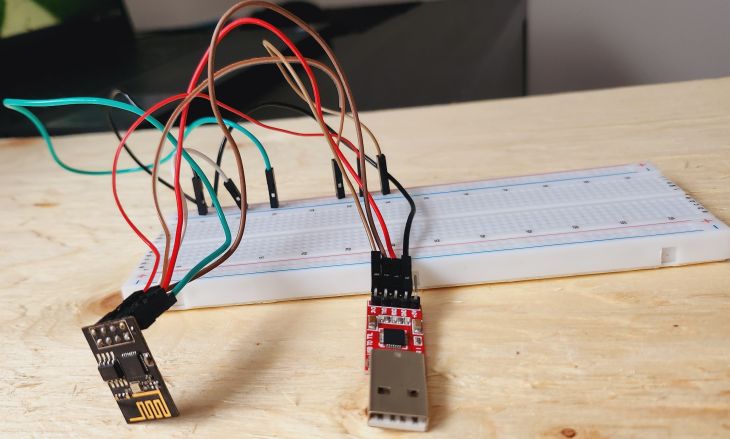
Step 1: Connecting ESP8266-01 to FTDI Module

Here is the connection diagram for connecting the ESP8266-01 Module to FTDI Module.

Connecting ESP8266-01 to FTDI Module

Here’s a table showing the connections between the ESP8266-01 module pins and the FTDI module pins:

ESP8266-01 Pin FTDI Module Pin
VCC 3.3V
GND GND
TX RX
RX TX
CH_PD 3.3V
GPIO0 GND


FTDI Module ESP8266-01 Connection

You can use a breadboard to connect the ESP8266-01 with FTDI Module as multiple GND and VCC are used.

Step 2: Downloading Bin File and ESP8266 Flasher Tool

We need two files for firmware flashing. From the following links download the bin file and firmware flasher tool.

  1. Ai-Thinker ESP8266 bin file
  2. ESP8266 Flasher Tool

Using the ESP8266 Flasher Tool, we can flash or upgrade the Ai-Thinker ESP8266 bin file to the ESP8266-01 Board

Step 3: Connect FTDI Module to Computer

Now connect the FTDI Module to the computer using the USB Cable.

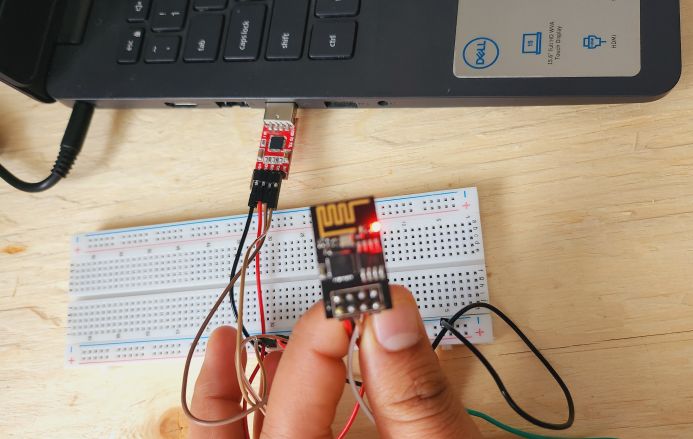
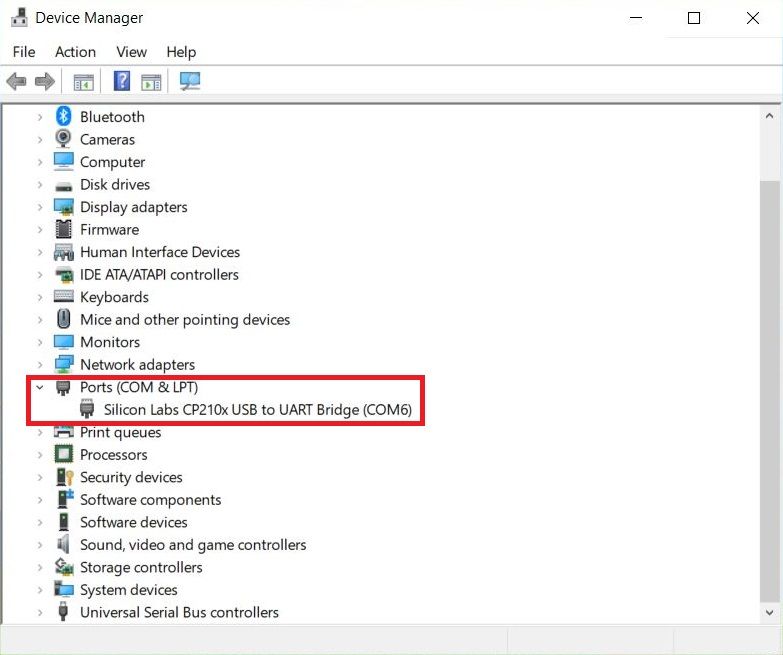
Go to the Device Manager of your computer and find the right COM port for your FTDI Device.


Step 4: Firmware Flashing

In this step, we will upgrade Firmware for ESP8266-01 using the ESP8266 Flasher Tool.

Therefore open the ESP8266 Flasher Tool.

Click on Bin option and Select the Bin File that you downloaded earlier.

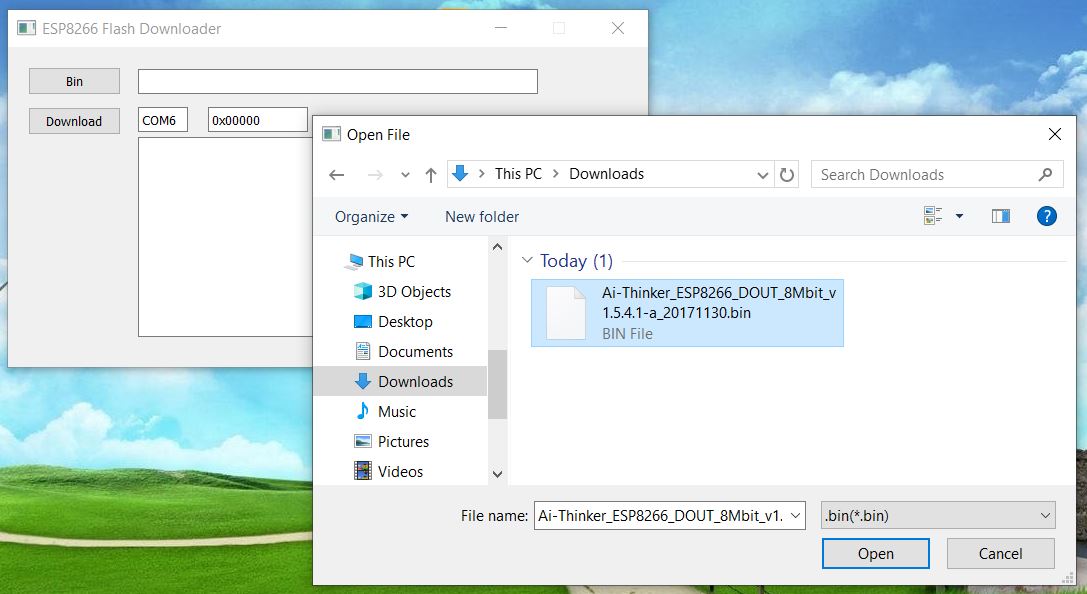
Also change the COM port number as allocated in Device Manager.

Click on Download option, so that the firmware flashing begins.

It will take some time to flash the complete firmware.

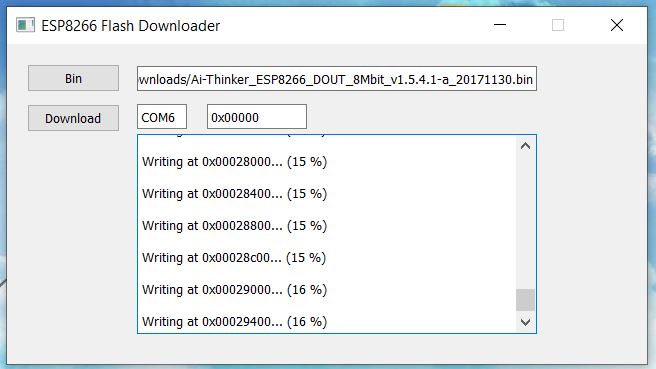
Once it reaches 99%, assume that the flashing is completed.

Ignore the “Failed to Leave Flash mode” message that appears at the end. This message means the flashing has been completed.

This is how you can Flash or Upgrade Firmware on generic ESP8266 board (ESP-01 or ESP8266-01). Now you can use it with Arduino or for stand alone applications.

Share. Facebook Twitter Pinterest LinkedIn Tumblr Email Reddit Telegram WhatsApp
Previous ArticleESP32 DW3000 UWB Module Achieving 500m Range
Next Article IoT-enabled Smart Fridge with ESP8266 WebServer

Related Posts

Humidity & Temperature Monitoring using DHT11 & NodeMCU on ThingSpeak

ESP8266 & DHT11 Humidity Temperature Monitor on ThingSpeak

Updated:October 19, 20253443K
Water Tank Level Monitoring System with GSM & ESP8266

Monitor Water Tank Level with GSM & ESP8266 on Blynk

Updated:June 28, 20255K
IoT-enabled Smart Fridge with ESP8266 & DS18B20

IoT-enabled Smart Fridge with ESP8266 WebServer

Updated:February 2, 202525K
IoT Based Patient Health Monitoring System using ESP8266 & Arduino

IoT Patient Health Monitoring with ESP8266 & Arduino

Updated:February 2, 2025156K
IoT Solar Panel Monitoring System with ESP8266 & MQTT

IoT Solar Panel Monitoring System with ESP8266 & MQTT

Updated:February 2, 202518K
Smart & Manual Home Automation with Alexa & ESP8266

Smart & Manual Home Automation with Alexa & ESP8266

Updated:November 20, 202315K
Add A Comment

CommentsCancel reply

Latest Posts
ESP32 Fingerprint Attendance System with Live Web Dashboard

ESP32 Fingerprint Attendance System with Live Web Dashboard

June 21, 2026
IoT Based PM & Air Quality Monitoring System using ESP32

IoT Based PM & Air Quality Monitoring System using ESP32

June 14, 2026
DIY ESP32 MLX90640 IR Thermal Camera with Live Web Display

DIY ESP32 MLX90640 IR Thermal Camera with Live Web Display

May 10, 2026
IoT Activity Tracker with ESP32 & Accelerometer Gyroscope

IoT Activity Tracker with ESP32 & Accelerometer/Gyroscope

May 2, 2026
A Guide to Sourcing Obsolete ICs for Vintage Projects

Beyond AliExpress: A Guide to Sourcing Obsolete ICs for Vintage Projects

April 21, 2026

ESP32 IoT Vehicle Motion Analyzer with MPU6050 & LIS3MDL

April 27, 2026
Building a Smart Sensor Node with a BLE Microcontroller

Building a Smart Sensor Node with a BLE Microcontroller

February 26, 2026
High-Accuracy Pitch, Roll, Yaw with ESP32 & BNO08x IMU

High-Accuracy Pitch, Roll, Yaw with ESP32 & BNO08x IMU

April 27, 2026
Top Posts & Pages
  • ESP32 Fingerprint Attendance System with Live Web Dashboard
    ESP32 Fingerprint Attendance System with Live Web Dashboard
  • ESP32 CAN Bus Tutorial | Interfacing MCP2515 CAN Module with ESP32
    ESP32 CAN Bus Tutorial | Interfacing MCP2515 CAN Module with ESP32
  • 12V DC to 220V AC Inverter Circuit & PCB
    12V DC to 220V AC Inverter Circuit & PCB
  • LD2410 Sensor with ESP32 - Human Presence Detection
    LD2410 Sensor with ESP32 - Human Presence Detection
  • IoT AC Energy Meter with PZEM-004T & ESP32 WebServer
    IoT AC Energy Meter with PZEM-004T & ESP32 WebServer
  • Silicon Controlled Rectifier (SCR): Construction, Working & Applications
    Silicon Controlled Rectifier (SCR): Construction, Working & Applications
  • How to use ADS1115 16-Bit ADC Module with Arduino
    How to use ADS1115 16-Bit ADC Module with Arduino
  • DIY AC Energy Meter using PZEM-004T & Arduino
    DIY AC Energy Meter using PZEM-004T & Arduino
Categories
  • Arduino Projects (197)
  • Articles (60)
    • Learn Electronics (19)
    • Product Review (15)
    • Tech Articles (28)
  • Electronics Circuits (46)
    • 555 Timer Projects (21)
    • Op-Amp Circuits (7)
    • Power Electronics (13)
  • IoT Projects (205)
    • ESP32 MicroPython (7)
    • ESP32 Projects (82)
    • ESP32-CAM Projects (15)
    • ESP8266 Projects (76)
    • LoRa/LoRaWAN Projects (22)
  • Microcontrollers (38)
    • AMB82-Mini IoT AI Camera (4)
    • BLE Projects (18)
    • STM32 Projects (19)
  • Raspberry Pi (93)
    • Raspberry Pi Pico Projects (57)
    • Raspberry Pi Pico W Projects (12)
    • Raspberry Pi Projects (24)
Follow Us
  • Facebook
  • Twitter
  • Pinterest
  • Instagram
  • YouTube
About Us

“‘How to Electronics’ is a vibrant community for electronics enthusiasts and professionals. We deliver latest insights in areas such as Embedded Systems, Power Electronics, AI, IoT, and Robotics. Our goal is to stimulate innovation and provide practical solutions for students, organizations, and industries. Join us to transform learning into a joyful journey of discovery and innovation.

Copyright © How To Electronics. All rights reserved.
  • About Us
  • Disclaimer
  • Privacy Policy
  • Contact Us
  • Advertise With Us

Type above and press Enter to search. Press Esc to cancel.

Ad Blocker Enabled!
Ad Blocker Enabled!
Looks like you're using an ad blocker. Please allow ads on our site. We rely on advertising to help fund our site.