

Overview: Gas Leakage Detector with Email Alert Notification using ESP32
In this project, we will learn how to make ESP32 Based Gas Leakage Detector with Email Alert Notification System. To sense the LPG Gas in Air, we will use the MQ2/MQ5 Gas Sensor. The MQ5 Gas Sensor is suitable for detecting H2, LPG, CH4, CO & Alcohol. Because of its greater Sensitivity & fast Response, safety Alert can be sent quickly. Earlier we made Gas Leak Alarm System using the MQ2 Sensor.
We will use the ESP32 Mail Client library & Send Email to any Email Address using an SMTP Server. The Email is sent automatically when any Gas/LPG Leakage is detected above certain Threshold Value. Thus this ESP32 Email Notifier system Alert the users to shut down the valve or take any action immediately. The system can be activated or deactivated through the Local Web Server. If we choose to deactivate, we won’t receive email notifications when the gas level is exceeded. We can use this System as a Safety System in Industry or at home.
Bill of Materials
Following are the components required for making this project. All the components can be easily purchased from Amazon. The component purchase link is given below.
| S.N. | Components Name | Quantity | Purchase Links |
|---|---|---|---|
| 1 | ESP32 Board | 1 | Amazon | AliExpress |
| 2 | MQ2/MQ5 Gas Sensor | 1 | Amazon | AliExpress |
| 3 | 5V Micro USB Data Cable | 1 | Amazon | AliExpress |
| 5 | Breadboard | 1 | Amazon | AliExpress |
| 4 | Connecting Jumper Wires | Amazon | AliExpress |
MQ5 Gas Sensor
The most popular Analog Gas Sensor used is MQ5 Gas Sensor. The MQ5 gas sensor detects the presence of various gases such as hydrogen, carbon monoxide, methane and LPG. The sensor interacts with a gas to measure its concentration ranging from 100ppm to 3,000ppm.
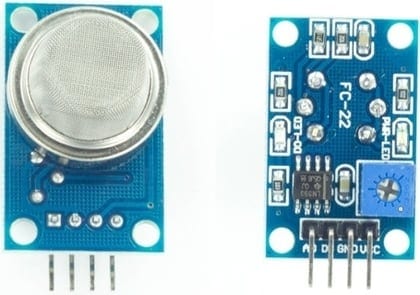
When a gas interacts with this sensor, it is first ionized into its constituents and is then adsorbed by the sensing element. This adsorption creates a potential difference in the element which is conveyed to the controller unit through an output analog pin in the form of current. Thus we are measuring the Analog current as an output which increases on increasing Gas Level.
The Sensor works on 3V-5V & has both the Analog & Digital output. It has 4 Pins as VCC, GND, D0 & A0. To learn more about this Sensor check its datasheet here: MQ5 Datasheet.
You can check some of the previous project made using this Sensor:
1.Gas Level Monitoring Over Internet Using ESP8266 & Gas Sensor
2.Smoke Level Detector using MQ-135 Sensor & Arduino with Alarm
3.Gas Leakage Detector using GSM & Arduino with SMS Alert
Hardware Circuit Assembly
We can make a small device that can be operated on Battery. In my case, I used Breadboard to Assemble and test the device. The Circuit Diagram for “ESP32 Gas Leakage Detector with Email Alert Notification” is given below.

You can connect Sensor VCC Pin to 3.3V/5V of ESP32 Board. We are not using the digital Pin, so we connect the Sensor Analog Pin to GPIO35 of ESP32 Board.

Setting Up Sender Email Address
Create a New Gmail Account from here: https://www.google.com/gmail/about/. Its better not to use the Personal Gmail Account for this purpose.

Now you need to allow less secure apps to get access to this new Gmail account by ESP32. If you don’t allow this option, you might not be able to set the ESP32 Email Alert part. Go to this link & turn on the “allow less secure” option.

Note: Turn OFF two-step Verification to access this.
Installing the Required Libraries
1. ESP32 Mail Client Library
To send emails with the ESP32, we’ll use the ESP32 Mail Client library. The library is developed by Mobizt and can be installed via Library Manager. You can download the library from here.
2. Asynchronous Web Server Libraries
To build the asynchronous web server we need two libraries, i.e ESPAsyncWebServer library & Async TCP Library.
Source Code: ESP32 Gas Leakage Detector with Email Alert Notification
Now let us move to the programming Part of this Project. First add all the Libraries explained above.
Copy the code given below & before uploading it to the ESP32 Board, make some changes in the code explained below.
|
1 2 |
const char* ssid = "***********"; //SSID of Wifi network const char* password = "***********"; // Password of wifi network |
Make changes to Wifi SSID & Password from here.
|
1 2 |
#define emailSenderAccount "[email protected]" // Sender email address #define emailSenderPassword "***********" // Sender email password |
Change the Sender Email here and fill the Email Address & Password you created earlier.
|
1 |
Fill the Receiver Address here where you want to send the Alert Email.
|
1 2 |
// Default Threshold Value String inputMessage3 = "40.0"; // Default gas_value |
Change the threshold value of the gas from here. When the gas level crosses this value, Email Alert is Send.
Thats all the whole changes you need to make in the code before uploading it to the ESP32 board. The full code is given below.
|
1 2 3 4 5 6 7 8 9 10 11 12 13 14 15 16 17 18 19 20 21 22 23 24 25 26 27 28 29 30 31 32 33 34 35 36 37 38 39 40 41 42 43 44 45 46 47 48 49 50 51 52 53 54 55 56 57 58 59 60 61 62 63 64 65 66 67 68 69 70 71 72 73 74 75 76 77 78 79 80 81 82 83 84 85 86 87 88 89 90 91 92 93 94 95 96 97 98 99 100 101 102 103 104 105 106 107 108 109 110 111 112 113 114 115 116 117 118 119 120 121 122 123 124 125 126 127 128 129 130 131 132 133 134 135 136 137 138 139 140 141 142 143 144 145 146 147 148 149 150 151 152 153 154 155 156 157 158 159 160 161 162 163 164 165 166 167 168 169 170 171 172 173 174 175 176 177 178 179 180 181 182 183 184 185 186 187 188 189 190 191 192 193 194 195 196 197 198 199 200 201 202 203 204 205 206 207 208 209 210 211 212 213 214 215 216 217 218 219 220 221 |
#include <WiFi.h> #include <AsyncTCP.h> #include <ESPAsyncWebServer.h> #include "ESP32_MailClient.h" const char* ssid = "***********"; //SSID of Wifi network const char* password = "***********"; // Password of wifi network #define emailSenderAccount "[email protected]" // Sender email address #define emailSenderPassword "***********" // Sender email password #define smtpServer "smtp.gmail.com" #define smtpServerPort 465 #define emailSubject "ALERT! Gas Leak Detected" // Email subject String enableEmailChecked = "checked"; String inputMessage2 = "true"; // Default Threshold Value String inputMessage3 = "40.0"; // Default gas_value String lastgaslevel; // HTML web page to handle 3 input fields (email_input, enable_email_input, threshold_input) const char index_html[] PROGMEM = R"rawliteral( <!DOCTYPE HTML><html><head> <title>Email Notification with Gas Level</title> <meta name="viewport" content="width=device-width, initial-scale=1"> </head><body> <h2>Gas Level Detection</h2> <h3>%GASVALUE%</h3> <h2>ESP Email Alert</h2> <form action="/get"> Email Address <input type="email" name="email_input" value="%EMAIL_INPUT%" required><br> Enable Email Notification <input type="checkbox" name="enable_email_input" value="true" %ENABLE_EMAIL%><br> Gas Level Threshold <input type="number" step="0.1" name="threshold_input" value="%THRESHOLD%" required><br> <input type="submit" value="Submit"> </form> </body></html>)rawliteral"; void notFound(AsyncWebServerRequest *request) { request->send(404, "text/plain", "Not found"); } AsyncWebServer server(80); String processor(const String& var) { if(var == "GASVALUE") { return lastgaslevel; } else if(var == "EMAIL_INPUT") { return inputMessage; } else if(var == "ENABLE_EMAIL") { return enableEmailChecked; } else if(var == "THRESHOLD") { return inputMessage3; } return String(); } // Flag variable to keep track if email notification was sent or not bool emailSent = false; const char* PARAM_INPUT_1 = "email_input"; const char* PARAM_INPUT_2 = "enable_email_input"; const char* PARAM_INPUT_3 = "threshold_input"; // Interval between sensor readings. unsigned long previousMillis = 0; const long interval = 5000; SMTPData smtpData; void setup() { Serial.begin(115200); WiFi.mode(WIFI_STA); WiFi.begin(ssid, password); if (WiFi.waitForConnectResult() != WL_CONNECTED) { Serial.println("WiFi Failed!"); return; } Serial.println(); Serial.print("ESP IP Address: http://"); Serial.println(WiFi.localIP()); // Send web page to client server.on("/", HTTP_GET, [](AsyncWebServerRequest *request){ request->send_P(200, "text/html", index_html, processor); }); // Receive an HTTP GET request at <ESP_IP>/get?email_input=<inputMessage>&enable_email_input=<inputMessage2>&threshold_input=<inputMessage3> server.on("/get", HTTP_GET, [] (AsyncWebServerRequest *request) { // GET email_input value on <ESP_IP>/get?email_input=<inputMessage> if (request->hasParam(PARAM_INPUT_1)) { inputMessage = request->getParam(PARAM_INPUT_1)->value(); // GET enable_email_input value on <ESP_IP>/get?enable_email_input=<inputMessage2> if (request->hasParam(PARAM_INPUT_2)) { inputMessage2 = request->getParam(PARAM_INPUT_2)->value(); enableEmailChecked = "checked"; } else { inputMessage2 = "false"; enableEmailChecked = ""; } // GET threshold_input value on <ESP_IP>/get?threshold_input=<inputMessage3> if (request->hasParam(PARAM_INPUT_3)) { inputMessage3 = request->getParam(PARAM_INPUT_3)->value(); } } else { inputMessage = "No message sent"; } Serial.println(inputMessage); Serial.println(inputMessage2); Serial.println(inputMessage3); request->send(200, "text/html", "HTTP GET request sent to your ESP.<br><a href=\"/\">Return to Home Page</a>"); }); server.onNotFound(notFound); server.begin(); } void loop() { unsigned long currentMillis = millis(); if (currentMillis - previousMillis >= interval) { previousMillis = currentMillis; float gas_analog_value = analogRead(35); float gas_value = ((gas_analog_value/1023)*100); Serial.print(gas_analog_value); Serial.print(", "); Serial.println(gas_value); lastgaslevel = String(gas_value); // Check if gas_value is above threshold and if it needs to send the Email alert if(gas_value > inputMessage3.toFloat() && inputMessage2 == "true" && !emailSent){ String emailMessage = String("Gas Level above threshold. Current Gas Level: ") + String(gas_value)); if(sendEmailNotification(emailMessage)) { Serial.println(emailMessage); emailSent = true; } else { Serial.println("Email failed to send"); } } // Check if gas_value is below threshold and if it needs to send the Email alert else if((gas_value < inputMessage3.toFloat()) && inputMessage2 == "true" && emailSent) { String emailMessage = String("Gas Level below threshold. Current gas_value: ") + String(gas_value) + String(" C"); if(sendEmailNotification(emailMessage)) { Serial.println(emailMessage); emailSent = false; } else { Serial.println("Email failed to send"); } } } } bool sendEmailNotification(String emailMessage) { // Set the SMTP Server Email host, port, account and password smtpData.setLogin(smtpServer, smtpServerPort, emailSenderAccount, emailSenderPassword); smtpData.setSender("ESP32_Gas_Alert_Mail", emailSenderAccount); // Set Email priority or importance High, Normal, Low or 1 to 5 (1 is highest) smtpData.setPriority("High"); // Set the subject smtpData.setSubject(emailSubject); // Set the message with HTML format smtpData.setMessage(emailMessage, true); // Add recipients smtpData.addRecipient(inputMessage); smtpData.setSendCallback(sendCallback); if (!MailClient.sendMail(smtpData)) { Serial.println("Error sending Email, " + MailClient.smtpErrorReason()); return false; } smtpData.empty(); return true; } void sendCallback(SendStatus msg) { // Print the current status Serial.println(msg.info()); // Do something when complete if (msg.success()) { Serial.println("----------------"); } } |
ESP32 Gas Leakage Detector with Email Alert Notification
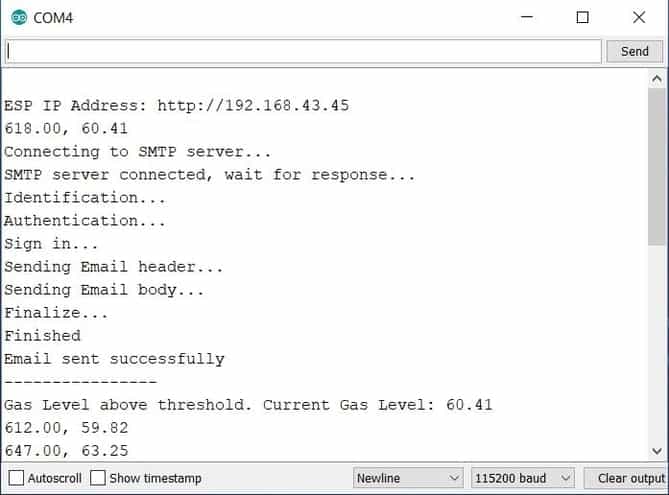
Once the code is uploaded to ESP32 Board, you can now open the Serial Monitor. The Serial Monitor will display the IP Address of the ESP32 Board. It will display all the process from start to the end including Mail Server getting Started to Sending Email if the threshold is crossed.
It will display the Gas Level along with the Analog value as well.
Now Copy the IP Address and paste it on any Web Browser like Chrome and then hit “Enter”. The Web Browser will display the Gas Value along with the Threshold Value Set.

You can enable or disable the Email Alert form here by simply ticking/unticking an option. Similarly, you can change the Email Address and also the Gas Threshold Value. All you need is put the value and Hit Send Button.
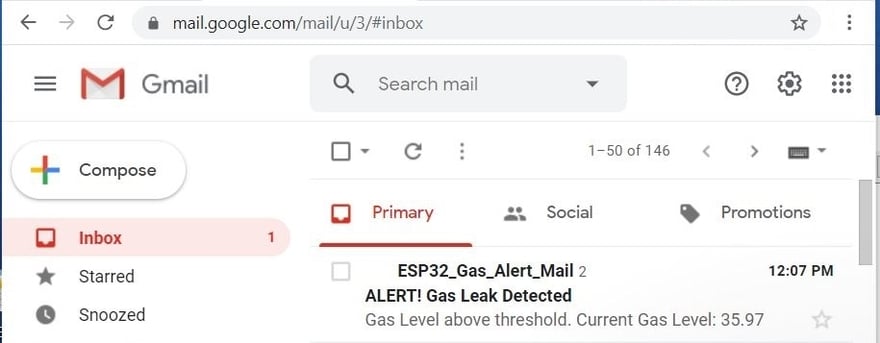
Now also open your Gmail Inbox, you can see Email Message Alert via ESP32 using the SMTP Mail Server.
Video Tutorial & Demonstration

 & Live Dashboard")


1 Comment
interesting project