

Overview
In this tutorial, we will use Realtek AMB82-Mini IoT AI Camera board for Object Detection & Identification task. In this example, we will be using AMB82-Mini board to detect 80 different kinds of objects such as person, bicycle, car, laptop etc using on-board camera sensor (JXF37). Earlier we used ESP32-CAM & OpenCV for Object Detection & Identification, which you can check to learn more.

The Realtek AMB82-Mini IoT AI Camera Board uses the algorithm like YOLOv3, YOLOv4 and YOLOv7. The applications of object detection and identification are widespread and include object recognition, autonomous vehicles, video surveillance, and many more. Therefore AMB82-Mini board can be used for numerous applications and building various AI-based projects such as Embedded AI Vision Camera.
Bill of Materials
We need the following components for this tutorial. You can purchase the components from given links.
| S.N. | Components | Quantity | Purchase Links |
|---|---|---|---|
| 1 | Realtek AMB82-Mini IoT AI Camera Board | 1 | Seeed Studio |
| 2 | Micro-USB Cable | 1 | Amazon | AliExpress |
Realtek AMB82-Mini IoT AI Camera Board
The Realtek AMB82-Mini IoT AI Camera Board is an advanced development tool for AI network camera applications.

This compact and robust board is equipped with the integrated Realtek RTL8735BDM SoC, a powerful system-on-a-chip that merges an Arm® v8M MCU, DualBand Wi-Fi, Bluetooth BLE5, audio codec, an ISP, H264/H265 encoder, DDR2 128MB memory, and a neural network intelligent engine. This combination of features allows for efficient coordination of various applications and controls, making it a versatile tool for developers.
The AMB82-Mini has been optimized for battery-powered appliances, displaying a quick boot-up time and ultra-low power consumption, making it perfect for IoT applications. It also incorporates robust security measures, including TrustZone/security mechanism. The board is compatible with multiple programming platforms such as RTOS, IAR, GCC, and Arduino IDE, giving developers the flexibility to use their preferred development environment.
The AMB82-Mini offers more than just wireless network camera solutions. The on-board Neural Network engine accelerates the AI Model processing, that supports variety of AI Models. This includes object detection, audio recognition, and facial recognition technologies, expanding the potential use cases for this board in IoT and AI applications. With the AMB82-Mini, developers are given a versatile platform to create innovative, intelligent products.
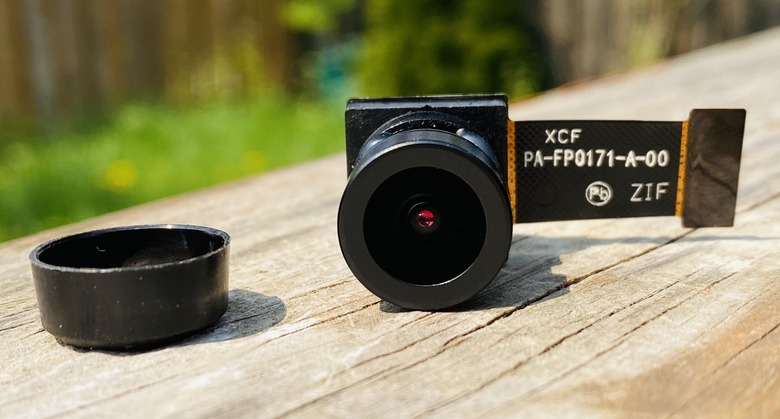
One of the major components of the AMB82-Mini is the JXF37 5 megapixels camera module. This Full HD CMOS image sensor boasts a resolution of 1920×1080 pixels, providing crystal clear images with fine details. The wide field of view FOV (D,H,V) of 130 degrees, coupled with the high-quality optical lens, makes this camera ideal for wide area surveillance, photography, and videography.
To learn more about the AMB82-Mini IoT AI Camera and to learn how to get started with it, you may refer to our previous article: Getting Started with Realtek AMB82-Mini IoT AI Camera Board
Algorithm Used for Object Detection & Identification
For Object Detection & Identification, the Realtek AMB82-Mini development board supports object detection through neural network tasks such as YOLO (You Only Look Once) versions 3, 4, and 7 TINY.

Here’s a brief explanation of the algorithm: YOLO (You Only Look Once): YOLO is a state-of-the-art, real-time object detection system that looks at the whole image at test time, so its predictions are informed by the global context in the image.
It frames object detection as a regression problem to spatially separated bounding boxes and associated class probabilities. It comes in various versions, with each new version improving on the previous one. YOLOv3, YOLOv4, and YOLOv7 TINY are mentioned in your context.
Object Detection & Identification with AMB82-Mini AI Camera
Now let us move to the project part and learn about the Object Detection & Identification with AMB82-Mini AI Camera. In this example we will utilize the JXF37 camera sensor on AMB82-Mini AI. This advanced board is capable of identifying a broad range of 80 distinct objects, spanning from people and bicycles to cars and laptops, among others.
Arduino IDE Setup & Example Code
To being with this example, you need to install Ameba Boards to the Arduino IDE. If you haven’t installed and configured the Arduino IDE, you may follow the Getting Started Tutorial to setup the Arduino IDE completely.
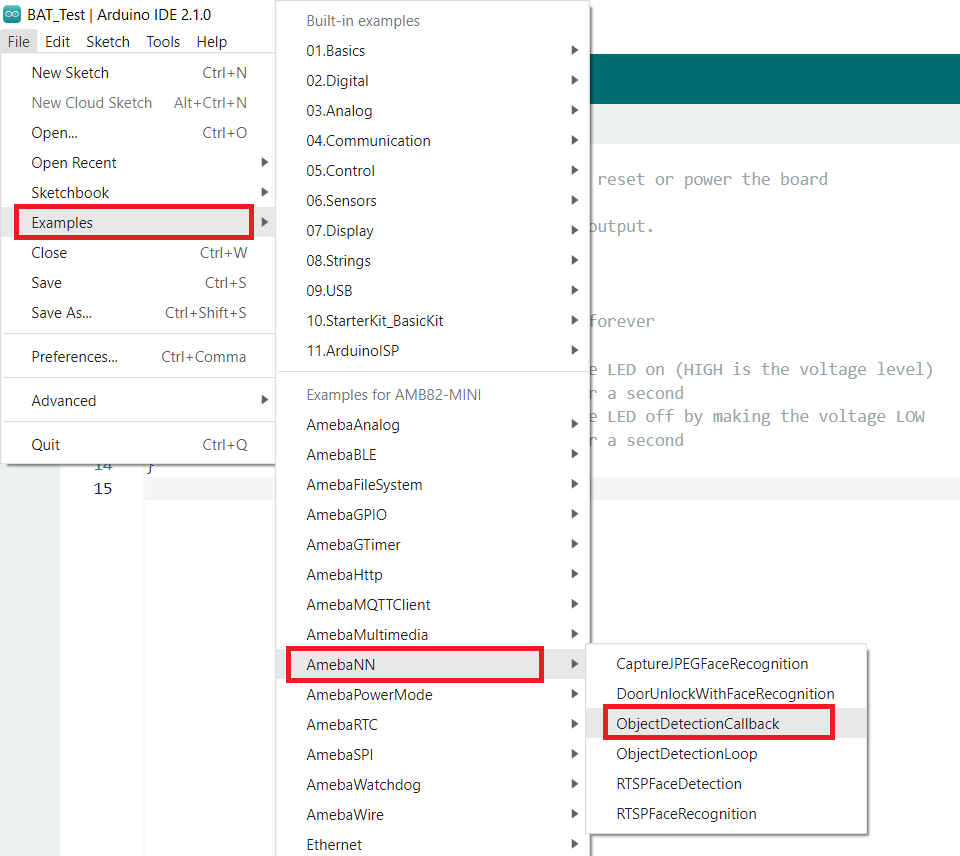
The following examples show how Object Detection and On-Screen Display are used. The main difference between the two examples is where the Object Detection results are processed. “ObjectDetectionCallback” uses a callback function, while “ObjectDetectionLoop” deals with the results in the loop function.
- ObjectDetectionLoop
- ObjectDetectionCallback
Open one of the Object Detection examples in “File” -> “Example” -> “AmebaNN” -> “ObjectDetectionLoop”.
Here is the code part of this project:
ObjectDetectionLoop.ino
|
1 2 3 4 5 6 7 8 9 10 11 12 13 14 15 16 17 18 19 20 21 22 23 24 25 26 27 28 29 30 31 32 33 34 35 36 37 38 39 40 41 42 43 44 45 46 47 48 49 50 51 52 53 54 55 56 57 58 59 60 61 62 63 64 65 66 67 68 69 70 71 72 73 74 75 76 77 78 79 80 81 82 83 84 85 86 87 88 89 90 91 92 93 94 95 96 97 98 99 100 101 102 103 104 105 106 107 108 109 110 111 112 113 114 115 116 117 118 119 120 121 122 123 124 125 126 127 128 129 130 131 132 133 134 135 136 137 138 139 |
#include "WiFi.h" #include "StreamIO.h" #include "VideoStream.h" #include "RTSP.h" #include "NNObjectDetection.h" #include "VideoStreamOverlay.h" #include "ObjectClassList.h" #define CHANNEL 0 #define CHANNELNN 3 // Lower resolution for NN processing #define NNWIDTH 576 #define NNHEIGHT 320 // OSD layers #define RECTLAYER OSDLAYER0 #define TEXTLAYER OSDLAYER1 VideoSetting config(VIDEO_FHD, 30, VIDEO_H264, 0); VideoSetting configNN(NNWIDTH, NNHEIGHT, 10, VIDEO_RGB, 0); NNObjectDetection ObjDet; RTSP rtsp; StreamIO videoStreamer(1, 1); StreamIO videoStreamerNN(1, 1); char ssid[] = "yourNetwork"; // your network SSID (name) char pass[] = "Password"; // your network password int status = WL_IDLE_STATUS; IPAddress ip; int rtsp_portnum; void setup() { Serial.begin(115200); // attempt to connect to Wifi network: while (status != WL_CONNECTED) { Serial.print("Attempting to connect to WPA SSID: "); Serial.println(ssid); status = WiFi.begin(ssid, pass); // wait 2 seconds for connection: delay(2000); } ip = WiFi.localIP(); // Configure camera video channels with video format information // Adjust the bitrate based on your WiFi network quality config.setBitrate(2 * 1024 * 1024); // Recommend to use 2Mbps for RTSP streaming to prevent network congestion Camera.configVideoChannel(CHANNEL, config); Camera.configVideoChannel(CHANNELNN, configNN); Camera.videoInit(); // Configure RTSP with corresponding video format information rtsp.configVideo(config); rtsp.begin(); rtsp_portnum = rtsp.getPort(); // Configure object detection with corresponding video format information // Select Neural Network(NN) task and models ObjDet.configVideo(configNN); ObjDet.modelSelect(OBJECT_DETECTION, DEFAULT_YOLOV4TINY, NA_MODEL, NA_MODEL); ObjDet.begin(); // Configure StreamIO object to stream data from video channel to RTSP videoStreamer.registerInput(Camera.getStream(CHANNEL)); videoStreamer.registerOutput(rtsp); if (videoStreamer.begin() != 0) { Serial.println("StreamIO link start failed"); } // Start data stream from video channel Camera.channelBegin(CHANNEL); // Configure StreamIO object to stream data from RGB video channel to object detection videoStreamerNN.registerInput(Camera.getStream(CHANNELNN)); videoStreamerNN.setStackSize(); videoStreamerNN.setTaskPriority(); videoStreamerNN.registerOutput(ObjDet); if (videoStreamerNN.begin() != 0) { Serial.println("StreamIO link start failed"); } // Start video channel for NN Camera.channelBegin(CHANNELNN); // Start OSD drawing on RTSP video channel OSD.configVideo(CHANNEL, config); OSD.begin(); } void loop() { std::vector<ObjectDetectionResult> results = ObjDet.getResult(); uint16_t im_h = config.height(); uint16_t im_w = config.width(); Serial.print("Network URL for RTSP Streaming: "); Serial.print("rtsp://"); Serial.print(ip); Serial.print(":"); Serial.println(rtsp_portnum); Serial.println(" "); printf("Total number of objects detected = %d\r\n", ObjDet.getResultCount()); OSD.createBitmap(CHANNEL, RECTLAYER); OSD.createBitmap(CHANNEL, TEXTLAYER); if (ObjDet.getResultCount() > 0) { for (uint32_t i = 0; i < ObjDet.getResultCount(); i++) { int obj_type = results[i].type(); if (itemList[obj_type].filter) { // check if item should be ignored ObjectDetectionResult item = results[i]; // Result coordinates are floats ranging from 0.00 to 1.00 // Multiply with RTSP resolution to get coordinates in pixels int xmin = (int)(item.xMin() * im_w); int xmax = (int)(item.xMax() * im_w); int ymin = (int)(item.yMin() * im_h); int ymax = (int)(item.yMax() * im_h); // Draw boundary box printf("Item %d %s:\t%d %d %d %d\n\r", i, itemList[obj_type].objectName, xmin, xmax, ymin, ymax); OSD.drawRect(CHANNEL, xmin, ymin, xmax, ymax, 3, OSD_COLOR_WHITE, RECTLAYER); // Print identification text char text_str[20]; snprintf(text_str, sizeof(text_str), "%s %d", itemList[obj_type].objectName, item.score()); OSD.drawText(CHANNEL, xmin, ymin - OSD.getTextHeight(CHANNEL), text_str, OSD_COLOR_CYAN, TEXTLAYER); } } } OSD.update(CHANNEL, RECTLAYER); OSD.update(CHANNEL, TEXTLAYER); // delay to wait for new results delay(100); } |
ObjectClassList.h
|
1 2 3 4 5 6 7 8 9 10 11 12 13 14 15 16 17 18 19 20 21 22 23 24 25 26 27 28 29 30 31 32 33 34 35 36 37 38 39 40 41 42 43 44 45 46 47 48 49 50 51 52 53 54 55 56 57 58 59 60 61 62 63 64 65 66 67 68 69 70 71 72 73 74 75 76 77 78 79 80 81 82 83 84 85 86 87 88 89 90 |
struct ObjectDetectionItem { uint8_t index; const char* objectName; uint8_t filter; }; // List of objects the pre-trained model is capable of recognizing // Index number is fixed and hard-coded from training // Set the filter value to 0 to ignore any recognized objects ObjectDetectionItem itemList[80] = { {0, "person", 1}, {1, "bicycle", 1}, {2, "car", 1}, {3, "motorbike", 1}, {4, "aeroplane", 1}, {5, "bus", 1}, {6, "train", 1}, {7, "truck", 1}, {8, "boat", 1}, {9, "traffic light", 1}, {10, "fire hydrant", 1}, {11, "stop sign", 1}, {12, "parking meter", 1}, {13, "bench", 1}, {14, "bird", 1}, {15, "cat", 1}, {16, "dog", 1}, {17, "horse", 1}, {18, "sheep", 1}, {19, "cow", 1}, {20, "elephant", 1}, {21, "bear", 1}, {22, "zebra", 1}, {23, "giraffe", 1}, {24, "backpack", 1}, {25, "umbrella", 1}, {26, "handbag", 1}, {27, "tie", 1}, {28, "suitcase", 1}, {29, "frisbee", 1}, {30, "skis", 1}, {31, "snowboard", 1}, {32, "sports ball", 1}, {33, "kite", 1}, {34, "baseball bat", 1}, {35, "baseball glove", 1}, {36, "skateboard", 1}, {37, "surfboard", 1}, {38, "tennis racket", 1}, {39, "bottle", 1}, {40, "wine glass", 1}, {41, "cup", 1}, {42, "fork", 1}, {43, "knife", 1}, {44, "spoon", 1}, {45, "bowl", 1}, {46, "banana", 1}, {47, "apple", 1}, {48, "sandwich", 1}, {49, "orange", 1}, {50, "broccoli", 1}, {51, "carrot", 1}, {52, "hot dog", 1}, {53, "pizza", 1}, {54, "donut", 1}, {55, "cake", 1}, {56, "chair", 1}, {57, "sofa", 1}, {58, "pottedplant", 1}, {59, "bed", 1}, {60, "diningtable", 1}, {61, "toilet", 1}, {62, "tvmonitor", 1}, {63, "laptop", 1}, {64, "mouse", 1}, {65, "remote", 1}, {66, "keyboard", 1}, {67, "cell phone", 1}, {68, "microwave", 1}, {69, "oven", 1}, {70, "toaster", 1}, {71, "sink", 1}, {72, "refrigerator", 1}, {73, "book", 1}, {74, "clock", 1}, {75, "vase", 1}, {76, "scissors", 1}, {77, "teddy bear", 1}, {78, "hair dryer", 1}, {79, "toothbrush", 1}}; |
We need to make some modifications to the code before uploading the code. From the following lines make changes to the WiFi SSID and Password.
|
1 2 |
char ssid[] = "yourNetwork"; // your network SSID (name) char pass[] = "Password"; // your network password |
Select Neural Network (NN) tasks and models using modelSelect() function.
|
1 |
ObjDet.modelSelect(OBJECT_DETECTION, DEFAULT_YOLOV4TINY, NA_MODEL, NA_MODEL); |
This function takes 4 arguments: Neural Network task, Object Detection model, Face Detection model, and Face Recognition model.
Replace with “NA_MODEL” if they are not necessary for your selected Neural Network task. Note that it is mandatory to call modelSelect() function before calling the begin() function.
Valid Neural Network task: OBJECT_DETECTION, FACE_DETECTION, FACE_RECOGNITION
Valid Object Detection model:
YOLOv3 model: DEFAULT_YOLOV3TINY, CUSTOMIZED_YOLOV3TINY
YOLOv4 model: DEFAULT_YOLOV4TINY, CUSTOMIZED_YOLOV4TINY
YOLOv7 model: DEFAULT_YOLOV7TINY, CUSTOMIZED_YOLOV7TINY
Now Compile the code after compilation you can upload the code to the AMB82-Mini board. To do that press and hold the boot button and then Press and release the Reset button and finally release the boot button.
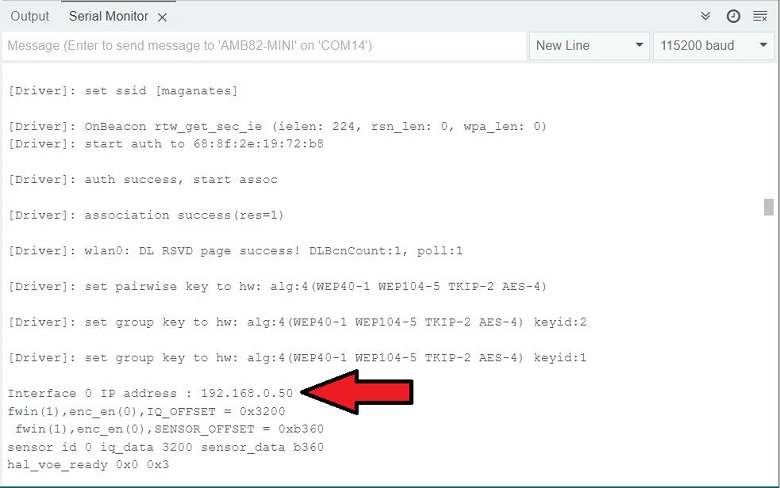
Once code get uploaded the Arduino IDE will show the following messages.

Object Detection Testing & Demo

Once code uploads, we can start testing Object Detection & Identification project using AMB82-Mini AI Camera.
Press the Reset button and wait for the AMB82-Mini board to connect to the WiFi network. The Serial Monitor will show the board’s IP address and network port number for RTSP.
The result of detected objects can be validated using VLC. You may download VLC media player from the link (here).
Upon the completion of the software installation, open VLC media player, and go to “Media” -> “Open Network Stream”.
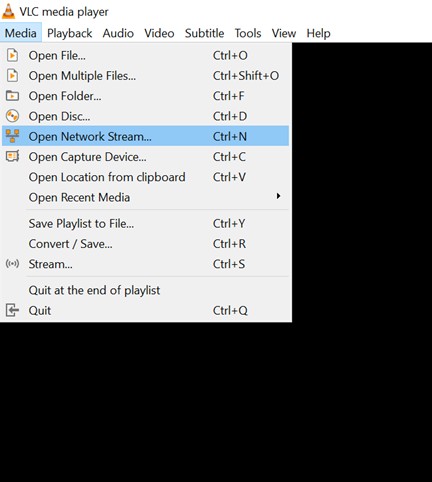
Make sure your PC is connected to the same network as the AMB82-Mini board for streaming. Since RTSP is used as the streaming protocol, key in “rtsp://{IPaddress}:{port}” as the Network URL in VLC media player.
Replace {IPaddress} with the IP address of your AMB82-Mini board board, and {port} with the RTSP port shown in Serial Monitor (e.g., “rtsp://192.168.1.154:554”). The default RTSP port number is 554.
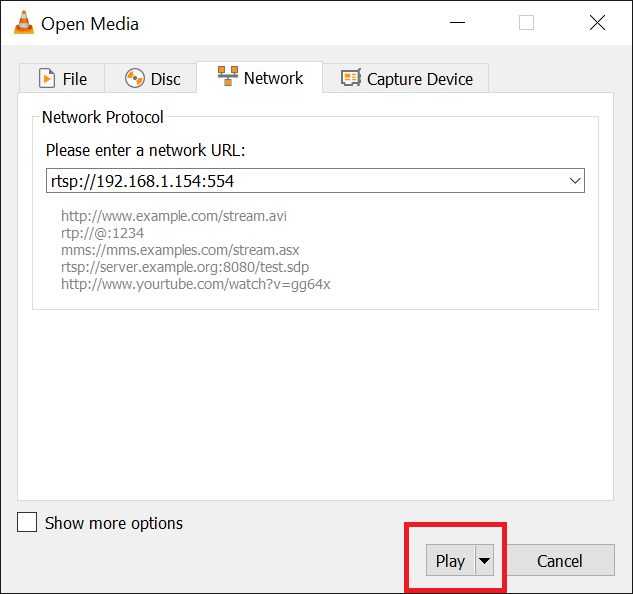
Following the setup, proceed by clicking the “Play” button to initiate RTSP streaming and view the outcome. The live video feed from the camera will be displayed in the VLC media player.
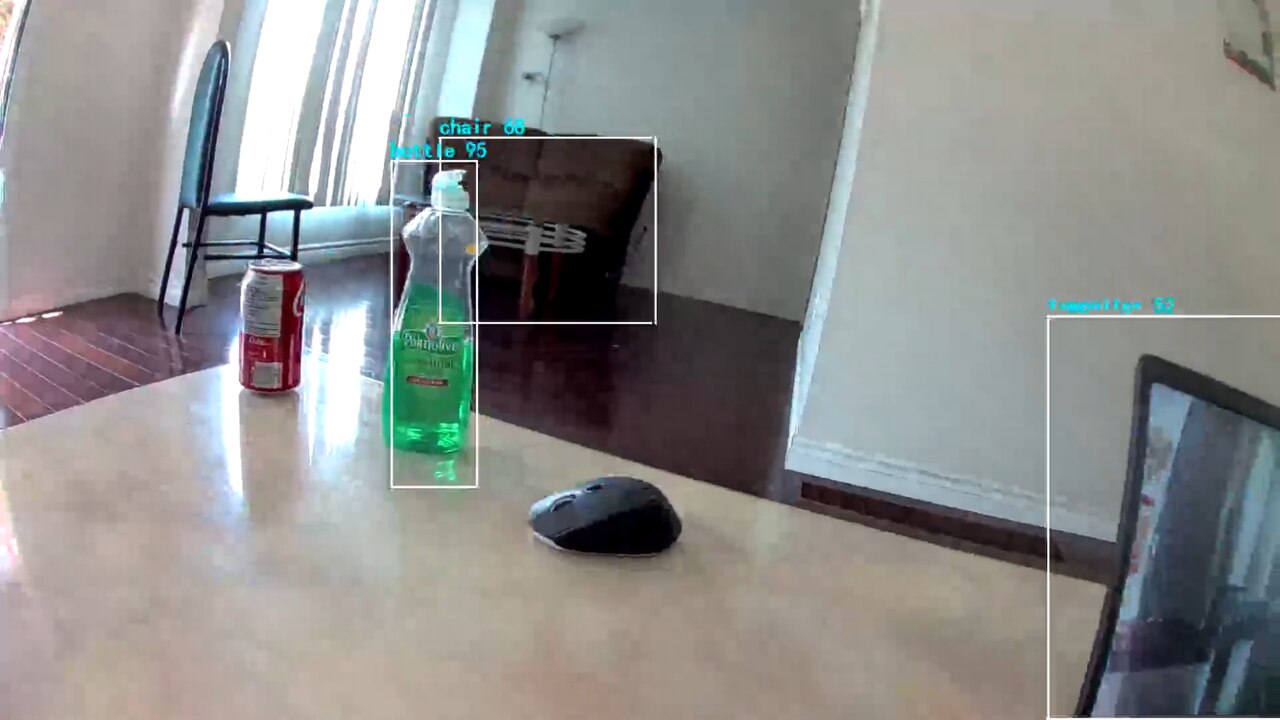
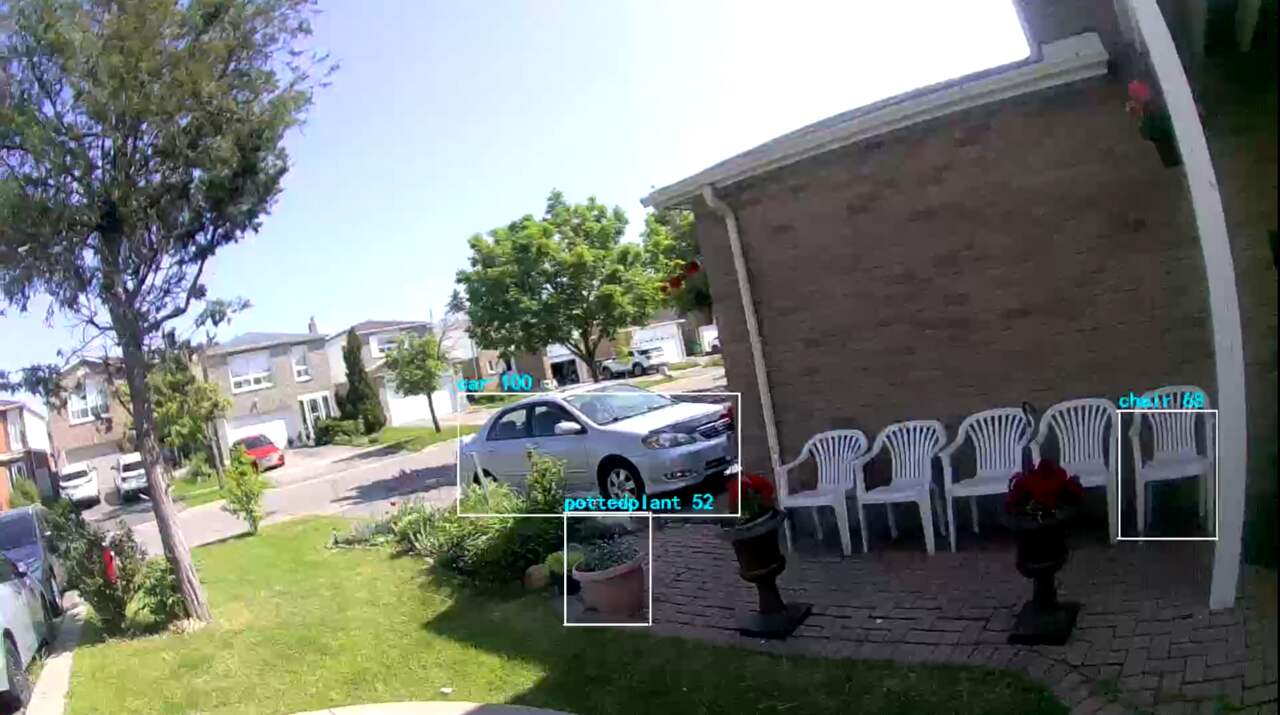
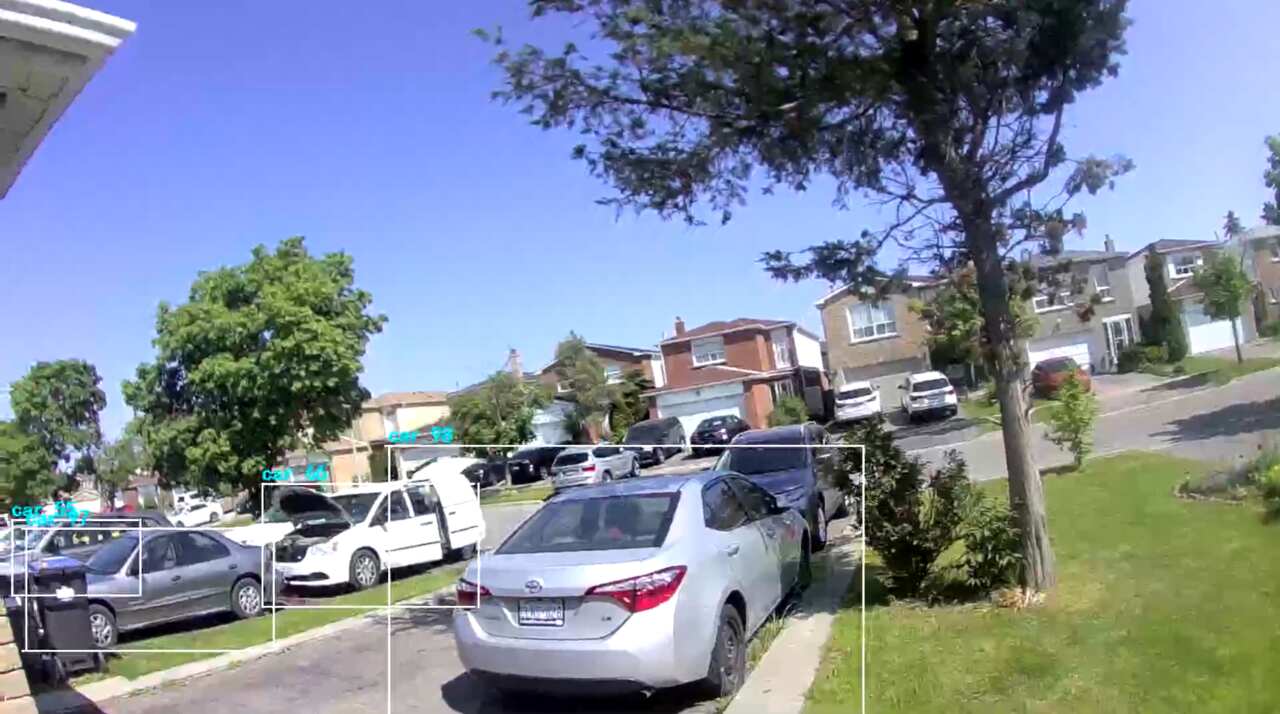
Upon successful object detection, a rectangular frame, known as a bounding box, will appear around the identified objects within the RTSP video stream. This box will be accompanied by the label of the detected object and a confidence score, reflecting the system’s certainty in its identification. This information assists in providing a clear visualization of the recognized objects.
Here are some samples of of images and object recognized inside the room.
Here are some samples of of images and object recognized outdoor.
This example is only able to identify the object that are trained (i.e. 80 objects).
The pre-trained model can recognize 80 different types of objects in total. The objects can be found in ObjectClassList.h. The index number for each object is fixed and should not be changed. To deactivate the detection of certain objects, set the filter value to 0. For example, set the filter value to 0 to exclude the detection of bicycles.
Conclusion
In conclusion, this tutorial has demonstrated the potent capabilities of the Realtek AMB82-Mini IoT AI Camera board in performing Object Detection and Identification tasks. With its ability to detect a diverse range of 80 different objects using the integrated JXF37 camera sensor, the AMB82-Mini board proves to be a powerful tool in the realm of computer vision, a prominent subfield of AI.
By utilizing advanced algorithms like YOLOv3, YOLOv4, YOLOv7 Tiny, the board ensures precise and reliable object identification. The widespread applications of object detection and identification, such as person recognition, autonomous vehicles, and video surveillance, make the AMB82-Mini board a versatile asset for developing an array of AI-centric projects. Thus, the Realtek AMB82-Mini IoT AI Camera board stands as a comprehensive and efficient solution for a myriad of AI and IoT applications.
Video Tutorial & Guide


3 Comments
Excellent post! However, it doesn’t seem to be in stock anywhere. Any idea what’s up with that and when it might be?
It will be available in August. Wait for 1-2 weeks.
They are sourced several places now. But check the prices. Alixexpres is way too high and shipping high. Not sure what is up with that. I got mine from Digi-Key. I’m totally pleased with the AMB82 and well work the $30. The software even compiles faster and the until is just amazing all around.
I did have a question and tested it myself. That is would it recognize a picture of someone’s face as easily as the real thing? Of course it does. So I wouldn’t use it necessarily as a security measure, at least not alone. I’m not sure if there is something to prevent that or not.