

Overview
In this guide, we will explore how to utilize the Realtek AMB82-Mini IoT AI Camera board to record high-quality video and audio content. Using the powerful AMB82-Mini development board, we will capture and encode video and audio data from the integrated camera sensor (JXF37) and audio codec, and save it as an MP4 file on an SD card.
Video recording and processing is an essential function in many applications of computer vision, from security and surveillance systems to autonomous vehicles, video conferencing, and multimedia production. By leveraging the potential of artificial intelligence (AI), we can enable machines not just to record the visual world, but also to understand it, paving the way for a host of smart and interactive features.
The Realtek AMB82-Mini IoT AI Camera board is designed for impressive multimedia recording, with a full HD CMOS image sensor (JXF37) for capturing clear video at 1920×1080 resolution. For audio, the AMB82-Mini board is equipped with an ADC/DAC/I2S codec and an onboard microphone for high-quality audio recording. Combining these features, the AMB82-Mini IoT AI Camera board is not just a tool for capturing video and audio data; it’s a comprehensive solution for creating AI-driven multimedia projects and applications such as Embedded AI Vision Camera.
Bill of Materials
We need the following components for this tutorial. You can purchase the components from given links.
| S.N. | Components | Quantity | Purchase Links |
|---|---|---|---|
| 1 | Realtek AMB82-Mini IoT AI Camera Board | 1 | Seeed Studio |
| 2 | Micro-USB Cable | 1 | Amazon | AliExpress |
| 3 | SD Card (32GB) | 1 | Amazon | AliExpress |
Realtek AMB82-Mini IoT AI Camera Board
The Realtek AMB82-Mini IoT AI Camera Board is an advanced development tool for AI network camera applications.

This compact and robust board is equipped with the integrated Realtek RTL8735BDM SoC, a powerful system-on-a-chip that merges an Arm® v8M MCU, DualBand Wi-Fi, Bluetooth BLE5, audio codec, an ISP, H264/H265 encoder, DDR2 128MB memory, and a neural network intelligent engine. This combination of features allows for efficient coordination of various applications and controls, making it a versatile tool for developers.
The AMB82-Mini has been optimized for battery-powered appliances, displaying a quick boot-up time and ultra-low power consumption, making it perfect for IoT applications. It also incorporates robust security measures, including TrustZone/security mechanism. The board is compatible with multiple programming platforms such as RTOS, IAR, GCC, and Arduino IDE, giving developers the flexibility to use their preferred development environment.
The AMB82-Mini offers more than just wireless network camera solutions. Its built-in neural network engine supports a variety of AI models, enabling the development of intelligent equipment. This includes object detection, audio recognition, and facial recognition technologies, expanding the potential use cases for this board in IoT and AI applications. With the AMB82-Mini, developers are given a versatile platform to create innovative, intelligent products.
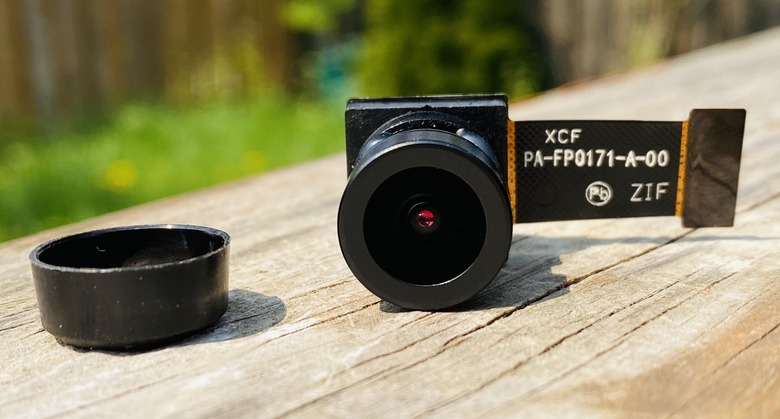
One of the major components of the AMB82-Mini is the JXF37 camera module. This Full HD CMOS image sensor boasts a resolution of 1920×1080 pixels, providing crystal clear images with fine details. The wide field of view (FOV) of 130 degrees, coupled with the high-quality optical lens, makes this camera ideal for wide area surveillance, photography, and videography.
To learn more about the AMB82-Mini IoT AI Camera and to learn how to get started with it, you may refer to our previous article:
Video Recording in Technology for Realtek AMB82-Mini Board
The Realtek AMB82-Mini IoT AI Camera Arduino Dev. Board uses JXF37 1920×1080 full HD CMOS image sensor with wide view angel FOV 130° optical lens. It supports video recording features as HDR/3DNR/WDR; H264/H265/JPEG video encoder 1080p@30fps +720p@30fps.
In the domain of video processing and transmission, HDR, 3DNR, and WDR are critical technologies used to enhance image quality, while H264/H265/JPEG are various video encoders used to compress the video content.
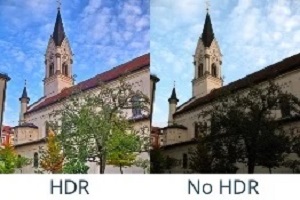
High Dynamic Range (HDR) allows cameras to record a greater range of light levels in the image, enhancing the contrast between the darkest and brightest areas. This leads to more detailed and realistic images, especially in challenging lighting conditions.
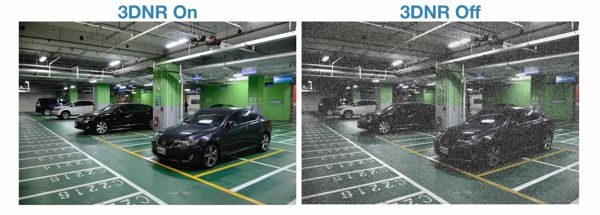
3D Noise Reduction (3DNR) technology is employed to reduce random noise in video footage, thus improving the clarity of the image. It works by analyzing consecutive frames and removing anomalies, resulting in smoother, cleaner video quality.
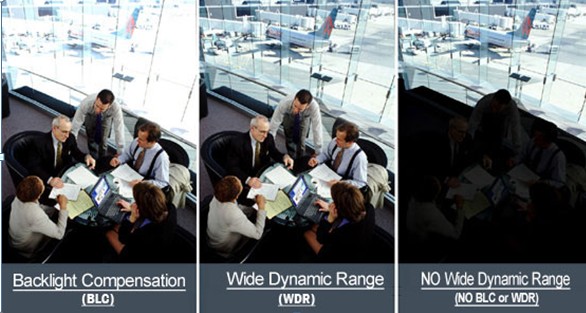
Wide Dynamic Range (WDR) is used to balance the lighting in a high-contrast scene, ensuring both bright and dark areas of the image are clear and detailed. It is particularly useful in situations where the background is bright, and the subject is in shadow.
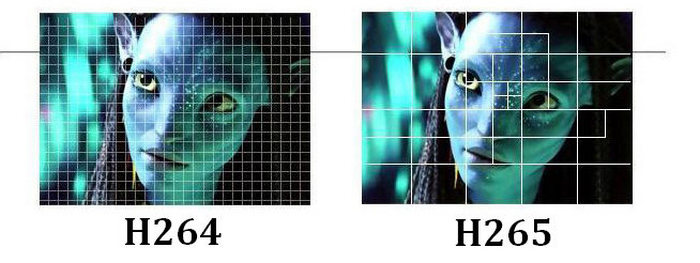
When it comes to video encoding, H264 (also known as AVC), H265 (HEVC), and JPEG are common formats. H264 and H265 are block-oriented, motion-compensation-based video compression standards. H265, the successor to H264, offers significantly better compression efficiency, allowing for higher quality video at smaller file sizes. JPEG, primarily used for still images, can also be used for video, usually in low-latency scenarios.
In the context of 1080p@30fps +720p@30fps, this means the video encoder can handle Full HD (1080p) and HD (720p) video recording at 30 frames per second concurrently. Such capability ensures high-resolution video capture while maintaining smooth motion.
1080p MP4 Video Recorder with AMB82-Mini IoT AI Camera
Now let us move to the project part and learn about the Video Recorder with AMB82-Mini AI Camera. In this example we will utilize the JXF37 camera sensor on AMB82-Mini AI. This advanced Camera Sensor board can record video in above mentioned format.
Arduino IDE Setup & Example Code
To being with this example, you need to install Ameba Boards to the Arduino IDE. If you haven’t installed and configured the Arduino IDE, you may follow the Getting Started Tutorial to setup the Arduino IDE completely.
In this example, we will use the AMB82-Mini development board to record video and audio data from the onboard camera sensor (JXF37) and audio codec to an MP4 file on the SD card.
The following examples show different use cases for MP4 recording.
- AudioOnly
- VideoOnly
- SingleVideoWithAudio
- DoubleVideoWithAudio
Source Code/Program
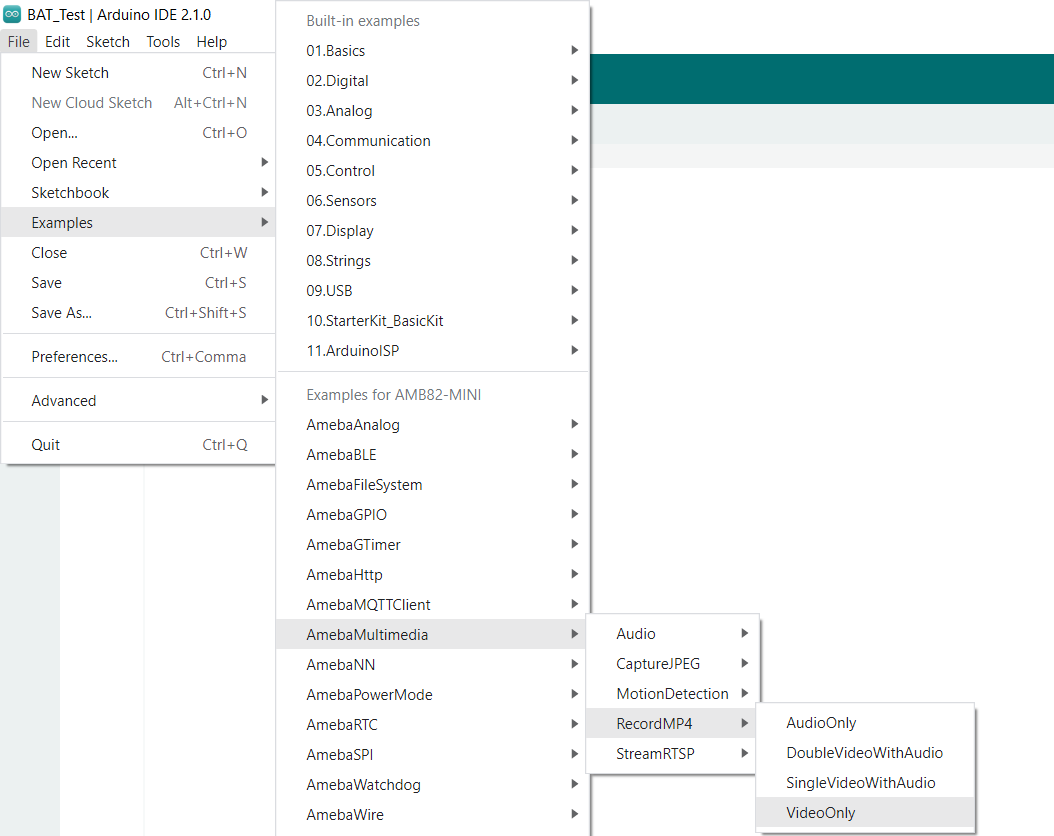
Open one of the RecordMP4 examples in “File” -> “Examples” -> “AmebaMultimedia”-> “RecordMP4”.
Here is the code part of this project:
|
1 2 3 4 5 6 7 8 9 10 11 12 13 14 15 16 17 18 19 20 21 22 23 24 25 26 27 28 29 30 31 32 33 34 35 36 37 38 39 40 41 42 43 44 45 46 47 48 49 50 51 52 53 54 55 56 57 |
#include "StreamIO.h" #include "VideoStream.h" #include "MP4Recording.h" #define CHANNEL 0 // Default preset configurations for each video channel: // Channel 0 : 1920 x 1080 30FPS H264 // Channel 1 : 1280 x 720 30FPS H264 VideoSetting config(CHANNEL); MP4Recording mp4; StreamIO videoStreamer(1, 1); // 1 Input Video -> 1 Output RTSP void setup() { Serial.begin(115200); // Configure camera video channel with video format information Camera.configVideoChannel(CHANNEL, config); Camera.videoInit(); // Configure MP4 with identical video format information // Configure MP4 recording settings mp4.configVideo(config); mp4.setRecordingDuration(30); mp4.setRecordingFileCount(1); mp4.setRecordingFileName("TestRecordingVideoOnly"); mp4.setRecordingDataType(STORAGE_VIDEO); // Set MP4 to record video only // Configure StreamIO object to stream data from video channel to MP4 recording videoStreamer.registerInput(Camera.getStream(CHANNEL)); videoStreamer.registerOutput(mp4); if (videoStreamer.begin() != 0) { Serial.println("StreamIO link start failed"); } // Start data stream from video channel Camera.channelBegin(CHANNEL); // Start recording MP4 data to SD card mp4.begin(); delay(1000); printInfo(); } void loop() { // do nothing } void printInfo(void) { Serial.println("------------------------------"); Serial.println("- Summary of Streaming -"); Serial.println("------------------------------"); Camera.printInfo(); Serial.println("- MP4 Recording Information -"); mp4.printInfo(); } |
The above code will record the videos for 30 seconds. In case you want to change the recording time make changes to following lines and replace the time in seconds.
|
1 |
mp4.setRecordingDuration(30); |
Uploading Code and Recording Videos
Now Compile the code after compilation you can upload the code to the AMB82-Mini board. To do that press and hold the boot button and then Press and release the Reset button and finally release the boot button.
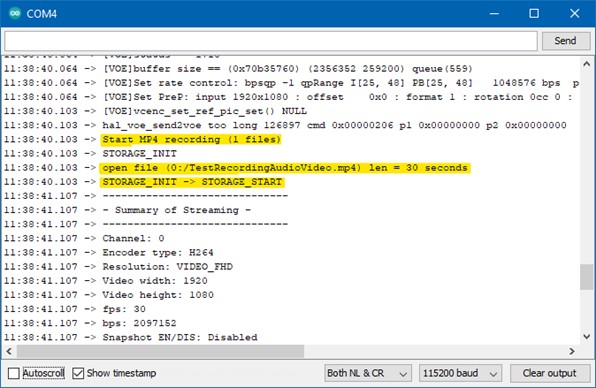
Once code get uploaded the Arduino IDE will show the following messages.

After pressing the Reset button, the Ameba Pro 2 board will start recording MP4 to SD card.
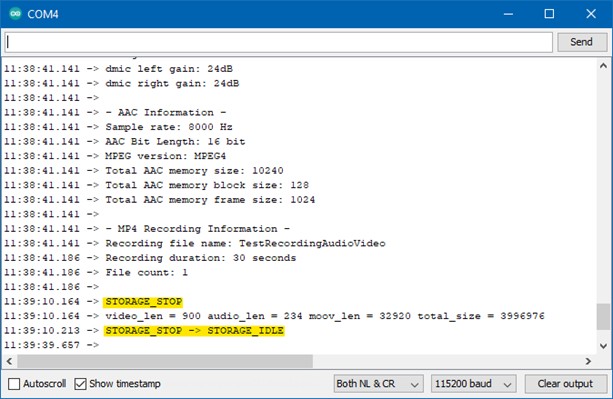
After the recording duration has passed, the MP4 file will stop recording.
Disconnect power from the Ameba Pro 2 board, remove the SD card and connect it to a computer to view the contents.
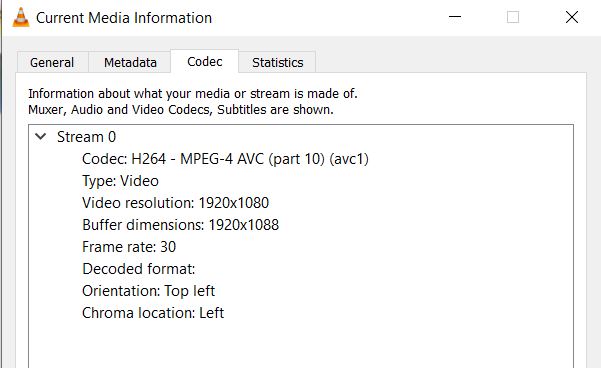
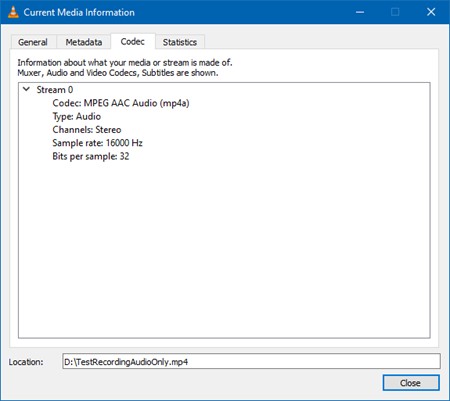
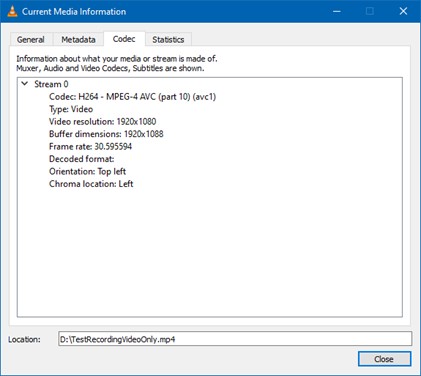
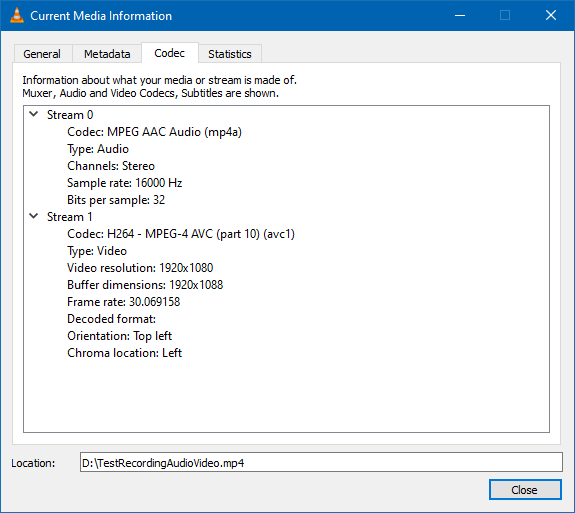
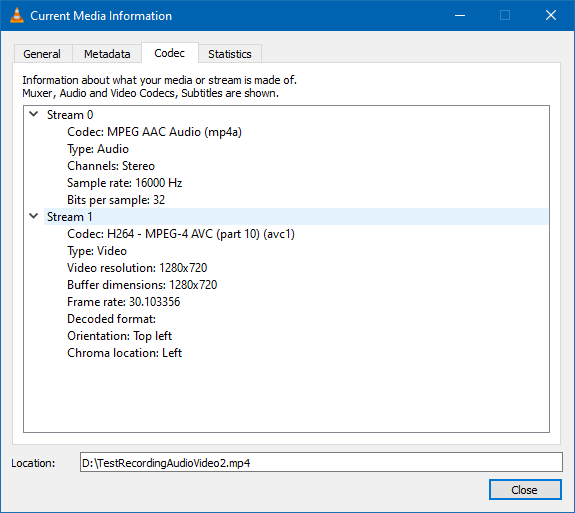
Depending on the compiled example, there will be either one or two MP4 videos. Using VLC to open the MP4 file, detailed information about the MP4 files can be obtained in “Tools” -> “Codec Information”.
MP4 Files details with all 4 Example Code
1. RecordMP4AudioOnly: Single 30 second MP4 file with audio only
2. RecordMP4VideoOnly: Single 30 second MP4 file with video only
3. RecordMP4SingleVideoWithAudio: Single 30 second MP4 file with audio and video
4. RecordMP4DoubleVideoWithAudio: One 30 second and one 15 second MP4 file. Both files with audio and video

Conclusion
In conclusion, the Realtek AMB82-Mini IoT AI Camera board stands as a versatile solution for superior multimedia recording. Its integrated JXF37 full HD CMOS sensor captures crisp and clear video, while the onboard audio codec ensures high-quality sound recording. With capabilities to support different MP4 recording use cases such as AudioOnly, VideoOnly, SingleVideoWithAudio, and DoubleVideoWithAudio, it offers wide-ranging adaptability.
The advanced video recording features like HDR, 3DNR, WDR and video encoding options (H264/H265/JPEG) further amplify its functionality. As a testament to its prowess, the AMB82-Mini isn’t merely a tool for audio and video capture, it emerges as a robust platform for crafting AI-infused multimedia projects and applications.
This guide has demonstrated the potential of this powerful development board and how to harness it effectively, paving the way for innovative multimedia creations.
Video Tutorial & Guide


4 Comments
DDR2 128MB memory – does it have 128MB DDR2 by default?
Just got the first board, used their Video/Audio example- and the video freezes after about 5 or 10 minutes. Anyone else see this ? Will try the second board when it arrives.
Using the example for single video and single audio streams, the board streams for say 5 or 10 minutes then the video freezes. Any one else seeing this ? Brand new board. Defective sensor maybe ? Audio continues to stream after video freezes.
Can other camera modules be used with this card? Like Zero cam noIR / OV5647 ?
I’d like to use it as a night camera with IR illumination.