

In this project, we are going to interface BMP180 Barometric Pressure Sensor with NodeMCU ESP8266 & OLED Display. We will display the Temperature, Pressure & Altitude value both in Serial Monitor and 0.96″ OLED Display. We will then publish these value in Thingspeak Server with over IoT Cloud.
Overview
The BMP180 barometric pressure sensor from Bosch is used to predict the weather, detect altitude, and measure vertical velocity. It can be used to measure environmental temperature, absolute & relative pressure & estimated altitude.
The atmospheric pressure which is also called Barometric pressure is the pressure caused by the weight of air pressing down on the Earth. The air in the atmosphere has mass, so gravity causes the weight of that column to exert pressure on the surface. The BMP180 outputs pressure readings in Pascals which is its SI unit. We can also measure the pressure in hectoPascals (hPa) or millimeter of mercury (mm of Hg).
In this IoT project, we will interface BMP180 Barometric Pressure Sensor with NodeMCU ESP8266-12E Board. We will use 0.96″ I2C OLED Display to display the weather parameter like Pressure, Temperature & Altitude. We will then send these data/parameter over the internet to Thingspeak Cloud Server.
To learn more about the BMP180 Sensor you can check this post here: BMP180 for Altitude, Pressure & Temperature Measurement using Arduino
Bill of Materials
Following are the components required for making this project. All the components can be purchased from Amazon. The components purchased link is given below.
| S.N. | Components Name | Quantity | Purchase Links |
|---|---|---|---|
| 1 | NodeMCU ESP8266 | 1 | Amazon | AliExpress |
| 2 | BMP180 Sensor | 1 | Amazon | AliExpress |
| 3 | 0.96" I2C OLED Display | 1 | Amazon | AliExpress |
| 4 | Connecting Wires | 10 | Amazon | AliExpress |
| 5 | Breadboard | 1 | Amazon | AliExpress |
BMP180 Barometric Pressure Sensor
The BMP180 Breakout is a barometric pressure sensor with an I2C (“Wire”) interface.

Barometric pressure sensors measure the absolute pressure of the air around them. This pressure varies with both the weather and altitude. Depending on how you interpret the data, you can monitor changes in the weather, measure altitude, or any other tasks that require an accurate pressure reading.
How BMP180 Barometric Pressure Sensor Works?
The BMP180 is a piezoresistive sensor that detects pressure. Piezoresistive sensors are made up of a semiconducting material (usually silicon) that changes resistance when a mechanical force like atmospheric pressure is applied.
The BMP180 measures both pressure and temperature because temperature changes the density of gasses like air. At higher temperatures, the air is not as dense and heavy, so it applies less pressure on the sensor. At lower temperatures, the air is denser and weighs more, so it exerts more pressure on the sensor. The sensor uses real-time temperature measurements to compensate for the pressure readings for changes in air density. The temperature measurement is taken first, followed by pressure measurement.
BMP180 Pins
The sensor is soldered onto a PCB with a 3.3V regulator, I2C level shifter and pull-up resistors on the I2C pins. This board is 5V compliant – a 3.3V regulator and a i2c level shifter circuit is included so you can use this sensor safely with 5V logic and power.
The Sensor has 4 pins, i.e VIN, GND, SDA, SCL. Connect the VIN pin to the 5V/3.3V voltage pin, GND to ground, SCL to I2C Clock and SDA to I2C Data of microcontroller.
Interfacing BMP180 Sensor with NodeMCU ESP8266
Now let us interface BMP180 Barometric Pressure Sensor with NodeMCU ESP8266. The connection is fairly simple.

Connect the VIN pin to the 3.3V voltage pin, GND to ground, SCL to D1 and SDA to D2 of Nodemcu ESP8266.
Source Code for BMP180 & ESP8266
Here is a simple source code for interfacing BMP180 with NodeMCU ESP8266.
You need a BMP180 Library for that. So fist download the BMP180 Library from this link below and add to the Arduino IDE.
In the following code make sure to make the change in altitude part. Just have a google search for the altitude of your city.
|
1 |
#define ALTITUDE 1655.0 // Altitude of SparkFun's HQ in Boulder, CO. in meters |
|
1 2 3 4 5 6 7 8 9 10 11 12 13 14 15 16 17 18 19 20 21 22 23 24 25 26 27 28 29 30 31 32 33 34 35 36 37 38 39 40 41 42 43 44 45 46 47 48 49 50 51 52 53 54 55 56 57 58 59 60 61 62 63 64 65 66 67 68 69 70 71 72 73 74 75 76 77 78 79 80 81 82 83 84 85 86 87 88 89 90 91 92 93 94 95 96 97 98 99 100 101 102 103 104 105 106 107 108 109 110 111 112 113 114 115 116 117 118 119 120 121 122 123 124 125 126 127 128 129 130 131 132 133 134 135 136 137 |
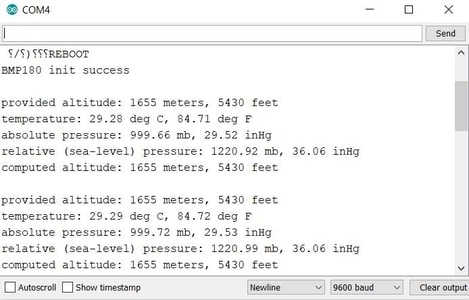
#include <SFE_BMP180.h> #include <Wire.h> // You will need to create an SFE_BMP180 object, here called "pressure": SFE_BMP180 pressure; #define ALTITUDE 1655.0 // Altitude of SparkFun's HQ in Boulder, CO. in meters void setup() { Serial.begin(9600); Serial.println("REBOOT"); // Initialize the sensor (it is important to get calibration values stored on the device). if (pressure.begin()) Serial.println("BMP180 init success"); else { // Oops, something went wrong, this is usually a connection problem, // see the comments at the top of this sketch for the proper connections. Serial.println("BMP180 init fail\n\n"); while(1); // Pause forever. } } void loop() { char status; double T,P,p0,a; // Loop here getting pressure readings every 10 seconds. // If you want sea-level-compensated pressure, as used in weather reports, // you will need to know the altitude at which your measurements are taken. // We're using a constant called ALTITUDE in this sketch: Serial.println(); Serial.print("provided altitude: "); Serial.print(ALTITUDE,0); Serial.print(" meters, "); Serial.print(ALTITUDE*3.28084,0); Serial.println(" feet"); // If you want to measure altitude, and not pressure, you will instead need // to provide a known baseline pressure. This is shown at the end of the sketch. // You must first get a temperature measurement to perform a pressure reading. // Start a temperature measurement: // If request is successful, the number of ms to wait is returned. // If request is unsuccessful, 0 is returned. status = pressure.startTemperature(); if (status != 0) { // Wait for the measurement to complete: delay(status); // Retrieve the completed temperature measurement: // Note that the measurement is stored in the variable T. // Function returns 1 if successful, 0 if failure. status = pressure.getTemperature(T); if (status != 0) { // Print out the measurement: Serial.print("temperature: "); Serial.print(T,2); Serial.print(" deg C, "); Serial.print((9.0/5.0)*T+32.0,2); Serial.println(" deg F"); // Start a pressure measurement: // The parameter is the oversampling setting, from 0 to 3 (highest res, longest wait). // If request is successful, the number of ms to wait is returned. // If request is unsuccessful, 0 is returned. status = pressure.startPressure(3); if (status != 0) { // Wait for the measurement to complete: delay(status); // Retrieve the completed pressure measurement: // Note that the measurement is stored in the variable P. // Note also that the function requires the previous temperature measurement (T). // (If temperature is stable, you can do one temperature measurement for a number of pressure measurements.) // Function returns 1 if successful, 0 if failure. status = pressure.getPressure(P,T); if (status != 0) { // Print out the measurement: Serial.print("absolute pressure: "); Serial.print(P,2); Serial.print(" mb, "); Serial.print(P*0.0295333727,2); Serial.println(" inHg"); // The pressure sensor returns abolute pressure, which varies with altitude. // To remove the effects of altitude, use the sealevel function and your current altitude. // This number is commonly used in weather reports. // Parameters: P = absolute pressure in mb, ALTITUDE = current altitude in m. // Result: p0 = sea-level compensated pressure in mb p0 = pressure.sealevel(P,ALTITUDE); // we're at 1655 meters (Boulder, CO) Serial.print("relative (sea-level) pressure: "); Serial.print(p0,2); Serial.print(" mb, "); Serial.print(p0*0.0295333727,2); Serial.println(" inHg"); // On the other hand, if you want to determine your altitude from the pressure reading, // use the altitude function along with a baseline pressure (sea-level or other). // Parameters: P = absolute pressure in mb, p0 = baseline pressure in mb. // Result: a = altitude in m. a = pressure.altitude(P,p0); Serial.print("computed altitude: "); Serial.print(a,0); Serial.print(" meters, "); Serial.print(a*3.28084,0); Serial.println(" feet"); } else Serial.println("error retrieving pressure measurement\n"); } else Serial.println("error starting pressure measurement\n"); } else Serial.println("error retrieving temperature measurement\n"); } else Serial.println("error starting temperature measurement\n"); delay(5000); // Pause for 5 seconds. }s |
Once the code is uploaded you can open the serial monitor to see the following atmospheric parameters.
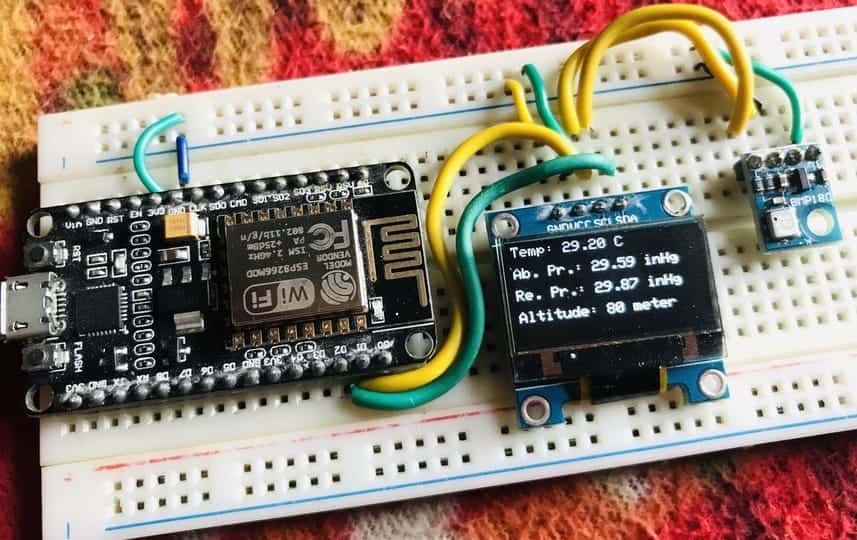
Interfacing BMP180 Sensor with NodeMCU ESP8266 & OLED Display
Now let us add an extra OLED Display to the Circuit. We will use SSD1306 I2C OLED Display. Connect its SDA & SCL pins to D2 & D1 of NodeMCU. The circuit is shown below.

Source Code for BMP180 & ESP8266 with OLED Display
You need to add extra 2 libraries for OLED Display. Get the library from the link below.
- Adafruit_SSD1306 : https://github.com/adafruit/Adafruit_SSD1306
- Adafruit_GFX : https://github.com/adafruit/Adafruit-GFX-Library
|
1 2 3 4 5 6 7 8 9 10 11 12 13 14 15 16 17 18 19 20 21 22 23 24 25 26 27 28 29 30 31 32 33 34 35 36 37 38 39 40 41 42 43 44 45 46 47 48 49 50 51 52 53 54 55 56 57 58 59 60 61 62 63 64 65 66 67 68 69 70 71 72 73 74 75 76 77 78 79 80 81 82 83 84 85 86 87 88 89 90 91 92 93 94 95 96 97 98 99 100 101 102 103 104 105 106 107 108 109 110 111 112 113 114 115 116 117 118 119 120 121 122 123 124 125 126 127 128 129 130 131 132 133 134 135 136 137 138 139 140 141 142 143 144 145 146 147 148 149 150 151 152 153 154 155 156 157 158 159 160 161 162 163 164 165 166 167 168 169 170 171 172 173 174 175 176 177 178 179 180 181 182 183 184 185 186 187 188 189 190 191 192 193 194 195 196 197 198 199 200 201 202 203 204 |
#include <SFE_BMP180.h> #include <SPI.h> #include <Wire.h> #include <Adafruit_GFX.h> #include <Adafruit_SSD1306.h> // You will need to create an SFE_BMP180 object, here called "pressure": SFE_BMP180 pressure; #define SCREEN_WIDTH 128 // OLED display width, in pixels #define SCREEN_HEIGHT 64 // OLED display height, in pixels #define OLED_RESET -1 // Reset pin # (or -1 if sharing Arduino reset pin) Adafruit_SSD1306 display(SCREEN_WIDTH, SCREEN_HEIGHT, &Wire, OLED_RESET); #define ALTITUDE 80.0 // Altitude of SparkFun's HQ in Boulder, CO. in meters void setup() { Serial.begin(115200); // open serial port, set the baud rate to 9600 bps display.begin(SSD1306_SWITCHCAPVCC, 0x3C); //initialize with the I2C addr 0x3C (128x64) display.clearDisplay(); Serial.println("REBOOT"); // Initialize the sensor (it is important to get calibration values stored on the device). if (pressure.begin()) { Serial.println("BMP180 init success"); display.clearDisplay(); display.setCursor(0,0); //oled display display.setTextSize(1); display.setTextColor(WHITE); display.println("BMP180 init success"); display.display(); delay(5000); display.clearDisplay(); } else { // Oops, something went wrong, this is usually a connection problem, // see the comments at the top of this sketch for the proper connections. Serial.println("BMP180 init fail\n\n"); display.clearDisplay(); display.setCursor(0,0); //oled display display.setTextSize(1); display.setTextColor(WHITE); display.println("BMP180 init fail"); display.display(); delay(5000); display.clearDisplay(); while(1); // Pause forever. } } void loop() { char status; double T,P,p0,a; // Loop here getting pressure readings every 10 seconds. // If you want sea-level-compensated pressure, as used in weather reports, // you will need to know the altitude at which your measurements are taken. // We're using a constant called ALTITUDE in this sketch: Serial.println(); Serial.print("provided altitude: "); Serial.print(ALTITUDE,0); Serial.print(" meters, "); Serial.print(ALTITUDE*3.28084,0); Serial.println(" feet"); // If you want to measure altitude, and not pressure, you will instead need // to provide a known baseline pressure. This is shown at the end of the sketch. // You must first get a temperature measurement to perform a pressure reading. // Start a temperature measurement: // If request is successful, the number of ms to wait is returned. // If request is unsuccessful, 0 is returned. display.clearDisplay(); status = pressure.startTemperature(); if (status != 0) { // Wait for the measurement to complete: delay(status); // Retrieve the completed temperature measurement: // Note that the measurement is stored in the variable T. // Function returns 1 if successful, 0 if failure. status = pressure.getTemperature(T); if (status != 0) { // Print out the measurement: Serial.print("temperature: "); Serial.print(T,2); Serial.print(" deg C, "); Serial.print((9.0/5.0)*T+32.0,2); Serial.println(" deg F"); display.setCursor(0,0); //oled display display.setTextSize(1); display.setTextColor(WHITE); display.print("Temp: "); display.print(T,2); display.print(" C"); display.display(); // Start a pressure measurement: // The parameter is the oversampling setting, from 0 to 3 (highest res, longest wait). // If request is successful, the number of ms to wait is returned. // If request is unsuccessful, 0 is returned. status = pressure.startPressure(3); if (status != 0) { // Wait for the measurement to complete: delay(status); // Retrieve the completed pressure measurement: // Note that the measurement is stored in the variable P. // Note also that the function requires the previous temperature measurement (T). // (If temperature is stable, you can do one temperature measurement for a number of pressure measurements.) // Function returns 1 if successful, 0 if failure. status = pressure.getPressure(P,T); if (status != 0) { // Print out the measurement: Serial.print("absolute pressure: "); Serial.print(P,2); Serial.print(" mb, "); Serial.print(P*0.0295333727,2); Serial.println(" inHg"); display.setCursor(0,15); //oled display display.setTextSize(1); display.setTextColor(WHITE); display.print("Ab. Pr.: "); display.print(P*0.0295333727,2); display.print(" inHg"); display.display(); // The pressure sensor returns abolute pressure, which varies with altitude. // To remove the effects of altitude, use the sealevel function and your current altitude. // This number is commonly used in weather reports. // Parameters: P = absolute pressure in mb, ALTITUDE = current altitude in m. // Result: p0 = sea-level compensated pressure in mb p0 = pressure.sealevel(P,ALTITUDE); // we're at 1655 meters (Boulder, CO) Serial.print("relative (sea-level) pressure: "); Serial.print(p0,2); Serial.print(" mb, "); Serial.print(p0*0.0295333727,2); Serial.println(" inHg"); display.setCursor(0,30); //oled display display.setTextSize(1); display.setTextColor(WHITE); display.print("Re. Pr.: "); display.print(p0*0.0295333727,2); display.print(" inHg"); display.display(); // On the other hand, if you want to determine your altitude from the pressure reading, // use the altitude function along with a baseline pressure (sea-level or other). // Parameters: P = absolute pressure in mb, p0 = baseline pressure in mb. // Result: a = altitude in m. a = pressure.altitude(P,p0); Serial.print("computed altitude: "); Serial.print(a,0); Serial.print(" meters, "); Serial.print(a*3.28084,0); Serial.println(" feet"); display.setCursor(0,45); //oled display display.setTextSize(1); display.setTextColor(WHITE); display.print("Altitude: "); display.print(a,0); display.print(" meter"); display.display(); } else Serial.println("error retrieving pressure measurement\n"); } else Serial.println("error starting pressure measurement\n"); } else Serial.println("error retrieving temperature measurement\n"); } else Serial.println("error starting temperature measurement\n"); delay(5000); // Pause for 5 seconds. } |
Once the code is uploaded you can see the following atmospheric parameters on OLED Display.
IoT Based BMP180 Pressure Temperature Monitor on Thingspeak with ESP8266
Now let us make a more modification in the code and make the project IoT Based. To make the project IoT based we need a server where we can post the data through API. For that, I used Thingspeak Server.
ThingSpeak is an open-source Internet of Things application and API to store and retrieve data from things using the HTTP and MQTT protocol over the Internet or via a Local Area Network. Thingspeak enables you to collect, store, analyze, visualize, and act on data from sensors.
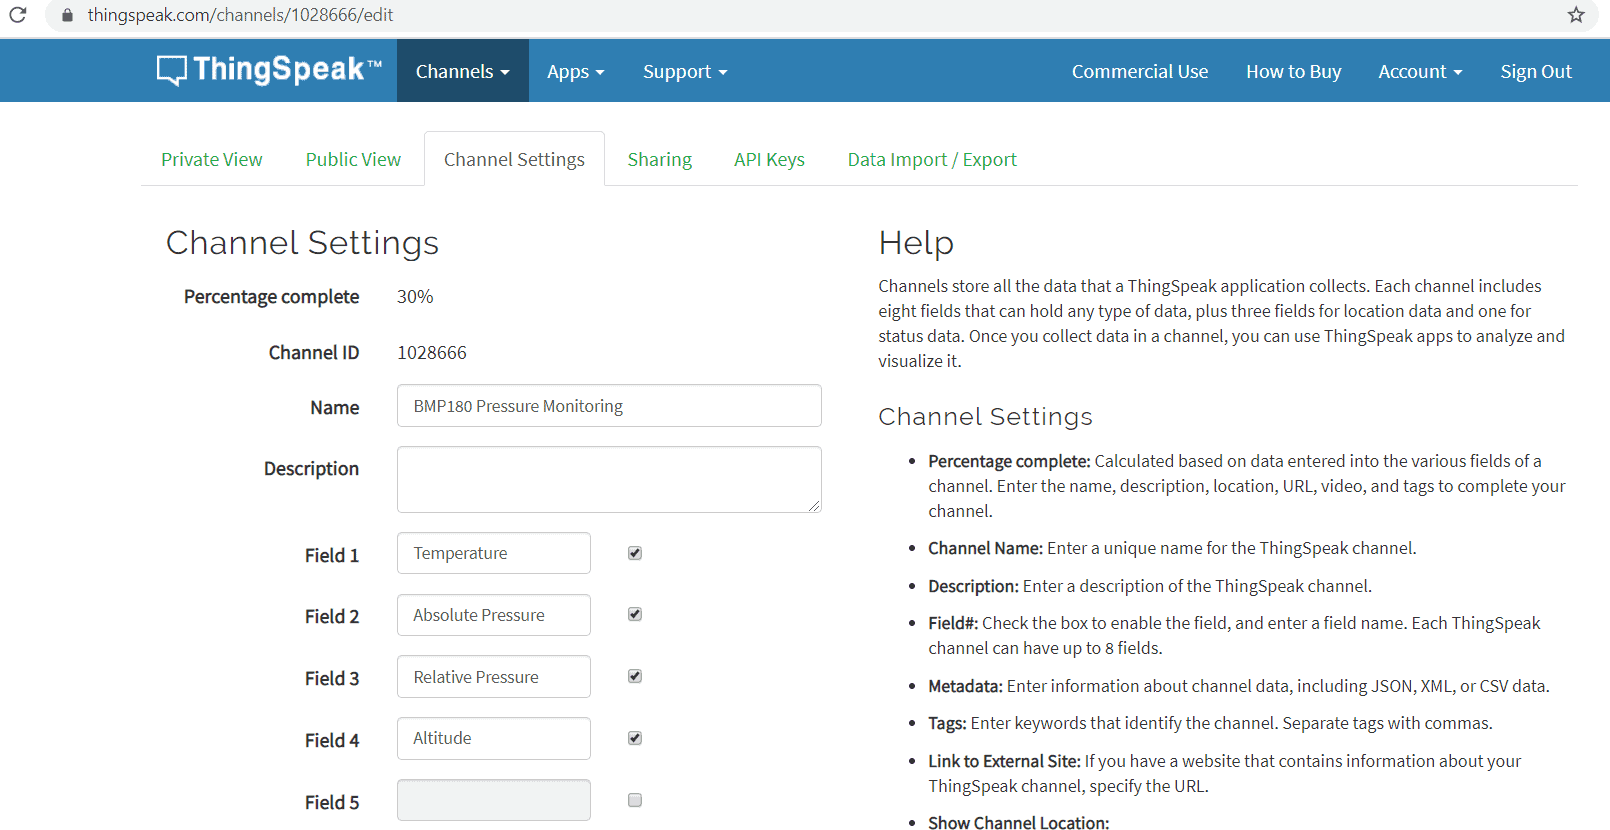
To setup the Thingspeak Server, visit https://thingspeak.com/. Create an account or simply sign in if you created the account earlier. Then create a new channel.
Source Code for BMP180 & ESP8266 on Thingspeak Server
Copy the API key and use it in the code below. Also, make sure to change the Wifi SSID & Password. Then upload the code to NodeMCU ESP8266 Board.
|
1 2 3 4 5 6 7 8 9 10 11 12 13 14 15 16 17 18 19 20 21 22 23 24 25 26 27 28 29 30 31 32 33 34 35 36 37 38 39 40 41 42 43 44 45 46 47 48 49 50 51 52 53 54 55 56 57 58 59 60 61 62 63 64 65 66 67 68 69 70 71 72 73 74 75 76 77 78 79 80 81 82 83 84 85 86 87 88 89 90 91 92 93 94 95 96 97 98 99 100 101 102 103 104 105 106 107 108 109 110 111 112 113 114 115 116 117 118 119 120 121 122 123 124 125 126 127 128 129 130 131 132 133 134 135 136 137 138 139 140 141 142 143 144 145 146 147 148 149 150 151 152 153 154 155 156 157 158 159 160 161 162 163 164 165 166 167 168 169 170 171 172 173 174 175 176 177 178 179 180 181 182 183 184 185 186 187 188 189 190 191 192 193 194 195 196 197 198 199 200 201 202 203 204 205 206 207 208 209 210 211 212 213 214 215 216 217 218 219 220 221 222 223 224 225 226 227 228 229 230 231 232 233 234 235 236 237 238 239 240 241 242 243 244 245 246 247 248 249 250 251 252 253 254 255 256 257 258 259 260 261 262 263 264 265 266 267 268 269 270 271 272 273 274 275 276 |
#include <ESP8266WiFi.h> #include <SFE_BMP180.h> #include <SPI.h> #include <Wire.h> #include <Adafruit_GFX.h> #include <Adafruit_SSD1306.h> // You will need to create an SFE_BMP180 object, here called "pressure": SFE_BMP180 pressure; #define SCREEN_WIDTH 128 // OLED display width, in pixels #define SCREEN_HEIGHT 64 // OLED display height, in pixels #define OLED_RESET -1 // Reset pin # (or -1 if sharing Arduino reset pin) Adafruit_SSD1306 display(SCREEN_WIDTH, SCREEN_HEIGHT, &Wire, OLED_RESET); #define ALTITUDE 80.0 // Altitude of SparkFun's HQ in Boulder, CO. in meters String apiKey = "14K8UL2QEK8BTHN6"; // Enter your Write API key from ThingSpeak const char *ssid = "Alexahome"; // replace with your wifi ssid and wpa2 key const char *pass = "12345678"; const char* server = "api.thingspeak.com"; WiFiClient client; void setup() { Serial.begin(115200); // open serial port, set the baud rate to 9600 bps display.begin(SSD1306_SWITCHCAPVCC, 0x3C); //initialize with the I2C addr 0x3C (128x64) display.clearDisplay(); delay(10); Serial.println("Connecting to "); Serial.println(ssid); display.clearDisplay(); display.setCursor(0,0); //oled display display.setTextSize(1); display.setTextColor(WHITE); display.println("Connecting to "); display.println(ssid); display.display(); WiFi.begin(ssid, pass); while (WiFi.status() != WL_CONNECTED) { delay(500); Serial.print("."); } Serial.println(""); Serial.println("WiFi connected"); display.clearDisplay(); display.setCursor(0,0); //oled display display.setTextSize(1); display.setTextColor(WHITE); display.println("WiFi connected"); display.display(); delay(3000); Serial.println("REBOOT"); // Initialize the sensor (it is important to get calibration values stored on the device). if (pressure.begin()) { Serial.println("BMP180 init success"); display.clearDisplay(); display.setCursor(0,0); //oled display display.setTextSize(1); display.setTextColor(WHITE); display.println("BMP180 init success"); display.display(); delay(5000); display.clearDisplay(); } else { // Oops, something went wrong, this is usually a connection problem, // see the comments at the top of this sketch for the proper connections. Serial.println("BMP180 init fail\n\n"); display.clearDisplay(); display.setCursor(0,0); //oled display display.setTextSize(1); display.setTextColor(WHITE); display.println("BMP180 init fail"); display.display(); delay(5000); display.clearDisplay(); while(1); // Pause forever. } } void loop() { char status; double T,P,p0,a; // Loop here getting pressure readings every 10 seconds. // If you want sea-level-compensated pressure, as used in weather reports, // you will need to know the altitude at which your measurements are taken. // We're using a constant called ALTITUDE in this sketch: Serial.println(); Serial.print("provided altitude: "); Serial.print(ALTITUDE,0); Serial.print(" meters, "); Serial.print(ALTITUDE*3.28084,0); Serial.println(" feet"); // If you want to measure altitude, and not pressure, you will instead need // to provide a known baseline pressure. This is shown at the end of the sketch. // You must first get a temperature measurement to perform a pressure reading. // Start a temperature measurement: // If request is successful, the number of ms to wait is returned. // If request is unsuccessful, 0 is returned. display.clearDisplay(); status = pressure.startTemperature(); if (status != 0) { // Wait for the measurement to complete: delay(status); // Retrieve the completed temperature measurement: // Note that the measurement is stored in the variable T. // Function returns 1 if successful, 0 if failure. status = pressure.getTemperature(T); if (status != 0) { // Print out the measurement: Serial.print("temperature: "); Serial.print(T,2); Serial.print(" deg C, "); Serial.print((9.0/5.0)*T+32.0,2); Serial.println(" deg F"); display.setCursor(0,0); //oled display display.setTextSize(1); display.setTextColor(WHITE); display.print("Temp: "); display.print(T,2); display.print(" C"); display.display(); // Start a pressure measurement: // The parameter is the oversampling setting, from 0 to 3 (highest res, longest wait). // If request is successful, the number of ms to wait is returned. // If request is unsuccessful, 0 is returned. status = pressure.startPressure(3); if (status != 0) { // Wait for the measurement to complete: delay(status); // Retrieve the completed pressure measurement: // Note that the measurement is stored in the variable P. // Note also that the function requires the previous temperature measurement (T). // (If temperature is stable, you can do one temperature measurement for a number of pressure measurements.) // Function returns 1 if successful, 0 if failure. status = pressure.getPressure(P,T); if (status != 0) { // Print out the measurement: Serial.print("absolute pressure: "); Serial.print(P,2); Serial.print(" mb, "); Serial.print(P*0.0295333727,2); Serial.println(" inHg"); display.setCursor(0,15); //oled display display.setTextSize(1); display.setTextColor(WHITE); display.print("Ab. Pr.: "); display.print(P*0.0295333727,2); display.print(" inHg"); display.display(); // The pressure sensor returns abolute pressure, which varies with altitude. // To remove the effects of altitude, use the sealevel function and your current altitude. // This number is commonly used in weather reports. // Parameters: P = absolute pressure in mb, ALTITUDE = current altitude in m. // Result: p0 = sea-level compensated pressure in mb p0 = pressure.sealevel(P,ALTITUDE); // we're at 1655 meters (Boulder, CO) Serial.print("relative (sea-level) pressure: "); Serial.print(p0,2); Serial.print(" mb, "); Serial.print(p0*0.0295333727,2); Serial.println(" inHg"); display.setCursor(0,30); //oled display display.setTextSize(1); display.setTextColor(WHITE); display.print("Re. Pr.: "); display.print(p0*0.0295333727,2); display.print(" inHg"); display.display(); // On the other hand, if you want to determine your altitude from the pressure reading, // use the altitude function along with a baseline pressure (sea-level or other). // Parameters: P = absolute pressure in mb, p0 = baseline pressure in mb. // Result: a = altitude in m. a = pressure.altitude(P,p0); Serial.print("computed altitude: "); Serial.print(a,0); Serial.print(" meters, "); Serial.print(a*3.28084,0); Serial.println(" feet"); display.setCursor(0,45); //oled display display.setTextSize(1); display.setTextColor(WHITE); display.print("Altitude: "); display.print(a,0); display.print(" meter"); display.display(); } else Serial.println("error retrieving pressure measurement\n"); } else Serial.println("error starting pressure measurement\n"); } else Serial.println("error retrieving temperature measurement\n"); } else Serial.println("error starting temperature measurement\n"); if (client.connect(server, 80)) // "184.106.153.149" or api.thingspeak.com { String postStr = apiKey; postStr += "&field1="; postStr += String(T,2); postStr += "&field2="; postStr += String(P*0.0295333727,2); postStr += "&field3="; postStr += String(p0*0.0295333727,2); postStr += "&field4="; postStr += String(a,0); postStr += "\r\n\r\n\r\n\r\n"; client.print("POST /update HTTP/1.1\n"); client.print("Host: api.thingspeak.com\n"); client.print("Connection: close\n"); client.print("X-THINGSPEAKAPIKEY: " + apiKey + "\n"); client.print("Content-Type: application/x-www-form-urlencoded\n"); client.print("Content-Length: "); client.print(postStr.length()); client.print("\n\n"); client.print(postStr); Serial.println(""); Serial.println("Data Send to Thingspeak"); } client.stop(); Serial.println("Waiting..."); Serial.println(""); Serial.println("***************************************************"); delay(5000); // Pause for 5 seconds. } |
BMP180 Pressure Temperature Data Monitoring on Thingspeak
Once the code is uploaded, the NodeMCU will try connecting to wifi network as shown below.


Now you can visit the Thingspeak Private view and monitor the sensor data from any part of the world.

 & Live Dashboard")


1 Comment
I got it built but the only thing it displays is pressure and nothing goes to ThingSpeak. I would also Love to figure out how to get the temperature that IS on the top in Fahrenheit.