Close Menu
  • Articles
    • Learn Electronics
    • Product Review
    • Tech Articles
  • Electronics Circuits
    • 555 Timer Projects
    • Op-Amp Circuits
    • Power Electronics
  • Microcontrollers
    • Arduino Projects
    • STM32 Projects
    • AMB82-Mini IoT AI Camera
    • BLE Projects
  • IoT Projects
    • ESP8266 Projects
    • ESP32 Projects
    • ESP32 MicroPython
    • ESP32-CAM Projects
    • LoRa/LoRaWAN Projects
  • Raspberry Pi
    • Raspberry Pi Projects
    • Raspberry Pi Pico Projects
    • Raspberry Pi Pico W Projects
  • Electronics Calculator
Facebook X (Twitter) Instagram
  • About Us
  • Disclaimer
  • Privacy Policy
  • Contact Us
  • Advertise With Us
Facebook X (Twitter) Instagram Pinterest YouTube LinkedIn
How To Electronics
  • Articles
    • Learn Electronics
    • Product Review
    • Tech Articles
  • Electronics Circuits
    • 555 Timer Projects
    • Op-Amp Circuits
    • Power Electronics
  • Microcontrollers
    • Arduino Projects
    • STM32 Projects
    • AMB82-Mini IoT AI Camera
    • BLE Projects
  • IoT Projects
    • ESP8266 Projects
    • ESP32 Projects
    • ESP32 MicroPython
    • ESP32-CAM Projects
    • LoRa/LoRaWAN Projects
  • Raspberry Pi
    • Raspberry Pi Projects
    • Raspberry Pi Pico Projects
    • Raspberry Pi Pico W Projects
  • Electronics Calculator
How To Electronics
Home » How to use FreeRTOS for STM32F103C8 in Arduino IDE
STM32 Projects

How to use FreeRTOS for STM32F103C8 in Arduino IDE

Vinod KumarBy Vinod KumarUpdated:August 21, 20223 Mins Read
Share Facebook Twitter LinkedIn Telegram Reddit WhatsApp
FreeRTOS STM32F103C8
Share
Facebook Twitter LinkedIn Pinterest Email Reddit Telegram WhatsApp

Overview: FreeRTOS for STM32F103C8

STM32F103C is an ARM Cortex M3 processor that is able to use FreeRTOS. Let’s get started FreeRTOS for STM32F103C8 in Arduino IDE directly. We can use Keil also but in this, we need to download and paste the downloaded files to the Keil path, it is a somewhat lengthy process compares to the Arduino IDE. To know about the FreeRTOS documentation and method definitions you can check FreeRTOS STM32F103C8.


What is FreeRTOS?

FreeRTOS may be a free and open-source real-time OS (RTOS) that runs on many popular microcontrollers, including STM32.

An Operating System may be a piece of software that manages other software and hardware resources during a computing system . A general-purpose OS is generally designed with attention on user experience.

For example, let’s say we’re developing an application on an OS for mobile phone. A user might want to stream a movie, so we can break that streaming experience into two jobs: downloading chunks of video from the web as Job 1 and displaying each chunk to the user as Job 2. These jobs could be a part of an equivalent program, during which case, they could be implemented as concurrently running threads.

If our processor only has 1 core available, our streaming application might be got to jump between job 1 and job 2 rapidly to offer the user the impression that downloading and viewing is occurring at an equivalent time.

freeRTOS STM32

It’s important to know how STM32F103C8 in Arduino IDE has bundled FreeRTOS. While FreeRTOS is an underlying software framework that permits for switching tasks, scheduling, etc., we won’t be making calls to FreeRTOS directly. ARM has created the CMSIS-RTOS library, which allows us to form calls to an underlying RTOS, thus improving the portability of code among various ARM processors.


How to download FreeRTOS for STM32F103C8 in Arduino IDE?

So, we will see how to install FreeRtos for the Arduino in steps wise.

Step 1:

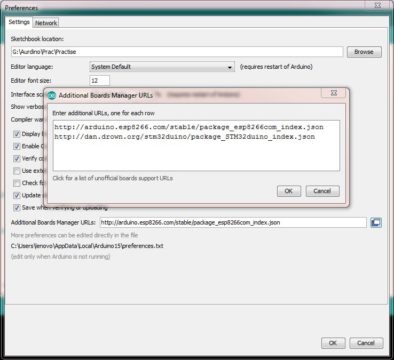
In Arduino IDE Initially go to File -> Preferences. Copy the below link and paste in the additional board manager as per the figure shown below. download link

C++
1
http://dan.drown.org/stm32duino/package_STM32duino_index.json

Step 2:

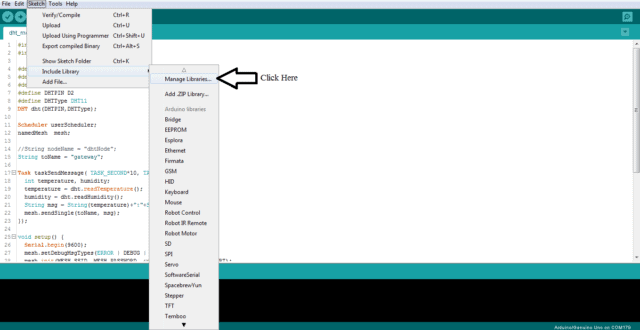
Now we need to download the FreeRTOS library file.  For download goto Sketch-> Include Library-> Manage libraries and click on Manage Libraries.

Step 3:

Now, wait for a second, in search bar type FreeRTOS, it will display some library files, scroll down and search for STM32duino FreeRTOS by Richard Barry. Then select that library and click on install. It will take some time to install. After installation shows as installed.

Step 4:

Now our Arduino able to use the freeRTOS library for STM32F103C8. We will write a simple blink program for onboard led and separate led.


Prerequisites

We need following hardware for this tutorial.

  1. STM32F103C board
  2. FTDI
  3. LED
  4. Jumper Wires
  5. Breadboard

Here I am using one onboard led which is connected PC13 and the other led is connecting separately which is connected to PB11.


How to run two different tasks on STM32F103C8 using FreeRTOS?

I am using two LEDs, for two LEDs creating two tasks each for one led. In this task, One led blinks for one second of time duration, and the other led blinks for 200ms of time duration. Now, let’s start the coding for two led’s blinking with FreeRTOS.

Create a new sketch in Arduino IDE, Copy and paste the below code in the sketch.

1
2
3
4
5
6
7
8
9
10
11
12
13
14
15
16
17
18
19
20
21
22
23
24
25
26
27
28
29
30
31
32
33
34
35
36
#include <MapleFreeRTOS821.h>
#define BOARD_LED_PIN PC13
#define LED_PIN PB11
 
static void task1(void *pvParameters) {
  for (;;) {
      vTaskDelay(1000);
      digitalWrite(BOARD_LED_PIN, HIGH);
      vTaskDelay(1000);
      digitalWrite(BOARD_LED_PIN, LOW);
  }
}
 
static void task2(void *pvParameters) {
  for (;;) {
      vTaskDelay(200);
      digitalWrite(LED_PIN, HIGH);
      vTaskDelay(200);
      digitalWrite(LED_PIN, LOW);
  }
}
 
void setup()
{
  pinMode(BOARD_LED_PIN, OUTPUT);
  pinMode(LED_PIN, OUTPUT);
  xTaskCreate(task1,"Task1",
              configMINIMAL_STACK_SIZE,NULL,tskIDLE_PRIORITY + 2,NULL);
  xTaskCreate(task2,"Task1",
              configMINIMAL_STACK_SIZE,NULL,tskIDLE_PRIORITY + 2,NULL);
  vTaskStartScheduler();
}
 
void loop()
{
}

After uploading code, you can see the following result.

FreeRTOS STM32F103C8 Arduino

Share. Facebook Twitter Pinterest LinkedIn Tumblr Email Reddit Telegram WhatsApp
Previous ArticleHow to interface Panasonic PIR Motion Sensor with Arduino
Next Article How to Control Stepper Motor with A4988 Driver & Arduino

Related Posts

PIR Motion Detection using Bluetooth & STM32 Board

PIR Motion Detection using Bluetooth & STM32 Board

Updated:December 23, 20234K
STM32 SHT85 Humidity Temperature Sensor

Collecting SHT85 Sensor Data using STM32 & Bluetooth Low Energy

Updated:August 20, 20222K
SX1276 STM32

Interfacing LoRa SX1276 with STM32 Microcontroller | LR1276-915MHz

Updated:May 29, 2023112K
BLE enabled Smart Bulb with STM32 & Javascript

BLE enabled Smart Bulb with STM32 & Javascript

Updated:August 20, 20222K
Create BLE Project using STM32 Microcontroller & BlueIO

Create BLE Project using STM32 Microcontroller & BlueIO

Updated:August 20, 202212K
DS18B20 STM32

Interfacing DS18B20 Temperature Sensor with STM32

Updated:August 21, 2022110K
Add A Comment

CommentsCancel reply

Latest Posts

ESP32 Fingerprint Attendance System with Live Web Dashboard

June 14, 2026
IoT Based PM & Air Quality Monitoring System using ESP32

IoT Based PM & Air Quality Monitoring System using ESP32

June 14, 2026
DIY ESP32 MLX90640 IR Thermal Camera with Live Web Display

DIY ESP32 MLX90640 IR Thermal Camera with Live Web Display

May 10, 2026
IoT Activity Tracker with ESP32 & Accelerometer Gyroscope

IoT Activity Tracker with ESP32 & Accelerometer/Gyroscope

May 2, 2026
A Guide to Sourcing Obsolete ICs for Vintage Projects

Beyond AliExpress: A Guide to Sourcing Obsolete ICs for Vintage Projects

April 21, 2026

ESP32 IoT Vehicle Motion Analyzer with MPU6050 & LIS3MDL

April 27, 2026
Building a Smart Sensor Node with a BLE Microcontroller

Building a Smart Sensor Node with a BLE Microcontroller

February 26, 2026
High-Accuracy Pitch, Roll, Yaw with ESP32 & BNO08x IMU

High-Accuracy Pitch, Roll, Yaw with ESP32 & BNO08x IMU

April 27, 2026
Top Posts & Pages
  • IoT Based PM & Air Quality Monitoring System using ESP32
    IoT Based PM & Air Quality Monitoring System using ESP32
  • 12V DC to 220V AC Inverter Circuit & PCB
    12V DC to 220V AC Inverter Circuit & PCB
  • Buck Converter: Basics, Working, Design & Application
    Buck Converter: Basics, Working, Design & Application
  • ECG Graph Monitoring with AD8232 ECG Sensor & Arduino
    ECG Graph Monitoring with AD8232 ECG Sensor & Arduino
  • How to use INA219 DC Current Sensor Module with Arduino
    How to use INA219 DC Current Sensor Module with Arduino
  • IoT AC Energy Meter with PZEM-004T & ESP32 WebServer
    IoT AC Energy Meter with PZEM-004T & ESP32 WebServer
  • Designing of MPPT Solar Charge Controller using Arduino
    Designing of MPPT Solar Charge Controller using Arduino
  • High-Accuracy Pitch, Roll, Yaw with ESP32 & BNO08x IMU
    High-Accuracy Pitch, Roll, Yaw with ESP32 & BNO08x IMU
Categories
  • Arduino Projects (197)
  • Articles (60)
    • Learn Electronics (19)
    • Product Review (15)
    • Tech Articles (28)
  • Electronics Circuits (46)
    • 555 Timer Projects (21)
    • Op-Amp Circuits (7)
    • Power Electronics (13)
  • IoT Projects (205)
    • ESP32 MicroPython (7)
    • ESP32 Projects (82)
    • ESP32-CAM Projects (15)
    • ESP8266 Projects (76)
    • LoRa/LoRaWAN Projects (22)
  • Microcontrollers (38)
    • AMB82-Mini IoT AI Camera (4)
    • BLE Projects (18)
    • STM32 Projects (19)
  • Raspberry Pi (93)
    • Raspberry Pi Pico Projects (57)
    • Raspberry Pi Pico W Projects (12)
    • Raspberry Pi Projects (24)
Follow Us
  • Facebook
  • Twitter
  • Pinterest
  • Instagram
  • YouTube
About Us

“‘How to Electronics’ is a vibrant community for electronics enthusiasts and professionals. We deliver latest insights in areas such as Embedded Systems, Power Electronics, AI, IoT, and Robotics. Our goal is to stimulate innovation and provide practical solutions for students, organizations, and industries. Join us to transform learning into a joyful journey of discovery and innovation.

Copyright © How To Electronics. All rights reserved.
  • About Us
  • Disclaimer
  • Privacy Policy
  • Contact Us
  • Advertise With Us

Type above and press Enter to search. Press Esc to cancel.

Ad Blocker Enabled!
Ad Blocker Enabled!
Looks like you're using an ad blocker. Please allow ads on our site. We rely on advertising to help fund our site.