

Overview
In this IoT Based Project, we will interface Thermocouple Temperature Sensor MAX6675 with NodeMCU ESP8266 Board and display the temperature data on a 0.96″ OLED Display. Since the project is IoT based, we will send the temperature data to the IoT Application called Blynk. The temperature data can be monitored online on the Blynk Application from any part of the world.
The device is capable of measuring the temperature from 0°C to 1024°C. Hence, it can be used in industrial applications. In industry due to the hot temperature or the heat radiation emitted by the body, it’s difficult to go near to the hot object and check the temperature manually using the Industrial Thermometer. Hence the solution is monitoring the temperature remotely using some IoT devices and Thermocouple Temperature Sensor.
Here we will implement a simple project using Thermocouple MAX6675 & ESP8266 Wifi Module. The ESP8266 will connect to the wifi router and using the internet connectivity it will send the temperature data regularly to some online servers. The best & free online server is the Blynk. We will learn more about the Blynk application later on but if you want to learn more about MAX6675, you can check this project: Arduino & MAX6675 Project.
Bill of Materials
Following are the list of components required for making this project. All the components can be easily purchased from Amazon. The component purchase link is given below.
| S.N. | Components Name | Quantity | Purchase Links |
|---|---|---|---|
| 1 | Nodemcu ESP8266 Board | 1 | Amazon | AliExpress |
| 2 | 0.96" I2C OLED Display | 1 | Amazon | AliExpress |
| 3 | MAX6675 Thermocouple Sensor | 1 | Amazon | AliExpress |
| 4 | Connecting Wires | 10 | Amazon | AliExpress |
| 5 | Breadboard | 1 | Amazon | AliExpress |
MAX7765 K-Type Thermocouple Temperature Sensor
This MAX6675 Module + K Type Thermocouple Sensor makes use of the Maxim MAX6675 K-Thermocouple to digital converter IC. It provides a microcontroller compatible digital serial interface (SPI compatible) for giving an accurate temperature-compensated measurement of the temperature.

It has a 12-bit resolution. This converter resolves temperatures to 0.25°C, allows readings as high as +1024°C, and exhibits thermocouple accuracy of 8 LSBs for temperatures ranging from 0°C to +700°C. Screw terminals allow for connection to the thermocouples spade connectors and a 5 pin standard 0.1″ header provides an interface to a microcontroller.
Circuit Diagram: MAX6675 & ESP8266
The circuit diagram for interfacing MAX6675 Thermocouple with NodeMCU ESP8266 is given below.

The SCK, CS & SO Pin of MAX6675 Board is connected to D5, D6 & D7 of NodeMCU Board. The SDA & SCL pin of 0.96″ I2C OLED Display is connected to D2 & D1 of Nodemcu. The OLED Display & MAX6675 Both operates between 3.3V to 5V. So connect the VCC Pin to 3.3V & GND to GND.
Setting Up Blynk Application
Blynk is an application that runs over Android and IOS devices to control any IoT based application using Smartphones. It allows you to create your Graphical user interface for IoT application. Here we will display the MAX6675 Temperature Data on Blynk Application.
So download and install the Blynk Application from Google Play Store. IOS users can download from the App Store. Once the installation is completed, open the app & sign-up using your Email id and Password.
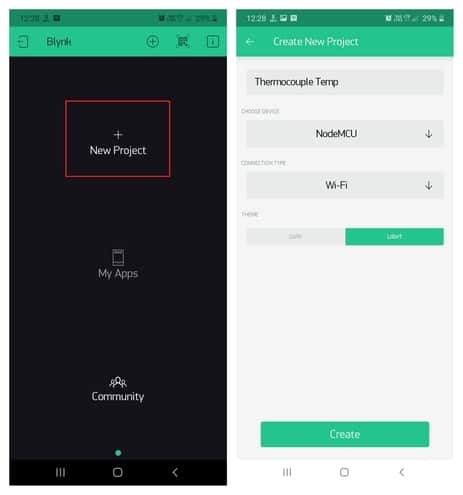
From the dashboard create a new project and select Nodemcu Board & Wifi Connection.
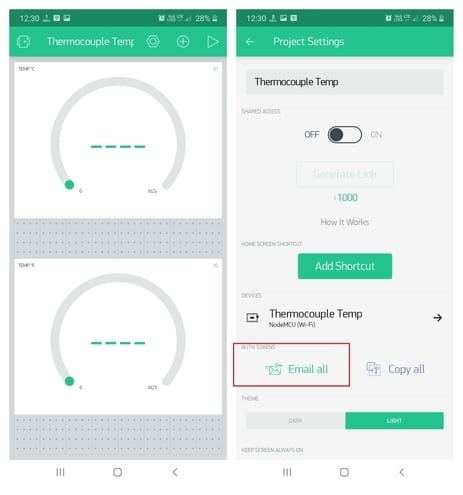
Then drag & drop or add 2 widgets and assign the variable as per code and then email the authentication code.
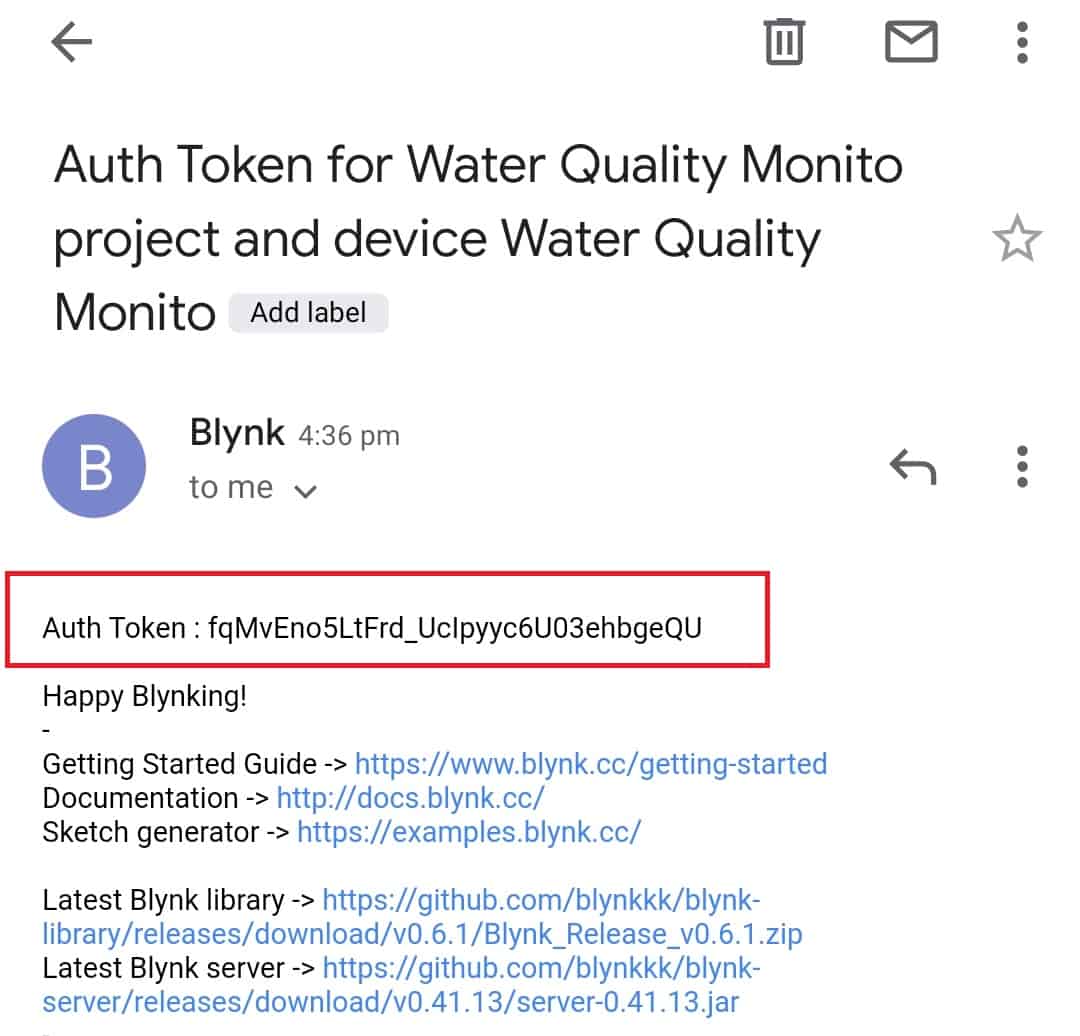
You will get the authentication code in the mail. Copy this authentication code. This will be used in your code.
Source Code/Program
The source Code or program for Industrial Thermometer using MAX6675 & ESP8266 is given below. The code requires some libraries. So first install the following libraries.
- MAX6675 Library: Download
- Blynk Library: Download
- Adafruit SSD1306 Library: Download
- Adafruit GFX Library: Download
From the code change the SSID & Password as well as the Blynk Authentication Code.
|
1 2 3 4 5 6 7 8 9 10 11 12 13 14 15 16 17 18 19 20 21 22 23 24 25 26 27 28 29 30 31 32 33 34 35 36 37 38 39 40 41 42 43 44 45 46 47 48 49 50 51 52 53 54 55 56 57 58 59 60 61 62 63 64 65 66 67 68 69 70 71 72 73 74 75 76 77 78 |
#define BLYNK_PRINT Serial #include <Blynk.h> #include <ESP8266WiFi.h> #include <BlynkSimpleEsp8266.h> #include <max6675.h> #include <Wire.h> #include <Adafruit_GFX.h> #include <Adafruit_SSD1306.h> #define SCREEN_WIDTH 128 // OLED display width, in pixels #define SCREEN_HEIGHT 64 // OLED display height, in pixels #define OLED_RESET -1 // Reset pin # (or -1 if sharing Arduino reset pin) Adafruit_SSD1306 display(SCREEN_WIDTH, SCREEN_HEIGHT, &Wire, OLED_RESET); char auth[] = "I-oKdQZnlok3qGlLdZTcCJsYcTTpbUiH"; // You should get Auth Token in the Blynk App. char ssid[] = "Alexahome"; // Your WiFi credentials. char pass[] = "loranthus"; int ktcSO = 12; int ktcCS = 13; int ktcCLK = 14; MAX6675 ktc(ktcCLK, ktcCS, ktcSO); void setup() { Serial.begin(115200); Blynk.begin(auth, ssid, pass); Serial.println("Max6675 test"); display.begin(SSD1306_SWITCHCAPVCC, 0x3C); //initialize with the I2C addr 0x3C (128x64) delay(500); display.clearDisplay(); display.setCursor(25, 15); display.setTextSize(1); display.setTextColor(WHITE); display.println(" Thermometer"); display.setCursor(25, 35); display.setTextSize(1); display.print("Initializing"); display.display(); delay(3000); } void loop() { Blynk.run(); float DC = ktc.readCelsius(); // Read temperature as Celsius float DF = ktc.readFahrenheit(); Serial.print("C = "); Serial.print(ktc.readCelsius()); Serial.print("\t F = "); Serial.println(ktc.readFahrenheit()); display.clearDisplay(); display.setTextSize(1); display.setTextColor(WHITE); display.setCursor(20, 0); display.print("Temperature"); display.setTextSize(2); display.setCursor(10, 20); display.print(ktc.readCelsius()); display.print((char)247); display.print("C"); display.setTextSize(2); display.setCursor(10, 45); display.print(ktc.readFahrenheit()); display.print((char)247); display.print("F"); display.display(); Blynk.virtualWrite(V1, ktc.readCelsius()); Blynk.virtualWrite(V2, ktc.readFahrenheit()); delay(1000); } |
IoT Industrial Temperature Monitor with MAX6675 & ESP8266
Upload the code to the Nodemcu Board. After uploading the code, the Nodemcu will try connecting to the network using the assigned Wifi SSID & Password.
The temperature Data can be observed in OLED Display both in Fahrenheit & in degree Celcius.

You can heat the temperature sensor, i.e. Thermocouple with the Gas Lighter. The OLED will display the rise in temperature.

Similalry you can check the Blynk Application. The Blynk application will receive the data from Blynk Server & Display it on Blynk Application Dashboard.
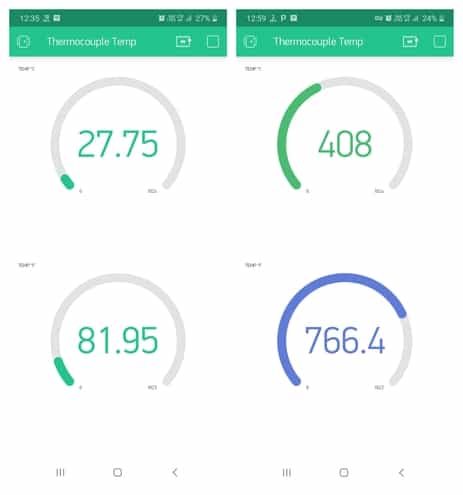
 & Live Dashboard")


1 Comment
Hello, the project is very interesting. Does the library work at temperatures below 0ºC? Thanks very much