

In this project, we will learn how to make IoT Based Air Quality Index Monitoring with ESP8266 & MQ135 Air Quality Sensor. We will monitor Air Quality Index (AQI) on Thingspeak Server.
Overview
The AQI is an index that tells you how clean or polluted your air is, and what associated health effects might be a concern for you.
The level of pollution has increased with times by a lot of factors like the increase in population, increased vehicle use, industrialization and urbanization which results in harmful effects on humans by directly affecting the health of the population exposed to it. So, we need to monitor the Air Quality Index. In this project, we are going to make an IoT Based Air Quality Index Monitoring System in which we will monitor the Air Quality Index over a Thingspeak server using the internet. We will use MQ135 Air Quality Sensor that can detect the level of various air pollutant.
To make this project more advanced you can add PM5003 PM2.5 Particulate Matter Sensor to this project. The detail of this project can found here: IoT Based PM2.5 & PM10 Air Quality Monitoring with ESP8266
Bill of Materials
Following are the components required for making this project. All the components can be purchased from Amazon. The components purchased link is given below.
| S.N. | Components Name | Quantity | Purchase Links |
|---|---|---|---|
| 1 | NodeMCU ESP8266 | 1 | Amazon | AliExpress |
| 2 | 0.96" I2C OLED Display | 1 | Amazon | AliExpress |
| 3 | Connecting Wires | 10 | Amazon | AliExpress |
| 4 | Breadboard | 1 | Amazon | AliExpress |
| 5 | MQ-135 Air Quality Sensor | 1 | Amazon | AliExpress |
Air Quality Index
The AQI is an index for reporting daily air quality. It tells you how clean or polluted your air is, and what associated health effects might be a concern for you. The AQI focuses on health effects you may experience within a few hours or days after breathing polluted air.
EPA calculates the AQI for five major air pollutants regulated by the Clean Air Act: ground-level ozone, particle pollution (also known as particulate matter), carbon monoxide, sulfur dioxide, and nitrogen dioxide. For each of these pollutants, EPA has established national air quality standards to protect public health. Ground-level ozone and airborne particles are the two pollutants that pose the greatest threat to human health in this country.

Think of the AQI as a yardstick that runs from 0 to 500. The higher the AQI value, the greater the level of air pollution and the greater the health concern. For example, an AQI value of 50 represents good air quality with little potential to affect public health, while an AQI value over 300 represents hazardous air quality.
MQ135 Air Quality Sensor
The MQ-135 gas sensor senses the gases like ammonia nitrogen, oxygen, alcohols, aromatic compounds, sulfide and smoke. The MQ-3 gas sensor has a lower conductivity to clean the air as a gas sensing material. In the atmosphere, we can find polluting gases, but the conductivity of the gas sensor increases as the concentration of polluting gas increases. MQ-135 gas sensor can be implemented to detect the smoke, benzene, steam and other harmful gases. It has the potential to detect different harmful gases. It is with low cost and particularly suitable for Air quality monitoring application.

The MQ135 sensor is a signal output indicator instruction. It has two outputs: analog output and TTL output. The TTL output is low signal light which can be accessed through the IO ports on the Microcontroller. The analog output is an concentration, i.e. increasing voltage is directly proportional to increasing concentration. This sensor has a long life and reliable stability as well.
0.96″ I2C OLED Display
This is a 0.96 inch blue OLED display module. The display module can be interfaced with any microcontroller using SPI/IIC protocols. It is having a resolution of 128×64. The package includes display board, display,4 pin male header pre-soldered to board.

OLED (Organic Light-Emitting Diode) is a self light-emitting technology composed of a thin, multi-layered organic film placed between an anode and cathode. In contrast to LCD technology, OLED does not require a backlight. OLED possesses high application potential for virtually all types of displays and is regarded as the ultimate technology for the next generation of flat-panel displays.
Air Quality Index Monitoring with ESP8266 & MQ135
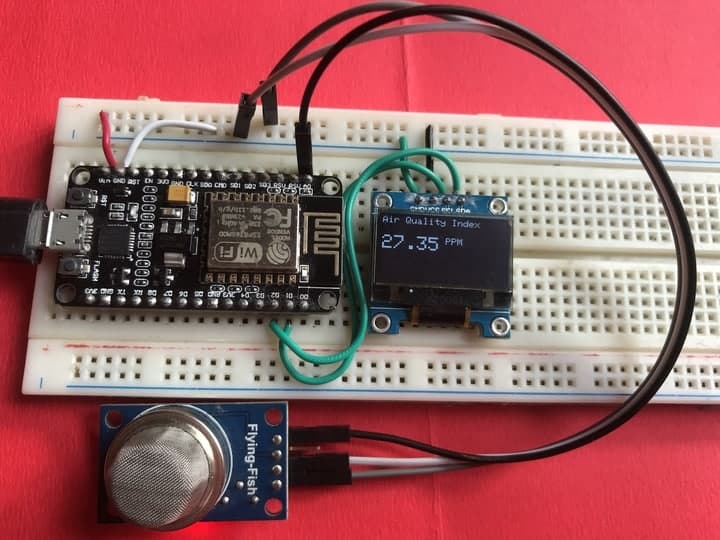
Now let us assemble the hardware and do the coding for the great IoT project. We will interface MQ135 Air Quality Sensor with NodeMCU ESP8266 Board and 0.96″ I2C OLED Display. The circuit diagram is given below.

You can assemble the circuit in a breadboard. First, connect the MQ135 Analog input pin to A0 of NodeMCU. Then connect its VCC and GND to NodeMCU Vin & GND respectively. Similarly, 0.96″ OLED Display is an I2C Module. So, connect its SDA & SCL Pin to Nodemcu D2 & D1 Pins. Connect its VCC to 3.3V GND to GND.

Setting up Thingspeak
ThingSpeak is an open-source Internet of Things application and API to store and retrieve data from things using the HTTP and MQTT protocol over the Internet or via a Local Area Network. Thingspeak enables you to collect, store, analyze, visualize, and act on data from sensors.
To setup the Thingspeak Server, visit https://thingspeak.com/. Create an account or simply sign in if you created the account earlier. Then create a new channel.
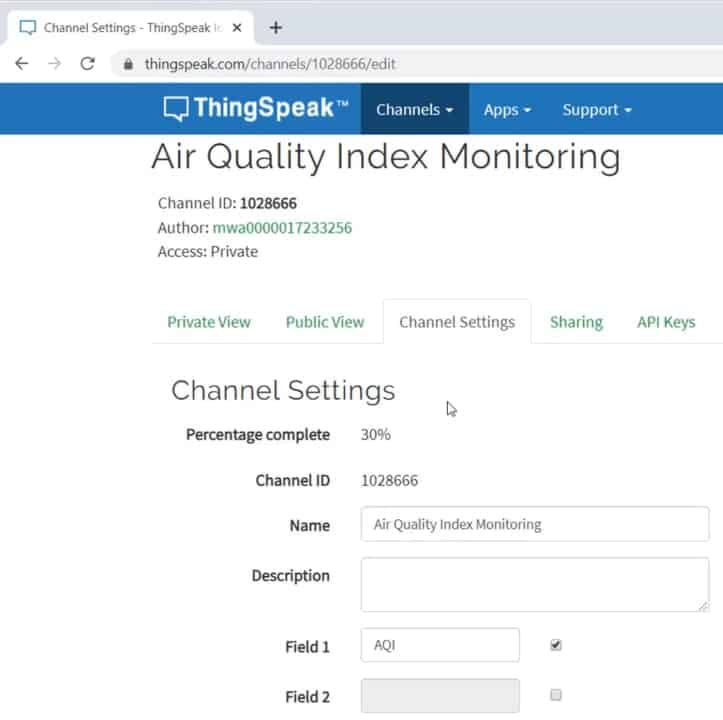
Copy the API key and use it in the code below.
Source Code/Program
The source code/program for making IoT Based Air Quality Index Monitoring with ESP8266 & MQ135 is given below. In the below code you need to make changes to Wifi SSID & Password. Also make sure to make changes to API Key from Thingspeak.
The code also requires MQ135 Library for compilation. So download the library from the following link below.
|
1 2 3 4 5 6 7 8 9 10 11 12 13 14 15 16 17 18 19 20 21 22 23 24 25 26 27 28 29 30 31 32 33 34 35 36 37 38 39 40 41 42 43 44 45 46 47 48 49 50 51 52 53 54 55 56 57 58 59 60 61 62 63 64 65 66 67 68 69 70 71 72 73 74 75 76 77 78 79 80 81 82 83 84 85 86 87 88 89 90 91 92 93 94 95 96 97 98 99 100 101 102 103 104 105 106 107 108 109 |
#include <ESP8266WiFi.h> #include <SPI.h> #include <Wire.h> #include "MQ135.h" #include <Adafruit_GFX.h> #include <Adafruit_SSD1306.h> #define SCREEN_WIDTH 128 // OLED display width, in pixels #define SCREEN_HEIGHT 64 // OLED display height, in pixels #define OLED_RESET -1 // Reset pin # (or -1 if sharing Arduino reset pin) Adafruit_SSD1306 display(SCREEN_WIDTH, SCREEN_HEIGHT, &Wire, OLED_RESET); String apiKey = "14K8UL2QEK8BTHN6"; // Enter your Write API key from ThingSpeak const char *ssid = "Alexahome"; // replace with your wifi ssid and wpa2 key const char *pass = "12345678"; const char* server = "api.thingspeak.com"; WiFiClient client; void setup() { Serial.begin(115200); display.begin(SSD1306_SWITCHCAPVCC, 0x3C); //initialize with the I2C addr 0x3C (128x64) display.clearDisplay(); delay(10); Serial.println("Connecting to "); Serial.println(ssid); display.clearDisplay(); display.setCursor(0,0); display.setTextSize(1); display.setTextColor(WHITE); display.println("Connecting to "); display.setTextSize(2); display.print(ssid); display.display(); WiFi.begin(ssid, pass); while (WiFi.status() != WL_CONNECTED) { delay(500); Serial.print("."); } Serial.println(""); Serial.println("WiFi connected"); display.clearDisplay(); display.setCursor(0,0); display.setTextSize(1); display.setTextColor(WHITE); display.print("WiFi connected"); display.display(); delay(4000); } void loop() { MQ135 gasSensor = MQ135(A0); float air_quality = gasSensor.getPPM(); Serial.print("Air Quality: "); Serial.print(air_quality); Serial.println(" PPM"); Serial.println(); display.clearDisplay(); display.setCursor(0,0); //oled display display.setTextSize(1); display.setTextColor(WHITE); display.println("Air Quality Index"); display.setCursor(0,20); //oled display display.setTextSize(2); display.setTextColor(WHITE); display.print(air_quality); display.setTextSize(1); display.setTextColor(WHITE); display.println(" PPM"); display.display(); if (client.connect(server, 80)) // "184.106.153.149" or api.thingspeak.com { String postStr = apiKey; postStr += "&field1="; postStr += String(air_quality); postStr += "r\n"; client.print("POST /update HTTP/1.1\n"); client.print("Host: api.thingspeak.com\n"); client.print("Connection: close\n"); client.print("X-THINGSPEAKAPIKEY: " + apiKey + "\n"); client.print("Content-Type: application/x-www-form-urlencoded\n"); client.print("Content-Length: "); client.print(postStr.length()); client.print("\n\n"); client.print(postStr); Serial.println("Data Send to Thingspeak"); } client.stop(); Serial.println("Waiting..."); delay(2000); // thingspeak needs minimum 15 sec delay between updates. } |
Testings & Results
Once the code is uploaded you can open serial monitor. The Nodemcu will first start connecting to wifi network. All the happening can se observed on Serial Monitor.
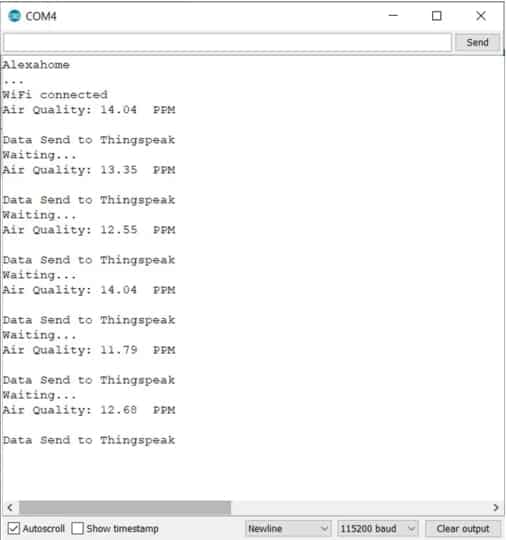
Once connected to a Wifi network, the sensor will read the value and the value will be displayed on OLED Screen.
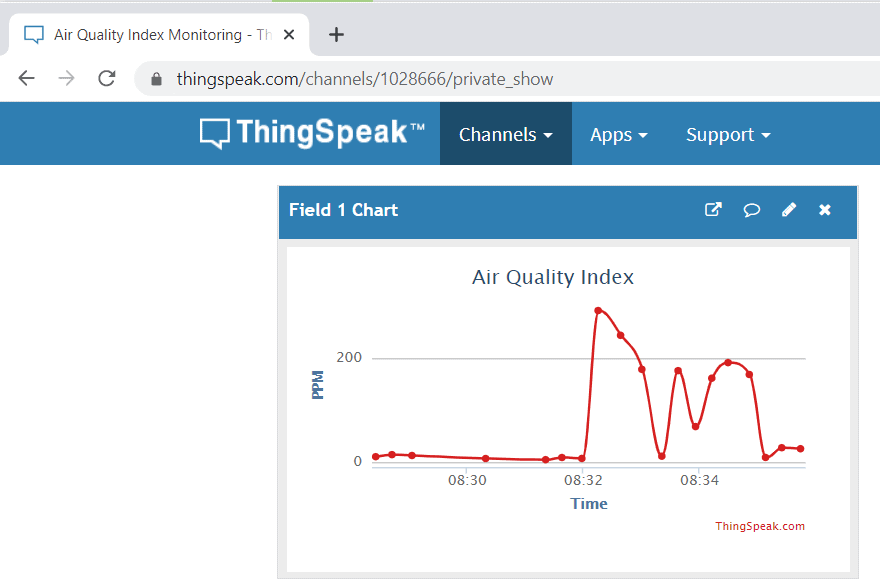
Similarly you can see the online data of Air Quality Index on Thingspeak Server. Just go to Thingspeak Private view and check the data being uploaded after the interval of 15 seconds.
Video Tutorial & Demonstration


8 Comments
how to know when the reading is refer to ‘smoke detected’ and why it shows ‘??????’ on COM3??
MQ135 is air quality sensor, it detects pollution level and mixture of air pollutant only.
Its showing ?????? On COM3 may be becoz you have selected wrong baud rate in serial terminal.
I try to do this project but the Thingspeak can not show the real time graph as your, how can I fix it.
Your board layout has a row pin spacing of 0.9 in., yet the NodeMCU you link in the article has row pin spacing of 1.0 in. Obviously, this won’t work. What is a source of 0.9 in sized NodeMCU with the proper pinouts?
i got the same result – nothing appears on thing speak – while i see the API key in the code i do not see any reference to channel ID.
WHAT SHOULD I DO IF I DONT WANT THE OLED DISPLAY PART ALONE plzzzzz help me
What changes should i do in the code
how to avoid Hard resetting via RTS pin
u can directly use serial output in ide