

Overview: ESP32 Music Player
In this project, we will learn how to make our own ESP32 Audio Music MP3 Player. The simple DIY Music Player project requires Customized ESP32 Board along with the Audio Expansion Shield. The Audio expansion board based on UDA1334ATS Audio Amplifier IC which is a Digital to Analog Converter IC helps in encoding and decoding of the Audio Signal. The customized board can help you to implement audio functions for ESP projects using an I2S audio library.
The ESP32 music player operates on a 5V Supply and you can either use 5V DC Adapter or a Power Bank to Power on the Circuit. The device is very small compact and portable. All you need is to copy the .mp3 or .wav files to the SD Card. The SD Card can be then inserted in the SD Card slot of Audio expansion Shield. After uploading the code, the Audio Player is ready. The best part about this ESP32 MP3 Audio Music player is, you can either use a headphone or a speaker as it has 3.5mm Audio Jack. Apart from this, there is a 3D Casing for this project where all the electronics can be packed.
These things used to be impossible or complicated 10-20 years ago, but now we are living in the age of Arduino & ESP32. The advancement of technology and the development of advanced powerful chip has made these project simpler and cheaper.
Bill of Materials

All the components required for this projects can be easily purchased from Makerfabs. The components Makerfabs is one of the best custom Board Designer in China. They can build the customized boards for Electronics Hobbyist, Students as well as Industralist. The components purchase link is given below.
| S.N. | Components Name | Description | Quantity | Buy Online |
|---|---|---|---|---|
| 1 | Customized ESP32 Board | MakePython ESP32 Board | 1 | Click Here |
| 2 | Audio Expansion Board | MakePython Audio Expansion | 1 | Click Here |
| 3 | 3D Casing | ESP32 Audio Fixture Kit | 1 | Click Here |
| 4 | Speakers | Speaker with 3.5mm Audio Jack | 1 | Amazon | AliExpress |
| 5 | 5V Power Supply | Power Bank | 1 | Amazon | AliExpress |
Cutomized ESP32 Board
As already explained above, we will first need a cutomized ESP32 Board. So I purchased an ESP32 Board specially designed for this project, i.e. MakePython ESP32 Board from MakerFabs.

MakePython ESP32 Board has the same ESP32 Chip from espressif. The advantage of this board over the normal ESP32 Board is that, the board has an additional 1.3″ I2C OLED Display added to it.
MakePython ESP32 is a powerful, generic Wifi+ BLE MCU module that supports both C/C++ & Python programming. It is true “breadboard compatible”, with the very detailed pins explanation, it is easy to learn & use. The MakePython ESP32 is programmed via Arduino IDE.

The complete pin description and detail about this board can be found here: MakePython ESP32 Description.
Audio Expansion Board
The Audio expansion board is based on the UDA1334ATS audio DAC, to implement audio functions to ESP projects. It communicates with ESP32 with I2S, and output relative good quality audio. Together with ESP32 for decoding, it could be an MP3 Audio files.

There 2 navigator switches, suitable for applications such as MP3 player: Previous / Next/ Confirm, and Audio adjusting. They’re also a Micro-SD holder and audio jack on the board, which makes it ready to use for a real MP3 player.

Features
- NXP Low Power Audio DAC: uDA1334
- Integrated Digital Filter Plus DAC
- Supports Sample Frequencies from 8 to 100 kHz
- Automatic System Clock Versus Sample Rate Detection
- Low Power Consumption
- I2S-bus and LSB-justified Format Compatible
- Digital de-emphasis for 44.1 kHz Sampling Rate
- Support Micro SD Card
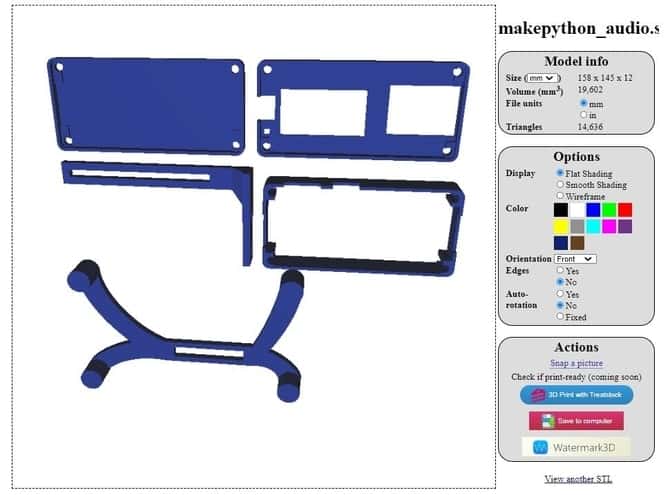
3D Casing
The 3D Casing for ESP32 Music Audio MP3 Player is required for giving a good look to the project. It also makes the device very compact size and portable.

The 3D Casing has been designed using 3D Modelling software. The STL files can be used for printing this 3D Casing. The STL Files for 3D Printing can be downloaded from here: 3D Case STL File.
Assembling & preparing the Hardware
Once all the individual components are available, its time to prepare and assemble the hardware for ESP32 Music Player. We will start by inserting casing on Audio Expansion Board.

Then we can insert the ESP32 Board in the expansion shield

Once that done, we will put the front and base side cover to the board.

Then using the screw, we will tighten the knots and bolts.

Then we will assemble the stand by connecting the two different 3D Printed parts in 90-degree angles. And the screw them as well.

And at last we will connect the stand and Cuboid part into a single unit.

Hence our final device is ready now. Now we need to connect the speaker to the board. To do that insert the Audio jack from the speaker to the 3.5mm audio socket of the Audio Expansion Board.

Required Arduino Library Installation
Before moving to the coding part, we need to install necessary library for the project. The required libraries are given below.
1. ESP32-audioI2S Library
This library plays mp3 and wav files from SD card via I2S with external hardware. The HELIX-mp3 and -aac decoder is also included. AudioI2S works with UDA1334A (Adafruit I2S Stereo Decoder Breakout Board) and PCM1502A. It plays also icy-streams and GoogleTTS. The library easily compiles with Arduino IDE.
2. OLED Libraries
We need two Library for OLED Display. Adafruit_SSD1306 is a library for our Monochrome OLEDs based on SSD1306 drivers. Adafruit GFX Library is the core graphics library for all our displays, providing a common set of graphics primitives (points, lines, circles, etc.).
Source Code/Program
After libraries are added to the Arduino IDE, you can can copy the program below and upload it to the ESP32 Board.

While uploading the program, please rotate the switch next to the 3.5mm Audio interface to the Audio socket.
|
1 2 3 4 5 6 7 8 9 10 11 12 13 14 15 16 17 18 19 20 21 22 23 24 25 26 27 28 29 30 31 32 33 34 35 36 37 38 39 40 41 42 43 44 45 46 47 48 49 50 51 52 53 54 55 56 57 58 59 60 61 62 63 64 65 66 67 68 69 70 71 72 73 74 75 76 77 78 79 80 81 82 83 84 85 86 87 88 89 90 91 92 93 94 95 96 97 98 99 100 101 102 103 104 105 106 107 108 109 110 111 112 113 114 115 116 117 118 119 120 121 122 123 124 125 126 127 128 129 130 131 132 133 134 135 136 137 138 139 140 141 142 143 144 145 146 147 148 149 150 151 152 153 154 155 156 157 158 159 160 161 162 163 164 165 166 167 168 169 170 171 172 173 174 175 176 177 178 179 180 181 182 183 184 185 186 187 188 189 190 191 192 193 194 195 196 197 198 199 200 201 202 203 204 205 206 207 208 209 210 211 212 213 214 215 216 217 218 219 220 221 222 223 224 225 226 227 228 229 230 231 232 233 234 235 236 237 238 239 240 241 242 243 244 245 246 247 248 249 250 251 252 253 254 255 256 257 258 259 260 261 262 263 264 265 266 267 268 269 270 271 272 273 274 275 276 277 278 279 280 281 282 283 284 285 286 287 288 289 290 291 292 293 294 295 296 297 298 299 300 301 302 303 304 305 306 307 308 309 310 311 312 313 314 315 316 317 318 319 320 321 322 323 324 325 326 327 328 329 330 331 332 333 334 335 336 337 338 339 340 341 342 343 344 345 346 347 348 349 350 351 352 353 354 355 356 357 358 359 360 361 362 363 364 365 366 367 368 369 370 371 372 373 374 375 376 377 378 379 380 381 382 383 384 385 386 387 388 389 390 391 392 393 394 395 396 397 398 399 400 401 402 403 404 405 406 407 408 |
#include "Arduino.h" //#include "WiFiMulti.h" #include "Audio.h" #include "SPI.h" #include "SD.h" #include "FS.h" #include <Adafruit_GFX.h> #include <Adafruit_SSD1306.h> //SD Card #define SD_CS 22 #define SPI_MOSI 23 #define SPI_MISO 19 #define SPI_SCK 18 //Digital I/O used //Makerfabs Audio V2.0 #define I2S_DOUT 27 #define I2S_BCLK 26 #define I2S_LRC 25 //SSD1306 #define MAKEPYTHON_ESP32_SDA 4 #define MAKEPYTHON_ESP32_SCL 5 #define SCREEN_WIDTH 128 // OLED display width, in pixels #define SCREEN_HEIGHT 64 // OLED display height, in pixels #define OLED_RESET -1 // Reset pin # (or -1 if sharing Arduino reset pin) Adafruit_SSD1306 display(SCREEN_WIDTH, SCREEN_HEIGHT, &Wire, OLED_RESET); //Button const int Pin_vol_up = 39; const int Pin_vol_down = 36; const int Pin_mute = 35; const int Pin_previous = 15; const int Pin_pause = 33; const int Pin_next = 2; Audio audio; struct Music_info { String name; int length; int runtime; int volume; int status; int mute_volume; } music_info = {"", 0, 0, 0, 0, 0}; String file_list[20]; int file_num = 0; int file_index = 0; void setup() { //IO mode init pinMode(Pin_vol_up, INPUT_PULLUP); pinMode(Pin_vol_down, INPUT_PULLUP); pinMode(Pin_mute, INPUT_PULLUP); pinMode(Pin_previous, INPUT_PULLUP); pinMode(Pin_pause, INPUT_PULLUP); pinMode(Pin_next, INPUT_PULLUP); //Serial Serial.begin(115200); //LCD Wire.begin(MAKEPYTHON_ESP32_SDA, MAKEPYTHON_ESP32_SCL); // SSD1306_SWITCHCAPVCC = generate display voltage from 3.3V internally if (!display.begin(SSD1306_SWITCHCAPVCC, 0x3C)) { // Address 0x3C for 128x32 Serial.println(F("SSD1306 allocation failed")); for (;;) ; // Don't proceed, loop forever } display.clearDisplay(); logoshow(); //SD(SPI) pinMode(SD_CS, OUTPUT); digitalWrite(SD_CS, HIGH); SPI.begin(SPI_SCK, SPI_MISO, SPI_MOSI); SPI.setFrequency(1000000); if (!SD.begin(SD_CS, SPI)) { Serial.println("Card Mount Failed"); lcd_text("SD ERR"); while (1) ; } else { lcd_text("SD OK"); } //Read SD file_num = get_music_list(SD, "/", 0, file_list); Serial.print("Music file count:"); Serial.println(file_num); Serial.println("All music:"); for (int i = 0; i < file_num; i++) { Serial.println(file_list[i]); } //Audio(I2S) audio.setPinout(I2S_BCLK, I2S_LRC, I2S_DOUT); audio.setVolume(21); // 0...21 open_new_song(file_list[file_index]); print_song_time(); } uint run_time = 0; uint button_time = 0; void loop() { audio.loop(); if (millis() - run_time > 1000) { run_time = millis(); print_song_time(); display_music(); } if (millis() - button_time > 300) { //Button logic if (digitalRead(Pin_next) == 0) { Serial.println("Pin_next"); if (file_index < file_num - 1) file_index++; else file_index = 0; open_new_song(file_list[file_index]); print_song_time(); button_time = millis(); } if (digitalRead(Pin_previous) == 0) { Serial.println("Pin_previous"); if (file_index > 0) file_index--; else file_index = file_num - 1; open_new_song(file_list[file_index]); print_song_time(); button_time = millis(); } if (digitalRead(Pin_vol_up) == 0) { Serial.println("Pin_vol_up"); if (music_info.volume < 21) music_info.volume++; audio.setVolume(music_info.volume); button_time = millis(); } if (digitalRead(Pin_vol_down) == 0) { Serial.println("Pin_vol_down"); if (music_info.volume > 0) music_info.volume--; audio.setVolume(music_info.volume); button_time = millis(); } if (digitalRead(Pin_mute) == 0) { Serial.println("Pin_mute"); if (music_info.volume != 0) { music_info.mute_volume = music_info.volume; music_info.volume = 0; } else { music_info.volume = music_info.mute_volume; } audio.setVolume(music_info.volume); button_time = millis(); } if (digitalRead(Pin_pause) == 0) { Serial.println("Pin_pause"); audio.pauseResume(); button_time = millis(); } } if (Serial.available()) { String r = Serial.readString(); r.trim(); if (r.length() > 5) { audio.stopSong(); open_new_song(file_list[0]); print_song_info(); } else { audio.setVolume(r.toInt()); } } } void open_new_song(String filename) { music_info.name = filename.substring(1, filename.indexOf(".")); audio.connecttoFS(SD, filename); music_info.runtime = audio.getAudioCurrentTime(); music_info.length = audio.getAudioFileDuration(); music_info.volume = audio.getVolume(); music_info.status = 1; Serial.println("**********start a new sound************"); } void display_music() { int line_step = 24; int line = 0; char buff[20]; ; sprintf(buff, "%d:%d", music_info.runtime, music_info.length); display.clearDisplay(); display.setTextSize(2); // Normal 1:1 pixel scale display.setTextColor(SSD1306_WHITE); // Draw white text display.setCursor(0, line); // Start at top-left corner display.println(music_info.name); line += line_step; display.setCursor(0, line); display.println(buff); line += line_step; sprintf(buff, "V:%d",music_info.volume); display.setCursor(0, line); display.println(buff); line += line_step; display.setCursor(0, line); display.println(music_info.status); line += line_step; display.display(); } void logoshow(void) { display.clearDisplay(); display.setTextSize(2); // Normal 1:1 pixel scale display.setTextColor(SSD1306_WHITE); // Draw white text display.setCursor(0, 0); // Start at top-left corner display.println(F("ESP32")); display.setCursor(0, 20); // Start at top-left corner display.println(F("MUSIC")); display.setCursor(0, 40); // Start at top-left corner display.println(F("PLAYER")); display.display(); delay(2000); } void lcd_text(String text) { display.clearDisplay(); display.setTextSize(2); // Normal 1:1 pixel scale display.setTextColor(SSD1306_WHITE); // Draw white text display.setCursor(0, 0); // Start at top-left corner display.println(text); display.display(); delay(500); } void print_song_info() { Serial.println("***********************************"); Serial.println(audio.getFileSize()); Serial.println(audio.getFilePos()); Serial.println(audio.getSampleRate()); Serial.println(audio.getBitsPerSample()); Serial.println(audio.getChannels()); Serial.println(audio.getVolume()); Serial.println("***********************************"); } void print_song_time() { //Serial.println(audio.getAudioCurrentTime()); //Serial.println(audio.getAudioFileDuration()); music_info.runtime = audio.getAudioCurrentTime(); music_info.length = audio.getAudioFileDuration(); music_info.volume = audio.getVolume(); } int get_music_list(fs::FS &fs, const char *dirname, uint8_t levels, String wavlist[30]) { Serial.printf("Listing directory: %s\n", dirname); int i = 0; File root = fs.open(dirname); if (!root) { Serial.println("Failed to open directory"); return i; } if (!root.isDirectory()) { Serial.println("Not a directory"); return i; } File file = root.openNextFile(); while (file) { if (file.isDirectory()) { } else { String temp = file.name(); if (temp.endsWith(".wav")) { wavlist[i] = temp; i++; } else if (temp.endsWith(".mp3")) { wavlist[i] = temp; i++; } } file = root.openNextFile(); } return i; } //********************************************** // optional void audio_info(const char *info) { Serial.print("info "); Serial.println(info); } void audio_id3data(const char *info) { //id3 metadata Serial.print("id3data "); Serial.println(info); } void audio_eof_mp3(const char *info) { //end of file Serial.print("eof_mp3 "); Serial.println(info); file_index++; if (file_index >= file_num) { file_index = 0; } open_new_song(file_list[file_index]); } void audio_showstation(const char *info) { Serial.print("station "); Serial.println(info); } void audio_showstreaminfo(const char *info) { Serial.print("streaminfo "); Serial.println(info); } void audio_showstreamtitle(const char *info) { Serial.print("streamtitle "); Serial.println(info); } void audio_bitrate(const char *info) { Serial.print("bitrate "); Serial.println(info); } void audio_commercial(const char *info) { //duration in sec Serial.print("commercial "); Serial.println(info); } void audio_icyurl(const char *info) { //homepage Serial.print("icyurl "); Serial.println(info); } void audio_lasthost(const char *info) { //stream URL played Serial.print("lasthost "); Serial.println(info); } void audio_eof_speech(const char *info) { Serial.print("eof_speech "); Serial.println(info); } |
ESP32 Music Player Test & Demo
After the code is uploaded to the ESP32 Board, you can start testing the Device by playing the music on it. But before that copy few mp3 files to the Micro-SD Card and insert it on the Audio Expansion SD-Card Slot.

Now your ESP32 Based MP3 Player is ready. So it’s time to play the music. So insert the Speaker stereo or earphone into a 3.5mm audio jack. You can use the power bank to power the ESP32 Audio Player Board & also the Speaker.
Once powering is done, the device will start playing the music.

The OLED Display screen displays the basic information of the song such as the name of the song, the time played, the length of the song.
You can press/move the lower side switch left and right for the next or previous song. Press it inward to pause. Similarly, the switch on the left is Volume Control & Mute. You can slide it up for increasing volume & down for decreasing volume. Also, you can Press in to mute.
Video Tutorial & Guide: ESP32 MP3 Player

You can also use this hardware to make an ESP32 Web Radio


6 Comments
Hi,
You have done a great job here showing all the pieces and parts and the code needed to put this together. I’ll like to test this out with Heltec_ESP32 LoRa 32 V2 with OLED. I hope it works out. Thank you..
Comple Error happened at
void open_new_song(String filename)
{
music_info.name = filename.substring(1, filename.indexOf(“.”));
audio.connecttoFS(SD,filename);
no matching function for call to ‘Audio::connecttoFS(fs::SDFS&,String&)’
How to do?
audio.connecttoFS(SD, filename.c_str());
audio.connecttoFS(SD,filename.c_str());
Hi, it’s a very nice project. I am trying this but in my case the MP3 file is playing just for 20sec (sometimes inbetween 17 to 22 sec) and then it stops. I am doing exactly the same you did.
My board is Ai thinker esp32 module.
What can be the reason.
Thank you.
How can I change the speed of the music?